Operation manual GB / IE Operation and Safety Notes............................................... Page 5 KH 2391 KH2391_Cover_UK.indd 5-8 31.08.
A 12 D 34 gngo 5 6 7 8 9 cp co glfuftfs fr cncmclbubtbsbrbqbpbobnbmbl gm B E elemeo eq es cr cq et ir er fp eu gp cq C cs ctcu dl dm dn dt do ds KH2391_Cover_UK.indd 9-12 dr dq du dp Kompernaß GmbH Burgstraße 21 · D-44867 Bochum (Germany) www.kompernass.com Last Information Update · Ident.-No.: KH2391-082006-1 / UK en epfnfo fqfmfl F gqgrgugthn gs hl hm hs hr im ho il hu ht hp hq iriq G ipioin 31.08.
Content Introduction For your safety.................................................................. Proper Use........................................................................ Equipment......................................................................... Scope of Supply................................................................ Technical Data.................................................................. Audio Storage Media.........................................................
Introduction Car Radio KH 2391 L Introduction L For your safety Please read these instructions through carefully and fold out the page with the illustrations while doing so. You should follow the instructions closely when you operate the device. If you have any further questions concerning the use of this device, please contact the service centre for your country (see guarantee card).
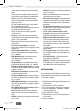
Introduction et Plug-in for rear left loudspeaker (-) eu Flat blade fuse socket fl Flat blade fuse 10 A fm ISO plug jack to the 12 V DC power connection Rear of the Remote Control (see Fig. G) in Battery compartment io Battery holder ip Unlock button (including connection of an automatic aerial) fn Plug-in for 12 V DC constant current Installation Accessories (see Fig.
Introduction / Safety Possible Connections ISO: 12 V DC ISO: loudspeaker (max. 2 pairs) (4 - 8 Ohm) MP3 player or USB memory stick (USB 1.1 and 2.0) SD or MMC Max. four amplifiers Display Liquid crystal screen (8-digit alpha-numerical dot-matrix LCD display) Background illumination (colour blue, 2 dimming levels) 3 Band PLL Tuner Display: frequency band, radio stations, mono or stereo reception, pre-sets, activated EON, AF, TA / TP and mute function FM-Band (FM 1, FM 2, FM 3) Frequency band: 87.
Safety · When installing in a motor vehicle please ensure that the vehicle cannot be operated and has been securely immobilised! Turn off the ignition and park the vehicle with the handbrake applied.
Safety / Preparation in the centre and moving towards the outside edge! · Please ensure that audio storage media used for playback are not exposed to condensation! Remove CDs, CD-Rs and CD-RWs from the device if the humidity is high and the ambient temperatures low. All audio storage media that are used should have completely dry surfaces. · Store audio storage media outside the device in an appropriate protective sleeve.
Preparation / Installation 1x 1x 1x 1x Stripping tongs or cable stripping knife Screwdriver SW 8 spanner (jaw size 8 mm) Ballpoint pen For the connection of an aerial installed in the vehicle you may require : 1 x Aerial adapters (in accordance with the technical data of the aerial) For the connection of an amplifier you will require: 2 x Cinch connection cables (insulation and plug: white / red) L Installation L Removing the control panel from the car radio • Avoid hard contact with the display
Installation L Connecting to the vehicle‘s 12 V DC power supply c Warning! · Before connecting to the 12 V DC power supply of a motor vehicle, consult the vehicle‘s operation manual on how to maintain electrical safety! · Ensure that when you establish the connection to the 12 V DC power supply the connection leads of the vehicle are not carrying any voltage. Do not damage any safety equipment such as the on-board computer or the alarm system of the vehicle.
Installation • Then insert the second red plug of the second cinch connection cable as far as it will go into the FRONT cinch plug jack (amplifier connection [red / front right]) of the amplifier. • Insert the white plug of the second cinch connection cable as far as it will go into the OUT / FRONT cinch plug jack (amplifier connection [white / front left]) gn.
Installation / Operation • Place the rear left-hand edge of the control panel 1on the control panel attachment point dson the front of the device. • Ensure that the plug-in connection strip cris positioned in front of the connection socket dl. • Carefully press the rear right-hand edge of the control panel 1against the control panel attachment point dpuntil it distinctly locks into place. • Fold the control panel 1upwards and allow it to lock into place. L Switching off • Press the button cp.
Operation desired fading level. Values between [10F] and [10R] can be selected. The mean value is [0]. Your settings are automatically stored. L Selecting and adjusting playback functions • Press the “SEL / VOL” control knob coand keep it pressed for two seconds. In order to select the next function, press the “SEL / VOL” control knob countil you have reached the desired function.
Operation [MULT OFF]: CD playback from the CD compartment cu. • Turn the “SEL / VOL” control knob coto set the desired function. BEEP ON / OFF: [BEEP ON]: A beep is heard through the loudspeakers when the radio is operated. [BEEP OFF]: No beep is heard when the radio is operated. • Turn the “SEL / VOL” control knob coto set the desired function. SEEK 1 / 2 : [SEEK 1]: The automatic station search stops at the first radio station that can be received.
Operation released the station search automatically stops at the next radio station with ideal reception and shows the information in the display window 9; or • Press the • SCAN button cm. The radio station search stops every 5 seconds at one of the radio stations that can be received. Manual Radio Station Search • Touch the 9 button 6lightly in order to approach the desired lower frequency step by step. • Touch the : button 7lightly in order to approach the desired higher frequency step by step.
Operation played back is transmitted. • Press and hold down the AF button 8so that [REG ON] appears in the display window 9. The tuner searches within the surrounding region for identical radio stations of the radio company. • Press the AF button 8. [REG OFF] appears in the display window 9. The tuner searches for all radio stations. PTY Function Select this function in order to receive stations with special programme categories. Press the PTY button bmand then one of the storage buttons 1-6 bpbqbrbsbtbu.
Operation Accessing Track Passages Within a track you can access previous or subsequent passages. • Press and hold down the 9 button 6in order to access a preceding passage within a track. • Press and hold down the : button 7in order to access a subsequent passage within a track. As soon as the button used is released, playback continues from the accessed passage. Selecting Tracks on the Basis of the Storage Location (Only possible with MP3 data) • Press the A/PS button clonce.
Operation Repeat • Press the 3 RPT button bsand the current track is repeated permanently. [RPT ON] appears in the display window 9. The current track is played back repeatedly. • Press the 3 RPT button bsagain. [RPT OFF] appears in the display window 9. Scanning • Press the 2 INT button btand the first few seconds of all tracks are played back. [INT ON] appears in the display window 9. • Press the 2 INT button btagain and playback continues without scanning the first few seconds.
Operation / Remote Control / Troubleshooting Disconnection • Remove the USB plug of the USB audio storage medium completely from the USB port do. Or • Press the SD / MMC in the SD and MMC port dn in order to unlock it. • Remove the SD / MMC from the SD and MMC port dn. L Remote Control Tip! Familiarise yourself with use of the similar buttons on the remote control (see Fig. F). Please see the layout of the control panel 1for the functions.
Troubleshooting / Care and Maintenance / Disposal on the ISO plug in the vehicle (various layouts of the respective manufacturers). As soon as the ignition is switched off the internal memory of the radio no longer has any power supply. E The colour coding of the stated cables must be red and yellow. In this case swap over the connections for 12 V constant current fnand 12 volt ignition current fp.
Information L Information L Important Guarantee Information Thank you for deciding to purchase a SilverCrest product with 36 months‘ guarantee (from the date of purchase). Please read the operating instructions carefully before using your product for the first time. If in spite of the high level of quality of this device you should have cause for complaint or a hardware fault should occur, you have the opportunity of contacting the service hotline (see guarantee card).
24 GB/IE KH2391_Content_UK.indd 24 05.09.
Please fill out this section completely and enclose with the device! Garantiekarte Guarantee MP3 Car Radio KH 2391 In order to ensure that your device is repaired free of charge please contact our service hotline. Please have your sales receipt at hand when doing so. Kompernass Service United Kingdom 08707/876177 Kompernass Service Ireland 087-99 62 077 Please provide clear details of the sender: www.mysilvercrest.
KH2391_Content_UK.indd 26 05.09.
GB/IE KH2391_Content_UK.indd 27 27 05.09.
28 GB/IE KH2391_Content_UK.indd 28 05.09.