
Installation Guide


9
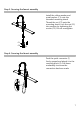
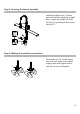
Step 7. Flushing and checking for leaks
Pull the hose assembly out of the spout
and remove the spray head by unscrewing
it from the hose in a counterclockwise
direction. Be sure to hold the end of the
hose down into the sink and turn the
faucet on to the warm position where it
mixes hot and cold water. Flush the water
lines for one minute. This flushes away any
debris that could cause damage to internal
parts. Check for leaks. Re-tighten any
connections if necessary, but do not
overtighten. Reinstall the spray head by
hand tightening it back onto the spray
hose. After installation is completed, turn
on the hot and cold water supplies. Check
for leaks.
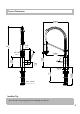
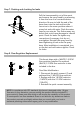
Step 8. Flow Regulator Replacement
This faucet ships with a (WHITE) 1.8 GPM
flow restrictor installed. An optional
(BLACK) 2.2 GPM flow restrictor is also
included in the box.
Flow Rate Modification:
1. Disconnect the quick connect (2) and
unthread the (1-WHITE) flow restrictor.
2. Replace with the 1.8 GPM restrictor
(1-WHITE) with the 2.2 GPM restrictor
(1-BLACK).
3. Reinstall the quick connect assembly.
NOTE: In compliance with CEC standards, this faucet is designed with a 1.8 gpm
flow rate. At your discretion, you may modify the product with the included 2.2
gpm restrictor. Please note that doing so will remove the capability of this product
to meet specific low-flow standards. Kraus is not liable for any alterations made to
the product post-sale, and highly advises that you consult with your local or
statewide plumbing enforcement agency prior to any modification.
2
1
1
1
2