
User Manual


2
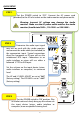
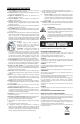
QUICK SETUP
Determine the audio input signal
that will be used with the studio monitors
and connect the audio cable (not included) to
the appropriate input. Typical connections
direct to a computer or DJ gear will use the
unbalanced RCA input. Connection to an
audio interface or mixer will use either a
balanced ¼” TRS or XLR input.
Set the volume on the input device (mixer,
audio interface or computer) to minimum
level.
The HF and LF LEVEL ADJUST are set at “0dB”
(factory setting). The VOLUME is set at “+6dB”
(factory setting).
Set the POWER switch to ‘ON’ position. Play
an audio track and slowly bring up the volume on
the input device (mixer, audio interface or
computer) to an acceptable listening level.
Set the POWER switch to ‘OFF’. Connect the AC power cord
(provided) to the AC inlet socket on the studio monitor and power outlet.
Warning: Incorrect AC voltage may damage the studio
monitor. Make sure the AC power outlet matches the studio
monitor (should state 100V~, 110-120V~ or 220-240V~.
STEP 1
STEP 2
STEP 3