
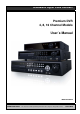
Owner manual


6
Mandatory Setup & Operation Precautions
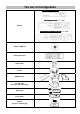
STEP 1. Date / Time Configuration (‘before’ HDD(s) installation)
Plug a network cable, if any.
Turn on the DVR and press ‘OK’ on no HDD(s) detection message.
Go to SETUP>SYSTEM>General>Setup.
Check on ‘NTP Setup’ box, and then select your ‘Time Zone’.
Select DST (Daylight Saving Time) ‘On’ or ‘Off’ accordingly.
When the DVR has no internet connection, adjust Date/Time manually. Otherwise the DVR will adjust the correct time
every hour automatically.
Click/Select ‘EXIT’ on your right and top corner.
Turn off the DVR for Step 2 (HDD(s) installation).
STEP 2. HDD(s) Installation / Addition / Moving / Replacement / Removal
HDD(s) Installation/Addition: Make sure the DVR is turned off. Connect a power cable and a SATA cable from DVR’s
main board to HDD(s). Use SATA port #1 (written on the board) for the first HDD and in order. Power the DVR on and
follow the screen. DVR starts recording. No rebooting required.
HDD(s) Removal: Make sure the DVR is turned off. Disconnect a power and a SATA cable from DVR’s main board to
HDD(s). Power the DVR on and follow the screen. (You may leave SATA port #1 unused when you removed the
attached #1 HDD.)
HDD(s) Selection: Even most of HDDs are compatible with DVRs; suggested HDD list is available by request.
Power Off
Do not turn DVR off, or plug off the power adapter while DVR is in operations (record/playback). It may cause permanent
damage to the equipment. Please Click ( ) Shutdown on System Menu Bar and then UNPLUG the power cable after
DVR is shut down completely. It is safe to wait for 5 seconds before turning the power on again.
(‘Shut Down’ by DVR’s menu selection does NOT physically power off the machine. Please physically unplug the power
cable from the DVR to completely turn off.)
Do not turn off External storage device (e.g., USB memory stick (powered), removable external hard disk, and similar)
while the DVR is on. It may cause permanent damage to the equipment. When you have to turn off external storage
device, make sure the DVR is turned off. When you turn those on, turn on external storage first and then DVR. (you may
unplug simple USB thumb drive freely unless it is in archiving process)
Do not turn DVR off, or plug off the power adapter when the DVR is formatting an HDD(s). It may cause permanent
damage to the equipment. Make sure the power is “ON” until the formatting of an HDD is completed. (note, a DVR
formats HDD(s) in seconds)
Monitor resolution
For the best picture display, a DVR’s local monitor output has a default resolution of 1920x1080 pixels. If your attached
monitor does not support 1080p resolution, and you cannot see any picture, please change the DVR’s resolution to the
lowest as following.
The lowest resolution (1024x768) Hot Keys: Use your ‘Remote Controller’ (It comes with a DVR)
Press followings in order one by one. REW>FF>BACKWARD>FORWARD
The resolution should be changed to 1024x768.
Default Password
For all (DVRs and Software) default password is 1111 (four 1(one)s).
For your protection, it is strongly recommended to change. Computer-like passwords are supported.
Upgrade
You may upgrade a DVR when the HDDs are added properly.
Contact your dealer/technical support when you need a help on updating.