
Corp. Saw User Manual


9
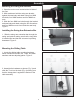
Mounting the Sliding Table Continued
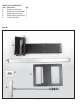
3. Slide the hardware toward the cast mounting
bracket located on the saw body. Place the
adjusting plate on top of the set screws as shown
(A,Fig.5).
4. Tighten the lock knob slightly, leaving loose for
adjustment.
5. Repeat procedure for rear mounting bracket.
6. Adjusting the parallel of the saw table and sliding
table with the four set screws (A, Fig.5).
Installing the Sliding Table Carriage
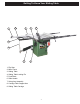
1. Locate the sliding table carriage mounting
hardware as shown. Figure 6.
2. Slide the T-nuts bar into the side channel of the
sliding table. Figure 7.
3. Attach the carriage table support arm to the
bottom the the sliding table carriage using two 8MM
carriage bolts, two 8MM washers and two 8MM hex
bolts. The head of the carriage bolts should lock
into the bottom of the sliding table carriage. Finger
tighten the two 6MM hex bolts only until next step
is completed. Figure 8.
Figure 5
Figure 6
Figure 7
Figure 8
Assembly
A