
User guide
7
protects the charger and brings the battery up to charge efficiently with minimum
heating, and also helps in conditioning (breaking chemical barriers) of the
battery. The yellow ‘CHARGING LED pulsating indicates these pulses. The
pulses are too rapid to be read on the Activator 282 digital voltmeter.
3.0. GENERAL OPERATION
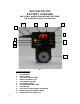
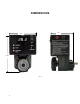
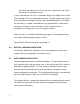
Refer to Figure 1.
When switched to ‘ON’, an automatic cycle of charge is initiated regardless of the
state of charge or discharge of the battery. The battery voltage is sensed by the
Activator 282 which determines the level of the charge algorithm, whether Pulse,
Constant Current, Constant Voltage or timing to topping (cell equalization) and
completion of charge Cutoff with READY LED indication.
Note that if the battery voltage is less than 4 Volts, the display may read only
some digital segments or not at all.
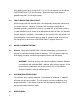
Switch (2) to ‘ON’. The fan will operate.
The yellow CHARGING LED (5) will illuminate.
Observe the digital voltmeter on the Activator 282. If the voltage is below 10
Volts, the CHARGING LED will indicate pulsing charge. The fan (8) rotation may
also be intermittent until the battery voltage is above about 9 Volts.
READY Led (6): Charging will continue for the time period necessary to
completely charge the battery. This may be a fraction of an hour or many
hours. When the battery reaches 28 Volts, the charging algorithm allows
the battery to continue charge as the battery voltage rises (maximum 28.6
Volts for Lead Acid or 31 Volts for NiCad), for an additional 30 minutes. At
the end of 30 minutes the READY LED (6) illuminates. Topping charge