
Paper Shredder User Manual

1
© Copyright 2007 Printed
Before You Start
The Baffle Kit and Shredder Kit are exclusively designed
for your 20 foot Land Pride Rotary Cutter. Please read
these installation instructions and your Rotary Cutter
Operator’s Manual thoroughly before beginning.
Especially read information relating to safety concerns.
Also included in the Operator’s Manual is important
information on operation, adjustment, troubleshooting,
and maintenance for this attachment (some manual
sections do not apply to all accessories).
A separate Rotary Cutter Parts Manual is available free
of charge at www.landpride.com or can be purchased
from your nearest Land Pride dealer. Have the model
and serial numbers of your cutter handy when placing an
order.
Manual Part Numbers:
• Operator’s Manual . . . . . . . . . . . . . . . . . 318-474M
• Parts Manual . . . . . . . . . . . . . . . . . . . . . 318-474P
General Information
These assembly instructions apply to the Baffle and
Shredder Kits listed below:
330-114A RC/RCM5020 BAFFLE KIT
318-958A RC/RCM5020 SHREDDER KIT
Tools required:
•
Safety Glasses
• Work Gloves
• Tape measure . . . . . . . . . . . . . . . . . . . .Baffle Kit Only
• Pencil . . . . . . . . . . . . . . . . . . . . . . . . . . .Baffle Kit Only
• Center Punch . . . . . . . . . . . . . . . . . . . . .Baffle Kit Only
• Hammer . . . . . . . . . . . . . . . . . . . . . . . . .Baffle Kit Only
• Drill with 9/16" Drill Bit . . . . . . . . . . . . . .Baffle Kit Only
• Extension Cord . . . . . . . . . . . . . . . . . . . . . . if required
• Two 3/4" wrenches . . . . . . . . . . . . . . . . .Baffle Kit Only
• Two 1 1/2" wrenches . . . . . . . . . . . . Shredder Kit Only
• One 55mm wrench . . . . . . . . . . . . . . Shredder Kit Only
When you see this symbol, the subsequent
instructions and warnings are serious - follow
without exception. Your life and the lives of
others depend on it!
!
IMPORTANT: Before you begin, read these
instructions and check to be sure all parts and tools
are accounted for. Please retain these installation
instructions for future reference and parts ordering
information.
Safety Information
!
WARNING
Never work under equipment supported by hydraulics.
Hydraulics can drop equipment if controls are actuated or if
hydraulic lines burst. Either situation can drop the cutter
instantly even when power to the hydraulics is shut off.
!
DANGER
Always disconnect main driveline from tractor PTO before
servicing the cutter deck. Cutter can be engaged if tractor is
started resulting in damage to the cutter, bodily injury and/or
death.
Baffle Assembly Instructions
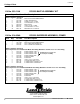
A detailed listing of parts for the Baffle and Shredder Kits
is provided on page 6. Use the list as a checklist to
inventory parts received. Please contact your local Land
Pride dealer for any missing hardware.
1. Lower cutter and wings to the lowest position.
2. Place tractor gear selector in park and/or set brakes,
shut engine off and remove ignition key.
3. Disconnect main driveline from tractor PTO.
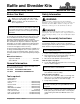
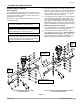
Refer to Figure 1 on page 2:
4. Locate and drill twelve 9/16" dia. holes on each wing
deck as shown in Figure 1.
5. The wings can be raised and locked into position for
the remainder of the assembly.
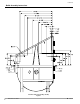
Refer to Figure 2 on page 3:
6. Attach the four front baffles (#4) to each wing deck
with 1/2"-13 x 1 1/2" GR5 hex head bolts (#5), 1/2"
flat washers (#7) and 1/2" hex whiz nut (#6).
7. Torque nuts to 76 ft-lbs.
8. Remove nuts securing the rear guard and attach rear
baffle plate (#1) to the inside of the rear deck plate
using existing hex whiz nuts. Do not remove rear
guard.
IMPORTANT: Read “Safety Information” above
before installing baffle plates.
NOTE: Drilling holes is not necessary on models
manufactured after serial # 536743.
IMPORTANT: The rear baffle is installed with the
same bolts attaching the rear guard. Do not remove
rear guard.
For RC(M)5020 Rotary Cutters
Baffle and Shredder Kits
8/20/07
Manual No. 330-148M