
UDS10 and UDS100 User Guide


Getting Started UDS10/UDS100 User Guide
16
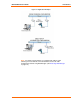
Assigning the IP Address and Related Network Settings
This section describes two ways to assign the IP address and related network
settings quickly.
DeviceInstaller
Serial Port Login
DeviceInstaller
Note: The DeviceInstaller User Guide and the DeviceInstaller online help
provide more detailed information on using DeviceInstaller.
Installing DeviceInstaller
To use the DeviceInstaller utility, you first install it from the product CD.
1. Insert the product CD into your CD-ROM drive. The Lantronix UDS10/UDS100
DeviceInstaller window displays.
2. If the CD does not launch automatically:
a) Click the Start button on the Task Bar and select Run.
b) Enter your CD drive letter, colon, backslash, deviceinstaller.exe (e.g.,
E:\deviceinstaller.exe).
3. Click the DeviceInstaller button.
4. Respond to the installation wizard prompts. (When prompted to select an
installation type, select Typical.)
Assigning the IP Address and Network Class
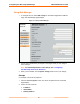
1. Click the Start button on the Task Bar and select Programs Æ Lantronix Æ
DeviceInstaller Æ DeviceInstaller. The DeviceInstaller window displays.
2. Click the Assign IP icon. The Assign IP Address window displays.
3. Enter the hardware (Ethernet) address of the device.
4. Select Assign a specific IP address to assign a static IP address to the device
or select Obtain an IP address automatically to enable BOOTP, DHCP, or
Auto IP on the device.
5. Click Next.
6. Enter an IP address, subnet mask, and gateway for the device. Enter this
information in XXX.XXX.XXX.XXX format.
7. Click Next.
8. Click the Assign button to finalize the IP assignment.