
Installation Manual


Larson Electronics LLC www.LarsonElectronics.com sales@larsonelectronics.com
9419 E US HWY 175, Kemp, TX 75143 - P: (800) 369-6671 - F: (903) 498-3364
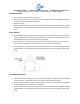
PENDANT MOUNT
1. Loosen the set screw provided in the top hub.
2. Attach conduit to the top hub, making sure that at least five threads are engaged and conduit is
as tight as per the requirements of the NEC.
3. Tighten set screw.
4. Remove junction box cover and pull supply wires into junction box. Attach Black lead for 120V or
Orange lead for 277V, White lead for Neutral and Green lead for Ground. Replace junction box
cover.
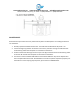
WALL MOUNT
1. Install Wall Mount Plate to the back of the fixture by means of two each ¼ -20 Flat head screw
provided. Flat head screws must be secured fastened. Install the fixture to the wall by means of
the Wall Mount Plate using two 5/16" bolts (not provided).
2. Attach conduit to any of the three 1/2" NPT hubs on the fixture, making sure that at least five
full threads are engaged and conduit is tight as per the requirements of the NEC.
3. Remove junction box cover and pull supply wires into junction box. Attach Black lead for 120V or
Orange lead for 227V, White lead for Neutral and Green lead for Ground. Replace junction box
cover.
END BRACKET MOUNT
1. Install end Bracket to wall using four 5/16" bolts (not provided). Install fixture to the end Bracket
using two each ¼ - 20 Hex Head screws, lock washers and flat washers provided.
2. Attach conduit to hub on the fixture, making sure that at least five full threads are engaged and
conduit is tight as per the requirements of the NEC.
3. Remove junction box cover and pull supply wires into junction box. Attach Black lead for 120V or
Orange lead for 277V, White lead for Neutral and Green lead for Ground. Replace junction box
cover.