
Installation Instructions
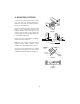
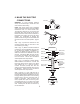
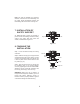


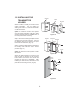


Table Of Contents

10
Figure 21
Figure 23
Figure 22
Figure 24
14. INSTALLING THE
BATTERY
Remove the back cover on the transmitter and
install both, 3 volt (#2032) batteries that were
included with the remote control. Make sure
the + sign is facing up. (Fig. 21)
15. OPERATING YOUR
TRANSMITTER
Restore power to ceiling fan and test for
proper operation.
A. , and buttons:
These three buttons are used to set the
fan speed as follows:
= low speed
= medium speed
= high speed
B. button:
This button turns the fan off.
C. button:
This button controls the light. Press and
release the button to turn the light ON or
OFF. Press and hold the button to set the
desired brightness. The light key has an
auto-resume, it will stay at the same
brightness as the last time it was turned off.
The Reverse switch is located on the top
housing. Slide the switch to the Left for warm
weather operation. Slide the switch to the
Right for cool weather operation.
Speed settings for warm or cool weather
depend on factors such as the room size.
Ceiling height, number of fans and so on.
NOTE: To operate the reverse function on this
fan, press the reverse button while the fan is
running.
Warm weather - (Forward) A downward airflow
creates a cooling effect as shown in Fig. 23.
This allows you to set your air conditioner on a
warmer setting without affecting your comfort.
Cool weather - (Reverse) An upward airflow
moves warm air off the ceiling area as shown
in Fig. 24. This allows you to set your heating
unit on a cooler setting without affecting your
comfort.