
Installation Instructions
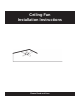
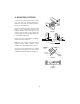
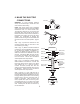
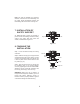


Table Of Contents

8
11. ATTACHING THE
LIGHT PLATE
NOTE: Before starting installation, disconnect
the power by turning off the circuit breaker or
removing the fuse at fuse box. Turning power
off using the fan switch is not sufficient to
prevent electric shock.
Raise and hold the light plate close to the
mounting plate and proceed to do the wire
connections, follow the same procedure with
the black wire connectors. Attach the light
plate to the mounting plate by using the three
screws provided that are preinstalled on the
mounting plate. (Fig. 16)
Figure 16
Figure 17
12. ATTACHING THE
LIGHT BULBS AND
GLASS SHADE
WARNING: Shut off the power supply before
removing or replacing lamp. In handling of
halogen bulb, care should be taken not to
touch it with your bare hands. Oil residue will
shorten the life of the halogen bulb. If you
accidentally come into contact, wipe
thoroughly with a clean, lint-free, cotton cloth.
Allow the bulb to cool off for 10 minutes before
changing the bulb. Use light bulb in
accordance with the fan's specification. TO
REDUCE THE RISK OF FIRE DO NOT
EXCEED MAXIMUM WATTAGE RATING.
Step 1. Install the 100W JD-type halogen bulb
(included). (Fig. 17)
Step 2. Install the glass shade by carefully
turning it clockwise until snug. DO NOT
OVERTIGHTEN. (Fig. 17)
Screws
Glass shade
Light plate
Bulbs
Mounting plate
Light plate
Wire connectors
403B-1
403B-1