INSTALLATION MANUAL SHOE STORAGE CABINET Tools Required 1
SUMMARY INTRODUCTION/TIPS AND WARNINGS page 3 STRUCTURAL DECOMPOSITION DIAGRAM page 4 PARTS LIST page 5 INSTALLATION STEPS page 7 2
INTRODUCTION Before using the product ,please read this manual carefully and then assemble it. To avoid any injury or damage to the product,please follow safety rules below. • • • • Product to be installed in a dry,flat place indoor. Assembly & movement: minimum 2 adults - heavy product. Make sure all screws in the part list included in the hardware package before assembly. In the event of a missing items,contact the seller within 48 hours. TIPS AND WARNINGS: • Do not lean on the shoe cabinet.
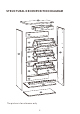
STRUCTURAL DECOMPOSITION DIAGRAM 1 18 19 17 20 21 8 14 16 12 6 15 12 11 9 4 6 15 12 12 10 16 11 14 12 15 14 12 11 6 8 7 2 3 The picture is for reference only 4 16 5
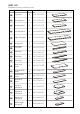
PART LIST Illustration picture for reference only DESCRIPTION 1 Top panel QTY 1 24.8*11.5*0.59" 2 Bottom panel 1 23.5*11.5*0.59" 3 Bottom panel 1 23.5*11.5*0.59" 4 Left side panel 1 52.9*11.5*0.59" 5 Right side panel 1 52.9*11.5*0.59" 6 Back panel 3 23.8*11.3*0.16" 7 Front rail 1 23.6*1.57*0.59" Back strip 1 NO.
19 Drawer back panel 1 21.6*2.99*0.47" 20 Drawer panel 1 23.4*3.54*0.59" 21 Drawer bottom panel 1 22.0*9.72*0.16" PART LIST Illustration picture for reference only NO. ILLUSTRATION QTY NO. SIZE ILLUSTRATION QTY SIZE 22 50 31 4 0.13*0.98" 23 50 32 8 0.13*0.62" 24 24 33 32 0.13*0.47" 25 24 34 18 0.15*0.47" 26 6 35 2 0.13*1.37" 3 36 2 3 37 2 29 2 38 6 30 2 39 8 27 28 Left Right 0.19*1.96" 6 0.15x0.
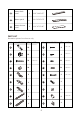
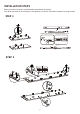
INSTALLATION STEPS Please read the instructions carefully before assembling the cabinet. Two adults are required for assembly of this product on a clean, flat surface instead of a rough surface. STEP 1 22 30 29 Please press the button to separate the drawer runner.
STEP 3 22 8 23 23 2 8 7 8 2 7 STEP 4 8 4 8 2 7
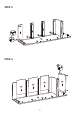
STEP 5 9 8 8 10 2 23 23 23 23 4 STEP 6 23 3 6 6 6 2 4 9
STEP 7 39 39 32 5 5 1 4 22 23 23 STEP 8 36 9 9 37 35 10
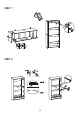
STEP 9 22 Attention: 23 23 Put 23 into the hole, turn 23 to lock 22 .
STEP 11 Adjust the angle 38 26 12 14 26 7 15 16 7 11 27 STEP 12 20 12 12 11 12 4 12 11 12 7 12 11 12