
Installation Guide


Standard Acrylic Units
Installation Instructions
INSTALLATION OF AN S 4136 OPEN TOP ACRYLIC
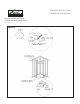
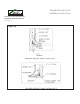
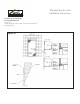
See Figures 19, 20 and 21
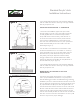
1. Frame in area 39” width x 37.5” deep. The unit will
be installed into this area and the backside of the front
anges will back up to the front stud and the back of the
unit should intersect the rear studs.
2. Ensure the unit you have is the correct hand
according to the plumbing in you installation area.
2a. Follow the Barrier Free Installation Instructions.
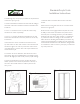
3. Secure the unit to the studs behind the front anges
and along the top back ange. Secure to the front studs
through the pre-drilled holes using screws. Drill through
the top back ange into the locations that intersect the
studs. Use a bit that is slightly larger than the screw so
as not to chip the surface. Do not drive nails through the
anges or this may chip the surface.
4. Mark the backside of the unit in the areas intended
for the plumbing connections. Drill these marks from the
backside with a small drill bit to the inside.
5. Using the small holes as pilot holes, drill from
the inside of the units with proper hole sizes for the
plumbing.
6. Make connections.
7. Water test connections.
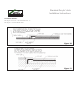
8. Dry Walling: Dry walling the back ange is done by
using two layers of drywall. One layer will butt up to the
top of the rear ange. The next layer will overtop and
extend down to the rear ledge. Dry walling the front
of the unit is done by using two layers of drywall. One
layer is used to butt against the front ange. The other
layer will overlap over the front face of the unit. A “J”
mold will be used to nish out the overlapping edge of
the unit. On the side walls, the dry wall will overlap the
studs and extend down to the horizontal ange.
Acrylic Bathing Units
Installation Instructions
INSTALLATION OF AN S 4136 OPEN TOP
ACRYLIC
See Figures 19, 20 & 21
1. Frame in area 39” width x 37.5” deep. The unit will
be installed into this area and the backside of the front
flanges will back up to the front stud and the back of the
unit should intersect the rear studs.
2. Ensure the unit you have is the correct hand
according to the plumbing in you installation area.
2a. Follow the Barrier Free Installation Instructions.
3. Secure the unit to the studs behind the front flanges
and along the top back flange. Secure to the front studs
through the pre-drilled holes using screws. Drill through
the top back flange into the locations that intersect the
studs. Use a bit that is slightly larger than the screw so
as not to chip the surface. Do not drive nails through the
flanges or this may chip the surface.
4. Mark the backside of the unit in the areas intended
for the plumbing connections. Drill these marks from the
backside with a small drill bit to the inside.
5. Using the small holes as pilot holes, drill from
the inside of the units with proper hole sizes for the
plumbing.
6. Make connections.
7. Water test connections.
8. Dry Walling: Dry walling the back flange is done by
using two layers of drywall. One layer will butt up to the
top of the rear flange. The next layer will overtop and
extend down to the rear ledge. Dry walling the front
of the unit is done by using two layers of drywall. One
layer is used to butt against the front flange. The other
layer will overlap over the front face of the unit. A “J”
mold will be used to finish out the overlapping edge of
the unit. On the side walls, the dry wall will overlap the
studs and extend down to the horizontal flange.
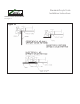
NOTE: Studs may need to be notched in around areas
that may have screws or bolts.
NOTE: Due to the nature of the materials, dimensions
may vary +/- 0.375”.
Installation, Storage & Cleaning Guide
13
Figure 19
Installation, Storage & Cleaning Guide
13
Figure 20
Installation, Storage & Cleaning Guide
13
Figure 21
NOTE: Studs may need to be notched in around areas
that may have screws or bolts.
NOTE: Due to the nature of the materials, dimensions
may vary +/- 0.375”.