
Installation Guide


Standard Acrylic Units
Installation Instructions
4. It is advised that all barrier free units should be designed
with an outside oor drain to catch any over-spray of water
that may escape the unit.
INSTALLATION PROCEDURE - 2” THRESHOLD
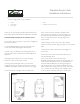
1. At the time of installation, prepare the pit in which
the unit will sit by pouring a very wet multi-purpose this
set bed (applied with a .5” notched trowel) of which
the pit walls become the boundary . Place the unit on
to the mix and make sure the tub sits plumb and ush.
This procedure will eliminate any voids under the tub.
Too much mix could cause the oor to push upward and
violate the drain-ability of the unit as well as bow the
threshold (see Figure 7).
2. A unit with a 2” threshold must be recessed in order
to allow the nished oor to come within .5” of the top
of the threshold on any 36” barrier free (ADA) unit and
level with the top of the threshold on any 60” barrier
free (ADA) unit. The pit depression should be deep
enough to allow for the specied nished oor detail
and the pit dimension should allow for the placement of
the unit inside the pit (see Figure 8).
3. It is advised that all barrier free units should be designed
with an outside oor drain to catch any over-spray of water
that may escape the unit.
PREPARATION OF THE ACRYLIC UNIT FOR
INSTALLATION
The barrier free special needs shower is a very sensitive
unit to proper installation, therefore, it is very important
that the following procedures are followed during remaining
installation process to create the ideal barrier free access area.
Prior to setting the product into the recessed pit, the pit must
be prepared with a multipurpose thin set applied with a .5”
notched trowel. This mixture needs to be wet in order to ll
all areas under the base and ow with the draft of the base.
When the pit has been prepared with the mixture, set the
unit into the recessed pit. After the unit has been set into the
thin set, it must be braced from the inside for 72 hours (until
the mix is set) to insure proper drainage.
Acrylic Bathing Units
Installation Instructions
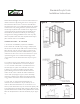
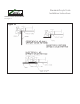
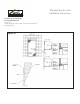
unit. The pit depression should be deep enough to
allow for the specified finished floor. Detail and the pit
dimensions should allow for the placement of the unit
inside the pit (see Figure 6).
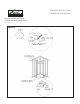
4. It is advised that all barrier free units should be
designed with an outside floor drain to catch any over-
spray of water that may escape the unit.
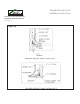
INSTALLATION PROCEDURE- 2” Threshold
1. At the time of installation, prepare the pit in which
the unit will sit by pouring a very wet multi-purpose this
set bed (applied with a .5” notched trowel) of which
the pit walls become the boundary . Place the unit on
to the mix and make sure the tub sits plumb and flush.
This procedure will eliminate any voids under the tub.
Too much mix could cause the floor to push upward and
violate the drainability of the unit as well as bow the
threshold (see Figure 7).
2. A unit with a 2” threshold must be recessed in order
to allow the finished floor to come within .5” of the top
of the threshold on any 36” barrier free (ADA) unit and
level with the top of the threshold on any 60” barrier
free (ADA) unit. The pit depression should be deep
enough to allow for the specified finished floor detail
and the pit dimension should allow for the placement of
the unit inside the pit (see Figure 8).
3. It is advised that all barrier free units should be
designed with an outside floor drain to catch any over-
spray of water that may escape the unit.
PREPARATION OF THE ACRYLIC UNIT FOR
INSTALLATION
The barrier free special needs shower is a very sensitive
unit to proper installation, therefore, it is very important
that the following procedures are followed during
remaining installation process to create the ideal barrier
free access area. Prior to setting the product into the
recessed pit, the pit must be prepared with a multi-
purpose thin set applied with a .5” notched trowel. This
mixture needs to be wet in order to fill all areas under
the base and flow with the draft of the base. When the
pit has been prepared with the mixture, set the unit into
the recessed pit. After the unit has been set into the thin
set, it must be braced from the inside for 72 hours (until
the mix is set) to insure proper drainage.
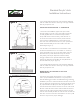
The following steps are proper procedure for the
placement of the brace
(see Figure 9):
1. Measure the distance between the drain and the
ceiling in the inside of the unit. The distance should be
between 80.5” and 80.75”.
2. Cut 2 x 4 members for the top and the bottom. They
should be 18” and 8” respectively.
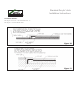
Figure 4
Figure 5
Figure 6