
Installation Guide


Standard Acrylic Units
Installation Instructions
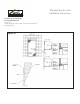
The following steps are proper procedure for the placement
of the brace (see Figure 9):
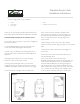
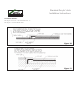
1. Measure the distance between the drain and the ceiling in
the inside of the unit. The distance should be between 80.5”
and 80.75”.
2. Cut 2 x 4 members for the top and the bottom. They
should be 18” and 8” respectively.
3. Cut a 2 x 4 member the distance between the top and
bottom less the thickness of the two pieces cut for the top
and bottom.
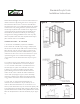
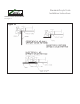
4. Place the brace in the unit with the members for the
top and bottom on each end of it. The brace with the ends
should be a tight t. In order to protect the surface of the
unit, please place a towel or other soft object between the
wood and he acrylic.
5. Level the unit in two directions, then attach the unit to
the framing using the pre-drilled holes in the anges. Check
the oor for high spots that would prevent proper drainage.
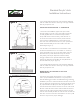
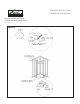
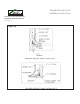
6. Check the threshold to ensure it remains at. If it has
exed upward, a brace should be placed from the top of
the unit to the bowed section to hold it in place as the
slurry cures.
7. Make the drain connection after the oor has been
braced.
8. Remove the bracing after the mix has cured and check
the oor for high spots.
Note: This unit is thoroughly tested in the plant to ensure
its ability to drain water. Several tests are performed on
each unit prior to it leaving the factory and all modied
threshold units ship with a “false” bottom or upside down
to prevent the drain from sitting on the oor. Failure to
follow the above handling and installation procedures may
cause improper drainage thus voiding the unit’s warranty. It
is advised that all barrier free units should be designed with
an outside oor drain to catch any over-spray of water that
may escape the unit.
Acrylic Bathing Units
Installation Instructions
3. Cut a 2 x 4 member the distance between the top
and bottom less the thickness of the two pieces cut for
the top and bottom..
4.
Place the brace in the unit with the members for the
top and bottom on each end of it. The brace with the
ends should be a tight fit. In order to protect the surface
of the unit, please place a towel or other soft object
between the wood and he acrylic.
5.
Level the unit in two directions, then attach the unit
to the framing using the pre-drilled holes in the flanges.
Check the floor for high spots that would prevent proper
drainage.
6.
Check the threshold to ensure it remains flat. If it has
flexed upward, a brace should be placed from the top
of the unit to the bowed section to hold it in place as the
slurry cures.
7.
Make the drain connection after the floor has been
braced.
8.
Remove the bracing after the mix has cured and
check the floor for high spots.
Note: This unit is thoroughly tested in the
plant to ensure its ability to drain water.
Several tests are performed on each unit
prior to it leaving the factory and all
modified threshold units ship with a “false”
bottom or upside down to prevent the drain
from sitting on the floor. Failure to follow the
above handling and installation procedures
may cause improper drainage thus voiding
the unit’s warranty. It is advised that all
barrier free units should be designed with
an outside floor drain to catch any over-
spray of water that may escape the unit.
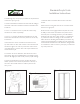
Figure 7
Figure 8
Figure 9
Acrylic Bathing Units
Installation Instructions
3. Cut a 2 x 4 member the distance between the top
and bottom less the thickness of the two pieces cut for
the top and bottom..
4.
Place the brace in the unit with the members for the
top and bottom on each end of it. The brace with the
ends should be a tight fit. In order to protect the surface
of the unit, please place a towel or other soft object
between the wood and he acrylic.
5.
Level the unit in two directions, then attach the unit
to the framing using the pre-drilled holes in the flanges.
Check the floor for high spots that would prevent proper
drainage.
6.
Check the threshold to ensure it remains flat. If it has
flexed upward, a brace should be placed from the top
of the unit to the bowed section to hold it in place as the
slurry cures.
7.
Make the drain connection after the floor has been
braced.
8.
Remove the bracing after the mix has cured and
check the floor for high spots.
Note: This unit is thoroughly tested in the
plant to ensure its ability to drain water.
Several tests are performed on each unit
prior to it leaving the factory and all
modified threshold units ship with a “false”
bottom or upside down to prevent the drain
from sitting on the floor. Failure to follow the
above handling and installation procedures
may cause improper drainage thus voiding
the unit’s warranty. It is advised that all
barrier free units should be designed with
an outside floor drain to catch any over-
spray of water that may escape the unit.
Figure 7
Figure 8
Figure 9