CS-440 BT Instruction Manual /MU UP TA AF MODE SEL 1 2 3 RPT INT 4 RDM 6 5 -10 +10 VOL AV IN BND MIC DN APS SHIFT PWR SHIFT EQ MU B AND M ENU M ODE SEL + SET UP Compatible to these Formats 3 4 6 7 8 9/A F 0/10 10 + / PT Y 1 2 -10 +10 5 CLK TA SLOW_FWD LOC ZOOM ST # TEL SE A R CH RPT AUDIO A-B PROG of Files Such As: MP4, JPEG, MP3, WMA .
Contents 1. Before Operation......................................................................................................2 1.1 Precautions.................................................................................................2 1.2 Battery Information of Remote Control........................................................2 1.3 The Remote Control Description.................................................................3 1.4 Locations and Names of the Controls...................
1. Before Operation 1.1 Precautions 1. Read through this instruction manual before installation and use. 2. Clear the panel and case with soft dry cloth only, do not apply any kind of thinner, alcohol or sprays. 3. The apparatus shall not be exposed to dripping or splashing . 1.2 Battery Information of the Remote Control Replace Battery in the Remote Control: + side up B A Fig.1 Fig.2 Fig.3 1.
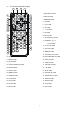
1.3 The Remote Control Description 3 27 35 EQ BAND PWR 1 1. BACK OFF BUTTON SHIFT 14 4 2. MENU BUTTON 2 29 MU MODE M ENU 32 9 34 SE L + SE T UP 24 28 21 22 1 2 -10 +10 5 CLK 6. > BUTTON 10 7. 11 6 7 8 39 9/AF 0/10 TA 10+ /PTY SLOW_FWD ST LOC # ZOOM TEL S EA RC H RPT AP S RDM 12 9. SEL BUTTON 16 10. PLAY/PAUSE BUTTON 11. NUMBER(0~10,+10 18 -10) BUTTONS 17 SUB TITLE LOU D REDI AL 12. 10+/PTY BUTTON 19 13. SETUP BUTTON 20 PROG |<< BUTTON 8.
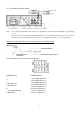
1.4 Locations and Names of the Controls 1 10 11 20 4 21 3 5 16 6 /MU 2 TA AF MODE UP SEL 9 1 12 RDM 3 2 RPT INT 4 5 6 -10 +10 VOL AV IN BND AP S DN MIC SHIFT 13 7 14 8 3 22 15 The figure of the front panel SD 17 18 19 The figure of the Unit Chassis Facet After removing the Front Panel 15. AV IN JACK 1.POWER/MUTE BUTTON 8. APS BUTTON 2. MODE BUTTON 9.1/PLAY/PAUSE BUTTON 3. UP / DN BUTTONS 10. 2/INT BUTTON 4. SEL/VOL BUTTON 11. 3/RPT BUTTON 5. LCD 12.
1.5 Description of the Rear Cabinet Note: 1. after connecting the Parking Line, the video on the small monitor of the front panel will be display only after braking the car. 2. Use the clip end of a Ground Line provided by manufacturer to connect the Fixing Screw Bolt, use another end of the Ground Line to connect the negative pole of the power source. Otherwise, the video on screen maybe flashes.
1.
2. Common Operation 1. To turn on/off the unit Under power off mode, press the POWER button to turn on the unit. Under power on mode, press and hold the POWER button on the front panel or briefly press the POWER button on the remote control to turn off the unit. 2. To select function mode Press the MODE button to select TUNER, USB (After inserting a USB storage), Card(After inserting a MMC or SD card) AUX or BLUETOOTH mode.
12. To do setup In setup mode, select the GENERAL, TIME, AUDIO, VIDEO, RADIO as follow: GENERAL SETUP Wallpaper: this function allows to choose the display background. Logo: this function allows to choose the starting screen. Beep: choose the buttons' sound on/off GENERAL SETUP CLOCK SETUP Clock time: adjust the clock. AUDIO SETUP Loud: choose between Loudness ON/OFF. EQ: choose between the different types of EQ.
3. Radio Operation 1. BAND BUTTON In RADIO mode, press the BAND button on the remote control or on the front panel to select your desired radio band of FM1, FM2, FM3, AM1 and AM2, and the selected band will be displayed on the small monitor of the front panel. 2. TUNE/SEEK UP/DOWN BUTTONS In RADIO mode: 1) Press and hold the UP/DN button to automatically search up/down for a available station from the current frequency.
POP M< -->ROCK M<-->EASY M<-->LIGHT M<--> CLASSICS<-->OTHER M<-->JAZZ<-->COUNTRY<-->NATION M<-->OLDIES<-->FOLK M<--> When PTY group is on, pressing the 6 number buttons also can select one of PTY programs as above. After selecting one of the PTY programs, it will display SEEK PTY and automatically search for the station of the PTY program. If the station of the PTY program does not exist, it will display PTY NONE and then return back to the normal station. 8.
4. USB and MMC/SD Operation Insert an USB or MMC/SD Card into their slots respectively, then the root menu will be displayed on the monitor and it will play audio file automatically if the USB or MMC/SD Card include audio files. During playback, press the STOP button twice to stop playback, then pull the USB out of the USB socket; or push the card and then pull it out of the card slot. Press and hold BAND to turn on SHIFT. : select to pause playback. : select to stop playback .
4.1 Pause Playback When playing MP4/JPEG/MP3/WMA files, press the PAUSE button to pause the playback, press the PLAY button to resume normal playback. 4.2 Stop Playback In MP3/WMA mode, press the STOP button once to pause the playback, then press the PLAY/PAUSE button to resume the normal playback(play from the point playing just now); press the STOP button twice to full stop the playback, then press the PLAY/PAUSE button to start playback from the first track.
4.7 Playback with Slow Speed During MP4 playback , press the SLOW_FWD button to execute the Slow Forward function. With each consecutive pressing of the SLOW_FWD button, the playback speed decreases. The speed levels in Slow Forward as follows: x1/2,x1/3,x1/4,x1/5,x1/6,x1/7,normal. During slow forward, press the PLAY button to resume normal playback. The function is only for video. 4.8 Playback Repeatedly 4.8.
4.12 Change Caption Language In MP4 mode, during playback, press the SUBTITLE button repeatedly to select the language of the caption or turn off the caption.(depend on the file played) In JPEG/MP3/WMA mode, the SUBTITLE button is invalid. 4.13 Look over Playback Information 1. In MP4/MP3/WMA mode, press the OSD button repeatedly to turn on/off the playback information. When it is on, it will display the information such as: Track serial number, Track elapsed time, Track remained time, etc. 2.
4.16 System Menu Setup Operation 1. Press the SETUP button on the remote controller to access the System Menu on the monitor. 2. There are 6 setup pages in all for the System Menu. Press the > or < button to select an desired setup page. 3. Press the ^ or v button to select an setup item in the selected setup page. 4. Press the > button to enter the setup item. Then press the v or ^ button to select a desired mode of the setup item, finally press the OK button to confirm it.
displayed during playback. AUDIO LANG This item is for selecting a audio language. SUBTITLE LANG This item is for selecting a subtitle language. MENU LANG This item is for selecting a menu language. 4.16.3 AUDIO SETUP KEY It is for selecting your desired basic music tone(from low to high). 4.16.4 VIDEO SETUP BRIGHTNESS It is for adjusting the brightness of the video output. CONTRAST It is for adjusting the contrast of the video output. SATURATION It is for adjusting the saturation of the video output.
4.16.5 SPEAKER SETUP DOWNMIX It is for selecting your desired sound effect when there is no center speaker and subwoofer. There are 3 modes: LT/RT, STEREO, VSS. LT/RT: When playing a media with PRO LOGIC Dolby stereo effect, choose the item, so it will output audio signal with vivid theatre effect. STEREO: If you choose the item, when outputting audio signal with 5.
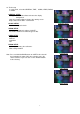
5. BLUE TOOTH HANDFREE SYSTEM 1. Enter Bluetooth mode When you use MODE button or Mode Menu to enter Bluetooth mode, it will display Bluetooth interface as right. Press and hold the BAND button to turn on shift then to do select. 2. Pairing and connection Bluetooth interface 1) Turn on the Bluetooth mode of the mobile phone; 2) Select the item of Finding the Bluetooth Device and enter it. After finishing the finding, it will show the name of the Bluetooth Device if finding a Bluetooth Device.
Note: During ringing, the phone number appears. 6. Trouble Shooting Please read the user manual carefully before using the this player. If you have any troubles in using this player, try to solve the problems by the suggestions mentioned below. If you can not remove the trouble after using all the suggestions, please contact the company or the technical service centre authorized by us.
7. Specification General Specification Power Supply Requirement..................................................DC 12V Maximum Power Output.......................................................4 x 25W Dimensions(w x h x d)..........................................................178 x 50 x 110mm USB/CARD Specification Format....................................................................................MP4/JPEG/MP3/WMA Output Video System.............................................................
CS-440BT Benutzerhandbuch 4-IN-1 AUTORADIO MIT KARTE/USB/BT/RADIO Hinweis: Informationen unterliegen unangekündigten Änderungen 21
Inhalt 1. Vor der Inbetriebnahme.........................................................................................23 1.1 Sicherheitsvorschriften.............................................................................23 1.2 Batterie der Fernbedienung.....................................................................23 1.3 Fernbedienung........................................................................................24 1.4 Bedienelemente und Funktionen.....................................
1. Vor der Inbetriebnahme 1.1 Sicherheitsvorschriften 1. Lesen Sie dieses Benutzerhandbuch vor der Installation und dem Gebrauch durch. 2. Reinigen Sie Bedienfeld und Gehäuse nur mit einem weichen, trocknen Tuch; keinen Verdünner, Alkohol oder Sprays verwenden. 3. Das Gerät vor Tropf- und Spritzwasser schützen. 1.2 Batterie der Fernbedienung Batterie der Fernbedienung austauschen 1.
1.3 Fernbedienung 16. SEARCH 17. RDM 18. RPT 19. SUBTITLE/REDIAL 20. LOUD 21. ST/# 22. ZOOM 23. AUDIO 24. CLK 25. A-B 26. TEL 27. EQ 1. ZURÜCK 2. MENU 3. POWER 4. PFEILTASTE ^ 5. >>| 6. PFEILTASTE > 7. |<< 8. PFEILTASTE v 9. SEL 10. PLAY/PAUSE 11. NUMMERNTASTEN (0~10,+10, -10) 12. 10+/PTY 13. SETUP 14. MODE 15. APS/HANGUP 28. LOC/SLOW-FWD/* 29. MUTE 30. STOP 31. VOLUME32. PFEILTASTE < 33. OK 34. VOLUME+ 35. BAND/SHIFT 36. PROG 37. OSD 38. AF 39.
1.4 Tasten und Funktionen Abbildung der Frontplatte Abbildung des Gehäuses nach Abnahme der Frontplatte 1. POWER/MUTE 2. MODE 3. PFEILTASTEN UP/DN 4. SEL/VOL 5. LCD 6. REL 7. BAND 15. AV-IN BUCHSE 16. USB-PORT 17. Kartenschlitz 18. RESET 19. LED-Kontrollleuchte 20. TA/AF 21. IR-Fernsensor 22. Mikrofon 8. APS 9.1/PLAY/PAUSE 10. 2/INT 11. 3/RPT 12. 4/RDM 13. 5/-10 14.
1.5 Rückseite RÜCKLEITUNG RÜCKFAHRKAMERA GRÜN GRÜN Hinweis: 1. Wenn die Parkleitung angeschlossen ist, erscheint nach dem Bremsen das Video auf dem kleinen Bildschirm des vorderen Bedienfelds. 2. Verbinden Sie die Klemme eines vom Hersteller mitgelieferten Erdungskabels mit der Befestigungsschraube; verbinden Sie das andere Ende des Erdungskabels mit dem negativen Pol des Netzes. Anderenfalls blinkt das Video möglicherweise auf dem Bildschirm.
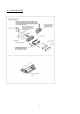
1.6 INSTALLATION INSTALLATIONSANLEITUNGEN Dies ist eine diebstahlsichere Installation. Das Gehäuse hat ein verschiebbares Metallgestell. Nehmen Sie die Anschlüsse ans Netz, der Lautsprecher und der Antenne gemäß den Anleitungen vor; installieren Sie dann gemäß der Abbildung das Metallgestell im Auto. METALLBÜGEL BEFESTIGEN SIE DAS METALLGESTELL AN DEN ENTPSRECHENDEN AUFHÄNGERN DES GESTELLS.
2. Allgemeine Funktionen 1. Gerät ein-/ausschalten Wenn das Gerät aus ist, drücken Sie die Taste POWER, um das Gerät einzuschalten. Wenn das Gerät an ist, halten Sie POWER an der Frontplatte gedrückt oder drücken Sie kurz die Taste POWER auf der Fernbedienung, um das Gerät auszuschalten. 2. Einen Betriebsmodus einstellen Wählen Sie durch Drücken der Taste MODE den Modus TUNER, USB (nach Anschluss eines USB-Geräts),Card (nach Anschluss einer MMC- oder SD-Karte), AUX oder BLUETOOTH.
9. Zurück-Taste Drücken Sie die Taste , um zum vorhergehenden Menü zurückzukehren. Drücken Sie die Menü-Taste solange, bis Sie zum Hauptmenü zurückgekehrt sind. 10. Gerät zurücksetzen Wenn die Displayanzeigen falsch sind, die Funktionstasten nicht funktionieren oder der Ton gestört ist, drücken Sie REL, um die Frontplatte abzunehmen, und drücken Sie dann mit einem zugespitzten Gegenstand die Taste RESET, um die Werkseinstellungen und alle Funktionen wiederherzustellen. 11.
3. Radiobetrieb 1. Taste BAND Drücken Sie im Modus RADIO die Taste auf der Fernbedienung oder an der Frontplatte, um ein Frequenzband FM1, FM2, FM3, AM1 oder AM2 zu wählen. Das gewählte Frequenzband wird auf dem kleinen Bildschirm der Frontplatte angezeigt. 2. Tasten TUNE/SEEK und UP/DOWN RADIO: 1) Halten Sie die Pfeiltasten UP/DN gedrückt, um automatisch auf der aktuellen Frequenz vorwärts/rückwärts nach verfügbaren Sendern zu suchen.
2) Falls die Signale der lokalen Radiosender zu stark sind, kann dies zu Störungen führen. Drücken Sie die Taste, um die LOC-Funktion zu aktivieren; im LCD-Display erscheint das LOC-Symbol. Stellen Sie lokale Sender ggf. neu ein. 7.
4. USB- und MMC/SD-Wiedergabe Schließen Sie an die jeweiligen Anschlüsse ein USB-Gerät oder eine MMC/SD-Karte an; auf dem Bildschirm wird das Hauptmenü angezeigt. Falls auf dem USB-Gerät oder der MMC/SD-Karte Audiodateien gespeichert sind, werden diese automatisch abgespielt. Drücken Sie während der Wiedergabe zweimal die Taste STOP, um die Wiedergabe zu beenden. Ziehen Sie dann das USB-Gerät heraus, oder drücken Sie auf die Karte und ziehen sie dann heraus.
: Gleiche Funktion wie die Taste ZOOM auf der Fernbedienung. : Standbilder schrittweise abspielen; drücken Sie >II, um die normale Wiedergabe fortzusetzen. : Kapitel/Titel 0-9 wählen und durch Drücken von OK die Auswahl abspielen. Hinweis: Halten Sie während der Wiedergabe die Tasten -10 oder +10 gedrückt, um den vorhergehenden oder nächsten Ordner für die Wiedergabe auszuwählen. Falls es nur einen Ordner gibt, ist diese Funktion ungültig. 4.
4.5 Kapitel/Titel über das Hauptmenü wählen Während der Wiedergabe von MP3/WMA wird auf dem Bildschirm die ganze Zeit über das Hauptmenü angezeigt. Drücken Sie während der Wiedergabe von MP4/JPEG die Taste STOP, um zum Hauptmenü zurückzukehren. Unten im Hauptmenü kennzeichnet der linke Datei-Icon die Audiodateien; der mittlere Datei-Icon kennzeichnet Bilddateien, und der rechte Datei-Icon die Videodateien.
1. Drücken Sie an dem Punkt (A), wo die zu wiederholende Sequenz starten soll, die Taste A-B. Drücken Sie die Taste erneut an dem Punkt (B), wo die zu wiederholende Sequenz zu Ende ist. Die Sequenz wird dann wiederholt abgespielt. 2. Drücken Sie die Taste A-B ein drittes Mal, um die Abschnittswiederholung A-B zu beenden und die normale Wiedergabe fortzusetzen. Die Wiederholung A-B ist nicht im Bildmodus verfügbar. 4.
4.14 Programmierte Wiedergabe Im Modus MP3/WMA können Sie Kapitel/Titel in einer gewünschten Reihenfolge für die Wiedergabe programmieren. 1. Drücken Sie während der Wiedergabe die Taste PROG, um folgendes Interface zu öffnen: 2. Navigieren Sie mit den Pfeiltasten auf das gewünschte Feld für die Eingabe der Titelnummer. 3. Geben Sie mit den Nummerntasten die Nummer des Titels/Kapitels/Tracks und die Sequenz ein. 4.
4. Öffnen Sie mit der Pfeiltaste > die gewählte Option. Stellen Sie mit den Tasten v oder ^ den gewünschten Modus für die gewählte Option ein; bestätigen Sie mit OK. * Durch Drücken von < kehren Sie zum übergeordneten Menü zurück. * Drücken Sie SETUP erneut, um das System-Menü zu schließen. Im System-Menü gibt es insgesamt 6 Setupseiten: 4.16.1 Seite SYSTEM SETUP Option TV TYPE Stellen Sie mit dieser Option die passende Bildschirmgröße des Fernsehers ein.
Option AUDIO LANG Wählen Sie eine Audiosprache aus. Option SUBTITLE LANG Wählen Sie eine Untertitelsprache aus. Option MENU LANG Wählen Sie eine Menüsprache aus. 4.16.3 Seite AUDIO SETUP Option KEY Wählen Sie den allgemeinen Ton aus (von niedrig bis hoch). 4.16.4 Seite VIDEO SETUP Option BRIGHTNESS Stellen Sie die Helligkeit für die Videoausgabe ein. Option CONTRAST Stellen Sie den Kontrast für die Videoausgabe ein. Option SATURATION Stellen Sie die Sättigung für die Videoausgabe ein.
4.16.5 Seite SPEAKER SETUP Option DOWNMIX Wählen Sie den gewünschten Soundeffekt für den Fall, dass kein mittlerer Lautsprecher oder Subwoofer vorhanden ist. Es gibt 3 Modi: LT/RT, STEREO, VSS. LT/RT: Wenn Sie ein Medium mit PRO LOGIC Dolby Stereo abspielen, wählen Sie diesen Modus, so dass das Audiosignal mit einem lebhaften Theatereffekt wiedergegeben wird. STEREO: Wählen Sie diesen Modus, damit während der 5.
5. BLUETOOTH FREISPRECHANLAGE 1. Den Bluetooth-Modus einstellen Wenn Sie den Bluetooth-Modus mit der Taste MODUS oder über das Modus-Menü einstellen, wird das Bluetooth-Interface wie rechts abgebildet geöffnet. Halten Sie BAND gedrückt, um Shift zu aktivieren und um auszuwählen. 2. Pairing und Verbindung 1) Stellen Sie am Handy den Bluetooth-Modus ein; 2) Wählen und öffnen Sie die Option zur Suche eines Bluetooth-Geräts.
(2) Drücken Sie kurz TEL, um die Nummer zu wählen. 5.3 Wahlwiederholung Drücken Sie kurz REDIAL oder tippen Sie auf den Icon 6. , um die zuletzt gewählte Nummer zu wählen. Anruf annehmen/ablehnen/beenden 6.1 Drücken Sie, wenn das Telefon klingelt, kurz die Taste TEL, um den Anruf anzunehmen; 6.2 Drücken Sie, wenn das Telefon klingelt, die Taste HANGUP, um den Anruf abzulehnen; 6.3 Drücken Sie während des Anrufs kurz die Taste HANGUP, um den Anruf zu beenden.
6. Problembeseitigung Lesen Sie das Benutzerhandbuch vor dem Gebrauch des Spielers sorgfältig durch. Versuchen Sie, etwaige Probleme anhand der nachfolgenden Anleitungen zu lösen. Wenn die Probleme dennoch nicht gelöst werden können, kontaktieren Sie das Unternehmen oder den von uns autorisierten Kundendienst. Aus Sicherheitsgründen darf die Abdeckung nicht geöffnet oder der Spieler von Ihnen selbst repariert werden, anderenfalls besteht die Gefahr eines Stromschlags.
7. Technische Daten Allgemeine Informationen Netzspannung...........................................................DC 12V Max. Ausgangsleistung.............................................4 x 25W Abmessungen (B x H x T..........................................178 x 50 x 110 mm USB/KARTE Format.......................................................................MP4/JPEG/MP3/WMA Videoausgabe .......................................................NTSC/PAL/AUTO Audiosystem....................................
CS-440BT Manuel d’instruction SYSTÈME AUDIO DE VOITURE 4 EN 1 AVEC USB/CARTE/BT/RADIO Remarque : Toute information est sujette à changement sans notification préalable 44
Table des matières 1. Avant d’utiliser......................................................................................................................46 1.1 Précautions............................................................................................................46 1.2 Information des piles de la télécommande.............................................................46 1.3 Description de la télécommande............................................................................47 1.
1. Avant l’utilisation 1,1 Précautions 1. Lisez ce manuel d’instruction dans son intégralité avant d’installer et d’utiliser. 2. Nettoyez le panneau et le boitier avec un linge sec et doux seulement, n’appliquez aucun alcool ou spray dissolvant. 3. L’appareil ne doit pas être exposé aux suintements ou aux éclaboussures. 1,2 Informations sur les piles de la télécommande Remplacer les piles de la télécommande 1.
1.3 Description de la télécommande 16. SEARCH BUTTON 17. RDM BUTTON 18. RPT BUTTON 19. SUBTITLE/REDIAL BUTTON 20. LOUD BUTTON 21. ST/# BUTTON 22. ZOOM BUTTON 23. AUDIO BUTTON 24. CLK BUTTON 25. A-B BUTTON 26. TEL BUTTON 27. EQ BUTTON 1. BACK OFF BUTTON 2. MENU BUTTON 3. POWER BUTTON 4. ^ BUTTON 5. >>| BUTTON 6. > BUTTON 7. |<< BUTTON 8. v BUTTON 9. SEL BUTTON 10. PLAY/PAUSE BUTTON 11. NUMBER(0~10,+10, -10) BUTTONS 12. 10+/PTY BUTTON 13. SETUP BUTTON 14. MODE BUTTON 15. APS/HANG UP BUTTON 28.
1.4 Emplacement et nom des commandes Panneau de commande frontal Boitier frontal après avoir enlevee le panneau frontal 1. TOUCHE POWER/MUTE 2. TOUCHE MODE 3. TOUCHES HAUT/BAS 4. TOUCHE SEL/VOL 5. LCD 6. BOUTON REL 7. TOUCHE BAND 8. TOUCHE APS 9.TOUCHE LECTURE/PAUSE 10. TOUCHE 2/INT 11. TOUCHE 3/RPT 12. TOUCHE 4/RDM 13. TOUCHE 5/-10 14. TOUCHE 6/+10 48 15. PRISE AV IN 16. PRISE USB 17. Fente carte 18. BOUTON DE RÉINITIALISATION 19. Indicateur DEL 20. TOUCHE TA/AF 21.
1.5 Description du boitier arrière Remarque: 1. Apres avoir connecté la ligne de stationnement, la vidéo sur le petit moniteur sur le panneau frontal ne s’affichera qu’après avoir gare la voiture. 2. Utilisez les pinces aux extrémités d’une ligne de terre fournie par le fabricant pour connecter les boulons de vis de fixation, utilisez l’autre extrémité de la Ligne de Terre pour connecter au pole négatif de la source d’alimentation. Autrement la vidéo sur l’écran risque de clignoter.
1,6 INSTALLATION DE L’UNITE MÉTHODE D’INSTALLATION Il s’agit d’une méthode d’installation pour protéger contre les vols L’unité principale doit être dotée d’une GAINE DE MONTAGE EN METAL. Connectez les fils, ex : l’alimentation, les haut-parleurs et l’antenne conformément aux explications de ce manuel d’instruction, puis installez la gaine de montage métal dans la voiture comme sur le Repliez les onglets sur la schéma ci-dessous.
2. Opération basique 1. Allumer / éteindre l’unité L’appareil éteint, appuyez sur la touche POWER pour allumer l’unité. L’appareil allumé, maintenez la touche POWER allumé sur le panneau frontal ou appuyez brièvement sur la touche POWER sur la télécommande pour éteindre l’unité. 2. Sélectionner le mode de fonction Appuyez sur la touche mode pour sélectionner entre les modes TUNER, USB (après avoir inséré une clé USB), Carte (après avoir inséré une carte MMC ou SD), AUX, ou BLUETOOTH.
10. Réinitialiser l’unité. Lorsque le moniteur sur le petit écran LCD s’affiche mal ou que certaines touches ne sont plus accessibles ou que le son est distordu, appuyez sur la touche REL sur le panneau frontal pour détacher celui-ci et tirez-le vers la droite puis sur la gauche pour l’enlever, ensuite appuyez sur la touche RESET pour réinstaller les programmes sur leur configuration initiale, et réinstaller les fonctions correctes. 11.
3. Utilisation de la radio 1. TOUCHE BAND En mode radio, appuyez sur la touche BAND sur la télécommande pour sélectionner la fréquence radio de votre choix entre Fm1, Fm2, Fm3, Am1 et Am2, et le mot signifie quelle station est sélectionnée apparaitre sur le petit moniteur sur le panneau frontal. 2. TOUCHES TUNE/SEEK UP/DOWN En mode RADIO : 1) Maintenez les touches HAUT/BAS appuyées pour rechercher automatiquement vers le bas ou le haut une station disponible à partir de la fréquence actuelle.
2 ) En mode Radio, lorsque les signaux des stations radio distantes sont très forts et que cela cause des interférences lors du réglage, appuyez sur cette touche pour activer la fonction LOC, et l’icone LOC apparaitra sur le LCD puis réglez de nouveau la station de radio de votre choix. 7.
4. UTILISATION MMC/SD et USB Insérez une clé USB ou une carte SD/MMC dans leurs fentes respectives, alors le menu racine s’affiche à l’écran et les fichiers audio contenus dans la clé USB ou la carte MMC qui en contiennent seront lus automatiquement. Pendant la lecture, appuyez sur la touche STOP deux fois pour arrêter la lecture, puis retirez la clé USB de la fente USB ou appuyez sur la carte puis tirez-la de la fente pour carte. Maintenez BAND appuyé pour activer SHIFT. : Met la lecture en pause.
: Lecture cran par cran, sélectionnez >|| pour reprendre la lecture normale. : Sélectionnez la piste / chapitre entre 0-9 puis sélectionnez OK pour commencer la lecture Remarque: Durant la lecture, maintenez -10 +10 appuyé pour sélectionner le fichier suivant ou précédent. S’il n'y a qu’un seul dossier, ces touches sont invalides.
Lors de la lecture de fichier JPEG, appuyez sur l’une des flèches de direction (>/: 90 deg cw; <: 90deg ccw; ^:HAUT<-->BAS; v: GAUCHE<-->DROITE 4,6 Lecture rapide En mode MP4, MP3, WMA, pendant la lecture normale, maintenez les touches HAUT/BAS appuyées pour avancer ou reculer rapidement aux vitesses suivantes : x2, x4, x8. x20, normal. Pendant la lecture rapide, appuyez sur la touche LECTURE pour reprendre la lecture normale.
4.10 Lecture aléatoire En mode MP3/WMA, appuyez sur la touche RDM pour circuler entre Random ON/OFF. En mode Random, la lecture se fera de manière aléatoire. En mode MP4/JPEG, la touche RDM sera invalide. 4.11 Zoom Vidéo/image En mode MP4/JPEG, pendant la lecture, appuyez sur la touche ZOOM de manière continue pour agrandir ou rétrécir les images vidéo aux multiples suivants : 2x, 4x, 8x, 1/2x, 1/4x, 1/8x, ETEINT.
3. Utilisez les touches numériques pour saisir le numéro du titre/chapitre/piste suivant dans l’ordre de votre choix. 4. Utilisez les touches directionnelles pour déplacer le curseur sur l’élément lecture, puis appuyez sur la touche OK pour lire les titres/chapitres/pistes dans l’ordre programmés; vous pouvez aussi appuyer simplement sur la touche LECTURE pour lire les titres/chapitres/pistes dans l’ordre programmés.
4.16.1 CONFIGURATION SYSTEME Type de TV L’élément de configuration permet de correspondre à la taille de l’écran. 4:3 PS: Choisissez cet élément lorsque vous connectez un téléviseur avec écran 4 :3. lorsque vous diffusez des images de taille 16 :9 , les parties gauches et droite de la vidéo seront coupées, et affichées en plein écran. 4:3 LB: Choisissez cet élément lorsque vous connectez un téléviseur avec écran 4 :3.
4.16.3 PARAMETRES AUDIO TOUCHES Cela sert à sélectionner la tonalité de votre choix pour les touches (de faible a fort) 4.16.4 CONFIGURATION VIDEO LUMINOSITE Cela sert à régler la luminosité de la sortie vidéo. CONTRASTE Cela sert à régler le contraste de la sortie vidéo. SATURATION Cela sert à régler la saturation de la sortie vidéo. NUANCE Cela sert à régler les nuances de la sortie vidéo. 4.16.
LT/RT (Gauche/Droite): Lorsque vous lisez un disque avec effet Dolby stéréo PRO LOGIC, choisissez cet élément afin que la sortie soit d’effet théâtre vivid STEREO : Si vous choisissez cet élément, lorsque vous émettrez des signaux audio 5.1 Canaux, les canaux gauche et droite seront émis, lorsque vous émettez des signaux 2 canaux, les deux canaux stéréo normaux seront émis VSS: Si vous choisissez cet élément, lorsque vous jouerez un disque enregistré en 5.
5. SYSTEME MAINS LIBRES BLUETOOTH 1. Entrer en mode Bluetooth Lorsque vous utilisez la touche MODE, ou le menu de sélection de mode, l’interface BLUETOOTH apparaitra comme sur l’image à droite Maintenez BAND appuyé pour activer Shift et sélectionner 2. Couplage et connexion Activez le mode Bluetooth du téléphone portable ; Sélectionnez l’élément de recherche d'appareil Bluetooth et entrez dedans. Après que la recherche soit terminée, les noms des appareils Bluetooth apparaitront s’il y en a.
5.3 Pour rappeler le dernier numéro composé Appuyez sur la touche REDIAL brièvement ou touchez l’icône 6. pour valider le numéro de téléphone. Accepter/rejeter/terminer l’appel 6.1 Lorsque le téléphone sonne, appuyez sur la touche TEL pour accepter l’appel ; 6.2 Lorsque le téléphone sonne, appuyez sur la touche HANGUP pour rejeter l’appel ; 6.3 Durant la conversation, appuyez sur la touche HANGUP brièvement pour terminer l’appel ; Remarque: Lors de la sonnerie le numéro de téléphone s’affiche.
6. Résolution des problèmes Veuillez lire le manuel de l’utilisateur attentivement avant d’utiliser ce lecteur. Si vous avez des soucis pour utiliser ce lecteur, essayez de résoudre les problèmes à l’aide des suggestions ci-dessous. si vous ne pouvez pas résoudre les problèmes après avoir utilisé toutes les suggestions, merci de contacter notre entreprise ou l’un de nos centres de réparation autorisé.
7. Spécifications Spécifications générales Tension d’alimentation...................................................DC 12V Puissance de sortie maximale.......................................4 x 25W Dimensions(w x h x d)....................................................178 x 50 x 110mm Spécification CARTE/USB Format............................................................................MP4/JPEG/MP3/WMA Système de sortie video………………………….........…NTSC/PAL/AUTO Système audio...............................
CS-440BT Manual de Instrucciones SISTEMA DE AUDIO PARA COCHE 4 EN 1 CON REPRODUCTOR DE TARJETAS/USB/BT/RADIO Aviso: Cualquier información queda sujeta a cambios sin notificación previa 67
Contenidos 1. Antes del uso................................................................................................................69 1.1 Precauciones..................................................................................................69 1.2 Información sobre la pila del mando a distancia.............................................69 1.3 Descripción del mando a distancia.................................................................70 1.
1. Antes del uso 1.1 Precauciones 1. Lea este manual de instrucciones antes del uso y la instalación. 2. Limpie el panel y el exterior del aparato con un trapo suave y seco. No aplique disolventes, alcohol ni espráis de ningún tipo. 3. No exponga el aparato a goteos ni salpicaduras . 1.2 Información sobre la pila del mando a distancia Sustitución de la pila del mando a distancia: 1.
1.3 Descripción del mando a distancia 16. BOTÓN SEARCH 17. BOTÓN RDM 18. BOTÓN RPT 19. BOTÓN SUBTITLE/REDIAL 20. BOTÓN LOUD 21. BOTÓN ST/# 22. BOTÓN ZOOM 23. BOTÓN AUDIO 24. BOTÓN CLK 25. BOTÓN A-B 26. BOTÓN TEL 27. BOTÓN EQ 1. BOTÓN DE REGRESO 2. BOTÓN MENU 3. BOTÓN PWR 4. BOTÓN ^ 5. BOTÓN >>| 6. BOTÓN > 7. BOTÓN |<< 8. BOTÓN v 9. BOTÓN SEL 10. BOTÓN REPR/PAUSA 11. BOTONES NUMÉRICOS (0~10,+10, -10) 12. BOTÓN 10+/PTY 13. BOTÓN SETUP 14. BOTÓN MODE 15. APS/HANG UP BUTTON 28. BOTÓN LOC/SLOW-FWD/* 29.
1.4 Localización y nombre de los controles de la unidad Ilustración del panel frontal Cara frontal después de extraer el panel 1. Botón PWR/MU 2. Botón MODE 3. Botones UP / DN 4. Botón SEL/VOL 5. Display LCD 6. Botón REL 7. Botón BND 8. Botón APS 9.1 Botón/REPR/PAUSA 10. Botón 2/INT 11. Botón 3/RPT 12. Botón 4/RDM 13. Botón 5/-10 14. Botón 6/+10 15. TOMA AV IN 16. TOMA USB 17. Ranura para tarjetas 18. Botón RESET 19. Indicador LED 20. Botón TA/AF 21. Sensor infrarrojo del mando a distancia 22.
1.5 Descripción de la parte posterior de la unidad CABLE DE MARCHA ATRÁS PERNO DE FIJACIÓN TOMA DE SALIDA DE VÍDEO Nota: 1. Nota: después de conectar el cable del freno de mano, el vídeo del pequeño monitor del panel frontal se mostrará solo después de aplicar el freno. 2. Emplee el extremo de un cable de toma de tierra suministrado por el fabricante para conectar el perno de fijación. Use el otro extremo del cable de toma de tierra para conectar el polo negativo de la fuente de alimentación.
1.6 INSTALACIÓN DE LA UNIDAD ESTA ES UNA INSTALACIÓN ANTIRROBO. EL CHASIS DE LA UNIDAD INCORPORA UNA ESTRUCTURA METÁLICA DESLIZANTE.
2. Funcionamiento básico 1. Para encender/apagar la unidad En el modo de apagado, pulse el botón POWER para encender la unidad. En el modo de encendido, mantenga pulsado el botón POWER del panel frontal o pulse el botón PWR del mando a distancia para apagar la unidad. 2. Para seleccionar el modo de funciones Pulse el botón MODE para seleccionar los modos TUNER, USB (después de conectar una unidad USB), TARJETA (después de introducir una tarjeta MMC o SD) AUX o BLUETOOTH.
Menú Principal. 10. Para llevar a cabo un "Reset" de la unidad Cuando el display LCD falle, o algunos botones no respondan, o el sonido se distorsione, pulse el botón REL del panel frontal para separar el panel y retirarlo, a continuación, use un objeto puntiagudo para pulsar el botón RESET y restablecer el estado inicial del sistema, después de lo cual, los posibles errores se habrán corregido. 11.
3. Funcionamiento de la radio 1. BOTÓN BAND En el modo RADIO, pulse el botón BAND del mando a distancia para seleccionar su banda de radio deseada: FM1, FM2, FM3, AM1 y AM2, y la banda seleccionada se mostrará en el pequeño monitor del panel frontal. . 2. BOTONES SINTONIZACIÓN/BÚSQUEDA ARRIBA/ABAJO En el modo RADIO: 1) Mantenga pulsado el botón UP/DN para buscar automáticamente hacia arriba/abajo una emisora disponible desde la emisora en la que se encuentre.
2) Cuando las señales de las emisoras de radio locales sean demasiado intensas, esto podría causar interferencias. Pulse este botón para activar la función LOC y mostrar la palabra LOC en el display LCD, después sintonice de nuevo las emisoras de radio locales. 7.
guardarse solo cuando se haya recibido el código de identificación del programa de tráfico. 4. Funcionamiento con USB y tarjetas MMC/SD Conecte una unidad USB o introduzca una tarjeta MMC/SD en sus respectivas ranuras, entonces se mostrará el menú raíz en el monitor y los archivos de audio se reproducirán automáticamente si la unidad USB o la tarjeta USB o MMC/SD contienen archivos de audio.
ángulo de reproducción. (Solo para el modo imagen.) : Misma función que el botón ZOOM del mando a distancia. : Tóquelo para reproducir fotograma a fotograma, seleccione >II para pasar a la reproducción normal. : Para seleccionar las pistas/capítulos de 0 a 9, a continuación, pulse OK para reproducir su selección. . Nota: Durante la reproducción, mantenga pulsado el botón -10,+10 para seleccionar la carpeta anterior o siguiente para su reproducción.
En la parte inferior del menú raíz, el icono de tipo de archivo de la izquierda es para archivos de audio; el icono de tipo de archivo del medio es para archivos de imágenes; el icono de tipo de archivo de la derecha es para archivos de vídeo. Si uno de estos 3 tipos de archivo no existiera, no será posible desplazar el cursor hasta el icono del tipo de archivo.
En el modo JPEG no habrá función de repetición de A-B. 4.
siguiente: 2. Use los botones direccionales para desplazar el cursor hasta el espacio deseado para introducir la secuencia de números. 3. Use los botones numéricos para introducir la secuencia numérica deseada de títulos/capítulos/pistas. 4.
* Pulse el botón < para regresar al nivel anterior. * Para el menú del sistema, hay en total 6 páginas de configuración. Se mostrarán de la forma siguiente: 4.16.1 CONFIGURACIÓN DEL SISTEMA TIPO DE TV El elemento de configuración sirve para hacer coincidir el tamaño de la pantalla del TV. 4:3 PS: Elija este elemento cuando se conecte a un TV cuya pantalla es del tipo 4:3.
En este elemento podrá seleccionar el idioma del menú. 4.16.3 CONFIGURACIÓN DE AUDIO CLAVE (KEY) Para seleccionar su tono de música básico (de bajo a alto). 4.16.4 CONFIGURACIÓN DE VÍDEO BRILLO (BRIGHTNESS) Para ajustar el vídeo de la salida de vídeo. CONTRASTE (CONTRAST) Para ajustar el contraste de la salida de vídeo. SATURACIÓN (SATURATION) Para ajustarla saturación de la salida de vídeo. COLOR (HUE) Para ajustar el color de la salida de vídeo. 4.16.
DOWNMIX Aquí podrá seleccionar el efecto de sonido que desee cuando no haya altavoz central ni subwoofer. Hay 3 modos: LT/RT, STEREO, VSS. LT/RT: Cuando reproduzca un disco con efecto Dolby estéreo PRO LOGIC, elija esta opción para reproducir una señal de audio con un efecto cinematográfico muy realista. STEREO: Si elije esta opción, cuando reproduzca una señal de audio con canales 5.
5. SISTEMA BLUETOOTH MANOS LIBRES 1. Para entrar en el modo Bluetooth Cuando use el botón MODE o el Menú de Modo para entrar en el modo Bluetooth, se mostrará la interfaz de Bluetooth como se puede ver a la derecha. Mantenga pulsado el botón BAND para activar Shift, a continuación, realice la selección. 2. Emparejamiento y conexión 1) Active el modo Bluetooth del teléfono móvil; 2) Seleccione el elemento de Búsqueda de Dispositivos Bluetooth y entre en él.
(2) Pulse TEL para realizar la llamar después de introducir los números. 5.3 Para volver a marcar el último número de teléfono (Rellamada) Pulse el botón REDIAL o toque sobre el icono 6. para validar el último número de teléfono. Aceptar/Rechazar/Finalizar una llamada 6.1 Cuando suene, pulse el botón TEL para aceptar la llamada; 6.2 Cuando suene, pulse COLGAR para rechazar la llamada; 6.3 Cuando esté en una conversación, pulse COLGAR para finalizar la llamada.
6. Localización y resolución de problemas Por favor, lea el manual del usuario atentamente antes de usar el reproductor. Si tuviera problemas usando este reproductor, intente resolverlos después de leer las sugerencias mencionadas a continuación. Si después de hacerlo, persistiera el problema, por favor, contacte con nuestra empresa o con un centro de servicio técnico autorizado por nosotros.
7. Especificaciones Especificaciones generales Requisitos de alimentación..................................................DC 12V Potencia máxima de salida..................................................4 x 25W Dimensiones(an x al x pr)....................................................178 x 50 x 110mm Especificaciones de USB/TARJETA Formato................................................................................MP4/JPEG/MP3/WMA Sistema de vídeo.....................................................
CS-440BT Handleiding 4 IN 1 AUDIOSYSTEEM VOOR IN AUTO MET KAART/USB/BT/RADIO Opmerking: Alle informatie onderhevig aan verandering zonder verdere kennisgeving 90
Inhoudsopgave 1. Vóór gebruik.....................................................................................................................92 1.1 Voorzorgsmaatregelen........................................................................................92 1.2 Informatie over batterij in afstandsbediening.......................................................92 1.3 Beschrijving van de afstandsbediening...............................................................93 1.
1. Vóór gebruik 1.1 Voorzorgsmaatregelen 1. Lees deze handleiding vóór installatie en gebruik zorgvuldig door. 2. Reinig het paneel en de hoes alleen met een droge doek, gebruik geen thinner, alcohol of sprays. 3. Het apparaat mag niet worden blootgesteld aan druppend of spattend water. 1.2 Informatie over batterij in afstandsbediening De batterij in de afstandsbediening vervangen: 1.
1.3 Beschrijving afstandsbediening 16. SEARCH 17. RDM 18. RPT 19. SUBTITLE/REDIAL 20. LOUD 21. ST/# 22. ZOOM 23. AUDIO 24. CLK 25. A-B 26. TEL 27. EQ 1. BACK OFF 2. MENU 3. POWER 4. ^ 5. >>| 6. > 7. |<< 8. v 9. SEL 10. PLAY/PAUSE 11.NUMERIEKE TOETSEN(0~10,+10, -10) 12. 10+/PTY 13. SETUP 14. MODE 15. APS/HANG UP 28. LOC/SLOW-FWD/* 29. MUTE 30. STOP 31. VOLUME32. < 33. OK 34. VOLUME+ 35. BAND/SHIFT 36. PROG 37. OSD 38. AF 39.
1.4 De plaatsing en benaming van de bedieningselementen op het apparaat Het voorpaneel De voorkant van het apparaat na het verwijderen van het voorpaneel 1. POWER/MUTE 2. MODE 3. UP / DN S 4. SEL/VOL 5. LCD 6. REL 7. BAND 8. APS 9.1/PLAY/PAUSE 10. 2/INT 11. 3/RPT 12. 4/RDM 13. 5/-10 14. 6/+10 15. AV INGANG 16. USB-poort 17. Kaartsleuf 18. RESET 19. LED-indicator 20. TA/AF 21. IR-Afstandsbedieningssensor 22.
1.5 Beschrijving van de achterkant Opmerking: 1. Na het aansluiten van de parkeerdraad, zal de video alleen op de kleine monitor van het voorpaneel worden getoond nadat er is geremd. 2. Sluit het uiteinde met klem van een aardekabel die is geleverd door de fabrikant aan op de bout om de schroef vast te zetten. sluit het andere uiteinde van de aardekabel aan op de negatieve pool van de voeding. Als u dit niet doet, dan kan het beeld knipperen.
1.6 INSTALLATIE APPARAAT INSTALLATIE-INSTRUCTIES Het apparaat dat u gaat installeren is een apparaat met diefstalbeveiliging. Het chassis van het apparaat heeft een gladde metalen behuizing. Maak de stroomaansluiting en de verbinding met de, luidsprekers en antenne volgens de instructies in de handleiding, installeer vervolgens de metalen behuizing als volgt in de auto. SELECTEER DE JUISTE Om het overslaan of vastlopen van discs te verminderen, bevestig de metalen beugel stevig aan het chassis van de auto.
2. Algemene bediening 1. Het apparaat in-/uitschakelen Druk als het apparaat is uitgeschakeld op POWER om het apparaat in te schakelen. Houd, als het apparaat is ingeschakeld, POWER ingedrukt op het voorpaneel of druk kort op POWER op de afstandsbediening om het apparaat uit te schakelen. 2. De functiemodus selecteren Druk op MODE om de TUNER-, USB- (na het plaatsen van een USB-apparaat), Kaart- (na het plaatsen van een MMC- of SD-kaart) AUX- of BLUETOOTH- modus te selecteren.
9. Terugkeren naar het vorige menu Druk op om terug te gaan naar het vorige menu, druk herhaaldelijk op de knop om helemaal terug te gaan naar het hoofdmenu. 10. Het apparaat resetten Als de monitor of het kleine LCD-display een verkeerde weergave geven of als sommige toetsen niet werken of als het geluid is vervormd, druk dan op REL op het voorpaneel om het voorpaneel los te koppelen en te verwijderen.
3. Bediening radio 1. DE BAND-TOETS Druk in de RADIO-modus op BAND op de afstandsbediening of op het voorpaneel om de gewenste radioband te selecteren, FM1, FM2, FM3, AM1 of AM2. De geselecteerde band wordt getoond op de kleine monitor van het voorpaneel. 2. DE TOETSEN VOOR OMHOOG/OMLAAG AFSTEMMEN/ZOEKEN In RADIO-modus: 1) Houd OMHOOG/OMLAAG ingedrukt om vanaf de huidige frequentie automatisch naar een zender met een hogere/lagere frequentie te zoeken.
Druk kort op PTY om een van de volgende modi te selecteren: PTY MUZIEK-groep - - PTY SPRAAK-groep - - PTY UITGESCHAKELD (OFF) Als er een PTY-groep is ingeschakeld, draai dan aan de VOL-knop of druk op + of – om een van de PTY programma’s te selecteren: <-->NIEUWS<-->ZAKEN<-->INFO<-->SPORT<-->EDUCATIE<-->DRAMA <-->CULTUUR<-->WETENSCHAP<--> GEVARIEERD<-->WEER<--> FINANCIEN <-->KINDEREN<-->SOCIAAL<-->RELIGIE<-->INBEL<-->REIZEN <-->VRIJE TIJD<-->DOCUMENT< -->GEEN PTY<-->POP M< -->ROCK M <-->EASY M<-->LIGHT M<--
4. Bediening bij afspelen USB en MMC/SD Plaats een USB-apparaat of MMC/SD-kaart in de juiste aansluiting, daarna zal het hoofdmenu worden getoond op de monitor en het apparaat zal automatisch audiobestanden afspelen als er audiobestanden op het USB-apparaat of de MMC/SD-kaart staan. Druk tijdens het afspelen twee keer op STOP om het afspelen te stoppen en haal vervolgens het USB-apparaat uit de USB-poort of druk op de kaart en trek deze uit de kaartsleuf.
: Dezelfde werking als ZOOM op de afstandsbediening. : Selecteer dit icoontje om stap voor stap af te spelen, selecteer >II om het normaal afspelen te hervatten. : Selecteer track/hoofdstuk 1-9 en druk op OK om af te spelen. Opmerking: Houd tijdens het afspelen -10,+10 ingedrukt om naar de vorige of volgende map te gaan. Als er maar één map is, dan hebben deze toetsen geen functie. 4.
audiobestanden; het middelste icoontje is voor afbeeldingen; het icoontje aan de rechterkant is voor videobestanden. Als een van deze 3 bestandssoorten niet bestaat, dan kunt u de cursor niet naar het icoontje van de desbetreffende bestandssoort verplaatsen.
4.
1. Druk tijdens het afspelen op PROG om het programma menu te openen, dit ziet er als volgt uit: 2. Gebruik de navigatietoetsen om de cursor te verplaatsen naar de gewenste positie voor het invoeren van het nummer 3. Gebruik de numerieke toetsen om het gewenste nummer van de titel/hoofdstuk/track in te voeren op de geselecteerde positie. 4.
* Druk op < om terug te keren naar het bovenliggende menu. * Druk nogmaals op SETUP om het instellingenmenu te verlaten. Het instellingenmenu heeft 6 instellingenpagina’s. Deze hebben de volgende opties: 4.16.1 SYSTEEMINSTELLINGEN TV TYPE Deze instelling moet overeenkomen met de grootte van het TV-scherm. 4:3 PS: Selecteer deze optie als het apparaat wordt aangesloten op een TV met 4:3 scherm.
4.16.3 AUDIO-INSTELLINGEN KEY Dit is voor het selecteren van de gewenste basismuziektonen (van laag tot hoog). 4.16.4 VIDEO-INSTELLINGEN BRIGHTNESS Dit is voor het instellen van de helderheid van het beeld. CONTRAST Dit is voor het instellen van het contrast van het beeld. SATURATION Dit is voor het instellen van de verzadiging van het beeld. HUE Dit is voor het instellen van de tint van het beeld. 4.16.
STEREO: Als u dit item selecteert, zullen bij het weergeven van 5.1-kanaals audiosignalen de linker- en rechterkanalen worden weergegeven; bij uitvoer van een signaal met 2 kanalen zullen de algemene 2 kanalen van het stereosignaal worden weergegeven. VSS: Als u dit item selecteert, dan zullen de hoofdluidsprekers de audio van media met 5.1-kanaals audiosignalen weergeven met VSS-effect. 4.16.6 DIGITALE INSTELLINGEN OP MODE Dit is voor het selecteren van de audioweergavemodus.
5. BLUETOOTH HANDSFREE-SYSTEEM 1. Open de Bluetooth-modus Gebruik MODE of het modusmenu om de Bluetooth-modus te openen. Het Bluetooth-menu verschijnt, zoals getoond in de afbeelding rechts. Houd BAND ingedrukt om SHIFT in te schakelen en selecteer daarna. 2. Pairen en verbinding maken 1) Schakel de Bluetooth-modus van de telefoon in; 2) Selecteer het item Finding the Bluetooth Device en open het item.
Druk kort op REDIAL of tik op het icoontje 6. om het laatste telefoonnummer te valideren. Oproep accepteren/weigeren/beëindigen 6.1 Druk als de telefoon gaat kort op TEL om de oproep te accepteren; 6.2 Druk als de telefoon gaat kort op HANGUP om de oproep te weigeren; 6.3 Druk tijdens het telefoongesprek kort op HANGUP om de oproep te beëindigen. Opmerking: Als de telefoon gaat, dan zal het nummer worden getoond.
6. Problemen oplossen Lees de handleiding zorgvuldig door voordat u deze speler gebruikt. Als u problemen heeft bij het gebruik van de speler, probeer deze problemen dan op te lossen met behulp van de onderstaande suggesties. Als u de problemen niet kunt oplossen met de suggesties, neem dan contact op met ons bedrijf of een geautoriseerde technische dienst. In het belang van uw eigen veiligheid, open de behuizing en repareer de speler niet zelf. Dit kan leiden tot elektrische schokken.
7. Specificaties Algemene specificaties Voeding.................................................................DC 12V Maximaal vermogen..............................................4 x 25W(160W) Afmetingen(b x h x d)............................................178 x 50 x 110mm Specificaties USB/KAART Formaat.................................................................MP4/JPEG/MP3/WMA Videosysteem........................................................NTSC/PAL/AUTO Audiosysteem...........................