CS-455 BT _ VOL + INSTRUCTION MANUAL SEL REL CD/USB/SD/MMC/MP3 PLAYER APS MUTE MOD /PTY BND DSP AUX TOP INT RPT RDM 3 4 -10 CO M PA CT +10 DI G I TAL AU DI O 1 2 5 6 5 IN 1 CAR AUDIO SYSTEM WITH AM/FM-RDS DIGITAL PLL TUNING RADIO SD/USB/CD(ESP)/MP3 PLAYER BLUE TOOTH HANDFREE SYSTEM www.lenco.
PRECAUTIONS AND MAINTENANCE 1. If the car interior is extremely hot, as after being parked in the sun, do not use the player until the car has been driven for a while to cool off the interior. 2. The protective case is to safely keep the front panel. 3. The unit is designed for negative terminal of the battery which is connected to the vehicle metal. Please confirm it before installation. 4. Do not allow the speaker wires to be shorted together when the unit is switched on.
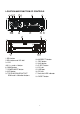
LOCATION AND FUNCTION OF CONTROLS 2 8 10 1 3 + VOL _ 5 7 SEL REL CD/USB/SD/MMC/MP3 PLAYER APS MUTE MOD /PTY BND DSP AUX TOP INT RPT RDM -10 COM PACT +10 DI GITAL AUDIO 1 4 6 2 3 11 4 9 5 6 12 15 13 14 SD 16 1.REL button 2.SEL button and VOL dial 3. LCD 4&5. I<< and >>I button 6. BAND button 7. POWER/MUTE button 8. APS button 9. TOP/PLAY/PAUSE,INT,RPT RDM and 1-6 Number buttons 18 17 10. MODE/PTY button 11. DSP button 12. AUX button 13. EJECT button 14. CD slot 15.
Basic Operation 1. REL BUTTON Press the REL button to fold down the front control panel. Then a disc can be inserted into the disc slot or ejected by pressing the EJ button. After flipping down the front panel, push it leftwards, then pull the right side of the panel outwards to remove it from the unit chassis. 2. SEL BUTTON (Select) AND VOL KNOB A) Press the SEL button briefly, it is activated as selecting each mode of E. VOL.
2)AF (ON/OFF) When AF switching mode is selected and the state of AF switching mode is displayed by AF segment in display. Segment off: AF switching mode off. Segment on: AF switching mode on, and has RDS information. Segment flashing: AF switching mode on, but RDS information is not received yet. When AF switching mode is selected, the radio checks the signal strength of AF all the time.
7)BEEP ON/BEEP OFF BEEP ON mode: The beep is generated when any key is pressed. BEEP OFF mode: The beep sound is disabled.. 8)VOL LAST/VOL DEFA VOL LAST: The radio switches on at the actual volume it had when it was last switched off. VOL DEFA: After pressing SEL button, AVOL will be displayed. Then you can pre-select a constant switch-on volume by using the VOL knob. 9)CLK ON/OFF CLK ON: Clock will always show on the display when power off. CLK OFF: Clock will disappear on the display when power off. 3.
9. PRESET STATION MEMORY AND TOP/>||, INT, RPT, RDM BUTTONS Go to any preset station by pressing one of the 6 preset station buttons (1-6). If one of these buttons is pressed for more than 2 seconds, the station currently being listened to will be memorized into the selected preset button. 10. MODE AND PTY (PROGRAM TYPE) BUTTON Press the MODE/PTY button to change among tuner (radio), disc (when a disc is loaded), SD card (when an SD card is inserted) , USB (when an USB stick is inserted) and AUX mode.
CD/MP3/USB/SD Operation 1. Skip up/down buttons Press the >>| button briefly to play next track. Press the |<< button briefly to play the current track from the beginning of it if the playing time is more than 2 seconds. Press the |<< button briefly to play the previous track if the playing time is less than 2 seconds. Press the >>| or |<< button and hold to skip forwards or backwards, release to resume normal playback. 2.
Blue Tooth Handfree System 1. Pair To pair your mobile phone with a Bluetooth device, simply activate the Bluetooth function on your mobile phone and search for devices. When the stereo has been found it should show as Car Kit, when you try to connect, it will ask for a password. The default password is 0000. When you have successfully paired your phone the message BT READY will be displayed followed by the mobile number.
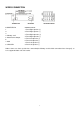
WIRES CONNECTION CONNECTOR A 1. 2. 3. 4. Memory +12V 5. Auto Antenna Output 6. 7. ACC 8. GROUND CONNECTOR B 1. Rear Right Speaker (+) 2. Rear Right Speaker (-) 3. Front Right Speaker (+) 4. Front Right Speaker (-) 5. Front Left Speaker (+) 6. Front Left Speaker (-) 7. Rear Left Speaker (+) 8. Rear Left Speaker (-) Notice: Some cars have special wires connection(the Memory and the ACC connection have changed), so here support the both sides ISO socket.
CARE FOR USING CD'S: About CD-R/CD-R/W discs: In addition to commercially-recorded audio CD's, this unit can play CD-R and CD-R/W discs. In come cases, particularly when recorded on older CD burners, some CD-R and CD-R/W discs may not play. Also, whenever you are recording a CD for playback in this receiver, it is recommended that you record at 24x or slower speed for CD-R and 4x or slower for CD-R/W to achieve higher signal quality and better playback performance. 1.
TROUBLE SHOOTING Before using the check list please make all the connections first. If you still have questions after going through the checklist, please consult your local customer service representative.
INSTALLATION 12
SPECIFICATION GENERAL Power requirement........................................................................................DC 12V. Current consumption..................................................................................10A MAX. POWER OUTPUT...................................................................................... 25W X 4. . Number of channels...................................................................................2 STEREO. Chassis dimensions............................
CS-455BT _ VOL + BEDIENUNGSANLEITUNG SEL REL CD/USB/SD/MMC/MP3 PLAYER APS MUTE MOD /PTY BND DSP AUX TOP INT RPT RDM 3 4 -10 CO M PA CT +10 DI G I TAL AU DI O 1 2 5 6 5-IN-1 KFZ-RADIO MIT MW/UKW-RDS-DIGITAL-PLL-RADIO & SD/USB/CD (ESP)/MP3-PLAYER BLUETOOTH-FREIHANDSYSTEM www.lenco.
SICHERHEITSHINWEISE UND WARTUNG 1. Wenn es im Auto besonders heiß ist, z. B. nach längerer Parkzeit in der Sonne, benutzen Sie den Player bitte erst nach dem sich das Auto verhältnismäßig abgekühlt hat. 2. Eine Schutztasche dient dem Schutz des Bedientafel. SCHUTZHÜLLE BEDIENTAFEL 3. Das Gerät wurde so konzipiert, dass der negative Anschluss der Batterie an die Karosserie angeschlossen wird. Überprüfen Sie dies bitte vor dem Einbau. 4.
ANORDUNG UND FUNKTIONEN DER BEDIENELEMENTE 2 8 10 1 3 + VOL _ 5 7 SEL REL CD/USB/SD/MMC/MP3 PLAYER APS MUTE MOD /PTY BND DSP AUX TOP INT RPT RDM -10 COM PACT +10 DI GITAL AUDIO 1 4 6 2 3 11 4 9 14 5 6 12 15 13 SD 16 1. REL-Taste 2. SEL-Taste und VOL-Regler 3. LCD-Anzeige 4 & 5. und 6. BAND-Taste 7. POWER/MUTE-Taste 8. APS-Taste 9. TOP/WIEDERGABE/PAUSE, INT, RPT RDM und Zifferntasten 1 - 6 18 17 10. MODE/PTY-Taste 11. DSP-Taste 12. AUX-Taste 13. EJECT-Taste 14.
Grundlegende Bedienung 1. REL-TASTE 2. SEL-TASTE (Auswahl) UND VOL-DREHKNOPF (Lautstärke) Betätigen Sie die REL-Taste, um die Bedientafel aufzuklappen. Sie können dann eine Disc in das Disc-Ladefach einlegen bzw. durch Betätigung der EJ-Taste auswerfen. Nach dem Umklappen der Bedientafel nach unten, drücken Sie sie nach links und ziehen sie dann die rechte Seite nach außen, um sie aus dem Gerätegehäuse zu entfernen. A) Betätigen Sie die SEL-Taste zur Auswahl des E.VOL.-Modus.
AF-Segment der Anzeige angezeigt. Segment aus: AF-Umschaltmodus aus Segment an: AF-Umschaltmodus ein + verfügbare RDS-Informationen Segment blinkt: AF-Umschaltmodus ein, RDS-Informationen werden aber noch nicht empfangen. Nachdem der AF-Modus aktiviert ist, überprüft das Radio ständig die AF-Signalstärke. Der Intervall zwischen den AFs, hängt von der Signalstärke des momentanen Sender. Das Gerät braucht dafür wenige Sekunden oder mehrere Minuten.
7) BEEP ON / BEEP OFF BEEP ON-Modus: Ein Signalton wird erzeugt, wenn eine Taste betätigt wird. BEEP OFF-Modus: Die Signalton-Funktion wird deaktiviert. 8) VOL LAST / VOL DEFA VOL LAST: Das Radio wird mit der gleichen Lautstärke eingeschaltet, mit der es ausgeschaltet wurde. VOL DEFA: Nach Betätigung der SEL-Taste, wird AVOL angezeigt. Sie können dann eine konstante Einschaltlautstärke einstellen, indem Sie den VOL-Drehknopf benutzen.
unter der ausgewählten Sendertaste gespeichert. 10. MODE UND PTY (PROGRAMMART) Betätigen Sie die MODE/PTY-Taste, um eine Betriebsart zu wählen. Die zur Verfügung stehenden Betriebsarten sind Tuner (Radio), Disc (wenn eine CD eingelegt ist), SD card (wenn eine SD-Karte eingelegt wird), USB (bei angeschlossenem USB-Medium) und AUX.
CD/MP3/USB/SD-Betrieb 1. Auswahltasten Betätigen Sie die >>|-Taste zur Wiedergabe des nächsten Titels. Betätigen Sie die Taste |<<, um den aktuellen Titel erneut von Anfang an abzuspielen (wenn die Abspielzeit über 2 Sekunden liegt). Betätigen Sie die Taste |<<, um zum vorherigen Titel zu springen (wenn die Abspielzeit unter 2 Sekunden liegt). Halten Sie die Taste >>| oder |<< gedrückt, um den Schnellsuchlauf zu aktivieren. Lassen Sie die Taste los, um die normale Wiedergabe fortzusetzen. 2.
Bluetooth-Freisprecheinrichtung 1. Pairing Um Ihr Mobiltelefon mit einem Bluetooth-Gerät koppeln, aktivieren Sie einfach die Bluetooth-Funktion auf Ihrem Mobiltelefon und starten Sie eine Suche nach Bluetooth-Geräten. Wenn die Anlage gefunden wurde, wird es als "Car Kit" angezeigt. Wenn Sie dann versuchen eine Verbindung aufzubauen, werden Sie nach dem Passwort gefragt. Das werksmäßig eingestellte Passwort ist 0000.
ANSCHLUSSBELEGUNG ANSCHLUSS A 1. 2. 3. 4. Speicher +12 V 5. KFZ-Antennenausgang 6. 7. ACC 8. MASSE ANSCHLUSS B 1. Rechter Lautsprecher Hinten (+) 2. Rechter Lautsprecher Hinten (-) 3. Rechter Lautsprecher Vorne (+) 4. Rechter Lautsprecher Vorne (-) 5. Linker Lautsprecher Vorne (+) 6. Linker Lautsprecher Vorne (-) 7. Linker Lautsprecher Hinten (+) 8.
KORREKTE HANDHABUNG VON CDs: Über CD-R/CD-R/W-Discs: Neben kommerziell aufgezeichneten Audio-CDs, kann dieses Gerät auch CD-R- und CD-RW-Discs abspielen. In bestimmten Fällen, insbesondere wenn die jeweilige Disc auf älteren CD-Brennern aufgezeichnet wurde, kann es dazu kommen, dass Ihre CD-R- oder CD-RW-Disc nicht abgespielt werden kann.
FEHLERBEHEBUNG Bevor Sie diese Fehlerbehebungstabelle benutzen, überprüfen Sie bitte alle Anschlüsse. Wenn Sie nach der Benutzung der Tabelle noch Fragen haben, wenden Sie sich bitte an Ihren örtlichen Kundendienst. Erscheinungsbild Ursache Behebung Das Gerät schaltet nicht Die Zündung ist Wenn der Strom richtig angeschlossen ist, stellen Sie ein. ausgeschaltet. den Zündschlüssel bitte auf "ON" oder "ACC". Die Sicherung ist Ersetzen Sie die Sicherung entsprechend dem durchgebrannt. Schaltplan.
EINBAUMETHODE Es handelt sich hierbei, um eine Anti-Diebstahl-Einbaumethode. Das Gerät verfügt über einen Metalleinbaurahmen. Verbinden Sie die Kabel, z. B. der Stromversorgung, Lautsprecher und Antenne, nach den Anweisungen in dieser Bedienungsanleitung. Installieren Sie dann den Metalleinbaurahmen entsprechend der Abbildung unten in den Wagen.
TECHNISCHE DATEN ALLGEMEIN Stromversorgung ....................................................................................... DC 12 V Stromverbrauch ...................................................................................... 10 A MAX. AUSGANGSLEISTUNG .......................................................................... 4 X 25 W Anzahl der Kanäle ................................................................................ 2 STEREO Gehäuseabmessungen .................................
CS-455BT MANUEL D’INSTRUCTION SYSTÈME AUDIO DE VOITURE 5 EN 1 RADIO A REGLAGE PLL NUMERIQUE AM/FM-RDS LECTEUR SD/ USB/CD(ESP)/MP3 SYSTEME MAINS LIBRES BLUETOOTH www.lenco.
PRÉCAUTIONS ET ENTRETIEN 1. Si la température a l'intérieur de la voiture est très élevée du fait d’être resté garé au soleil, n’utilisez pas le lecteur avant d’avoir conduit un moment et que la température intérieure soit redescendue. 2. Le boitier de protection permet de garder le panneau frontal en toute sécurité. BOITIER DE PROTECTION PANNEAU FRONTAL 3. L’unité est conçue pour un terminal négatif de la batterie à connecter au métal de la voiture. Confirmez cela avant l’installation. 4.
EMPLACEMENT ET FONCTION DES BOUTONS 1.Touche REL 2.Touche SEL et molette de VOL 3. LCD 4&5. Touche et 6. Touche BAND 7. Touche POWER/MUTE (M/A, Muet) 8. Touche APS 9. Touches numeriques 1-6 TOP/PLAY/ PAUSE,INT,RPT RDmand 10. TOUCHE MODE/PTY 11. Touche DSP 12. Touche AUX 13. Touche EJECT 14. Fente CD 15. Port USB 16. Fente SD 17. Indicateur DEL antivol 18.
Fonctionnement basique 1. BOUTON REL 2. BOUTON SEL (Sélectionner) ET MOLETTE DE VOLUME Appuyez sur le bouton REL pour rabattre le panneau de commande. Alors, vous pouvez insérer un disque dans la fente disque ou éjecter un disque grâce au bouton EJ. Après avoir rabattu le panneau frontal, poussez-le vers la gauche, puis tirez le coté droit du panneau vers l’extérieur pour l’enlever du châssis de l’unité A) Appuyez brièvement sur le bouton SEL, il est activé comme sélecteur de mode de volume d’encodage.
2) AF (Marche/Arrêt) Lorsque vous appuyez brièvement, le mode de commutation AF est sélectionné et le mode de commutation AF s’affiche sur l’écran par un segment AF. Segment éteint : Mode de commutation AF éteint. Segment allumé : Mode de commutation AF allumé avec information RDS. Segment clignotant : Mode de commutation AF allumé, mais l’information RDS n'est pas encore reçue. Lorsque le mode de commutation AF est sélectionné, la radio inspecte la force du signal AF en permanence.
Mode RETURN L : Sélectionné comme 150 secondes. Mode RETURN S : Sélectionné comme 90 secondes. 6) MASK DPI / MASK ALL: Mode MASK DPI : Seules les AF avec une PI différente sont masquées. Mode MASK ALL : Les AF avec une PI différente et pas de signal RDS avec une force de champ élevée sont masquées. 7)BEEP ON/BEEP OFF Mode BEEP ON : Un bip sonore est émis dès lors que vous appuyez sur une touche. Mode BEEPOFF : Les bip sonores sont désactivés.
8. BOUTON APS (Auto-storage / preset scan = enregistrement auto / Scan de présélection) 1) Avec une pression longue de plus d’une seconde, la radio recherchera sur la fréquence en cours et inspectera le niveau de force de signal jusqu'à ce que 6 stations soient trouvées. Alors, les fréquences des 6 stations sont présélectionnées sur leur emplacement de numéro de présélection correspondant. L’enregistrement automatique est appliqué dans chaque bande sélectionnée.
15. PRISE USB Lorsque vous souhaitez jouer un fichier sur une clé USB, ouvrez le couvercle de protection en plastique et insérez la clé USB dans la fente. L’unité passera en mode USB automatiquement, et jouera la première piste de la clé USB. Lorsque vous n’utilisez pas la fente USB, veuillez fermer le couvercle de protection en plastique. 16. FENTE CARTE SD Lorsque vous désirez jouer des pistes sur une carte SD, insérez la carte SD dans la fente pour carte.
Fonctionnement CD/MP3/USB/SD 1. Bouton avance/retour rapide Appuyez brièvement sur le bouton >>| pour jouer la piste suivante Appuyez brièvement sur le bouton |<< pour jouer la piste en cours depuis le début si le temps de lecture est supérieur à 2 secondes. Appuyez brièvement sur le bouton |<< pour jouer la piste précédente si le temps de lecture est inférieur à 2 secondes. Maintenez appuyé le bouton >>| ou |<< pour revenir en avant ou en arrière dans les piste, relâchez pour reprendre la lecture normale.
mode RPT, appuyez sur le bouton RPT à nouveau pour arrêter le mode de lecture répétée et l’écran LCD affichera RPT OFF. 4) Appuyez sur le bouton RDM pour jouer toutes le pistes du disque dans le désordre, et RDM ON apparaitra sur l’écran LCD. Dans le mode RDM, appuyez de nouveau sur le bouton RDM pour arrêter la lecture aléatoire et l’écran LCD affichera RDM OFF.
Système Bluetooth main libre 1. Coupler Pour coupler votre téléphone à un appareil Bluetooth, activez simplement la fonction Bluetooth sur votre téléphone mobile et recherchez les appareils. Lorsque la stéréo a été détectée, elle devrait s’indiquer comme Car Kit, lorsque vous essayez de connecter, il demandera un mot de passe. Le mot de passe par défaut est 0000. Lorsque vous avez correctement couplé votre téléphone, le message BT READY s’affichera suivi du numéro du téléphone mobile.
CONNEXION DES FILS CONNECTEUR A 1. 2. 3. 4. Mémoire + 12V 5. Sortie antenne auto 6. 7. ACC 8. TERRE Remarque: certaines voitures ont des fils de connexion (la mémoire et la connexion ACC ont des changements), dans ce cas la les deux fiches ISO sont compatibles.
PRÉCAUTIONS D’UTILISATION DES CD : A propos des disques CD-R et CD-R/W : En plus des CD audio enregistrés pour le commerce, cette unité peut également lire des disques CD-R et CD-R/W. Dans certains cas, particulièrement lorsqu’enregistrés sur des graveurs de CD peu récents, il se peut que certains CD-R et CD-R/W ne se lisent pas.
RÉSOLUTION DES PROBLÈMES Avant d’utiliser cette liste, veuillez effectuer correctement toutes les connexions. Si vous avez encore des questions après avoir lu cette liste, veuillez consulter votre représentant de service-client local. Problèmes courants Cause Solution Il n’y a pas d’alimentation. Le contact de la voiture est éteint. Si l’alimentation est correctement connectée à l’accessoire de voiture, tournez le contact sur ON ou ACC.
MÉTHODE D’INSTALLATION C’est une méthode d’installation antivol. L’unité principale est dotée d’une GAINE DE MONTAGE EN MÉTAL. Veuillez connectez les fils, par exemple, l’alimentation, les haut-parleurs et l’antenne en Suivant les détails de ce manuel d’instruction, puis installez la gaine de montage en métal dans la voiture comme sur le schéma ci-dessous.
CARACTÉRISTIQUES GÉNÉRALITÉS Tension d'alimentation..........................................................DC 12V. Consommation électrique………………………………… 10A MAX PUISSANCE DE SORTIE………………………………. 4 x 25W Nombre de canaux.........................................................2 STÉRÉO. Dimensions du châssis...............................178[W] X 50[H] X 165[D] Section FM Gamme de fréquence...........................................87.5MHz -108MHz Sensibilité utile…............................................
CS-450CD MANUAL DE INSTRUCCIONES SISTEMA DE AUDIO PARA COCHE 5 EN 1 CON SINTONIZACIÓN DIGITAL PLL DE RADIO AM/FM-RDS REPRODUCTOR DE SD/USB/CD(ESP)/MP3 SISTEMA BLUE TOOTH MANOS LIBRES www.lenco.
PRECAUCIONES Y MANTENIMIENTO 1. Si en el interior del coche hiciera un calor extremo, por haber estado aparcado al sol, no use el reproductor hasta haber conducido el coche durante un rato para enfriar su interior. 2. El estuche protector se le proporciona para guardar el panel de forma segura. ESTUCHE PROTECTOR PANEL FRONTAL 3. La unidad ha sido diseñada para el terminal negativo de la batería que está conectado al metal del vehículo. Por favor, confirme esto antes de la instalación. 4.
LOCALIZACIÓN Y FUNCIONES DE LOS CONTROLES 10. Botón MODE/PTY 11. Botón DSP 12. Botón AUX 13. Botón EJ 14. Ranura para CD 15. Puerto USB 16. Ranura para SD 17. Indicador LED antirrobo 18. Botón RESET 1.Botón REL 2.Botón SEL y dial VOL 3. LCD 4 y 5. Botón y 6. Botón BAND 7. Botón ENCENDIDO/MUTE 8. Botón APS 9.
Funcionamiento básico 1. Botón REL 2. Botón SEL (Seleccionar) y control de VOL Pulse el botón REL para desplegar el panel frontal de control. Entonces podrá introducir un disco en la ranura o expulsarlo pulsando el botón EJ. Después de desplegar el panel frontal, muévalo hacia la izquierda, después tire de su lado derecho hacia la fuera para separarlo de la unidad principal. A) Pulse el botón SEL, y se activará la selección de modo de E. VOL.
2)AF (ON/OFF) Cuando se haya seleccionado el modo de conmutación AF, su estado se mostrará por el segmento AF. Segmento desactivado: modo de conmutación AF desactivado. Segmento activado: modo de conmutación AF activado, información RDS contenida. Segmento parpadeante: modo de conmutación AF activado, aunque la información RDS no ha sido recibida todavía. Cuando el modo de conmutación AF haya sido seleccionado, la radio comprobará la intensidad de la señal AF en todo momento.
Modo RETURN L: seleccionado en 90 segundos. Modo RETURN S: seleccionado en 60 segundos. 6) MASK DPI/MASKALL: Modo MASK DPI: enmascara solo la AF con una PI diferente. Modo MASKALL: enmascara solo la AF con una PI diferente y sin señal RDS con un campo de alta intensidad. 7)BEEP ON/BEEP OFF Modo BEEP ON: El pitido podrá oírse cuando se pulse cualquier botón. Modo BEEP OFF: El pitido estará desactivado.
número de presintonía que le corresponda. La función de memorización automática se llevará a cabo en cada banda de frecuencias seleccionada. Cuando finalice la operación de memorización automática, la radio realizará la búsqueda de presintonías. 9. BOTONES DE MEMORIA DE PRESINTONÍAS Y TOP />||, INT, RPT, RDM Vaya a cualquier emisora presintonizada pulsando uno de los 6 botones de emisoras presintonizadas (1-6).
16. RANURA PARA TARJETAS SD Cuando necesite reproducir archivos almacenados en una tarjeta SD, introduzca la tarjeta SD en la ranura. La unidad pasará al modo SD, y después reproducirá el primer archivo contenido en la tarjeta SD. Nota: Cuando tanto la tarjeta SD como la unidad USB han sido introducidos en la ranura y en la toma, el modo elegido automáticamente por el sistema será USB. 17. LED PARPADEANTE 18.
Uso de CD/MP3/USB/SD 1.Salto +/Pulse el botón >>| para reproducir la pista siguiente. Pulse el botón |<< para reproducir la pista actual desde el comienzo si el tiempo de reproducción transcurrido es superior a 2 segundos. Pulse el botón |<< para reproducir la pista anterior si el tiempo de reproducción transcurrido es inferior a 2 segundos. Mantenga pulsado el botón >>| o |<< para avanzar hacia delante o hacia atrás, soltándolo para reanudar la reproducción normal. 2.
proceso de RPT, pulse el botón RPT de nuevo para detener el modo de reproducción repetida, entonces el display LCD mostrará RPT OFF. 4) Pulse el botón RDM para repetir todas las pistas del disco en orden aleatorio, RDM ON ser mostrará en el display LCD. En el proceso de RDM, pulse el botón RDM de nuevo para detener la reproducción en orden aleatorio, entonces el display LCD mostrará RDM OFF.
Sistema Bluetooth manos libres 2. Emparejamiento Para emparejar su teléfono móvil con un dispositivo Bluetooth, bastará con activar la función Bluetooth de su teléfono móvil y buscar dispositivos. Cuando se encuentre el estéreo, se mostrará como Car Kit. Cuando intente realizar la conexión, le pedirá una contraseña. La contraseña predeterminada es 0000. Cuando haya emparejado su teléfono satisfactoriamente, se mostrará el mensaje BT READY seguido del número del teléfono móvil.
CONEXIÓN DE CABLES CONECTOR A 1. 2. 3. 4. Memoria +12V 5. Salida de antena auto 6. 7. ACC 8. TOMA A TIERRA CONECTOR B 1. Altavoz posterior derecho (+) 2. Altavoz posterior derecho (-) 3. Altavoz frontal derecho (+) 4. Altavoz frontal derecho (-) 5 Altavoz frontal izquierdo (+) 6. Altavoz frontal izquierdo (-) 7. Altavoz posterior izquierdo (+) 8.
CUIDADO EN EL USO DE CDs: Sobre los discos CD-R/CD-R/W: Además de los discos CD de audio grabados para su explotación comercial, esta unidad podrá reproducir discos CD-R y CD-R/W. En algunos casos, en especial cuando se haya grabado en grabadores de CD antiguos, algunos discos CD-R y CD-R/W podrían no reproducirse.
LOCALIZACIÓN Y RESOLUCIÓN DE PROBLEMAS Antes de pasar la lista de comprobaciones, deberá primero realizar todas las conexiones. Si todavía tuviera preguntas después de haber leído todas la lista de comprobaciones, por favor, consulte a su representante del servicio técnico local.
MÉTODO DE INSTALACIÓN Este es un método de instalación antirrobo. La unidad principal incluye una MANGA DE MONTAJE METÁLICA. Por favor, realice las conexiones, por ejemplo, alimentación, altavoces, antena. Hágalo según lo que se le pide en este Manual de Instrucciones, después instale la manga de montaje metálica en el coche tal y como se muestra en el diagrama de debajo.
ESPECIFICACIONES GENERAL Alimentación..................................................................................DC 12V. Consumo....................................................................................10A MÁX. POTENCIA DE SALIDA............................................................... 4 X 25W Número de canales.................................................................2 ESTÉREO. Dimensiones del chasis...................................178[AN] X 50[AL] X 165[PR].
CS-450CD HANDLEIDING 5 IN 1 AUDIOSYSTEEM VOOR IN AUTO MET AM/FM-RDS DIGITALE PLL RADIO SD/USB/CD(ESP)/MP3-SPELER BLUETOOTH HANDFREESYSTEEM www.lenco.
VOORZORGSMAATREGELEN EN ONDERHOUD 1. Als het erg warm is in de auto, bijvoorbeeld als de auto is geparkeerd in de zon, gebruik de speler dan niet tot de auto een tijdje heeft gereden om het interieur af te koelen. 2. Het beschermdoosje is bedoeld om het voorpaneel veilig te bewaren. BESCHERMDOOSJE VOORPANEEL 3. Het apparaat is ontworpen voor de negatieve pool van de accu die is aangesloten op het metaal van het voertuig. Bevestig dit vóór de installatie. 4.
PLAATSING EN FUNCTIE BEDIENINGSELEMENTEN 1.REL 2.SEL en VOLUMEREGELING 3. LCD 4&5. en 6. BAND 7. POWER/MUTE 8. APS 9. TOP/PLAY/PAUSE,INT,RPT RDM en 1-6 Numerieke toetsen 10. MODE/PTY 11. DSP 12. AUX 13. EJECT 14. CD-sleuf 15. USB-poort 16. SD-sleuf 17. Anti-diefstal LED-indicator 18.
Standaard bediening 1. REL 2. SEL (Select) EN VOLUMEREGELING Druk op REL om het voorpaneel omlaag te klappen. Daarna kan een disc in de sleuf worden geplaatst of uit worden geworpen door op EJ te drukken. Nadat het voorpaneel omlaag is geklapt, kunt u het naar links drukken en vervolgens de rechterkant van het paneel naar buiten trekken om het apparaat uit het chassis te halen. A) Druk kort op SEL om een van de volgende volumemodi te selecteren: E. VOL.
2)AF (ON/OFF) Als de AF-schakelmodus is geselecteerd en de staat van de AF-schakelmodus wordt getoond in het AF-gedeelte van het display. Segment uit: AF-schakelmodus uitgeschakeld. Segment aan: AF-schakelmodus ingeschakeld en beschikt over RDS-informatie. Segment knippert: AF-schakelmodus ingeschakeld, maar er is nog geen RDS-informatie ontvangen. Als de AF-schakelmodus is geselecteerd, dan zal de radio de signaalsterkte van AF constant controleren.
6) MASK DPI/MASKALL: MASK DPI-modus: onderdruk alleen de AF’s met een verschillende PI. MASKALL-modus: onderdruk de AF’s met een andere PI en krachtige NIET-RDS-signalen. 7)BEEP ON/BEEP OFF BEEP ON-modus: Er klinkt na elke toetsdruk een pieptoon. BEEP OFF-modus: De pieptoon wordt uitgeschakeld. 8)VOL LAST/VOL DEFA VOL LAST: Het volumeniveau wordt onthouden bij het uitschakelen, de radio zal met ditzelfde volumeniveau inschakelen. VOL DEFA: De melding AVOL zal worden getoond na het drukken op de knop SEL.
geïmplementeerd op elke geselecteerde band. Als het automatische opslaan is voltooid, dan zal de radio de voorkeurszenderscan uitvoeren. 2) Als u kort op de knop drukt, dan zal de radio naar elke voorkeurszender op de huidige band zoeken, de zender 5 seconden afspelen en daarna opnieuw zoeken. 9. VOORKEURSZENDERS EN TOP/>||, INT, RPT, RDM Ga naar een voorkeurszender door op een van de 6 knoppen van voorkeurszenders te drukken (1-6).
16. SD-KAARTSLEUF Als u bestanden op de SD-kaart wilt afspelen, plaats de SD-kaart dan in de SD-kaartsleuf. Het systeem zal automatisch naar de SD-modus schakelen en het eerste bestand op de SD-kaart afspelen. Opmerking: Als de SD-kaart en USB-stick beide worden geplaatst in hun sleuf of aansluiting, dan zal het systeem automatisch naar de USB-modus schakelen. 17. KNIPPEREND LAMPJE 18.
Bediening CD/MP3/USB/SD 1.Skip up/down Druk kort op >>| om de volgende track af te spelen. Druk kort op |<< om de huidige track vanaf het begin af te spelen als de track 2 seconden of meer heeft gespeeld. Druk kort op |<< om terug te gaan naar de vorige track als de track voor minder dan 2 seconden heeft gespeeld. Houd >>| of |<< ingedrukt om vooruit of terug te spoelen en laat de knop los om het normale afspelen te hervatten. 2.
Bluetooth handsfreesysteem 1.Koppelen U kunt uw mobiele telefoon koppelen met een Bluetooth-apparaat door de Bluetooth-functie op uw mobiele telefoon in te schakelen en te zoeken naar apparaten. Als de stereo wordt gevonden, dan wordt deze getoond als Car Kit en er zal naar een wachtwoord worden gevraagd wanneer u verbinding probeert te maken. Het standaardwachtwoord is 0000. Als u uw telefoon succesvol hebt gekoppeld, dan zal de melding BT READY en daarna uw mobiele telefoonnummer worden getoond.
BEDRADING CONNECTORA 1. 2. 3. 4. Geheugen +12V 5. Auto-antenne-uitvoer 6. 7. ACC 8. AARDE CONNECTOR B 1. Luidspreker rechtsachter (+) 2. Luidspreker rechtsachter (-) 3. Luidspreker rechtsvoor (+) 4. Luidspreker rechtsvoor (-) 5. Luidspreker linksvoor (+) 6. Luidspreker linksvoor (-) 7. Luidspreker linksachter (+) 8.
ZORG BIJ HET GEBRUIK VAN CD'S: Over CD-R/CD-R/W discs: In aanvulling op commercieel opgenomen audio CD's, kan het apparaat ook CD-R en CD-R/W discs afspelen. In bepaalde gevallen, vooral bij opnamen met oudere CD-branders, kunnen sommige CD-R en CD-R/W discs niet afspelen. Als u een CD opneemt voor het afspelen in deze radio, dan is aanbevolen om de disc voor de beste signaalkwaliteit en afspeelprestaties te branden met een snelheid van 24x of lager voor CD-R en 4x of langzamer voor CD-R/W. 1.
PROBLEMEN OPLOSSEN Zorg ervoor dat alle aansluitingen zijn gemaakt vóór het gebruik van de checklist. Als u na het doorlopen van deze checklist nog steeds vragen heeft, neem dan contact op met de klantenservice van uw plaatselijke vertegenwoordiger. Algemene symptomen Oorzaak Oplossing Geen stroom. Het contact van de auto is uitgeschakeld. Als de voeding is aangesloten op het accessoirescircuit van de auto, maar de motor niet draait, draai dan de stand contactsleutel naar de “ON” of “ACC”.
INSTALLATIEMETHODE Dit is een methode die diefstal tegengaat. Het apparaat draagt een METALEN MONTAGEHULS. Sluit de bedrading, bv. de voeding, luidsprekers en antenne aan volgens de aanwijzingen in deze handleiding. Installeer vervolgens de metalen montagehuls in de auto volgens de onderstaande afbeelding.
SPECIFICATIES ALGEMEEN Voeding...............................................................................DC 12V. Stroomverbruik..................................................................10A MAX. VERMOGEN...................................................................... 4 X 25W Aantal kanalen................................................................2 STEREO. Afmetingen chassis...................................178[W] X 50[H] X 165[D]. FM GEDEELTE Frequentiebereik.........................