
manual


CAUTION:
Usage of controls or adjustments or performance of procedures other than those specified herein may resulte in hazardous
radiation exposure.
This unit should not be adjusted or repaired by anyone except qualified service personnel.
PRECAUTIONS FOR USE
Installation
• Unpack all parts and remove protective material.
• Do not connect the unit to the mains before checking the mains voltage and before all other connections have been made.
• Do not cover any vents and make sure that there is a space of several centimeters around the unit for ventilation.
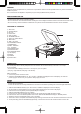
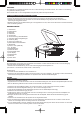
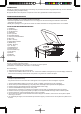
LOCATION OF CONTROLS
1) Dust cover
2) Spindle adaptor
3) AC cord
4) Audio cable
5) Pick-up holder
6) UP/DOWN selector
7) 33/45 rpm speed selector
8) REC button
9) SKIP - UP button
10) OFF/USB/PH selector
11) MODE button
12) SKIP - DN button
13) F - UP button
14) ID3/PROG button
15) STOP/SD button
16) PLAY/PAUSE button
17) LCD display
18) SD slot
19) USB slot
20) STOP button
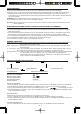
CONNECTION
Audio connection
The record player has an inbuilt preamplifier and can therefore be connected directly to the Line In / Aux input
on a hi-fi system.
• Connect the audio cable(4) to the Line In / Aux input on your hi-fi system
(red plug = right channel; white plug = left channel).
Mains connection
1. Connect the power cord to AC outlet
2. switch the OFF/USB/PH Selector to “ PH “ function. if ”PHONO” is displayed on the LCD display, it’s mean the
power supply is normal. now your system is ready to play the music.
PHONO
NOTED:
- remove the stylus protector.
- be sure that the tone arm is being detached from the tone arm rest before operating and re-secured again afterwards.
1. Slide the OFF/USB/PH selector(13) to “PH” function, “PHONO” is displayed on the LCD display
2. Set the 33/45 rpm speed selector(7) to the proper position depending on the record to be played.
3. Place the record on the platter (use the spindle adaptor if required).
4. Slide the UP/DOWN selector(6) to “UP” position
5. Lift the tone arm from the rest and slowly move it to the record side. the platter will start to rotate.
6. Place the tone arm to the desired position of the record, Slide the UP/DOWN selector(6) to “DOWN” position
7. Adjust the volume to the desired level on your hi-fi system.
8. At the end of record, the platter will automatically stop rotating, lift the tone arm from the record and return it to the rest.
9. To stop manually, press the STOP Button(20) directly, or lift the tone arm from the record and return it to the rest
E - 1
1
2
3
4
5
6
7
8
9
10
11
12
13
14
15
16
17
18
19
20
OFF PH
USB
USB REC SD
REC
SKIP-UP
SKIP-DN
MODE
F-UP
STOP/SD
ID3/PROG
PLAY/PAUSE
33
45
UP
DOWN
STOP