NXT-01 OWNER'S MANUAL
CAUTION TO PREVENT FIRE OR SHOCK HAZARD, DO NOT USE THIS PLUG WITH AN EXTENSION CORD, RECEPTACLE OR OTHER OUTLET UNLESS THE BLADES CAN BE FULLY INSERTED TO PREVENT BLADE EXPOSURE. TO PREVENT FIRE OR SHOCK HAZARD, DO NOT EXPOSE THIS APPLIANCE TO RAIN OR MOISTURE.
IMPORTANT NOTES Avoid installing this unit in places exposed to direct sunlight or close to heat radiating appliances such as electric heaters, on top of other stereo equipment that radiates too much heat, places lacking ventilation or dusty areas, places subject to constant vibration and/or humid or moist areas. Do not attempt to clean this unit with chemical solvents as this might damage the finish. Use a clean dry cloth. Operate controls and switches as described in the manual.
PREPARATION FOR USE UNPACKING AND SET UP This system consists of the following components: Tuner/CD Player unit, Remote Control, AM Antenna and FM Antenna. Carefully remove all the components from the display carton and verify that you have all the necessary components before you dispose of the display carton. Remove all packing materials from the individual components. Remove any descriptive labels that may be attached to the front panel of the main unit.
POWER SOURCE This system is designed to operate on 220V AC 50Hz house current only. Connecting this system to any other power source may cause damage to the system and such damage is not covered by your warranty. NOTE: The system has an AC plug and will only fit into matching AC outlets. This is a safety feature to reduce the possibility of electric shock. If the plug will not fit in your AC outlets, you should have the outlet changed by a qualified, licensed electrician.
AUXILIARY SOURCE CONNECTIONS You can listen to the sound from external audio sources through the speakers of this system. Connect the Aux/Line/Audio Output Jacks of the external audio source to the AUX IN Jack at the back panel of Tuner/CD unit. Note: Connection cables are not included. Examples of External Audio Sources that can be connected to this system are: Cassette Player, Mini Disc Player, the sound from your TV, VCR, DVD player, etc.
REMOTE CONTROL BATTERY The remote control requires one button-type 3-volt lithium battery, included. To extend the life of the original battery we have inserted a small clear plastic spacer tab between the lithium battery and the battery terminal. You must remove this battery spacer tab before you can use the remote control. To remove the tab, pull it in the direction of the arrow in the illustration as shown.
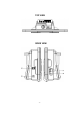
LOCATION OF CONTROLS AND INDICATORS MAIN UNIT FRONT VIEW BACK VIEW -7-
TOP VIEW SIDES VIEW -8-
1.) 2.) 3.) 4.) 5.) 6.) 7.) 8.) 9.) 10.) 11.) 12.) 13.) 14.) 15.) 16.) 17.) 18.) 19.) 20.) 21.) 22.) 23.) 24.) 25.) 26.) 27.) 28.
REMOTE CONTROL 1. 2. 3. 4. 5. 6. 7. 8. 9. 10. 11. 12. 13. STANDBY / ON Button OPEN/CLOSE Button PLAY / PAUSE Button STOP / BAND Button VOLUME + Button SKIP / TUNE Button VOLUME Button PRESET / ALBUM + Button TIMER Button SLEEP Button PRESET / ALBUM Button RANDOM / RDS MODE Button REPEAT / RDS PTY Button 14. 15. 16. 17. 18. 19. 20. 21. 22. 23.
OPERATING INSTRUCTIONS Make sure that the MAIN Power SWITCH on the back of the Amplifier/Subwoofer unit is ON . Make sure that you have removed the battery spacer from the remote control handset. Make sure the AC power cord from the Amplifier/Subwoofer unit is properly connected to a 220V 50Hz household AC power outlet. Make sure that the minimum distance around the whole unit for sufficient ventilation is 10cm.
SETTING THE CLOCK When the system is connected to the AC outlet for the first time and --:-- will keep flashing on the display. This is your indication that the time display is incorrect and needs to be reset. Set the Clock time in the Standby mode. 1.) While the unit is in the Standby mode, press and hold the CLOCK/PROG button on the remote control for 3 seconds to enter Clock Set mode. 24 HOUR shows with 24 keep flashing in the display indicating that the clock is set for 24-hour European time. 2.
MAIN VOLUME, VARIABLE BASS AND TREBLE CONTROLS VOLUME ADJUSTMENT Press the VOL + or VOL buttons on the top panel or on the remote control to increase or decrease the volume. The volume level indicator appears on the main display. The range is from 00 (Minimum) to 30 (Maximum). This system will remember the last volume level you selected before switching the power Off and will automatically return to that volume level when the power is switched On again.
ANTENNA INFORMATION FM Make sure the FM lead wire antenna is plugged into the FM antenna jack on the top of the main unit and the wire is unwounded and extended to its full length. It may be necessary to vary the direction of this wire antenna until you find the position that provides the best reception for your favorite FM stations. AM The AM ferrite bar antenna is inside the main unit.
LISTENING TO THE RADIO 1.) Press the STANDBY/ON button on the top panel or on the remote control. The main display turns on. Press the FUNCTION button repeatedly on the top panel or on the remote control to switch between various modes. Note: The looping order of the FUNCTION button is: TUNER CARD-USB. CD AUX The display will show an MW or FM station frequency. To select a different band (MW or FM), press the STOP/BAND button on the top panel or on the remote control.
PRE-SETTING STATIONS IN THE TUNER MEMORY This system includes a 40 station preset memory. You can store up to 30 FM stations and 10 AM stations in the tuner memory for immediate recall. The procedure for storing stations in memory is as follows: 1.) Follow step 2 under LISTENING TO THE RADIO to select the first station you wish to memorize. For example: FM 103.5 MHz. 2.) When the desired station appears on the display, press the CLOCK/PROG button on the top panel or on the remote control.
5.) Press the CLOCK/PROG button again to enter the station in the selected preset memory number. 6.) Repeat steps 4 and 5 until you have memorized up to 30 stations on FM band, then press the STOP/BAND button to switch to the AM band and follow the same procedure to enter up to 10 stations on the AM band. Note: The saved preset station will be lost if the MAIN Power SWITCH on the back panel of the subwoofer is switched 'OFF', or if the AC power is interrupted.
RDS Mode RDS Display Press RDS MODE button once, PS is displayed. Then the RDS indicator light up and the station name appear. No PS appears if no RDS signal is sent. Press RDS MODE button twice, PTY is display. Then the RDS indicator light up and the broadcast program type appear. No PTY appears if no RDS signal is sent. Press RDS MODE button three times, RT is displayed. Then, the RDS indicator light up and a text message sent by the station appear. No RT appears if no RDS signal is sent.
RDS Display Press RDS PTY button. PTY SEL is displayed.
PLAYING COMPACT DISCS IMPORTANT: This CD player can play normal CDs plus CD Recordable (CD-R) and CD Rewriteable (CD-RW) discs. However the playability of CD-R/RW discs may be affected by the type of software that was used in ripping the tracks from the original discs and burning the tracks onto the blank media. Playability may also be affected by the quality and condition of the blank media you use for recording. 100% compatibility cannot be guaranteed.
Note: If the disc is inserted upside down or if the disc is badly scratched and unreadable, playback will not be possible. In this case, the main display will show NO DISC . Remove the disc and reinsert it properly, or try another disc. Note: If the disc is neither Music CD nor MP3 CD format, the unit might still read the disc and start playback on a mute track. In this case, please remove the disc from the unit. 6.
PAUSE CONTROL To pause momentarily during CD playback, press the PLAY/PAUSE button on the top panel or on the remote control again. The sound stops and the display elapsed time keep flashing on the display but the disc continues to spin. Press the PLAY/PAUSE button once more to cancel Pause mode and resume playback. The elapsed time display stops flashing.
FIND PARTICULAR TRACK BY ALPHABETICAL ORDER FOR MP3 DISC (REMOTE CONTROL ONLY) While playing a MP3 disc divided with different album (folder), you can search a particular track by finding track name in alphabetical order. 1.) Press the ST/MO/FIND button once on the remote control either when the disc is playing or stopped. The logo keep flashing on the display. 2.) The system sorts the tracks by A-Z and 0-9 in ascending alphabetical or order of the first character of the tracks.
REPEAT PLAYBACK You can program the player to continuously repeat a single track, the entire disc or a single folder. The Repeat function can be activated by using the remote control while a disc is playing or while the disc is stopped. One Track Repeat Press the SKIP/TUNE or button on the top panel or on the remote control until the desired track number appears in the display, then press the PLAY/PAUSE button to begin playback on that track. Press the REPEAT button once.
RANDOM PLAYBACK This feature allows you to play all the tracks on a disc in random order. Load the disc as usual and wait until the display shows the total playing time and number of tracks. Press the RANDOM button, the RANDOM indicator appears in the display. The tracks will be played in random order continuously. You can generate another track by pressing the SKIP/TUNE the top panel or on the remote control.
3.) Press the SKIP/TUNE or buttons to select the first track you wish to program. Example: Track 03. 4.) Press the CLOCK/PROG button again to enter Track 03 in Program Memory 01. The Program number advances to P-02 and the track display returns to 00 . 5.) Repeat Steps 3 and 4, selecting a different track number each time until you have entered up to 64 tracks in the memory. Press the PLAY/PAUSE button to begin programmed playback. MP3 PROGRAMMED PLAYBACK 1.
5.) Press the CLOCK/PROG button again to enter the Track 02 of Folder 04 in Program Memory 01. The Program number advances to P-02 and the folder and track display returns to 00 and 000 respectively. 6.) Repeat Steps 3 to 5, selecting a different track number each time until you have entered up to 64 tracks in the memory. After you have programmed up to 64 tracks, press the PLAY/PAUSE button to begin programmed playback.
ON SCREEN DISPLAY If your MP3 disc contains ID3 information, you can press and hold the ST/MO/FIND button for 1 second during playback to show the track information on the display. To quit the On Screen display, press and hold the ST/MO/FIND button again If your disc does not support the On Screen Display, only the FILE name will be shown on the screen.
PLAYING SD/MMC CARD AND USB DRIVE This system supports direct MP3 playback from the SD/MMC Card or USB Drive. 1.) Press the STANDBY/ON button on the top panel or on the remote control to turn the system On . 2.) Press the FUNCTION button on the top panel or on the remote control to CARD-USB mode. 3.) Insert the SD/MMC or USB Drive to the system. After successfully searching, the total number of tracks and total number of folders will show on the display. 4.
TIMER FUNCTION This system includes a programmable Timer function that will turn the system On and then shut the system Off at the desired time. You can use the timer to wake you up to the TUNER or to your favorite CD. Remarks: If the clock time is not set, this timer function can not be activated. Note: Timer function do not work with USB, SD/MMC playback. To Set the Turn-On Time 1.) Press the TIMER button on the remote control. The TIMER ON indicator shows in the display. 2.
8) Press the SKIP/TUNE minute. or buttons to set the display to the desired turn-off Note: If the turn-off time is equal to the turn-on time, ERROR message shows on the display. Re-enter the turn-off time after the ERROR message disappears. 9) Press the TIMER button again. The message begins flashing. 10) Press the SKIP/TUNE or between TUNER and CD . TUNER buttons to select the Timer operating mode 11) Press the TIMER button again. The VOLUME message begins flashing.
Notes: As long as the TIMER indicator remains in the display the timer will turn the system on every day at the same time. To deactivate the timer press the TIMER button on the remote control, the TIMER indicator disappears from the display. To reactivate the timer press the TIMER button on the remote control, the TIMER indicator reappears in the display. To change the saved Timer setting, press and hold the TIMER button on the remote control for about 1 second.
5.) Press the SLEEP button once to check the remaining countdown. 6.) When the Sleep Timer counts down to 00 , the power shuts off automatically. Notes: You can shut the unit off manually before the Sleep Timer counts down to 00 by pressing the STANDBY/ON button at any time. If you are falling asleep to CD, the system will only operate until the CD ends.
RESETTING If the system does not have any respond from either the remote control or the main unit, you may have experienced a severe electric shock (ESD) or a power surge that triggered the internal computer to shut down automatically. If this occurs, simply disconnect the main power and connect the main power again after one minute. Note: Although disconnect the power will unlock the internal computer after a power surge, it will also erase all of the preset tuner memories, clock, and timer settings.
CARE AND MAINTENANCE COMPACT DISC CARE To remove a disc from its storage case, press down on the center of the case and lift the disc out, holding it carefully by the edges. Fingerprints and dust should be carefully wiped off the disc s recorded surface with a soft cloth. Unlike conventional records, compact discs have no grooves to collect dust and microscopic debris, so gently wiping with a soft cloth should remove most particles. Wipe in a straight line from the inside to the outside of the disc.