Model SCD-720 User Manual - Portable Boombox with DAB+/ FM radio, Bluetooth, CD, cassette and USB Player DRAAGBARE BOOMBOX MET DAB+/FM-RADIO, BLUETOOTH®, CD-, CASSETTE- EN USB-SPELER Bedienungsanleitung – Tragbare Boombox mit DAB+- und FM-Radio, Bluetooth, CD- und USB-Player sowie Kassettenlaufwerk Mode d’emploi - Boombox portable avec radio DAB+/ FM, Bluetooth, CD, cassette et lecteur USB Manual de usuario – Radiocasete portátil con radio DAB+/ FM, Bluetooth, CD, casete y reproductor USB
INDEX English ••••••••••••••••••••••••••••••••••••••••••••••••••••••••••••••••••••••••••••••••••••• 3 Nederlands •••••••••••••••••••••••••••••••••••••••••••••••••••••••••••••••••••••••••••••••20 Deutsch •••••••••••••••••••••••••••••••••••••••••••••••••••••••••••••••••••••••••••••••••••37 Français•••••••••••••••••••••••••••••••••••••••••••••••••••••••••••••••••••••••••••••••••••55 Español •••••••••••••••••••••••••••••••••••••••••••••••••••••••••••••••••••••••••••••••••••72 V2.
ENGLISH CAUTION: Usage of controls or adjustments or performance of procedures other than those specified herein may result in hazardous radiation exposure. PRECAUTIONS BEFORE USE KEEP THESE INSTRUCTIONS IN MIND: 1. Do not cover or block any ventilation openings. When placing the device on a shelf, leave 5 cm (2 ) free space around the whole device. 2. Install in accordance with the supplied user manual. 3.
25. Refer all servicing to qualified service personnel. Servicing is required hen the device has been damaged in any ay, such as the po er supply cord or the plug, hen liquid has been spilled or objects have fallen into the device, hen the device has been exposed to rain or moisture, does not operate normally, or has been dropped. 26. Long exposure to loud sounds from personal music players may lead to temporary or permanent hearing loss. 27.
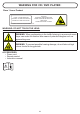
WARNING FOR CD / DVD PLAYER: Class 1 Laser Product CLASS 1 LASER PRODUCT APPAREIL LASER DE CALSSE 1 PRODUCO LASER DE CLASE 1 This product contains a lo CAUTION INVISIBLE LASER RADIATION WHEN OPEN AND INTERLOCKS DEFEATED AVOID EXPOSURE TO BEAM po er laser device WARNING: DO NOT TOUCH THE LENS. WARNING: When participating in the traffic listening to a personal music player can make the listener less a are of potential dangers such as approaching cars.
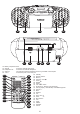
OVERVIEW SOURCE SCAN MENU INFO ENTER VOLUME 1 1 1. USB input: 2. SOURCE: 3 4 5 6 4+ 3 7 8 9 10 11 12 13 Input for USB stick 3. MENU / INFO: 4. PREVIOUS 5. POWER 2 2 : : Press this key to choose different modes: DAB+/FM/CD/USB/BLUETOOTH/CASSETTE TAPE/AUX IN. DAB+: Press to display station information. Press and hold to enter the Menu for setting change. Press or to select menu item. FM: Press to display station information. Press and hold to enter the Menu for setting change.
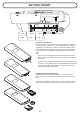
SOURCE SCAN MENU INFO ENTER VOLUME 1 2 3 4+ FOLDER PAIR REPEAT PROGRAM CASSETTE RECORDER 16 15 14 15 16 AUX IN OPEN OPEN ~AC IN 17 18 19 20 21 22 Battery compartment door AUX IN: Connect to external audio player Headphone out: Connect to the external headphone Antenna: The antenna should be extended to ensure a good DAB+ / FM reception ~AC in: Connect the po er cord to this jack 23. Standby 23 24. Numeric buttons 44 25. Memory 24 26. Previous / Tune 43 27. Folder 25 42 28.
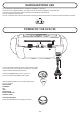
BATTERY INSERT OPEN OPEN AUX IN + 1,5V + 1,5V + 1,5V ~AC IN 1,5V + C 1,5V C 1,5V C 1,5V 1,5V + C 1,5V + 1,5V + C 1,5V C 1,5V + BATTERY OPERATION: For DC operation, firstly remove the AC plug from the AC outlet and disconnect the AC cord from the ~ AC IN jack. Remove the battery compartment door at the rear of the unit. Install 6pcs UM-2 (LR14) C size batteries (NOT supplied) according to the polarity markings sho n inside of the compartment. Install the battery compartment door.
EAR/HEADPHONE USE On the back site of the SCD-720 you ill find the headphone connection. Use a ear set or headphone ith 3, 5mm stereo jack to connect the headphone to the SCD-720. If you put in the 3,5mm stereo jack the speakers of the SCD-720 ill turned off. Only the headphone ill ork no . You can control the volume by the volume knob. All other functions are the same as normal use ithout headset connected.
DAB+ RADIO Adjusting the Antenna The antenna at the rear panel of the unit should be fully extended to ensure a good DAB+ / FM reception. Alter the antenna position for the best reception. DAB+ OPERATION The first time the DAB+ mode is selected, it ill automatically scan for available DAB+ stations. Wait until the scanning has finished. The display ill sho the scanning progress. After scanning it ill tune to the first station. The available stations in a certain reception band ill be sho n in the display.
Displaying DAB+ Station Information There are several types of information as listed belo . To change the display information, press the INFO button repeatedly. Radio Text scrolling Multiplex Name Signal Bar Frequency Program Type (PTY) Signal Error Rate Audio Bit Rate 1. Radio Text scrolling: Sho s music titles or program details provided by the broadcaster. 2. Signal Bar: Transmission signal level. The more characters are displayed, the stronger the signal being received.
FM RADIO Adjusting the Antenna The antenna at the rear panel of the unit should be fully extended to ensure a good DAB+ / FM reception. Alter the antenna position for the best reception. FM RADIO OPERATION Auto Scan 1. Turn on the unit in FM mode. 2. Press and hold the SCAN button to start auto-scanning and saving the available stations (max. 20 storage). Manual Scan or button repeatedly to tune to a different frequency. 1. Press the 2.
Scan Setting 1. Press and hold the MENU button (or press the MENU button on the remote control) to access the menu control. or button until Scan is displayed and then press the ENTER button. 2. Press the 3. Press the or button to toggle bet een Strong and All and then press the ENTER button confirm. When the Strong is selected, only the strong stations are detected. Scanning ill ignore the noisy stations.
MP3 Disc or MP3 USB mode 1. In stop mode press the PROGRAM button, the display sho s the program number and the folder number. 2. Press the FOLDER button (or the FOLDER˄ / FOLDER˅ button on the remote control) to select the desired folder. 3. Press the PROGRAM button to save the desired folder. or button to select the desired track. 4. Press the 5. Press the PROGRAM button to save the desired track. 6. Repeat steps 2-3 to program up to 99 programmed tracks. button to start playing the programmed tracks. 7.
CASSETTE TAPE Press the SOURCE button repeatedly to enter the Cassette tape mode. The display ill sho buttons are location at the top front of the unit. button to open the cassette tape door. 1. Press the CASSETTE STOP/EJECT 2. Insert the cassette tape and close the door firmly. TAPE . The cassette control Insert the cassette tape with the tape side facing up Play side is facing for ard button to playback. 3. Press the CASSETTE PLAY button to pause the playback.
OTHER FUNCTIONS AUX IN This allo s you to connect the sound from an external player through your unit. 1. Plug a 3.5mm audio cable (not included) into your external player line out and the other end into the AUX IN jack. 2. Press the SOURCE button to enter AUX mode. Display sho s AUDIO IN . 3. Start your external player to play music. 4. The unit plays the sound. EQ OPERATION / X BASS You can enjoy different EQ sound effect modes.
FUNCTIONS REMOTE CONTROL Standby: Source: Equalize r: X-Bass: Sleep: Mono/Stereo: Folder ˄˅: Memory: Tune˅ / tune˄: ( / ) CH+ / CH-: : Repeat REPEAT RANDOM VOL DISPLAY Random: Press the STANDBY button to turn on the unit. To turn off, press the STANDBY button again. Selection of user function: DAB+ RADIO, FM-RADIO, CD, USB, BLUETOOTH, TAPE (CASSETTE), AUDIO IN (AUX). EQ setup: FLAT / ROCK / CLASSIC / POP / VOCAL / JAZZ. Super bass on/off. Sleep time setup: 90-80-70-60-50-40-30-20-10 min.
TROUBLE SHOOTING o po er ● Ensure that the mains cable is securely connected. ● Ensure that the unit is s itched on. The unit does not respond hen pressing an uttons. ● Remove the batteries ( hen inserted) and remove the po ercord for a minute. Then reinsert the batteries. No sound output ● Turn up the volume. I can’t find the Bluetooth name of this unit on m Bluetooth device for Bluetooth pairing ● Ensure that the unit is s itched on.
TECHNICAL OVERVIEW TECHNICAL SPECIFICATIONS DAB+ radio frequency range: FM radio frequency range: Bluetooth frequency range: Bluetooth transmission po er: AC po er input: Batteries operation: Speaker output po er: Bluetooth: Aux in: Headphone out: Remote control battery: Unit dimension (L x D x H): Working Temperature: Total eight: ● ● 174.928-239.2 MHz 87.5-108 MHz 2.402-2.480 GHz 4 dBm 230V~ 50Hz 25W 6 x 1.5V C (UM-2), not supplied 2x6W V5.0 3.5mm stereo jack 3.
NEDERLANDS LET OP: Het gebruik van afstandsbedieningen of aanpassingen of de uitvoering van procedures die niet in dit document zijn gespecificeerd, kan leiden tot gevaarlijke blootstelling aan straling. VOORZORGSMAATREGELEN VOOR GEBRUIK ONTHOUD DE VOLGENDE INSTRUCTIES: 1. Bedek of blokkeer de ventilatieopeningen niet. Wanneer u het apparaat op een schap plaatst, dient u 5 cm (2 ) vrije ruimte rondom het gehele apparaat te behouden. 2. Installeer het product volgens de meegeleverde gebruikershandleiding.
. 22. 23. 24. 25. 26. 27. 28. 29. de aarschu ingen of voorzorgsmaatregelen in deze gebruikershandleiding ordt niet gedekt door de garantie. Ver ijder nooit de behuizing van dit apparaat. Plaats dit apparaat nooit op andere elektrische apparatuur. Geef kinderen geen gelegenheid in aanraking met plastic zakken te komen. Gebruik uitsluitend uitbreidingen/accessoires gespecificeerd door de fabrikant. Laat alle reparaties over aan gek alificeerd onderhoudspersoneel.
WAARSCHUWING VOOR CD / DVD SPELER: Klasse 1 Laserproduct LET OP ONZICHTBARE STRALING WANNEER OPEN EN BEVEILIGING NIET INTACT. VERMIJD BLOOTSTELLING AAN DE BUNDEL Dit product bevat een laser met laag vermogen. KLASSE 1 LASERPRODUCT APPAREIL LASER DE CALSSE 1 PRODUCO LASER DE CLASE 1 WAARSCHUWING: RAAK DE LENS NIET AAN. WAARSCHUWING: Bij deelname aan het verkeer kan het luisteren naar een persoonlijke muziekspeler de gebruiker minder be ust maken van mogelijke gevaren zoals het naderen van auto’s.
OVERZICHT SOURCE SCAN MENU INFO ENTER VOLUME 1 1 2 3 4 2 5 6 1. USB input: : 2. SOURCE 3. MENU / INFO: 4+ 3 7 8 9 10 11 12 13 Aansluiting voor USB-stick. Druk op deze toets om verschillende modi te kiezen: DAB+/FM/CD/USB/BLUETOOTH/CASSETTE TAPE/AUX IN. DAB+: Druk herhaaldelijk om de zenderinformatie eer te geven. of Ingedrukt houden tot het menu opent voor het ijzigen van de instellingen. Druk om het menu item te selecteren. FM: Druk herhaaldelijk om de zenderinformatie eer te geven.
SOURCE SCAN MENU INFO ENTER VOLUME 1 2 3 4+ FOLDER PAIR REPEAT PROGRAM CASSETTE RECORDER 16 15 14 15 16 AUX IN OPEN OPEN ~AC IN 17 15. Bass poort 16. Luidspreker 17. Draagbeugel 18. Deksel batterijvak 19. AUX IN: 20. Oor/kop telefoon uit: 21. Antenne: 22.
PLAATSEN BATTERIJEN OPEN OPEN AUX IN + 1,5V + 1,5V + 1,5V ~AC IN 1,5V + C 1,5V C 1,5V C 1,5V 1,5V + C 1,5V + 1,5V + C 1,5V C 1,5V + WERKING OP BATTERIJEN: Voor de erking op batterijen moet u eerst de netstekker uit het stopcontact halen en het netsnoer uit de SCD-720-aansluiting halen. Ver ijder het klepje van het batterijvakje aan de achterkant van het apparaat. Plaats 6st UM-2 (LR14) C-batterijen (NIET meegeleverd) met de juiste polariteit in het batterijvak.
OOR/HOOFDTELEFOON GEBRUIK Op de achterzijde van de SCD-720 vindt u de koptelefoonaansluiting. Gebruik een oorset of hoofdtelefoon met 3, 5 mm stereo-aansluiting om de hoofdtelefoon aan te sluiten op de SCD-720. Als je de 3,5mm stereo-aansluiting in de SCD-720 steekt, zullen de luidsprekers van de SCD-720 uitgeschakeld orden. Alleen de koptelefoon zal nu erken. U kunt het volume regelen met de volumeknop. Alle andere functies zijn hetzelfde als bij normaal gebruik zonder aangesloten oorset of hoofdtelefoon.
DAB+ RADIO Aanpassen van de antenne De antenne op het achterpaneel van het apparaat moet volledig orden uitgeschoven om een goede DAB+ / FM-ontvangst te garanderen. Wijzig de positie van de antenne voor de beste ontvangst. DAB+ WERKING De eerste keer dat de DAB+ functie ordt geselecteerd, zal deze automatisch scannen naar de beschikbare DAB+ zenders. Wacht tot het scannen klaar is. Het display toont de voortgang van het scannen. Na het scannen start het eerste station.
Opgeslagen DAB+ voorkeurze nder terugroepen De toesteltoetsen gebruiken om de voorkeurszenders terug te roepen. 1. Om de voorkeurszender van kanaal 1, 2 of 3 op te roepen, drukt u respectievelijk op de toets met het ge enste nummer. Dan zal het voorkeurszender orden afgespeeld. 2. Om een andere voorkeurzender onder 4 tot 20 op te roepen, druk op toets 4. Recall Preset verschijnt in het display. of om de ge enste voorkeurzender te selecteren om af te spelen. 3. Druk op toets 4.
FM RADIO Aanpassen van de antenne De antenne op het achterpaneel van het apparaat moet volledig orden uitgeschoven om een goede DAB+ / FM-ontvangst te garanderen. Wijzig de positie van de antenne voor de beste ontvangst. FM-RADIOBEDIENING Automatisch scannen 1. Zet het toestel aan op de FM-functie door te selecteren met de SOURCE toets. 2. Houd de toets SCAN ingedrukt om het automatisch scannen te starten en de beschikbare zenders op te slaan (max. 20 opslag).
ANDERE FM MENUBEDIENING Houd de MENU-toets ingedrukt (of druk op de MENU-toets op de afstandsbediening) om toegang te krijgen tot de of toets voor verschillende opties zoals hieronder beschreven. menubediening. Druk vervolgens op de Scaninstelling 1. Houd de MENU-toets ingedrukt (of druk op de MENU-toets op de afstandsbediening) om toegang te krijgen tot de menu bediening. 2. Druk op de toets of tot Scan ordt eergegeven en druk dan op de toets ENTER. 3.
Geprogrammeerde weergave CD-modus Dit apparaat kan orden geprogrammeerd om een reeks geselecteerde tracks af te spelen. 1. Druk in de stopmodus op de toets PROGRAM, het display geeft het programmanummer en het tracknummer eer.. of toets om het ge enste nummer te selecteren. 2. Druk op de 3. Druk op de toets PROGRAM om het ge enste nummer op te slaan. 4. Herhaal de stappen 2-3 om tot 30 geprogrammeerde tracks te programmeren. om de geprogrammeerde tracks af te spelen. 5. Druk op de toets 6.
CASSETTE RECORDER Druk herhaaldelijk op de SOURCE-toets om de cassetterecordermodus te openen. Op het display verschijnt TAPE . De bedieningsknoppen van de cassetterecorder bevinden zich aan de bovenzijde van het toestel. om de cassetterecorderklep te openen. 1. Druk op de CASSETTE STOP/EJECT-knop 2. Plaats de cassetteband en sluit de deur goed af. om af te spelen. 3. Druk op de knop CASSETTE PLAY Plaats de cassetteband met de bandzijde naar boven. Speelzijde is naar voren gericht.
OTHER FUNCTIONS AUX IN (Audio in) Hierdoor kunt u het geluid van een externe speler via u toestel aansluiten. 1. Sluit een 3,5 mm audiokabel (niet meegeleverd) aan op u externe speler en de andere zijde op de AUX IN-aansluiting. 2. Druk op de toets SOURCE om de AUX-modus te selecteren. Het display toont AUDIO IN . 3. Start u externe speler om muziek af te spelen en regel het geluidsvolume op de externe speler omhoog. 4. Het apparaat speelt het geluid af.
FUNCTIONS REMOTE CONTROL Standby: Source: Equalize r: X-Bass: Sleep: Mono/Stereo: Folder ˄˅: Memory: Tune˅ / tune: ( / ) REPEAT RANDOM CH+ / CH-: : Repeat Random: VOL DISPLAY Druk op de STANDBY-toets om het toestel in te schakelen. Om uit te schakelen, drukt u opnieu op de STANDBY-toets. Selectie van de gebruikersfunctie: DAB+ RADIO, FM-RADIO, CD, USB, BLUETOOTH, CASSETTE RECORDER (CASSETTE), AUDIO IN (AUX).
PROBLEEMOPLOSSING Geen stroom. ● Zorg ervoor dat de netkabel goed is aangesloten. ● Zorg ervoor dat het apparaat is ingeschakeld. Het apparaat reageert niet als er op een toets wordt gedrukt. ● Ver ijder de batterijen (indien geplaatst) en ver ijder het netsnoer voor een minuut. Plaats vervolgens de batterijen en netsnoer eer terug. Geen geluid. ● Zet het volume harder of ver ijder de hoofdtelefoonplug.
TECHNISCH OVERZICHT TECHNISCHE SPECIFICATIES DAB+ radiofrequentiebereik: FM radiofrequentiebereik: Bluetooth frequentiebereik: Bluetooth zendvermogen: AC stroomingang: Batterij gegevens: Luidsprekeruitgangsvermogen: Bluetooth: Aux in: Hoofdtelefoon uitgang: Batterij afstandsbediening: Afmetingen (L x B x H): Gebruikstemperatuur: Ge icht: ● ● 174.928-239.2 MHz 87.5-108 MHz 2.402-2.480 GHz 4 dBm 230V~ 50Hz 25W 6 x 1.5V C (UM-2), niet meegeleverd 2x6W V5.0 3.5mm stereo jack 3.
DEUTSCH ACHTUNG: Eine andere als die hier beschriebene Bedienung, Einstellung oder Verwendung der Funktionen kann zu gefährlicher Strahlenbelastung führen. VORSICHTSMASSNAHMEN VOR DER BENUTZUNG BEFOLGEN SIE IMMER FOLGENDE ANWEISUNGEN: 1. Blockieren oder bedecken Sie keine L ftungs ffnungen. Wenn Sie das Ger t auf ein Regal stellen, lassen Sie um das gesamte Ger t 5 cm (2 ) freien Platz. 2. Stellen Sie das Ger t entsprechend den An eisungen der mitgelieferten Bedienungsanleitung auf. 3.
21. 22. 23. 24. 25. 26. 27. 28. 29. Entfernen Sie niemals das Geh use dieses Produkts. Stellen Sie das Produkt niemals auf andere elektrische Ger te. Halten Sie Kinder von den Plastikt ten fern. Benutzen Sie nur vom Hersteller spezifizierte Er eiterungen/Zubeh rteile. Lassen Sie alle Eingriffe von qualifiziertem Servicepersonal ausf hren.
WARNUNG FÜR DEN CD/DVD-PLAYER: Laserprodukt der Klasse 1 LASERPRODUKT DER KLASSE 1 APPAREIL LASER DE CALSSE 1 PRODUCO LASER DE CLASE 1 ACHTUNG UNSICHTBARE LASERSTRAHLUNG BEI FFNEN UND UMGEHEN DER VERRIEGELUNG NICHT DIREKT IN DEN STRAHL SCHAUEN Dieses Produkt enth lt eine Lasereinheit geringer Leistung. WARNUNG: BERÜHREN SIE DIE LINSE NICHT. WARNUNG: Bei der Teilnahme am Stra enverkehr kann das H ren von Musik ber ein Musikger t von m glichen Gefahren ie beispiels eise sich nähernde Fahrzeuge ablenken.
ÜBERSICHT SOURCE SCAN MENU INFO ENTER VOLUME 1 1 1. USB-Port: 2. QUELLE: 5. EIN/AUS : : 6. ZIFFERNTASTEN: 7. 8. 9. 10. 11. 12. 3 4 5 6 4+ 3 7 8 9 10 11 12 13 Eingang f r den USB-Stick Diese Taste f r die Aus ahl eines der Modi DAB+, FM, CD, USB, BLUETOOTH, KASSETTE oder AUX-EINGANG dr cken. DAB+: Diese Taste zur Anzeige der Informationen des Radiosenders dr cken. Diese Taste gedr ckt halten, um das Men zum ndern von Einstellungen aufzurufen.
SOURCE SCAN MENU INFO ENTER VOLUME 1 2 3 4+ FOLDER PAIR REPEAT PROGRAM CASSETTE RECORDER 16 15 14 15 16 AUX IN OPEN OPEN ~AC IN 17 18 19 20 21 22 CD-Fachdeckel Kassettenfacht r Bassreflex ffnung Lautsprecher Tragegriff Batteriefachabdeckung AUX-EINGANG: Hier ein externes Audio iedergabeger t anschlie en Kopfh rerbuchse: Hier einen externen Kopfh rer anschlie en Antenne: Die Antenne herausziehen, um einen guten DAB+/FM-Empfang sicherzustellen.
EINLEGEN DER BATTERIEN OPEN OPEN AUX IN + 1,5V + 1,5V + 1,5V ~AC IN 1,5V + C 1,5V C 1,5V C 1,5V 1,5V + C 1,5V + 1,5V + C 1,5V C 1,5V + BATTERIEBETRIEB: Ziehen Sie f r den Batteriebetrieb zuerst den Netzstecker aus der Netzsteckdose und danach das Netzkabel aus der Netzanschlussbuchse ~AC IN des Ger ts. Entfernen Sie die Batteriefachabdeckung auf der R ckseite des Ger ts.
BENUTZEN EINES OHR-/KOPFHÖRERS Auf der R ckseite Ihres SCD-720 befindet sich eine Buchse f r den Anschluss eines Kopfh rers. Hier k nnen Sie an Ihrem SCD-720 ein Ohrh rerpaar oder einen Kopfh rer mit 3,5-mm-Klinkenstecker anschlie en. Sobald Sie den 3,5-mm-Klinkenstecker in die Kopfh rerbuchse stecken, erden die Lautsprecher Ihres SCD-720 stummgeschaltet. Die Audioausgabe erfolgt dann nur ber die Ohr-/Kopfh rer. Mit dem Lautst rkeregler k nnen Sie die Wiedergabelautst rke einstellen.
DAB+-RADIO Ausrichten der Antenne Die Antenne auf der R ckseite des Ger ts sollte vollst ndig herausgezogen erden, um einen gutem DAB+-/FM-Empfang sicherzustellen. ndern Sie die Ausrichtung der Antenne, um den besten Empfang zu erhalten. DAB+-BEDIENUNG Wenn Sie den DAB+-Modus das erste Mal aus hlen, dann scannt das Ger t automatisch nach verf gbaren DAB+-Radiosendern. Warten Sie solange, bis dieser Initialscan abgeschlossen ist. Auf dem Display ird der Scanfortschritt angezeigt.
oder , um den abzurufenden Senderspeicherplatz auszu 3. Dr cken Sie die Taste 4. Dr cken Sie die Taste ENTER, um den Senderspeicherplatz abzurufen. hlen. Wie Sie mit Hilfe der Fernbedienung Senderspeicherpl tze abrufen: 1. Wenn Sie die Taste MEMORY dr cken, dann ird auf dem Display Recall (Abruf) angezeigt. oder , um den abzurufenden Senderspeicherplatz auszu hlen. 2. Dr cken Sie die Taste 3. Dr cken Sie die Taste ENTER, um den Senderspeicherplatz abzurufen.
FM-RADIO Ausrichten der Antenne Die Antenne auf der R ckseite des Ger ts sollte vollst ndig herausgezogen erden, um einen gutem DAB+-/FM-Empfang sicherzustellen. ndern Sie die Ausrichtung der Antenne, um den besten Empfang zu erhalten. FM-RADIOBEDIENUNG Automatischer Scan 1. Wechseln Sie in den FM-Modus. 2. Halten Sie die Taste SCAN gedr ckt, um das automatische Scannen zu starten und die verf gbaren Radiosender (max. 20) zu speichern. Manueller Scan 1. Dr cken Sie mehrmals die Taste 2.
WEITERE FM-MENÜOPTIONEN Halten Sie die Taste MENU am Ger t gedr ckt oder dr cken Sie die Taste MENU auf der Fernbedienung, um das Menü oder , um eine der auf der folgenden Seite beschriebenen anzeigen zu lassen. Dr cken Sie anschlie end die Taste Men optionen auszu hlen. Scaneinstellung 1. Halten Sie die Taste MENU am Ger t gedr ckt oder dr cken Sie die Taste MENU auf der Fernbedienung, um das Menü anzeigen zu lassen. 2.
MP3-CD-Modus oder MP3-USB-Datenträgermodus Wenn Sie hrend der Wiedergabe die Taste REPEAT einmal dr cken, dann ird auf dem Display REP.ONE (EINZELTITELWIEDERHOLUNG) angezeigt. Der aktuelle Titel ird iederholt iedergegeben. Wenn Sie die Taste REPEAT erneut dr cken, dann ird auf dem Display REP.ALBUM (VERZEICHNIS WIEDERHOLEN) angezeigt. Alle Titel des aktuellen Verzeichnisses erden iederholt iedergegeben. Wenn Sie die Taste REPEAT erneut dr cken, dann ird auf dem Display REP.ALL (ALLES WIEDERHOLEN) angezeigt.
BLUETOOTH Bitte folgen Sie den nachstehenden An eisungen f r das Koppeln des Ger ts mit Ihrem Bluetooth-Ger t. 1. Dr cken Sie mehrmals die Taste SOURCE, um in den Bluetooth-Modus zu echseln. Auf dem Display ird BT AUDIO (BLUETOOTH-AUDIO) angezeigt. Die Suche ird gestartet und auf dem Display ird BT AUDIO (BLUETOOTH-AUDIO) blinkend angezeigt. 2.
HINWEIS: - F r das Aufzeichnen k nnen nur Kassetten vom Typ 1 benutzt erden. - Wenn das Kassettenband locker ist, dann drehen Sie es mit Hilfe eines Bleistifts solange zur ck, bis es straff ist, um einer Besch digung der Kassette oder des Ger ts vorzubeugen. - Auf der Kassettenoberseite besitzt die Kassette links und rechts je eils eine Nase, die herausgebrochen erden kann. Wenn die Nase herausgebrochen ist, dann kann die je eilige Seite der Kassette nicht mehr f r Aufzeichnungen benutzt erden.
SPRACHEINSTELLUNG Sie k nnen die OSD-Sprache Ihres Ger ts einstellen. 1. Schalten Sie hierf r das Ger t ein und echseln Sie dann in den DAB+- oder FM-Modus. 2. Halten Sie die Taste MENU am Ger t gedr ckt oder dr cken Sie die Taste MENU auf der Fernbedienung, um das Menü anzeigen zu lassen. oder solange, bis System (System) angezeigt ird und anschlie end zum Best tigen 3. Dr cken Sie die Taste Ihrer Aus ahl die Taste ENTER. 4.
FUNKTIONEN DER FERNBEDIENUNG Standby: Quelle: Equalize r: X-Bass: Sleep: Mono/Stereo: Folder ˄˅: Memory: Tune˅/Tune˄: REPEAT RANDOM ( / ) CH+/CH-: : Repeat VOL DISPLAY Random: Dr cken Sie die Taste STANDBY, um das Ger t einzuschalten. Dr cken Sie die Taste STANDBY erneut, um es auszuschalten. Diese Taste f r die Aus ahl der Signaleingangsquellen DAB+-RADIO, FM-RADIO, CD, USB, BLUETOOTH, KASSETTE (KASSETTEN) oder AUDIO-EINGANG (AUX) dr cken.
PROBLEMBEHEBUNG Kein Strom ● Verge issern Sie sich, dass das Netzkabel ordnungsgem ● Verge issern Sie sich, dass das Ger t eingeschaltet ist. verbunden ist. Das Gerät reagiert nicht auf das Drücken der Tasten. ● Entfernen Sie die Batterien (falls eingelegt) und ziehen Sie f r eine Minute das Netzkabel vom Ger t ab. Legen Sie anschlie end die Batterien ieder ein. Keine Tonausgabe ● Heben Sie die Lautstärke an.
TECHNISCHE DATEN TECHNISCHE DATEN DAB+-Radio-Frequenzbereich: FM-Radio-Frequenzbereich: Bluetooth Frequenzbereich: Bluetooth- bertragungsleistung: AC-Netzeingang: Batteriebetrieb: Lautsprecherausgangsleistung: Bluetooth: AUX-Eingang: Kopfh rerbuchse: Batterie Fernbedienung: Ger teabmessung (L x T x H): Betriebstemperatur: Gesamtge icht: ● ● 174,928 239,2 MHz 87,5 108 MHz 2,402 2,480 GHz 4 dBm 230 V~/50 Hz, 25 W 6 x 1,5-V-Batterie der Gr e UM-2 (C); nicht im Lieferumfang enthalten 2x6W V5.
FRANÇAIS ATTENTION : L’utilisation de commandes ou d’ajustements ou l’exécution de procédures autres que celles spécifiées dans le présent document peuvent entraîner une exposition dangereuse aux radiations. PRÉCAUTIONS AVANT UTILISATION GARDEZ CES INSTRUCTIONS À L’ESPRIT : 1. Ne couvrez pas et n’obturez pas les ouvertures de ventilation. Lorsque vous placez l’appareil sur une étagère, laissez 5 cm (2”) d’espace libre tout autour de l’appareil. 2. Installez-le conformément au mode d’emploi fourni. 3.
20. Vérifiez que l’appareil est en position stable. La garantie ne couvre pas les dégâts occasionnés par l’utilisation de cet appareil en position instable, par les vibrations, les chocs ou par la non-observation de tout autre avertissement ou précaution contenus dans ce mode d’emploi. 21. N’ouvrez jamais cet appareil. 22. Ne placez jamais cet appareil sur un autre appareil électrique. 23. Ne laissez pas les sacs en plastique à la portée des enfants. 24.
AVERTISSEMENTS RELATIFS AU LECTEUR DE CD/DVD : Appareil à laser de classe 1 MISE EN GARDE RAYONNEMENT LASER INVISIBLE LORSQUE L’APPAREIL EST OUVERT ET QUE LES VERROUS SONT INEFFICACES, ÉVITEZ L’EXPOSITION AU FAISCEAU Ce produit contient un dispositif laser à faible puissance. APPAREIL À LASER DE CLASSE 1 APPAREIL Á LASER DE CLASSE 1 PRODUCO LASER DE CLASE 1 AVERTISSEMENT : NE TOUCHEZ PAS LA TÊTE DE LECTURE.
APERÇU SOURCE SCAN MENU INFO ENTER VOLUME 1 1 1. Entrée USB : 2. SOURCE : 3. 4. 5. 6. 7. 8. 9. 10. 11. 12. 2 3 4 5 2 6 4+ 3 7 8 9 10 11 12 13 Entrée pour clé USB Appuyez sur cette touche pour choisir parmi les différents modes : DAB+/FM/CD/USB/BLUETOOTH/ CASSETTE/AUX IN. MENU / INFO : DAB+ : Appuyez dessus pour afficher les informations de la station. Maintenez enfoncée cette touche pour accéder au menu pour modifier les réglages Appuyez sur ou pour sélectionner le point de menu.
SOURCE SCAN MENU INFO ENTER VOLUME 1 2 3 4+ FOLDER PAIR REPEAT PROGRAM CASSETTE RECORDER 16 15 14 15 16 AUX IN OPEN OPEN ~AC IN 17 18 19 20 13. 14. 15. 16. 17. 18. 19. 20. 21. 22.
INSERTION DES PILES OPEN OPEN AUX IN + 1,5V + 1,5V + 1,5V ~AC IN 1,5V + C 1,5V C 1,5V C 1,5V 1,5V + C 1,5V + 1,5V + C 1,5V C 1,5V + FONCTIONNEMENT SUR PILES : Pour un fonctionnement CC, débranchez d'abord la fiche CA de la prise secteur et débranchez le cordon d'alimentation CA de la prise d’entrée CA. Retirez la porte du compartiment à piles à l’arrière de l’appareil.
UTILISATION DES ÉCOUTEURS/DU CASQUE Vous trouverez la connexion pour le casque sur la face arrière du SCD-720. Utilisez un casque ou des écouteurs avec une prise stéréo de 3,5 mm pour connecter le casque au SCD-720. Si vous insérez la prise stéréo 3,5 mm, les haut-parleurs du SCD-720 s’éteignent. Seul le casque d’écoute fonctionnera désormais. Vous pouvez contrôler le volume à l’aide du bouton de volume. Toutes les autres fonctions sont identiques à celles d’une utilisation normale sans casque connecté.
RADIO DAB+ Ajustement de l’antenne L’antenne située sur le panneau arrière de l’appareil doit être complètement déployée pour assurer une bonne réception DAB+/FM. Orientez l’antenne autrement afin d’améliorer la réception. UTILISATION EN DAB+ La première fois que le mode DAB+ est sélectionné, l’appareil recherchera automatiquement les stations DAB+ disponibles. Attendez que l’appareil ait fini la recherche. L’écran indiquera la progression de la recherche.
ou pour sélectionner le numéro du préréglage de votre choix à rappeler. 3. Appuyez sur la touche 4. Appuyez sur ENTER pour rappeler. Utiliser les boutons de la télécommande pour rappeler le préréglage : 1. Appuyez sur la touche MEMORY, « Recall » (Rappeler) s’affiche. 2. Appuyez sur la touche ou pour sélectionner le numéro du préréglage de votre choix à rappeler. 3. Appuyez sur ENTER pour rappeler.
RADIO FM Ajustement de l’antenne L’antenne située sur le panneau arrière de l’appareil doit être complètement déployée pour assurer une bonne réception DAB+/FM. Orientez l’antenne autrement afin d’améliorer la réception. UTILISATION DE LA RADIO FM Recherche automatique 1. Mettez l’appareil en marche et réglez-le en mode FM. 2. Maintenez enfoncé le bouton SCAN pour lancer une recherche automatique et sauvegarder les stations disponibles (max. 20 emplacements). Recherche manuelle 1.
AUTRES UTILISATIONS DU MENU FM Appuyez sur la touche MENU (ou appuyez sur la touche MENU de la télécommande) et maintenez-la enfoncée pour accéder ou pour accéder à différentes options tel que décrit à la page aux commandes du menu. Puis, appuyez sur la touche suivante. Réglages de recherche 1. Appuyez sur la touche MENU (ou appuyez sur la touche MENU de la télécommande) et maintenez-la enfoncée pour accéder aux commandes du menu. 2.
Lorsque vous appuyez à nouveau sur la touche REPEAT, l’appareil revient à la lecture normale. Lecture programmée Mode Disque CD Cet appareil peut être programmé pour lire une séquence de pistes sélectionnées. 1. En mode arrêt, appuyez sur la touche PROGRAM, l’écran affiche le numéro de programme et le numéro de piste. ou pour sélectionner la piste de votre choix. 2. Appuyez sur la touche 3. Appuyez sur le bouton PROGRAM pour sauvegarder la piste voulue. 4.
Remarque : • Maintenez enfoncée la touche PAIR pour annuler la connexion en cours et lancer la recherche d’un autre dispositif Bluetooth. • Ce produit est doté d’une fonction de réception bluetooth, vous ne pouvez pas l’utiliser pour transmettre de son bluetooth (le casque ou l’oreillette Bluetooth ne reçoit pas le signal du SCD-720), cela signifie que vous pouvez recevoir sans fil un signal sonore bluetooth provenant d’une source externe comme un smartphone.
AUTRES FONCTIONS ENTRÉE AUXILIAIRE Cela vous permet de connecter le son provenant d’un lecteur externe par le biais de votre appareil. 1. Branchez un câble audio de 3,5 mm (non fourni) sur la sortie ligne de votre lecteur externe et l’autre extrémité sur prise AUX IN. 2. Appuyez sur le bouton SOURCE pour passer en mode AUX. « AUDIO IN » (entrée audio) s'affiche. 3. Lancez la lecture de musique sur votre lecteur externe. 4. L’appareil lit le son.
FONCTION DE LA TÉLÉCOMMANDE Mise en veille : Source : Égaliseur : X-Bass : Veille : Mono/stéréo : Folder ˄˅ : Mémoire : Tune˅ / tune˄ : ( / ) REPEAT RANDOM CH+/CH- : Répétition Aléatoire : VOL DISPLAY : Appuyez sur le bouton STANDBY pour mettre l'appareil en marche. Pour l'éteindre, rappuyez sur le bouton STANDBY. Sélection de la fonction utilisateur : RADIO DAB+, FM-RADIO, CD, USB, BLUETOOTH, CASSETTE (CASSETTE), ENTRÉE AUDIO (AUX).
DÉPANNAGE Pas d’alimentation ● Vérifiez que le cordon secteur est correctement branché. ● Assurez-vous que l’appareil est allumé. L’appareil ne répond pas aux touches. ● Retirez les piles (lorsqu’elles sont présentes) et retirez le cordon pendant une minute. Puis réinsérez les piles. Pas de son ● Augmenter le volume. Je n’arrive pas à trouver le nom Bluetooth de cet appareil sur mon appareil Bluetooth pour l’appairage Bluetooth ● Assurez-vous que l’appareil est allumé.
DONNÉES TECHNIQUES CARACTÉRISTIQUES TECHNIQUES Plage de fréquence radio DAB+ : Plage de fréquence radio FM : Plage de fréquence Bluetooth : Puissance de transmission Bluetooth : Entrée d’alimentation CA : Fonctionnement sur piles : Puissance de sortie des enceintes : Bluetooth : Entrée auxiliaire : Sortie casque : Pile de la télécommande : Dimensions de l’appareil (L x P x H) : Température de fonctionnement : Poids total : ● ● 174,928-239,2 MHz 87,5-108 MHz 2,402-2,480 GHz 4 dBm 230 V~ 50 Hz 25 W 6 x 1,5 V
ESPAÑOL PRECAUCIÓN: El uso de controles o ajustes o rendimiento de procedimientos excepto aquellos que los aqu especificados puede provocar una exposición peligrosa a la radiación. PRECAUCIONES PREVIAS AL USO TENGA ESTAS INSTRUCCIONES EN MENTE: 1. No cubra o bloquee ninguna apertura de ventilación. Cuando coloque el dispositivo en una estantería, deje 5 cm (2”) de espacio libre alrededor de todo el dispositivo. 2. Instálelo conforme al manual de usuario que se adjunta. 3.
21. 22. 23. 24. 25. 26. 27. 28. 29. derivados de usar este producto en una posición inestable, vibraciones o golpes o por no seguir otras advertencias o precauciones que aparecen en este manual de usuario. Nunca retire la carcasa del dispositivo. Nunca coloque este dispositivo sobre otro equipo eléctrico. Mantenga las bolsas de plástico fuera del alcance de los niños. Use nicamente los dispositivos/accesorios especificados por el fabricante. Remita todas las reparaciones al personal cualificado.
ADVERTENCIA PARA EL REPRODUCTOR CD / DVD: Producto láser de clase 1 PRODUCTO LÁSER DE CLASE 1 APPAREIL Á LASER DE CALSSE 1 PRODUCO LASER DE CLASE 1 PRECAUCIÓN RADIACIÓN LÁSER INVISIBLE CUANDO SE ABRA Y LOS CIERRES SE DESBLOQUEEN EVITE LA EXPOSICIÓN AL HAZ Este producto contiene un dispositivo láser de baja potencia. ADVERTENCIA: NO TOQUE LA LENTE.
VISTA GENERAL SOURCE SCAN MENU INFO ENTER VOLUME 1 1 1. Entrada USB: 2. FUENTE: 3. 4. 5. 6. 7. 8. 9. 10. 11. 12. 13. 2 3 4 2 5 4+ 3 6 7 8 9 10 11 12 13 Entrada para memoria USB Pulse esta tecla para elegir diferentes modos: DAB+/FM/CD/USB/BLUETOOTH/CINTA DE CASETE / ENTRADA AUXILIAR. MEN / DAB+: Púlselo para mostrar la información de la emisora. o INFORMACIÓN: Manténgalo pulsado para entrar en el men para un cambio de configuraci n. Pulse para seleccionar el elemento del menú.
SOURCE SCAN MENU INFO ENTER VOLUME 1 2 3 4+ FOLDER PAIR REPEAT PROGRAM CASSETTE RECORDER 16 15 14 15 16 AUX IN OPEN OPEN ~AC IN 17 18 19 20 14. 15. 16. 17. 18. 19. 21 22 Puerta del compartimento de la cinta de casete Puerto de bajos Altavoz Asa de transporte Puerta del compartimento de las pilas ENTRADA Conéctelo al reproductor de audio externo AUXILIAR: 20. Salida de Conéctelo al auricular externo auriculares: 21.
INSERCIÓN DE LAS PILAS OPEN OPEN AUX IN + 1,5V + 1,5V + 1,5V ~AC IN 1,5V + C 1,5V C 1,5V C 1,5V 1,5V + C 1,5V + 1,5V + C 1,5V C 1,5V + FUNCIONAMIENTO DE LAS PILAS: Para utilizarlo con CC, retire primero el conector de CA de la toma de CA y desconecte el cable de CA del conector de entrada de corriente. Retire la puerta del compartimento de las pilas situada en la parte posterior de la unidad.
USO DE AUDÍFONOS / AURICULARES En la parte posterior del SCD-720 encontrará la conexión de los auriculares. Use un audífono o auricular con una toma estéreo de 3,5 mm para conectar el auricular al SCD-720. Si coloca una toma estéreo de 3.5mm los altavoces del SCD-720 se desconectarán. Solo funcionarán los auriculares. Puede controlar el volumen mediante el dial de volumen. Todas las demás funciones son las mismas que el uso normal sin auricular conectado.
DAB+ RADIO Ajuste de la antena La antena situada en el panel posterior de la unidad debe estar completamente extendida para asegurar una buena recepción DAB+ / FM. Cambie la posici n de la antena para conseguir la mejor recepci n. FUNCIONAMIENTO DE DAB+ La primera vez que se seleccione el modo DAB+, buscará automáticamente las emisoras DAB+ disponibles. Espere hasta que la búsqueda haya terminado. La pantalla mostrará el progreso de la búsqueda. Tras la búsqueda, sintonizará la primera emisora.
Mostrar la información de la emisora DAB+ Existen varios tipos que información que se enumeran a continuación. Para cambiar la información de la pantalla, pulse el botón INFO de forma reiterada. Desplazamiento por el texto de radio Nombre multiplex Barra de señal Tipo de programa (PTY) Tasa de error de señal Frecuencia Tasa bit radio 1. Desplazamiento por el texto de radio: Muestra los títulos de música o la información del programa proporcionada por la emisora. 2.
RADIO FM Ajuste de la antena La antena situada en el panel posterior de la unidad debe estar completamente extendida para asegurar una buena recepción DAB+ / FM. Cambie la posici n de la antena para conseguir la mejor recepci n. FUNCIONAMIENTO DE LA RADIO FM Búsqueda automática 1. Encienda la unidad en modo FM. 2. Mantenga pulsado el botón SCAN para iniciar la búsqueda automática y guardar las emisoras disponibles (almacenamiento máx. 20).
OTROS FUNCIONAMIENTOS DEL MENÚ FM Mantenga pulsado el botón MENU (o pulse el botón MENU en el mando a distancia) para acceder al control del menú. Posteo para ver las diferentes opciones tal y como se describen en la página siguiente. riormente pulse el botón onfiguraci n de squeda 1. Mantenga pulsado el botón MENU (o pulse el botón MENU en el mando a distancia) para acceder al control del menú. 2. Pulse el botón o hasta que se muestre “Scan (Busq)” y posteriormente, pulse el botón ENTER. 3.
Reproducci n programada Modo de disco CD Esta unidad puede programarse para reproducir una secuencia de pistas seleccionadas. 1. En modo parada, pulse el botón PROGRAM, la pantalla muestra el número de programa y el número de pista. o para seleccionar la pista que desee. 2. Pulse el botón 3. Pulse el botón PROGRAM para guardar la pista que desee. 4. Repita los pasos 2-3 para guardar hasta 30 pistas programadas. para empezar la reproducción de las pistas programadas. 5. Pulse el botón 6.
CINTA DE CASETE Pulse el botón SOURCE de forma reiterada para entrar en el modo cinta de casete. La pantalla mostrará “TAPE CINTA)”. Los botones del control del casete están situados en la parte superior delantera de la unidad. para abrir la puerta de la cinta de casete. 1. Pulse el bot n PARADA / EXPULSI N DEL CASETE 2. Inserte la cinta de casete y cierre la puerta con fuerza. Inserte la cinta de casete con la cinta de casete hacia arriba La cara que se reproduce da hacia arriba para reproducirla. 3.
OTRAS FUNCIONES ENTRADA AUX Esto le permite conectar el sonido de un reproductor externo a través de su unidad. 1. Conecte un cable de audio de 3,5 mm (no incluido) en la salida de línea del reproductor externo y en la toma AUX IN. 2. Pulse el botón SOURCE para entrar en el modo AUX. La pantalla muestra “ENTRADA AUDIO”. 3. Empiece a reproducir música con el reproductor externo. 4. La unidad reproduce el sonido.
FUNCIONES DEL MANDO A DISTANCIA En espera: Fuente: Ecualiza dor: Bajo X: Dormir: Mono/Estéreo: arpeta ˄˅: Memoria: Sintoni ar˅ / sintoni ar ˄: ( / ) REPEAT RANDOM CH+/CH-: Repetir : Aleatorio: VOL DISPLAY Pulse el botón STANDBY para encender la unidad. Para apagarlo, vuelva a pulsar el botón STANDBY. Selección de otras funciones: DAB+ RADIO, FM-RADIO, CD, USB, BLUETOOTH, CINTA (CASETE), ENTRADA DE AUDIO (AUXILIAR). Configuraci n del Ecualizador: FLAT / ROCK / CLASSIC / POP / VOCAL / JAZZ.
SOLUCIÓN DE PROBLEMAS: No se enciende ● Compruebe que el cable de red está bien conectado. ● Asegúrese de que la unidad está encendida. La unidad no responde cuando se pulsa cualquier ot n. ● Retire las pilas (cuando estén insertadas) y retire el cable de alimentación durante un minuto. Posteriormente, vuelva a insertar las pilas. o ha salida de sonido ● Suba el volumen.
VISTA GENERAL TÉCNICA ESPECIFICACIONES TÉCNICAS Margen de frecuencias de radio DAB+: Alcance de frecuencia de radio FM: Rango de frecuencias Bluetooth: Potencia de transmisión Bluetooth: Entrada de alimentaci n CA: Funcionamiento con pilas: Potencia de salida del altavoz: Bluetooth: Entrada auxiliar: Salida de auriculares: Pila del mando a distancia: Dimensiones de la unidad (L x P x A): Temperatura de funcionamiento: Peso total: ● ● 174,928-239,2 MHz 87,5 - 108 MHz 2,402 - 2,480 GHz 4 dBm 230 V~ 50 Hz 25