
User's Guide

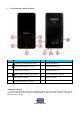


a. To Connecting Player
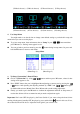
To connect player to your computer, plug the connector of USB Cable into a USB port on your
computer, and connect the other end to player, then the “Connect” screen appear for view.
Now the player is ready for media files transfer with your computer and the battery is
charging.
You can transfer the media files by using the computer mouse use drag and place, or copy and
paste, in between the player and your computer. Disconnect it when you’re done.
b. To Disconnecting Player
It’s important not to disconnect player while it’s syncing or transferring files. Eject the player
before disconnect it.
To eject player, press and hold M button for about 2 seconds, the “Connect” screen will switch
to “Main Menu” screen. And now is safe to disconnect the player with your computer. Unplug
the USB cable from the player. Or,
If you’re using a Windows PC, you can also eject player in My Computer or by clicking the
“Safely Remove Hardware” icon in the Windows system tray, select the correspondence name
of USB Device and choose “Stop” > choose “Confirm” > choose “Confirm” follow by the pop
up windows you’re your computer.
If you’re using a Mac, you can also eject player by dragging the player icon on the desktop to
the Trash.
Disconnect the USB cable from the player and computer, simply remove it.
If you accidentally disconnect player without ejecting it, reconnect it to your computer and
sync again. However, some media file may loss.
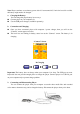
3. Getting Start the Player
Turn ON / OFF the player and use of Main Menu.
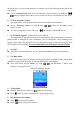
Slide the power switch to “ON” position, then you will see any one of the following shown
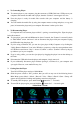
Main Menu screen, Music / Movie / Record / Voice / Photo / eBook / Game / Setup, will
appear on LCD after the Loading and Opening screen have displayed.
To standby OFF the player, press and hold the button for 3 – 4 seconds.
To turn ON the player again, press and hold the button for 3 – 4 seconds again.
“Main Menu” screens