User's Guide PB42 Portable Receipt Printer
Intermec Technologies Corporation Worldwide Headquarters 6001 36th Ave. W. Everett, WA 98203 U.S.A. www.intermec.com The information contained herein is proprietary and is provided solely for the purpose of allowing customers to operate and service Intermec-manufactured equipment and is not to be released, reproduced, or used for any other purpose without written permission of Intermec.
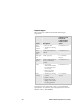
Document Change Record This page records changes to this document. The document was originally released as version -001. Version Number Date Description of Change 002 12/2005 Revised to support release 2 of the PB42 firmware. 003 3/2006 Revised to add more information on Intermec Settings, downloading fonts and graphics, and cold booting the printer.
iv PB42 Portable Receipt Printer User’s Guide
Contents Before You Begin......................................................................................................vii Safety Icons ................................................................................................vii Global Services and Support .......................................................................vii Who Should Read This Document? ............................................................ix Related Documents .....................................................
Specifications........................................................................................................... 37 Accessories for the PB42 ..........................................................................................
Before You Begin This section provides you with safety information, technical support information, and sources for additional product information. Safety Icons This section explains how to identify and understand cautions and notes that you see in this document. A caution alerts you to an operating procedure, practice, condition, or statement that must be strictly observed to prevent equipment damage or destruction, or corruption or loss of data.
Telephone Support These services are available from Intermec Technologies Corporation. Service Description In the U.S.A. and Canada call 1-800-755-5505 and choose this option Order Intermec products • Place an order. 1 and then choose 2 Order Intermec media • Ask about an existing order. Order printer labels and ribbons. 1 and then choose 1 Order spare parts Order spare parts. 1 or 2 and then choose 4 Technical Support Talk to technical support about your Intermec product.
Who Should Read This Document? The PB42 Portable Receipt Printer User’s Guide is written for the person who is responsible for installing, configuring, maintaining, and troubleshooting the printer. Related Documents The Intermec web site contains Intermec documents (in PDF) that you can download for free. To download documents 1 Visit the Intermec web site at www.intermec.com. 2 Click Service & Support > Manuals. 3 In the Select a Product field, choose the product whose documentation you want to download.
x PB42 Portable Receipt Printer User’s Guide
Learning About the PB42 Portable Receipt Printer The PB42 is a rugged receipt printer designed for use with the CK60 or 700 Computer with a Bluetooth™ radio. The PB42 provides: • print resolution of 203 dpi. • print speeds up to 5.1 cm (2 inches) per second (ips). • serial or Bluetooth™ communication options. Identifying the Parts of the Printer Use the next two illustrations to familiarize yourself with the printer.
Media cover release button Media window PB42 Back and Side View: View of the back and side of the PB42 to show important features. What’s New? This revision of the user’s guide supports these new features: • How to upgrade the computer or download fonts and graphics using SmartSystems console. For more information, see “Downloading Fonts, Graphics, and Upgrades to the PB42” on page 28. • How to cold boot the printer. For more information, see “Cold Booting the PB42” on page 34.
Understanding the Control Panel The PB42 control panel contains two buttons and four lights. Use the buttons to work with the PB42. Use the lights to understand the state of the printer. See the following tables to understand how the buttons work and what the lights mean. Battery lights Radio button and light Feed button Ready-to-Work indicator PB42 Control Panel: Use this illustration to familiarize yourself with the buttons and lights on the PB42.
Understanding the PB42 Lights Light State Description Battery lights (printer powered externally) Off No batteries are installed. Fast blinking red There is a charging error. Verify that battery is good by inserting it in a known good charger. Solid red The batteries are charging. Solid green The battery charging is complete. Battery lights (printer battery powered) Off The batteries are in a charged state. Blinking red The batteries are low. Recharge or replace your batteries now.
Understanding the PB42 Lights (continued) Light State Description Radio light Fast blinking green The radio is receiving data. Slow blinking green The Bluetooth radio is on. Off The radio is off. Understanding the Printer Sounds The PB42 plays sounds in response to several actions that you can do with the printer. See the following table to understand when the sounds occur.
Using the Batteries The PB42 uses lithium-ion 2400 mAh batteries (Model 318-015-001) for power. You can operate the PB42 with one or two batteries installed. You must fully charge the batteries before you can use the PB42. Fully charged batteries can last for up to one week without needing to be recharged. Use Intermec battery pack model 318-015-001 only. Use of another pack may present a risk of fire or explosion.
2 Insert batteries into the two battery slots until they lock in place. The contact side of the battery faces the back of the printer. The printer plays the Power sound when you insert the battery completely. Batteries Battery cover 3 Close the battery cover by pulling the battery cover latch toward the front of the printer and pushing down.
Charging the Batteries There are several ways to charge the PB42 batteries: • Connect AC power to the printer and charge the batteries while they are inside the PB42. • Place the PB42 with batteries installed in the 4-bay charger (Model AC10). • Charge the batteries in the CK60/PB42 quad battery charger (Model AC4). For information on charging your batteries in the 4-bay charger, see the PB42 4-Bay Charger Quick Start Guide (P/N 930-118001).
AC outlet AC power cord Power supply DC power connector 3 Connect one end of the power cord to the power supply and then plug the other end into an AC outlet.
Extending Battery Life Here are some tips for extending the overall life of your batteries: • Never expose the batteries to direct sunlight or temperatures over 40°C (104°F). • Only charge the batteries inside the PB42 using a power supply or a 4-bay charger (Model AC10) or in the CK60/PB42 quad battery charger (Model AC4). Here are some tips for extending the life of your battery between charges: • Turn off the radio when you are not using it.
To load media 1 Slide the media cover release button to the unlocked (left) position. Media cover release button 2 Press the media cover release button to open the media cover. Media cover Media cover release button 3 Insert the media roll between the two media supports until it fits into place. Make sure you load the media clockwise so that it pulls off the core from the bottom of the printer.
Media supports 4 Pull out a few inches of the media. 5 Close the media cover by pressing in the middle of the lid (or on both sides) until it latches. The printer emits the Hardware sound to tell you that the media door closed correctly. 6 Slide the media cover release button to the locked (right) position. 7 Press the Feed button to advance the media.
Printing a Configuration Test Page After you have loaded the media in the printer, you are ready to print out the configuration test page. Use this information for reference when installing your PB42 and to verify proper printer operation. If you cannot get the configuration test page to print, see “Troubleshooting” on page 30 for help. To print the configuration test page • Press and hold the Feed and Radio buttons until the printer emits the Button sound and the page starts to print.
Wireless (Bluetooth) Configuration: F/W Ver : 2.15 12/27/2004 (c) Roving Networks Device Address : 00A0960AF16F 00A0960AF16F Device Name Service Name : : "PB42-12345678910" "Wireless Printer" Class of Device : 00040680 Mode : Discoverable, Connectable Reserve Printer : Disabled Security: Authentication Off, Encryption Off Version: 3.20 12/27/2004 (c) Roving Networks Fonts: LOC CPI *---DESCRIPTION---* R 20.3 Arabic CP1256 10x16 R 14.
Configuring the PB42 You can configure several settings on the PB42 by using Intermec Settings from your CK60 or 700 Computer. Here are some of the settings you can configure for the PB42 from your handheld computer: • Darkness adjust • Set low battery indicator • Bluetooth communications • Restore factory defaults Intermec Settings is available as part of the operating system upgrade for your CK60 or 700 Computer. You can download the upgrade files for your computer from the Intermec web site at www.
Setting Up Bluetooth Communications The PB42 contains a Bluetooth radio that allows wireless communication with a remote device from distances up to 100 meters (approximately 328 feet) depending on the Bluetooth range capabilities of the remote device , environmental conditions, and obstructions. For the Bluetooth-enabled devices to exchange data, both devices must establish a connection. Bluetooth software is always running in the background, ready to respond to connection requests.
Serial Port Settings on the PB42 Parameter Default Setting Baud rate 115200 Data bits 8 Parity None Stop bits 1 Flow control Hardware Note: The PB42 only supports CTS flow control. You must disable DSR flow control in your printing application while using serial communications with the PB42. To connect the PB42 to a PC 1 Connect the 8-pin circular DIN connector to the serial port on the PB42.
Cancelling a Print Job You can cancel or stop a print job at any time during the printing process. You may find this feature helpful if you make a mistake entering data or send incomplete information. This procedure only works if you are in the process of sending a print job or the printer is currently printing a print job. Otherwise, pressing both buttons will print the configuration test page information. To cancel a print job 1 Press and hold the Feed and Radio buttons until the printer beeps.
3 Use an application such as ActiveSync to copy the .cab file onto the root directory of your handheld computer. 4 Double-click the .cab file on your handheld computer. To download fonts, graphics, and upgrades using SmartSystems 1 Download the PB42 fonts, graphics, or firmware upgrade .exe file from the Intermec web site to your desktop PC. 2 Double-click the .exe file on your desktop PC. The file automatically extracts and installs the files in the Software Vault section of the SmartSystems Console.
3 On the Settings tab, make sure you select the following values for these settings: Setting Select This Value COM port COM6 Baud rate 115200 Handshaking Hardware Use remote DCB Enabled 4 Select the Printer Flash Update tab. 5 Click Choose Update. A browser window opens. 6 Browse to your .upg file, select it, and click OK. The browser window closes and you return to the Printer Flash Update tab. 7 Select Send Update. 8 Wait for the “Firmware Upgrade Success” message on the CK60.
Calling Product Support To talk to an Intermec Product Support representative in North America or Canada, call: 1-800-755-5505 Outside the U.S.A. and Canada, go to www.intermec.com and click Contact to find your local Intermec representative. Before you call Intermec Product Support, make sure you have the following information ready: • Serial number • Firmware version • Bluetooth or Serial port settings You can find all of the information listed above on the configuration test page.
Printer Problems and Possible Solutions Use the following tables to troubleshoot some common problems you may encounter with the PB42 printer. Printer Problems and Possible Solutions Problem The printer has no power. Possible Solution • Make sure the batteries are properly installed. For help, see “Installing the Batteries” on page 16. • Recharge or replace the batteries as necessary. For help, see “Charging the Batteries” on page 18. Media is not feeding through the printer.
Printer Problems and Possible Solutions (continued) Problem Possible Solution The radio light is not on. • Press the radio button to turn the radio on. • Remove the batteries and connect a power adapter. For help, see “Charging the Batteries” on page 18. The blue light is blinking. • Make sure media is loaded and the media cover is closed. For help, see “Loading Media” on page 20. • Remove the batteries and connect a power adapter. For help, see “Charging the Batteries” on page 18.
Printer Problems and Possible Solutions (continued) Problem Possible Solution The battery charge is not lasting as long as it should. • Check the battery date. If the battery is a few years old, the shortened life may be due to normal aging. • Replace the battery. The configuration test page does not print. • Make sure that the blue light is not blinking. If it is, make sure your printer has media and that the media cover is closed. • Make sure that you can advance media by pressing the Feed button.
To cold boot the PB42 1 Disconnect the PB42 from power source if externally powered. 2 Remove the batteries from the PB42. 3 Insert the batteries back into the PB42. 4 Reconnect external power if powered externally. Cleaning the Printer To properly maintain your PB42, you should clean it at the recommended intervals. To avoid possible personal injury or damage to the printer, never insert any pointed or sharp objects into the printer. Use only cleaning agents specified next.
Cleaning the PB42 36 Printer Part Cleaning Method Cleaning Interval Printhead Use 70% isopropyl alcohol on a cotton swab to clean the print elements from end to end. After every five rolls of media or more often if necessary. Platen roller Rotate the platen roller and clean it thoroughly with 70% isopropyl alcohol on a cotton swab. After every five rolls of media or more often if necessary. Paper sensor Clean thoroughly with 70% isopropyl alcohol and a cotton swab.
Specifications Label and Printing Specifications Print density 8 dots/mm (203 dots/inch) Maximum media width 11.2 cm (4.4 inches) Print width 10.4 cm (4.1 inches) Print speed 5.1 cm (2 inches) per second Receipt roll core (ID) 1.9 cm (0.75 inch) Receipt roll maximum diameter 6.5 cm (2.55 inches) Physical Dimensions Depth 7.87 cm (3.1 inches) Height 18.03 cm (7.1 inches) Width 16.82 cm (6.62 inches) Weight Less than 1.39 kg (49 ounces) with battery packs and receipt paper.
Factory Default Settings Setting Default Value Serial port Baud rate 115200 Data bits 8 Parity None Stop bits 1 Flow control Hardware Bluetooth 38 Bluetooth authentication No Discoverable Yes Connectable Yes Class of device 0x040680 Service name Wireless printer Device name PB42-xxxxxxxxxxx (where x’s represent the serial number of the printer) Baud rate 115200 Data bits 8 Parity None Handshake hardware Low battery indicator 7.
Accessories for the PB42 You can use these accessories (sold and ordered separately) with the PB42. To order accessories, contact your local Intermec sales representative. AC4 Quad Charger (Model AC4) Use the AC4 to charge up to four PB42 batteries at a time. The battery charger is designed to sense when a battery is fully charged and not overcharge it, ensuring long and consistent battery life.
Serial Cable (P/N 075497) The serial adapter is an 8-pin DIN to DB9 connector that connects from the PB42 printer to your desktop PC. Shoulder Strap (P/N 074788) Use the shoulder strap in combination with the handstrap to easily carry the PB42 printer. The wide padded strap makes it comfortable to wear the PB42 for long periods of time. System Bag (P/N 825-170-001) Use the system bag to carry your PB42, a CK60 or 700, media, and cables or other accessories in one bag.
Worldwide Headquarters 6001 36th Avenue West Everett, Washington 98203 U.S.A. tel 425.348.2600 fax 425.355.9551 www.intermec.