benutzerinformation user manual gebruiksaanwijzing notice d'utilisation Kühlschrank Refrigerator Koelkast Réfrigérateur LK0801
leonard INHALT Sicherheitshinweise Betrieb Erste Inbetriebnahme Täglicher Gebrauch Praktische Tipps und Hinweise 2 4 4 5 6 Reinigung und Pflege 6 Was tun, wenn … 7 Technische Daten 9 Montage 9 Hinweise zum Umweltschutz 14 Änderungen vorbehalten Lesen Sie zu Ihrer Sicherheit und für die optimale Geräteanwendung vor der Installation und dem Gebrauch des Gerätes die vorliegende Benutzerinformation aufmerksam durch, einschließlich der Ratschläge und Warnungen.
leonard 3 Bei einer eventuellen Beschädigung des Kältekreislaufs: – Offene Flammen und Zündfunken vermeiden – Den Raum, in dem das Gerät installiert ist, gut lüften • Technische und anderweitige Änderungen am Gerät sind gefährlich. Ein defektes Netzkabel kann Kurzschlüsse und einen Brand verursachen und/oder zu Stromschlägen führen. Warnung! Elektrische Bauteile (Netzkabel, Stecker, Kompressor) dürfen zur Vermeidung von Gefahren nur vom Kundendienst oder einer Fachkraft ausgewechselt werden. • • • • 1.
leonard • Vergewissern Sie sich, dass der Netzstecker des Gerätes nach der Installation frei zugänglich ist. • Verbinden Sie das Gerät ausschließlich mit einer Trinkwasserzuleitung. 3) Kundendienst • Sollte die Wartung des Gerätes elektrische Arbeiten verlangen, so dürfen diese nur von einem qualifizierten Elektriker oder einem Elektro-Fachmann durchgeführt werden.
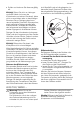
leonard 5 TÄGLICHER GEBRAUCH Wichtig! Das Gerät wird in Frankreich verkauft. Entsprechend den Vorschriften in diesem Land muss das Gerät mit einer speziellen Vorrichtung ausgestattet sein (siehe Abbildung), die im unteren Fach des Kühlraums angebracht ist und den kältesten Bereich des Kühlraums anzeigt. Verstellbare Ablagen/Einsätze Die Wände des Kühlschranks sind mit einer Anzahl von Führungsschienen ausgestattet, die verschiedene Möglichkeiten für das Einsetzen der Ablagen bieten.
leonard PRAKTISCHE TIPPS UND HINWEISE Normale Betriebsgeräusche • Unter Umständen ist ein leichtes Gurgeln und Blubbern zu hören, wenn das Kältemittel durch die Leitungen gepumpt wird. Das ist normal. • Bei eingeschaltetem Kompressor wird das Kältemittel umgewälzt und Sie hören ein Surren und ein pulsierendes Geräusch vom Kompressor. Das ist normal. • Die thermische Ausdehnung kann ein plötzliches Krachen verursachen. Das ist eine natürliche und nicht gefährliche physikalische Erscheinung.
leonard 7 • Spülen und trocknen Sie diese sorgfältig ab. Wichtig! Ziehen Sie nicht an Leitungen und/oder Kabeln im Innern des Kühlschranks und achten Sie darauf, diese nicht zu verschieben oder zu beschädigen. Benutzen Sie zur Reinigung des Innenraums keinesfalls Putzmittel, Scheuerpulver, stark parfümierte Reinigungsmittel oder Wachspolituren, da diese die Oberfläche des Innenraums beschädigen und einen starken Eigengeruch hinterlassen können. nicht überfließt und auf die gelagerten Lebensmittel tropft.
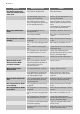
leonard Störung Das Gerät funktioniert nicht. Die Lampe funktioniert nicht. Mögliche Ursache Abhilfe Das Gerät ist abgeschaltet. Gerät einschalten. Der Netzstecker steckt nicht richtig in der Steckdose. Stecken Sie den Netzstecker richtig in die Steckdose. Das Gerät bekommt keinen Strom. Es liegt keine Spannung an der Netzsteckdose an. Testen Sie bitte, ob ein anderes Gerät an dieser Steckdose funktioniert. Kontaktieren Sie gegebenenfalls einen qualifizierten Elektriker.
leonard 9 Ersetzen der Lampe 1. Trennen Sie den Netzstecker von der Netzversorgung. 2. Lösen Sie die Schraube an der Lampenabdeckung. 3. Nehmen Sie die Lampenabdeckung ab (siehe hierzu die Abbildung). 4. Ersetzen Sie die defekte Lampe durch eine Lampe mit der gleichen Leistung, die speziell für Haushaltsgeräte vorgesehen ist. (die maximal erlaubte Leistung steht auf der Lampenabdeckung). 5. Bringen Sie die Lampenabdeckung an. 6. Ziehen Sie die Schraube an der Lampenabdeckung fest. 7.
leonard Klimaklasse Umgebungstemperatur SN +10°C bis + 32°C N +16°C bis + 32°C ST +16°C bis + 38°C T +16°C bis + 43°C Elektrischer Anschluss Kontrollieren Sie vor der ersten Benutzung des Gerätes, ob die Netzspannung und frequenz Ihres Hausanschlusses mit den auf dem Typenschild angegebenen Anschlusswerten übereinstimmen. Das Gerät muss geerdet sein. Zu diesem Zweck ist die Netzkabelsteckdose mit einem Schutzkontakt ausgestattet.
leonard 11 min. 200 cm2 min 1 mm min. 200 cm2 Wichtig! Entfernen Sie nach Bedarf den Anschlagdämpfer der Küchenmöbeltür, um Platz für die freie Beweglichkeit der Gerätetür zu schaffen. Ausrichtung der Küchenmöbel Wichtig! Bitte stellen Sie sicher, dass das Küchenmöbel vertikal im 90° Winkel nach allen Seiten ausgerichtet ist. Richten Sie die Küchenmöbeltüren vor der Aufstellung des Gerätes aus.
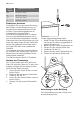
leonard 2. Installieren Sie das Gerät in der Einbaunische. a) Schieben Sie das Gerät in Pfeilrichtung (1), bis die obere Spaltabdeckung am Küchenmöbel anschlägt. b) Schieben Sie das Gerät in Pfeilrichtung (2), bis die untere Spaltabdeckung am Küchenmöbel anschlägt. 4. Befestigen Sie das Gerät mit 4 Schrauben in der Nische. I 2 1 3. Stellen Sie das Gerät in der Einbaunische korrekt ein. Richten Sie das untere Scharnier auf das Küchenmöbel aus. 5.
leonard 13 6. Lösen Sie die Teile (Ha), (Hb), (Hc) und (Hd). Ha Hb 9. Öffnen Sie die Gerätetür und die Tür des Küchenmöbels in einem Winkel von 90°. Setzen Sie das kleine Viereck (Hb) in die Führung ein (Ha). Bringen Sie die Gerätetür und die Küchenmöbeltür zusammen und markieren Sie die Bohrungen. 8 mm Hc Hd 7. Montieren Sie Teil (Ha) an der Innenseite des Küchenmöbels. ca. 50 mm Hb 90° 21 mm 10. Entfernen Sie die Halter. Setzen Sie den Nagel (K) 8 mm von der Außenkante der Tür ein.
leonard 11. Setzen Sie das kleine Viereck erneut auf die Führung und schrauben Sie es mit den mitgelieferten Schrauben fest. Richten Sie die Küchenmöbeltür und die Gerätetür auf Teil Hb aus. 12. Drücken Sie Teil (Hd) auf Teil (Hb). Hb Hd Hb Prüfen Sie alles erneut, um sicherzustellen, dass: • Alle Schrauben fest angezogen sind. • Der Dichtungsstreifen fest am Gerät befestigt ist. • Die Tür korrekt öffnet und schließt.
leonard 15 CONTENTS Safety information Operation First use Daily use Helpful hints and tips 15 17 17 17 18 Care and cleaning 19 What to do if… 20 Technical data 21 Installation 22 Environmental concerns 26 Subject to change without notice In the interest of your safety and to ensure the correct use, before installing and first using the appliance, read this user manual carefully, including its hints and warnings.
leonard Warning! Any electrical component (power cord, plug, compressor) must be replaced by a certified service agent or qualified service personnel to avoid hazard. • • • • 1. Power cord must not be lengthened. 2. Make sure that the power plug is not squashed or damaged by the back of the appliance. A squashed or damaged power plug may overheat and cause a fire. 3. Make sure that you can come to the mains plug of the appliance. 4. Do not pull the mains cable. 5.
leonard 17 Environment Protection This appliance does not contain gasses which could damage the ozone layer, in either its refrigerant circuit or insulation materials. The appliance shall not be discarded together with the urban refuse and rubbish. The insulation foam contains flammable gases: the appli- ance shall be disposed according to the applicable regulations to obtain from your local authorities. Avoid damaging the cooling unit, especially at the rear near the heat exchanger.
leonard Movable shelves The walls of the refrigerator are equipped with a series of runners so that the shelves can be positioned as desired. Important! Do not move the glass shelf above the vegetable drawer and the bottle shelf to ensure correct air circulation. To make these adjustments proceed as follows: gradually pull the shelf in the direction of the arrows until it comes free, then reposition as required.
leonard 19 Meat (all types) : wrap in polythene bags and place on the glass shelf above the vegetable drawer. For safety, store in this way only one or two days at the most. Cooked foods, cold dishes, etc..: these should be covered and may be placed on any shelf. Fruit and vegetables: these should be thoroughly cleaned and placed in the special drawer(s) provided.
leonard • disconnect the appliance from electricity supply • remove all food • defrost8) and clean the appliance and all accessories • leave the door/doors ajar to prevent unpleasant smells. If the cabinet will be kept on, ask somebody to check it once in a while to prevent the food inside from spoiling in case of a power failure. WHAT TO DO IF… Warning! Before troubleshooting, disconnect the mains plug from the mains socket.
leonard 21 Problem The temperature in the appliance is too high. Possible cause Solution The temperature regulator is not set correctly. Set a lower temperature. The door is not closed correctly. Refer to "Closing the door". The product temperature is too high. Let the product temperature decrease to room temperature before storage. Many products are stored at the same time. Store less products at the same time. There is no cold air circulation in the appliance.
leonard INSTALLATION Read the "Safety Information" carefully for your safety and correct operation of the appliance before installing the appliance.
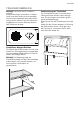
leonard 23 min. 200 cm2 min 1 mm min. 200 cm2 Important! Remove the furniture door damper if possible, to provide free space for the free movement of the appliance door. Furniture alignment Installing the appliance Important! Make sure that the kitchen furniture is aligned vertically and at 90° in all directions. Adjust the kitchen furniture doors before installing the appliance. 90° 90° Caution! Make sure that the mains cable can move freely. Do the following steps: 1. Install the sealing strip.
leonard 2. Install the appliance in the niche. a) Push the appliance in the direction of the arrows (1) until the upper gap cover stops against the kitchen furniture. b) Push the appliance in the direction of the arrows (2) against the cupboard on the opposite side of the hinge. 4. Attach the appliance to the niche with 4 screws. I 2 1 3. Adjust the appliance in the niche. Align the lower hinge with the kitchen furniture. 5. Attach the covers (C, D) to the lugs and the hinge holes.
leonard 25 7. Install the part (Ha) on the inner side of the kitchen furniture. ca. 50 mm 90° 21 mm 9. Open the appliance door and the kitchen furniture door at an angle of 90°. Insert the small square (Hb) into guide (Ha). Put together the appliance door and the furniture door and mark the holes. 8 mm 90° ca. 50 mm 21 mm Ha 8. Push the part (Hc) on the part (Ha). Hb Ha 10. Remove the brackets. Install the nail (K) 8 mm far from the outer edge of the door.
leonard 11. Place the small square on the guide again and fix it with the screws supplied. Align the kitchen furniture door and the appliance door by adjusting the part Hb. 12. Press the part (Hd) on the part (Hb). Hb Hd Hb Do a final check to make sure that: • All screws are tightened. • The sealing strip is attached tightly to the cabinet. • The door opens and closes correctly.
leonard 27 INHOUD Veiligheidsinformatie Bediening Het eerste gebruik Dagelijks gebruik Nuttige aanwijzingen en tips 27 29 29 30 31 Onderhoud en reiniging 31 Problemen oplossen 32 Technische gegevens 34 Montage 34 Het milieu 39 Wijzigingen voorbehouden VEILIGHEIDSINFORMATIE In het belang van uw veiligheid en om een correct gebruik te kunnen waarborgen is het van belang dat u, alvorens het apparaat te installeren en in gebruik te nemen, deze gebruiksaanwijzing, inclusief de tips en waarschuwingen, grondig
leonard waar milieuvriendelijk is, maar ook uiterst ontvlambaar. Controleer of de onderdelen van het koelcircuit tijdens transport en installatie van het apparaat niet beschadigd zijn geraakt. Indien het koelcircuit beschadigd is: – open vuur en ontstekingsbronnen vermijden – de ruimte waar het apparaat zich bevindt grondig ventileren • Het is gevaarlijk om wijzigingen aan te brengen in de specificaties of dit product op enigerlei wijze te modificeren.
leonard 29 nen worden en brandwonden veroorzaken. • Het apparaat mag niet vlakbij radiatoren of kooktoestellen geplaatst worden. • Verzeker u ervan dat de stekker bereikbaar is nadat het apparaat geïnstalleerd is. • Sluit het apparaat alleen aan op een drinkwaterleiding. 11) Onderhoud • Alle elektrotechnische werkzaamheden die noodzakelijk zijn voor het uitvoeren van onderhoud aan het apparaat, dienen uitgevoerd te worden door een gekwalificeerd elektricien of competent persoon.
leonard Belangrijk! Gebruik geen oplosmiddelen of schuurpoeders. Deze beschadigen de lak. DAGELIJKS GEBRUIK Belangrijk! Dit apparaat wordt in Frankrijk verkocht. In overeenstemming met de regelgeving die in dit land geldig is, moet hij worden geleverd met een speciaal apparaat (zie afbeelding) dat in het onderste deel van de koelkast moet worden geplaatst om de koudste zone daarvan aan te geven.
leonard 31 NUTTIGE AANWIJZINGEN EN TIPS Normale bedrijfsgeluiden • U kunt een zwak gorgelend en borrelend geluid horen wanneer het koelmiddel door leidingen wordt gepompt. Dat is normaal. • Als de compressor aan staat, wordt het koelmiddel rondgepompt en dan zult u een zoemend en kloppend geluid van de compressor horen. Dat is normaal. • De thermische uitzetting kan een plotseling krakend geluid veroorzaken. Dit is een natuurlijk, niet gevaarlijk fysisch verschijnsel. Dat is normaal.
leonard paraat schoon met een borstel of stofzuiger. Deze handeling zal de prestatie van het apparaat verbeteren en het elektriciteitsverbruik besparen. Belangrijk! Zorg ervoor dat u het koelsysteem niet beschadigt. Veel normaal verkrijgbare keukenreinigers bevatten chemicaliën die de kunststoffen die in dit apparaat gebruikt zijn kunnen aantasten/beschadigen. Daarom wordt het aanbevolen de buitenkant van dit apparaat alleen schoon te maken met warm water met een beetje afwasmiddel.
leonard 33 Probleem Mogelijke oorzaak Oplossing Het apparaat krijgt geen stroom. Er staat geen spanning op het stopcontact. Sluit een ander elektrisch apparaat aan op het stopcontact. Neem contact op met een gekwalificeerd elektricien. Het lampje staat in stand-by. Sluit en open de deur. Het lampje is stuk. Zie 'Het lampje vervangen'. De temperatuur is niet goed ingesteld. Stel een hogere temperatuur in. De deur is niet goed gesloten. Zie 'De deur sluiten'. De deur is te vaak open gedaan.
leonard 7. Steek de stekker in het stopcontact. 8. Open de deur. Controleer of het lampje gaat branden. De deur sluiten 1. Maak de afdichtingen van de deur schoon. 2. Stel de deur, indien nodig, af. Raadpleeg "Montage". 3. Vervang, indien nodig, de defecte deurafdichtingen. Neem contact met de service-afdeling.
leonard 35 voor dit doel. Als het stopcontact niet geaard is, sluit het apparaat dan aan op een afzonderlijk aardepunt, in overeenstemming met de geldende regels, raadpleeg hiervoor een gekwalificeerd elektricien. De fabrikant neemt geen verantwoordelijkheid op zich als de bovenstaande veiligheidsmaatregelen niet worden nageleefd. Dit apparaat voldoet aan de EU. richtlijnen. Omkeerbaarheid van de deur De deur van het apparaat gaat naar rechts open.
leonard 1. Installeer de afdichtstrip. a) Verwijder de afdekking van de strip. b) Bevestig de zelfklevende afdichtstrip op het apparaat zoals aangegeven op de afbeelding. 90° 90° 2. Installeer het apparaat in de nis. a) Duw het apparaat in de richting van de pijlen (1) totdat de afdekking van de opening tegen het keukenmeubel aankomt. b) Duw het apparaat in de richting van de pijlen (2) tegen de kast tegenover het scharnier.
leonard 37 3. Stel het apparaat in de nis af. Lijn het onderste scharnier uit met het keukenmeubilair. 5. bevestig de afdekkingen (C, D) aan de uitsteeksels en de gaten van de scharnieren. Bevestig de afdekking van het scharnier (E) op het scharnier. D C E 4. Bevestig het apparaat met 4 schroeven aan de nis. 6. Maak de onderdelen (Ha), (Hb), (Hc) en (Hd) los.
leonard 7. Monteer onderdeel (Ha) aan de binnenkant van het keukenmeubel. ca. 50 mm 90° 9. Zet de deur van het apparaat en de deur van het keukenmeubel open in een hoek van 90°. Plaats het kleine vierkantje (Hb) in de geleider (Ha). Zet de deur van het apparaat en de deur van het keukenmeubel tegen elkaar en markeer de gaten. 21 mm 8 mm 90° ca. 50 mm 21 mm 8. Duw onderdeel (Hc) op onderdeel (Ha). Ha Ha Hb 10. Verwijder de beugels.
leonard 39 11. Plaats het kleine vierkantje op de geleider terug en maakt het goed met de meegeleverde schroeven vast. Lijn de deur van het keukenmeubel en de deur van het apparaat uit met behulp van onderdeel Hb. 12. Duw onderdeel (Hd) op onderdeel (Hb). Hb Hd Hb Controleer goed en verzeker u ervan dat: • alle schroeven zijn aangehaald. • de afdichtingsstrip goed bevestigd is aan de kast. • De deur goed open en dicht gaat.
leonard SOMMAIRE Consignes de sécurité Fonctionnement Première utilisation Utilisation quotidienne Conseils utiles Entretien et nettoyage 40 42 42 43 44 45 En cas d'anomalie de fonctionnement Caractéristiques techniques Installation En matière de sauvegarde de l'environnement 46 48 48 52 Sous réserve de modifications CONSIGNES DE SÉCURITÉ Pour votre sécurité et garantir une utilisation correcte de l'appareil, lisez attentivement cette notice, y compris les conseils et avertissements, avant d'instal
leonard 41 – évitez les flammes vives et toute autre source d'allumage – aérez soigneusement la pièce où se trouve l'appareil • Ne modifiez pas les spécifications de l'appareil. Si le câble d'alimentation est endommagé, il peut causer un court circuit, un incendie et/ou une électrocution. Avertissement Les éventuelles réparations ou interventions sur votre appareil, ainsi que le remplacement du câble d'alimentation, ne doivent être effectuées que par un professionnel qualifié. • • • • 1.
leonard • Assurez-vous que la prise murale reste accessible après l'installation de l'appareil. • Branchez à l'alimentation en eau potable uniquement. 15) Maintenance • Les branchements électriques nécessaires à l'entretien de l'appareil doivent être réalisés par un électricien qualifié ou une personne compétente. • Cet appareil ne doit être entretenu et réparé que par un Service après-vente autorisé, exclusivement avec des pièces d'origine. C.F.C. contribuant ainsi à préserver l'environnement.
leonard 43 UTILISATION QUOTIDIENNE Indicateur de température Pour vous aider au bon réglage de votre appareil nous avons équipé votre réfrigérateur d'un indicateur de température, celui-ci étant placé dans la zone la plus froide. La zone la plus froide du compartiment réfrigérateur se situe au niveau de la clayette inférieure en verre. Le symbole ci-contre indique l'emplacement de la zone la plus froide de votre régrigérateur.
leonard Pour les ajuster, procédez comme suit : tirez progressivement dans le sens des flèches pour les dégager, puis repositionnezles selon les besoins. Emplacement des balconnets de la porte En fonction de la taille des emballages des aliments conservés, les balconnets de la porte peuvent être positionnés à différentes hauteurs.
leonard 45 Beurre et fromage : placez-les dans des récipients étanches spéciaux ou enveloppezles soigneusement dans des feuilles d'aluminium ou de polyéthylène, pour emmagasiner le moins d'air possible. Lait en bouteille : bouchez-le et placez-le dans le balconnet de la contreporte réservé aux bouteilles. Bananes, pommes de terre, oignons et ail ne se conservent pas au réfrigérateur, s'ils ne sont pas correctement emballés.
leonard • débranchez l'appareil • retirez tous les aliments • dégivrez16) et nettoyez l'appareil et tous les accessoires • laissez la porte/les portes entrouverte(s) pour prévenir la formation d'odeurs désagréables. Si, toutefois, vous n'avez pas la possibilité de débrancher et vider l'appareiI, faites vérifier régulièrement son bon fonctionnement pour éviter la détérioration des aliments en cas de panne de courant.
leonard 47 Anomalie Cause possible Remède Des produits empêchent l'eau de s'écouler dans le réservoir d'eau. Assurez-vous que les produits ne touchent pas la plaque arrière. De l'eau coule sur le sol. L'eau de dégivrage ne s'écoule pas dans le plateau d'évaporation situé au-dessus du compresseur. Fixez la gouttière d'évacuation de l'eau au plateau d'évaporation. La température à l'intérieur de l'appareil est trop basse. La température n'est pas correctement réglée.
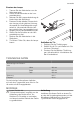
leonard CARACTÉRISTIQUES TECHNIQUES Dimensions de la niche d'encastrement Hauteur 880 mm Largeur 560 mm Profondeur 550 mm Tension 230 V Fréquence 50 Hz Les caractéristiques techniques figurent sur la plaque signalétique située sur le côté gauche à l'intérieur de l'appareil et sur l'étiquette énergétique. INSTALLATION Pour votre sécurité et le bon fonctionnement de l'appareil, veuillez lire attentivement les "Consignes de sécurité" avant d'installer l'appareil.
leonard 49 90° 90° Ventilation La circulation d'air derrière l'appareil doit être suffisante. min. 200 cm2 min. 200 cm2 min 1 mm Alignement du meuble Important Assurez-vous que le meuble de cuisine soit aligné verticalement et à 90° dans tous les sens. Ajustez les portes du meuble de cuisine avant d'installer l'appareil. Important Enlevez l'amortisseur de charnière de la porte du meuble, pour créer de l'espace et faciliter l'ouverture et la fermeture de la porte de l'appareil.
leonard 1. Installez la bande isolante. a) Enlevez la protection. b) Appliquez la bande isolante adhésive sur l'appareil comme indiqué dans la figure. 3. Ajustez l'appareil dans la niche. Alignez la charnière inférieure sur le meuble de cuisine. 4. Fixez l'appareil à la niche à l'aide de 4 vis. 2. Installez l'appareil dans la niche. a) Poussez l'appareil dans le sens des flèches (1) jusqu'à ce que le cache supérieur bute contre le meuble de cuisine.
leonard 51 5. Fixez les caches (C, D) aux éléments de fixation et aux orifices de la charnière. Fixez le cache charnière (E) à la charnière. 7. Installez la pièce (Ha) sur la face intérieure du meuble de cuisine. ca. 50 mm 90° D C 21 mm 90° ca. 50 mm 21 mm E 8. Poussez la pièce (Hc) sur la pièce (Ha). 6. Détachez les pièces (Ha), (Hb), (Hc) et (Hd).
leonard 9. Ouvrez la porte de l'appareil et la porte du meuble de cuisine à un angle de 90°. Insérez le petit carré (Hb) dans la glissière (Ha). Réunissez la porte de l'appareil et la porte du meuble et marquez les trous. 11. Placez de nouveau le petit carré sur la glissière et fixez-le avec les vis fournies. Alignez la porte du meuble de cuisine et la porte de l'appareil en ajustant la pièce Hb. 8 mm Ha Hb Hb 12. Appuyez la pièce (Hd) sur la pièce (Hb). 10. Sortez les rails de transport.
leonard 53
leonard
leonard 55
211621428-A-112011