
Instructions / Assembly
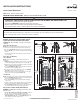

c. Connect the phase wires (G), neutral (H) and ground (I) conductors to appropriate
terminals and torque to spec in the terminations table (fig. 4 or 5).
d. If installing with a main circuit breaker (J), also install terminal covers (L) that
have been provided (fig. 6).
e. When installing this enclosure as the service entrance, the bonding strap (M)
(included) MUST BE installed (fig. 7). Torque to 20 lb-ins.
f.
When installing this enclosure as a sub panel, DO NOT install the bonding strap (M).
NOTE: For Service Equipment, apply “SERVICE DISCONNECT” label (provided) to
trim, near main breaker handle.
NOTE: For Branch Equipment, apply “MAIN” label (provided) to trim, near main
breaker handle.
Step 4: Branch Circuit Breakers
WARNING: Leviton circuit breakers MUST BE used with a Leviton circuit
breaker enclosure.
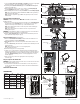
a. Strip and connect the load power and load neutral wires to the load terminals (N)
and ground wire to the ground bus (O) of the circuit breaker enclosure (fig. 8).
Strip wires and torque load terminals to spec in the terminations table.
NOTE: Ensure that the main breaker is in the OFF position before installing any
branch circuit breakers.
NOTE: Ensure that all branch circuit breakers are in the OFF position before
installing into the panel.
WARNING: TO AVOID RISK OF FIRE, check all wiring and ensure all circuit breakers
are installed in the proper position before energizing panel.
b. Align the hooks and guides (Q) of the branch circuit breaker with the panel and
press until breaker snaps into place (fig. 9).
Step 5: Installing Cover (Sold separately)
a. Remove the main breaker knockout (R) if a main breaker was installed. Do not
remove in installations using the main lugs (K).
b. Twist-outs (S) must be removed for each position that contains a branch circuit
breaker.
c. To remove twist-outs (S), first strike with a screwdriver, then twist with pliers until
detached (fig. 10).
NOTE: Fill any unused open spaces in cover using filler plates
(see filler plate instructions).
d. Install door using the cover screws (provided).
e. Leviton covers contain a feature for adjustment in flush mounting applications.
In flush mount applications for covers larger than 42 spaces, dead front interlock
tabs MUST BE disengaged to allow for adjustment of dead front position(fig.11a).
Turn each adjustment screw (T) until the cover fits tightly against the circuit
breakers (fig.11b).
f. Apply circuit directory labels in the appropriate location depending on
cover/door type.
Step 6: Complete the Installation
WARNING: Before providing power to the load center, check all electrical connections
and confirm that the wiring is correct.
a. Ensure that the main and all branch circuit breakers are in the OFF position. To
energize, first turn ON the main breaker, and then turn ON each individual branch
circuit breaker.
SAVE THESE INSTRUCTIONS
For Technical Assistance Call: 1-800-824-3005 (USA Only)
or 1-800-405-5320 (Canada Only) www.leviton.com
PK-A3214-10-00-0D
© 2019 Leviton Mfg. Co., Inc.
Fig. 4
Fig. 5
Fig. 6
Fig. 7
Fig. 10
Fig. 9
Fig. 11
TERMINATIONS
Termination
Point
Wire
Gauge
Strip
Length
Torque
Main Breaker
or Main Lug
300 MCM - #3 AWG 1.0 in. 250 lb-ins.
Main Neutral
300 MCM - #3 AWG 1.5 in. 375 lb-ins.
Main Ground
2/0 AWG - #4 AWG 0.75 in. 50 lb-ins.
Load Power
(brass)
#4 AWG - #8 AWG
#10 AWG - #14 AWG
0.40 in.
0.40 in.
45 in-lbs.
35 in-lbs.
Load Neutral
(silver)
#4 AWG - #8 AWG
#10 AWG - #14 AWG
0.40 in.
0.40 in.
45 in-lbs.
35 in-lbs.
Ground Bus
#4 AWG - #6 AWG
#8 AWG
#10 AWG - #14 AWG
0.50 in.
0.50 in.
0.50 in.
35 in-lbs.
25 in-lbs.
20 in-lbs.
Main Neutral (H)
Main Ground
(I)
Phase wires
(G) (x2)
Main lugs (K) (x2)
Main Circuit breaker (J)
Main Neutral
(H)
Main Ground
(I)
Phase wires
(G) (x2)
Terminal covers (L)
(x2)
Main Circuit breaker (J)
a.
a. b.
b.
Align hooks
and guides (Q)
Press until
breaker snaps
into place
Fig. 8
Load terminals (N)
Ground
bus
(O)
Load Power
Load Neutral
Twist-outs
(S)
Main
breaker
knockout
(R)
Adjustment
screws
(T) (x2)
Bonding strap
(M)
6 Tab locations
shown by arrows
Tabs must be
disengaged to
achieve flush surface
Tabs flushed
WEB VERSION