
Operation Manual


3
4
6
5
7
8
1
2
9
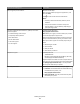
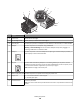
Use the To
1 Scanner unit Access the ink cartridges.
2 Ink cartridge access Install, replace, or remove the ink cartridges.
3 Ethernet port Connect your printer to a computer, a local network, an external DSL, or a cable modem.
4 USB port Connect the printer to a computer using a USB cable.
Warning—Potential Damage: Do not touch the USB port except when plugging in or
removing a USB cable or installation cable.
5 LINE port
LINE
Connect the printer to an active telephone line (through a standard wall jack, DSL filter, or
VoIP adapter) to send and receive faxes.
6 EXT port
EXT
Connect additional devices (telephone or answering machine) to the printer and the
telephone line. Use this port if you do not have a dedicated fax line for the printer, and if
this connection method is supported in your country or region.
Note: Remove the plug to access the port.
7 Power supply with port Connect the printer to a power source using the power cord.
8 Duplex unit
• Print on both sides of a sheet of paper.
• Remove paper jams.
9 Printhead access Install the printhead.
Note: The carrier moves to the printhead access area when no printhead is installed in the
printer.
About your printer
10