ENGLISH LCD TV OWNER’S MANUAL LCD TV MODELS 19LU70 22LU70 Please read this manual carefully before operating your TV. Retain it for future reference. Record model number and serial number of the TV. Refer to the label on the back cover and quote this information to your dealer when requiring service. Model : Serial No.
ACCESSORIES Ensure that the following accessories are included with your TV. If an accessory is missing, please contact the dealer where you purchased the TV. ■ Image shown may differ from your TV. ACCESSORIES Owner’s Manual Batteries Power Cord This item is not included for all models. * Lightly wipe any stains or fingerprints on the surface of the TV with the polishing cloth. Remote Control Polishing Cloth Polishing cloth for use on the screen. Do not use excessive force.
contents ACCESSORIES WATCHING TV / PROGRAMME CONTROL Remote Control Key Functions - - - - - - - - - - - - - - - - - 24 PREPARATION CONTENTS Front Panel Controls - - - - - - - - - - - - - - - - - - - - - - - - 4 Back Panel Information - - - - - - - - - - - - - - - - - - - - - - 5 Stand Installation - - - - - - - - - - - - - - - - - - - - - - - - - - 6 Desktop Pedestal Installation - - - - - - - - - - - - - -
DVD OPERATION TIME SETTING Notes On Discs - - - - - - - - - - - - - - - - - - - - - - - - - - - - 56 Clock Setup - - - - - - - - - - - - - - - - - - - - - - - - - - - - - - 91 Playing DVD Or Video CD - - - - - - - - - - - - - - - - - - - - 58 Auto On/Off Time Setting - - - - - - - - - - - - - - - - - - - - - 92 Mp3 Operation - - - - - - - - - - - - - - - - - - - - - - - - - - - - 63
PREPARATION Front Panel Controls Image shown may differ from your TV. INPUT MENU OK PREPERATION VOLUME PROGRAMME POWER (Standby/Operation) Disc Tray Insert a disc with label upward. Press the EJECT button to open or close the tray. Remote Control Sensor DVD Indicator illuminates blue when loading the disc or turning on the TV. NOTE ► If you cannot open the disc tray with the EJECT button, please contact your local product distributor.
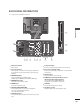
BACK PANEL INFORMATION ■ Image shown may differ from your TV. 1 PREPERATION 11 12 13 2 3 4 5 6 7 � Main Power Switch Power On/Off � Power Cord Socket This TV operates on an AC power. The voltage is indicated on the Specifications page. Never attempt to operate the TV on DC power. � HDMI/DVI IN Input Connect an HDMI signal to HDMI IN. Or DVI (VIDEO) signal to HDMI/DVI port with DVI to HDMI cable. � RGB/DVI Audio Input Connect the audio from a PC or DTV.
PREPARATION Stand Installation ■ Image shown may differ from your TV. ➊ Carefully place the TV screen side down on a cushioned surface to protect the screen from damage. ➋ Assemble the TV as shown. Slide the stand upwards (towards the back of the TV) until the locking pins are locked fully with an audible click. 2 1 PREPERATION Desktop Pedestal Installation For adequate ventilation allow a clearance of 4” (10cm) all around the TV.
Careful installation advice ■ You should purchase necessary components to fix the TV safety and secure to the wall on the market. ■ Position the TV close to the wall to avoid the possibility of it falling when pushed. ■ The instructions shown below are a safer way to set up the TV, by fixing it to the wall, avoiding the possibility of it falling forwards if pulled. This will prevent the TV from falling forward and causing injury. This will also prevent the TV from damage.
PREPARATION ■ The TV can be installed in various ways such as on a wall, or on a desktop etc. ■ The TV is designed to be mounted horizontally. EARTHING Power Supply Ensure that you connect the earth wire to prevent possible electric shock. If grounding methods are not possible, have a qualified electrician install a separate circuit breaker. Do not try to earth the TV by connecting it to telephone wires, lightening rods or gas pipes.
■ To prevent damage do not connect to the mains outlet until all connections are made between the devices. ANTENNA CONNECTION ■ For optimum picture quality, adjust antenna direction. ■ An antenna cable and converter are not supplied.
EXTERNAL EQUIPMENT SETUP ■ To avoid damaging any equipment, never plug in any power cord until you have finished connecting all equipment. ■ Image shown may differ from your TV. HD RECEIVER SETUP ■ This TV can receive Digital RF/Cable signals without an external digital set-top box. However, if you do receive Digital signals from a digital set-top box or other digital external device, refer to the diagram as shown below.
Connecting with an HDMI Cable ➊ Connect the digital set-top box to HDMI/DVI IN or HDMI IN jack on the TV. ➋ Turn on the digital set-top box. 1 (RGB) (Refer to the owner’s manual for the digital set-top box.) ➌ Select HDMI or HDMI input source using the INPUT button on the remote control. 2 1 NOTE ► Check that your HDMI cable is version . or higher. If the HDMI cables don’t support HDMI version . , flickering or no screen display can result.
EXTERNAL EQUIPMENT SETUP DVD SETUP Connecting with a Component Cable ➊ Connect the video outputs (Y, PB, PR) of the DVD to the COMPONENT IN 1 VIDEO jacks on the TV. ➋ Connect the audio outputs of the DVD to the COMPONENT IN AUDIO jacks on the TV. ➌ Turn on the DVD player, insert a DVD. ➍ Select Component input source using the INPUT button on the remote control. ➎ Refer to the DVD player’s manual for operating instructions.
Connecting with a Euro Scart Cable ➊1 Connect the Euro scart socket of the DVD to the AV Euro scart socket on the TV. ➋ Turn on the DVD player, insert a DVD. ➌ Select AV input source using the INPUT button on the remote control. If connected to AV Euro scart socket, select AV input source. ➍ Refer to the DVD player’s manual for operating instructions. NOTE 1 ► Any Euro scart cable used must be signal shielded. ► Copy-protected programmes will not be output on the EURO scart sockets for legal reasons.
EXTERNAL EQUIPMENT SETUP VCR SETUP To avoid picture noise (interference), allow adequate distance between the VCR and TV. Connecting with a RF Cable (RGB) ➊ Connect the ANT OUT socket of the VCR to the ANTENNA IN socket on the TV. ➋ Connect the terrestrial antenna cable to the ANT IN socket of the VCR. ➌ Press the PLAY button on the VCR and match the appropriate channel between ANTENNA IN the TV and VCR for viewing.
Connecting with a Euro Scart Cable (RGB) (RGB) ➊ Connect the Euro scart socket of the VCR to the AV Euro scart socket on the TV. ➋ Insert a video tape into the VCR and press PLAY on the VCR. (Refer to the VCR owner’s manual.) ANTENNA IN ➌ Select AV input source using the INPUT button on the remote control. ➍ If connected to AV Euro scart socket, select AV input source. ANTENNA IN 1 NOTE 2 1 ► Any Euro Scart cable used must be signal shielded.
EXTERNAL EQUIPMENT SETUP INSERTION OF CI MODULE - To view the encrypted (pay) services in digital TV mode. - This feature is not available in all countries. ➊ Insert the CI Module to PCMCIA (Personal Computer Memory Card International Association) CARD SLOT of TV as shown. For further information, see p.39. NOTE ► Check if the CI module is inserted into the PCMCIA card slot in the right direction. If the module is not inserted properly, this can cause damage to the TV and the PCMCIA card slot.
OTHER A/V SOURCE SETUP Camcorder Video Game Set white, and Audio Right = red) ➋ Select AV input source using the INPUT button on the remote control. ➌ Operate the corresponding external equipment. EXTERNAL EQUIPMENT SETUP ➊ Connect the AUDIO/VIDEO jacks between TV and external equipment. Match the jack colours. (Video = yellow, Audio Left = (Refer to external equipment operating guide.) USB SETUP ➊ Connect the USB device to the USB IN jack on the side of the TV.
EXTERNAL EQUIPMENT SETUP PC SETUP This TV provides Plug and Play capability, meaning that the PC adjusts automatically to the TV’s settings. Connecting with a D-sub 5 pin Cable ➊ ➋ ➌ ➍ Connect the RGB output of the PC to the RGB IN (PC) jack on the TV. Connect the PC audio output to the AUDIO IN (RGB/DVI) jack on the TV. Turn on the PC and the TV. Select RGB input source using the INPUT button on the remote control.
Supported Display Resolution RGB(PC), HDMI (DVI) -PC mode HDMI , HDMI -DTV mode Resolution Horizontal Frequency(kHz) Vertical Frequency(Hz) 720 x 400 31.468 70.08 640 x 480 31.469 59.94 800 x 600 37.879 60.31 1024 x 768 48.363 60.00 1280 x 768 47.78 59.87 1360 x 768 47.72 59.80 Horizontal Frequency(kHz) Vertical Frequency(Hz) 640 x 480 31.649 31.469 59.94 60 720 x 480 31.47 31.50 59.94 60 720 x 576 31.25 50.00 1280 x 720 37.50 44.96 45.00 50.00 59.94 60 1920 x 1080 28.
EXTERNAL EQUIPMENT SETUP Screen Setup for PC mode (In RGB mode only) Selecting Resolution To view a normal picture, match the resolution of RGB mode and resolution of PC. PICTURE Move • Contrast • Brightness • Sharpness • Colour • Tint • Advanced Control • Picture Reset SCREEN OK EXTERNAL EQUIPMENT SETUP 2 3 4 Prev. Resolution 90 50 60 60 0 Auto Config. Position Size Phase Screen 1 Move Reset Select PICTURE. RED RED REDRED RED GREEN RED RED GREEN GREEN GREEN GREEN Select Screen.
Auto Configure Automatically optimizes the display. This is recommended for the first time connecting to a PC. PICTURE Move • Contrast • Brightness • Sharpness • Colour • Tint • Advanced Control • Picture Reset SCREEN OK 90 50 60 60 0 Resolution Auto Config. Position Size RED Screen 2 3 4 5 GREEN RED REDRED RED Select PICTURE. Select Screen. YELLOW GREEN GREEN RED RED GREEN GREEN Select Auto Config.. BLUE YELLOW YELLOW GREEN RED YELLOW YELLOW GREEN Select Yes.
EXTERNAL EQUIPMENT SETUP Adjustment for screen Position, Size, Phase If the picture is not clear after auto adjustment and especially if characters are still trembling, adjust the picture phase manually. PICTURE Move • Contrast • Brightness • Sharpness • Colour • Tint • Advanced Control • Picture Reset SCREEN OK 90 50 60 60 0 EXTERNAL EQUIPMENT SETUP 2 3 4 Prev. Resolution Auto Config. Position Size Phase Screen 1 Move Reset Select REDRED REDPICTURE. Select Screen.
Screen Reset Returns Position, Size and Phase to the factory default settings. PICTURE Move • Contrast • Brightness • Sharpness • Colour • Tint • Advanced Control • Picture Reset SCREEN OK 90 50 60 60 0 Resolution Auto Config. Position Size 3 4 5 Yes No Reset Select PICTURE. RED REDRED RED Select Screen. GREEN GREEN RED RED RED GREEN GREEN Select Reset. YELLOW YELLOW GREEN GREEN RED YELLOW YELLOW GREEN Select Yes. BLUE BLUE YELLOW YELLOW GREEN YELLOW BLUE BLUE RED Run Reset.
WATCHING TV / PROGRAMME CONTROL Remote Control Key Functions When using the remote control, aim it at the remote control sensor on the TV. TV/RAD Selects Radio and TV channel. AV MODE It helps you select and set images and sounds when connecting AV devices.(u p.42) POWER Switches the TV on from standby or off to standby. INPUT Toggles between all AV inputs sequentially. (u p.41) ENERGY SAVING Adjust the Energy Saving mode of the TV. (u p.73) 0~9 number Selects a programme.
VOLUME UP/ Adjusts the volume. DOWN MUTE Switches the sound on or off. Programme UP/ Selects a programme. DOWN PAGE UP/DOWN Move from one full set of screen information to the next one. DVD Controls the Built-In DVD Operation. Control Buttons For further details, see the ‘DVD Operation’ section. (u p.56) These buttons are used for teletext. For further details, see the ‘Teletext’ section.(u p.98) Shows programme schedule.(up.52) Select the desired quick menu source.
WATCHING TV / PROGRAMME CONTROL Turning On The TV - When your TV is turned on, you will be able to use its features. ➊ Firstly, connect the power cord pushing it firmly home and check the main power on the TV. At this stage, the TV switches to standby mode. (The power indicator on the TV illuminates red.) ➋ In standby mode to turn TV on, press the POWER, INPUT or P∧∨ (Programme Up/Down) button on the TV or press the POWER, INPUT, P∧∨ or NUMBER button on the remote control and the TV will switch on.
Quick Menu Your TV’s OSD (On Screen Display) may differ slightly from that shown in this manual. Q.Menu (Quick Menu) is a menu of features which users might use frequently. Audio Selects your desired picture format. For Zoom Setting, select 14:9, Zoom and Cinema Zoom in the Ratio Menu. After completing Zoom Setting, the display goes back to Q.Menu. Selects the sound output. Energy Saving Sleep Timer Selects your desired Energy Saving mode. Sets the sleep timer. Picture Mode Fav.
WATCHING TV / PROGRAMME CONTROL On Screen Menus Selection and Adjustment Your TV’s OSD (On Screen Display) may differ slightly from that shown in this manual.
Auto Programme Tuning Use this to automatically find and store all available programmes. When you start auto programming, all previously stored service information will be deleted. The maximum number of programmes that can be stored is 1098 (digital:999, analogue:99). But the number may differ slightly depending on broadcasting signals.
WATCHING TV / PROGRAMME CONTROL Manual Programme Tuning (In Digital Mode) Manual Tuning lets you manually add a programme to your programme list. SETUP Auto Tuning Manual Tuning Programme Edit Software Update Diagnostics CI Information Move DTV OK SETUP RED Auto Tuning Manual Tuning Programme Edit Software Update Diagnostics CI Information GREEN RED YourMove receiver willOKadd this channel to your channel list.
Manual Programme Tuning (In Analogue Mode) Manual Tuning lets you manually tune and arrange the stations in whatever order you desire. SETUP Move Auto Tuning Manual Tuning Programme Edit Software Update Diagnostics CI Information TV OK RED SETUP Storage 1 Auto Tuning Manual Tuning Programme Edit Software Update Diagnostics CI Information System PAL-BG Band V/UHF Channel 1 Fine Search C 01 Name Store Close GREEN RED REDRED RED REDRED Select SETUP.
RED BLUE WATCHING TV / PROGRAMME CONTROL GREEN 8 CommenceYELLOW searching. RED 9 RED GREEN Select Store.BLUE GREEN RED RED YELLOW YELLOW You can assign a station name with five characters to each programme number. ■ Assigning a station name 1 RED GREEN BLUE Select Name. GREEN RED BLUE WATCHING TV / PROGRAMME CONTROL 2 Select the position and make your choice of the second character, and so on. YELLOW YELLOW GREEN RED 0 to 9, +/ -, and blank.
Programme Edit This function enables you to delete, move or select the programmes you want. You can change the programme number using “Move”function, if “Automatic Numbering” is unchecked when you start Auto Tuning. SETUP Move Programme Edit OK Auto Tuning Manual Tuning Programme Edit Software Update Diagnostics CI Information Delete Pr. Change Select SETUP. 2 Select Programme Edit.
WATCHING TV / PROGRAMME CONTROL RED ■ 1 Selecting programmes RED 2 GREEN 3 ■ Select a programme. GREEN Check the selected programme. YELLOW YELLOW Check the all programmes. BLUE Deleting programmes WATCHING TV / PROGRAMME CONTROL 1 2 RED RED Moving programmes GREEN 1 YELLOW 3 YELLOW GREEN BLUE SelectYELLOW the programmes you want to delete. RED GREEN 2 GREEN RED BLUE ■ RED YELLOW BLUE RED Delete the selected programmes.
Software Update Software Update allows you to update the system software to maintain proper performance of the product. The software can be downloaded through the digital broadcasting system. SETUP Move SETUP OK Auto Tuning Manual Tuning Programme Edit Software Update Diagnostics CI Information Auto Tuning Manual Tuning Programme Edit Software Update Diagnostics CI Information Move OK Auto Update Manual Update Regular Auto Update On Search Time Hour 03 Minute 00 Close Select SETUP.
WATCHING TV / PROGRAMME CONTROL SETUP Auto Tuning Manual Tuning Programme Edit Software Update Diagnostics CI Information Move OK Auto Update Channel Manual Update Regular Auto Update On Search Time Hour 03 Minute 00 Search Close Close Close ■ RED REDRED Manual Update 1 Select Manual Update. REDGREEN RED GREEN GREEN WATCHING TV / PROGRAMME CONTROL 2 or 3 ■ SelectGREEN the desired channelRED number. YELLOW RED GREEN YELLOW YELLOW RED Select Search. Searches for the new software.
* When detecting new software using Auto Update or Manual Update menu SETUP Auto Tuning Manual Tuning Programme Edit Software Update Diagnostics CI Information ➊ The new software information will be shown. ➋ Select Yes using the <> button and press the OK button to OK Move start the software update. Software Update New System Software is Available. • Select No and press the OK button to return to the previous menu without updating.
WATCHING TV / PROGRAMME CONTROL Diagnostics This function enables you to view system status information such as Manufacturer, Model/Type, Update Date, Software Version, Loader Version, Micom Version, Strength, or Quality. Diagnostics SETUP Move OK Manufacturer Model / Type Update Date Software Version Loader Version Micom Version Auto Tuning Manual Tuning Programme Edit Software Update Diagnostics CI Information LG Electronics Inc. 19LU7000EU 05 Mar. 2009 0.00.39 I5.
CI Information (In Digital Mode Only) This function enables you to watch some encrypted digital terrestrial services (pay services). If you remove the CI Module, you cannot watch pay services. When the module is inserted into the CI slot, you can access the module menu. To purchase a module and smart card, contact your dealer. Do not repeatedly insert or remove a CI module from the TV. This may cause a malfunction. When the TV is turned on after inserting a CI Module, you may not have any sound output.
RED GREEN WATCHING TV / PROGRAMME CONTROL GREEN YELLOW Selecting The Programme List YELLOWare stored in the memory by displaying the programme list.BLUE You can check which programmes Programme List Favourite List BLUE Displayed when the Locked Programme. RED Exit WATCHING TV / PROGRAMME CONTROL ■ 1 2 ■ Display or exit the programme list. ■ 1 Displaying the Programme List Selecting a Programme Displaying the Favourite List 1 YELLOW Display or exit the favourite programme list.
Input List HDMI and AV1, 2 (SCART) can be recognized by a detect pin and thus enabled only when an external device approves voltage. RED Antenna AV1 GREEN HDMI2 YELLOW ■ 1 1 2 AV3 Component RGB DVD RED HDMI1 GREEN RED Using INPUT button BLUE Using MENU button Select the input source. YELLOW BLUE Select INPUT. RED RED Select the input source. GREEN GREEN YELLOW YELLOW BLUE BLUE • By pressing INPUT button repeatedly on the inputGREEN list, you can move easily among the connected inputs.
WATCHING TV / PROGRAMME CONTROL Input Label Selects a label for each external input source. OPTION Menu Language Audio Language Subtitle Language Hard of Hearing ( ) Country Input Label Key Lock Mode Setting WATCHING TV / PROGRAMME CONTROL 1 Move OK : English : English : English : Off : UK : Off : Home Use AV1 AV2Move OK AV3 : Netherlands Component : Nederlands RGB : English : English HDMI1 : Off HDMI2 Close RED REDRED RED Select OPTION. 2 RED Select Input Label.
Initializing (Reset to original factory settings) This function initializes all settings. It is useful to initialize the product or when you move to other city or country. When the Factory Reset is completed, you must restart the Initializing setup. When the Lock System menu is “On”, the message to enter the password appears.
TO USE A USB DEVICE When you connect a USB device, this pop up menu is displayed, automatically. “POP UP MENU” will not be displayed while the OSD including Menu, EPG or Schedule list is activated. When the Pop Up menu does not appear, you can select Music List or Photo List in the USB menu. In USB device, you can not add a new folder or delete the existing folder. 1 Connect the USB device to the USB IN jacks on the side of TV. RED • It doesn’t support USB HDD. • This TV Supports on JPEG and MP3.
Photo List You can view photo files on USB storage device. The On Screen Display may be different from your TV. Images are an example to assist with the TV operation. PHOTO(*.JPEG) supporting file Baseline: 7680 x 4320 • You can play JPEG files only. • Only baseline scan is supported among JPEG (SOF0, SOF1 only). • Non-supported files are displayed in the form of bitmap. Screen Components 1 Select USB. 2 Select Photo List.
TO USE A USB DEVICE Photo Selection and PopUp Menu Photo List USB Device Page 1/1 1 file(s) Marked Free Space 2GB Up Folder Up Folder Navigation Photo List Option Page Change Select Exit USB Device Page 1/1 1 file(s) Marked Free Space 2GB Up Folder TO USE THE USB DEVICE View u Unmark All Delete u Close u u u Up Folder Navigation 1 2 3 4 Option Page Change Select Exit Select the target RED REDfolder or drive. Select the desired photos.
How To View Photo Detailed operations are available on full-sized photo view screen. USB Device Photo List Page 1/1 1 file(s) Marked Free Space 2GB Up Folder Up Folder Navigation Option Page Change Select Exit USB Device Photo List Page 1/1 1 file(s) Marked View Loading Unmark All Slideshow Delete BGM Delete Option Close Close The aspect ratio of a photo may change the size of the photo displayed on the screen in full size.
RED TO USE A USB DEVICE RED GREEN 6 Select the Slideshow , BGM, YELLOW (Rotate), Delete, Option or Close. GREEN YELLOW BLUE • Use < > button to select the previous or next photo. Loading Slideshow BGM Delete Option Close • Use ⋁ < > and OK button to select and control the menu on the fullsized screen. BLUE u Slideshow: When no picture is selected, all photos in the current folder are TO USE THE USB DEVICE displayed during slide show.
Music List You can play music files on USB storage device. Purchased music files(*.MP3) may contain copyright restrictions. Playback of these files may not be supported by this model. Music file on your USB device can be played by this unit. The On Screen Display may be different from your TV. Images are an example to assist with the TV operation. MUSIC (*.MP3) supporting file Bit rate 32 ~ 320 • Sampling rate MPEG1 layer 3: 32 kHz, 44.1 kHz, 48 kHz. REDRED Screen Components Select USB.
TO USE A USB DEVICE Music Selection and PopUp Menu As shown , up to 6 music titles are listed per page. USB Device Music List Page 1/3 1 file(s) Marked Free Space 2GB Title Up Folder Navigation Option Page Change Select Exit u USB Device Music List Page 1/1 1 file(s) Marked Free Space 2GB TO USE THE USB DEVICE Title Play Marked Play with Photo Unmarked All Delete Close Up Folder Navigation 1 2 3 4 Option Page Change Select Exit Play (During stop) : Play the selected musics.
■ If you don’t press any button for a while during the playing, the play information box (as shown in the below) will float as a screen saver. ■ Screen saver is to prevent screen pixel damage due to an fixed image remaining on the screen for a extended period of time. NOTE ► When music is playing, is displayed in back of the music title. ► A damaged or corrupted music does not play but displays 00:00 in playtime.
BLUE TV GUIDE (EPG; ELECTRONIC PROGRAMME GUIDE) (In Digital Mode) The TV GUIDE displays the programmes for the next 7 days sent by the broadcaster. Three modes are available for quick search and reminder; Table, Schedule and Find. 1 Display or exit the TV Guide. 2 GREEN GREEN Move to Schedule mode. 3 YELLOW YELLOW Move to Find mode. 4 TV GUIDE (EPG; ELECTRONIC PROGRAMME GUIDE) GB-52 RED RED BLUE BLUE RED GREEN YELLOW BLUE Move to Table mode.
Button Function in Table Mode You can view the programme information of all channels in time and date order. TV Guide Table Schedule Find RED RED GREEN GREEN YELLOW YELLOW Date Reservation GREEN YELLOW Information Change theGREEN date. Change BLUEthe page. BLUE RED YELLOW BLUE Switch between TV and Radio groups. Now RED ■ 1 YELLOW Select a programme on RED air. 2 BLUE Switch to the selectedGREEN programme. ■ Display the programme information.
TV GUIDE (EPG; ELECTRONIC PROGRAMME GUIDE) (IN DIGITAL MODE) Button Function in Schedule Mode Schedule displays the list of the programmes reserved. You can edit, delete or add the reminders. TV Guide Schedule Table Find Reminder Channel Der Alte 15/09 15:35 16:35 Once Date Start Time End Time Repeat RED GREEN TV GUIDE (EPG; ELECTRONIC PROGRAMME GUIDE) YELLOW BLUE OK RED Move Delete GREEN New Reminder Cancel Change Edit/Add Information RED Edit or add a reminder.
Button Function in Find Mode Find enables you to find the programme you want by entering the keyword, genre, time and day of the programme. TV Guide Table Schedule Find Keyword All Genre All RED RED Time & Day Every Time Everyday Search GREEN BLUE Pr. Change GREEN RED Information RED Page Change TV GUIDE (EPG; ELECTRONIC PROGRAMME GUIDE) YELLOW Sort GREEN GREENGenre, Time, Day values Input the Keyword, and select Search. YELLOW Display theYELLOW previous inputted values.
DVD OPERATION Notes On Discs Symbol “ ” may appear on the TV screen during operation. A “ ” means that the operation is not permitted by the unit or is not available on the disc. On handling discs Do not touch the playback side of the disc. Do not attach paper or tape to discs. Playback side On cleaning discs DVD OPERATION ■ Fingerprints and dust on the disc cause picture and sound deterioration. Wipe the disc from the centre outwards with a soft cloth. Always keep the disc clean.
Title: When two or more movies are recorded on a disc, the disc is divided into two or more parts. Each part is called a “TITLE”. Chapter: The titles can be subdivided into many sections. Each section is called a “CHAPTER”. Track: An audio CD can contain several items. These are assigned to the tracks. Note ► If an MP3 or JPG file CD is created using an incorrect method, the player may not be able to recognize it.
DVD OPERATION Playing DVD Or Video CD Basic Playback 1 2 3 4 Turn TV on. Select DVD input. Open the disc tray. DVD OPERATION Place a disc with the label side facing upward. The disc tray will be closed and the playback will start automatically. Stop / Resume 1 2 Press to stop playback temporarily. (“II n” appears on the screen.) The unit memorizes the location where you stopped (even if standby or other input modes). Resume playback from the location where you stopped.
Pause Playback (Still Mode) 1 Press to pause playback. 2 ■ Return to normal playback. The sound is muted during still mode. Fast Backward/Forward 1 or Return to normal playback. Slow Backward/Forward 1 2 3 ■ DVD OPERATION 2 Press to fast backward or forward playback. Select the required speed by pressing repeatedly. (x2, x4, x16, x32 or x128) Press to pause playback. or Press to slow backward or forward playback. Select the required speed by pressing repeatedly.
DVD OPERATION Skip a Chapter/Track 1 Press to skip the current chapter/track. Playback starts from the beginning of the next chapter/track. 2 ■ Press to return to the beginning the current chapter/track. You can select the previous or next chapter/track you want by pressing repeatedly. Still Picture and Frame-by-Frame Playback 1 Press to pause playback. DVD OPERATION 2 Press it repeatedly to advance the picture frame-by-frame. 3 Return to normal playback.
A-B Repeat Playback A-B repeat playback allows you to repeat between two selected points. 1 Select the start point during playback. “A” is displayed on TV screen and the starting point of your selected segment is set up. 2 Select the end point. “A B” is displayed on TV screen and the ending point is set up. Playback starts at the point that you selected. Playback stops at the end point, returns to Point A automatically, and then starts again. 3 Resume normal playback.
DVD OPERATION Information Display 1 ■ Press this button during playback. The status information such as Title number, Chapter number, Playing time, Audio options, Subtitle language, and Angle will appear. Title Chapter Time Audio Subtitle Angle OSD display may different depending on a sort of DVD disc. Camera Angle (DVD only) If the scene was recorded from multiple angles, you can easily change the camera angle of the scene you are currently watching. 1 Press this button during playback.
Zoom When enlarging the picture, it may become distorted. 1 Press this button during playback. 2 Press it repeatedly to enlarge the DVD picture; x1, x4, x16. 3 ■ Adjust the main picture position while in the enlarged picture mode. Zoom may not work on some DVDs. PBC (Video CD Only) 1 ■ DVD OPERATION Set Playback Control (PBC) to On or Off. Select On or Off. ■ ■ On: Video CDs with PBC are played according to the PBC. Off: Video CDs with PBC are played the same way as Audio CDs.
DVD OPERATION Information Display 1 Press to view the information on the current playback file. The information such as path, title, artist, album, year and comment will appear one by one by pressing repeatedly. Stop / Resume 1 Press once to stop playback temporarily. (“II n” appears on the screen.) 2 Resume playback from the location where you stopped. Full Stop / Eject DVD OPERATION 1 Press twice to stop playback fully. (“n” appears on the screen.) 2 Remove the disc.
Move to Another Track 1 Press to go to the next track. Playback starts from the beginning of the next track 2 ■ Press to return to the beginning the current track. You can select the previous or next track you want by pressing repeatedly. Repeat Playback You can play a specific track repeatedly. 1 Press to set the repeat mode. Press it repeatedly to change the repeat mode. (TRACK, ALL, OFF) 1 Press to edit the programme list. (“ ” appears on the screen.
DVD OPERATION Audio CD Operation Basic Playback 1 00 : 01 : 37 List Insert a disc. The AUDIO CD menu screen appears and the playback will start automatically from the first track. ■ TRACK 01 TRACK 02 TRACK 03 TRACK 04 TRACK 05 TRACK 06 TRACK 07 TRACK 08 You can easily move the cursor to the next page using the DISC MENU button. Stop / Resume 1 DVD OPERATION 2 Press once to stop playback temporarily. (“II n” appears on the screen.) Resume playback from the location where you stopped.
Fast Backward/Forward 1 or 2 Press to fast backward or forward playback. Select the required speed by pressing repeatedly. (x2, x4 or x8) Return to normal playback. Move to Another Track 1 Press to go to the next track. Playback starts from the beginning of the next track 2 Press to return to the beginning the current track. You can select the previous or next track you want by pressing repeatedly. Repeat Playback DVD OPERATION ■ You can play a specific track repeatedly.
DVD OPERATION A-B Repeat Playback A-B repeat playback allows you to repeat between two selected points. 1 2 3 Select the start point during playback. “A” is displayed on TV screen and the starting point of your selected segment is set up. Select the end point. “A-B” is displayed on TV screen and the ending point is set up. Playback starts at the point that you selected. Playback stops at the end point, returns to Point A automatically, and then starts again. Resume normal playback.
JPEG Operation Basic Playback 1 1/30 List Insert a disc. The PHOTO menu screen appears. 2 Select the desired folder. 3 Select the desired file. 4 IMG. 001 IMG_002 IMG_003 IMG_004 IMG_005 IMG_006 IMG_007 / Photo / IMG_001.jpg or Music Display the selected JPEG image in full screen. Return to the menu screen. ■ You can easily move the cursor to the next page using the DISC MENU button.
DVD OPERATION Slide Show 1 Select the desired file. 2 Select “ 3 ” to set the time interval of slide show. Select the required speed by pressing repeatedly. (6, 10 or 14 seconds) 4 Select “ ” to start the slide show from the selected file. DVD OPERATION 5 Press to pause the slide show. 6 Press to stop the slide show. ■ Press the DISPLAY button to hide the play control menu during showing. Rotation 1 Rotate a JPEG file clockwise or counter-clockwise during showing.
PICTURE CONTROL RED Picture Size (Aspect Ratio) Control GREEN You can watch the screen in various picture formats; 16:9, Just Scan, Original, Full Wide, 4:3, 14:9, Zoom and Cinema Zoom1. If a fixed image is displayed on the screen for a long time, that fixed image may become imprinted on the screen and remain visible. 1 • You can also adjust Aspect Ratio in the PICTURE menu. • By pressing OK button in 14:9, Zoom or Cinema Zoom 1, you can adjust the zoom size and position.
PICTURE CONTROL • 4:3 The following selection will allow you to view a picture with an original 4:3 aspect ratio, gray bars will appear on both the left and right of the screen. • 14:9 You can view a picture format of 14:9 or a general TV programme in the 14:9 mode. The 14:9 screen is viewed in the same way as in 4:3, but is magnified to the left and right. • Zoom The following selection will allow you to view the picture without any alteration, while filling the entire screen.
Energy Saving It reduces the TV’s power consumption. You can increase the brightness of your screen by adjusting the Energy Saving level or by setting the Picture Mode. When adjusting Energy Saving in MHEG mode, the Energy Saving setting is applied after the MHEG is finished. PICTURE Aspect Ratio Energy Saving Picture Mode Move : 16:9 : Off : Standard • Backlight • Contrast • Brightness • Sharpness • Colour 1 Select PICTURE.
PICTURE CONTROL Preset Picture Settings - Picture Mode Vivid Standard Natural Cinema Sport Game Strengthen the contrast, brightness, colour and sharpness for vivid picture. The most general screen display status. The most natural screen display status. Optimizes video for watching movies. Optimizes video for watching sports events. Optimizes video for playing games.
Manual Picture Adjustment - User Mode ■ Backlight To control the brightness of the screen, adjust the brightness of LCD panel. Adjusting the backlight when setting the brightness of the set is recommended. ■ Contrast ■ Brightness ■ Colour ■ Sharpness ■ Tint 1 3 4 5 NOTE Aspect Ratio Energy Saving Picture Mode Adjusts the signal level between black and white in the picture. You may use Contrast when the bright part of the picture is saturated.
PICTURE CONTROL Picture Improvement Technology You can calibrate the screen for each Picture Mode or set the video value according to the special video screen. You can set the video value differently for each input. To reset to the factory default screen after making adjustments to each video mode, execute the “Picture Reset” function for each Picture Mode.
Colour Temperature (Warm/Medium/Cool) ■ Choose one of three automatic colour adjustments. Set to warm to enhance hotter colours such as red, or set to cool to make picture bluish. Noise Reduction (Off/Low/Medium/High) ■ Reduces screen noise without compromising video quality Black Level (Low/High) • Low : The picture of the screen gets darker. • High : The picture of the screen gets brighter. ■ Set black level of the screen to proper level.
PICTURE CONTROL Picture Reset Settings of the selected picture modes return to the default factory settings. PICTURE Move • Contrast • Brightness • Sharpness • Colour • Tint • Advanced Control • Picture Reset PICTURE OK Screen 1 2 PICTURE CONTROL 3 Move OK • Contrast 90 • Brightness 50 • Sharpness 60 Resetting• Colour video configuration… 60 • Tint 0 • Advanced Control • Picture Reset 90 50 60 60 0 Screen Select PICTURE. Select Picture Reset.
Mode Setting We recommend setting the TV to “Home Use” mode for the best picture in your home environment. “Store Demo” mode is an optimal setting for displaying at stores. OPTION Audio Language Subtitle Language Hard of Hearing ( ) Country Input Label Key Lock Mode Setting Factory Reset 1 2 4 OK OPTION : English : English : Off : UK Move OK : English Audio Language : English Subtitle Language Selecting the environment. : Off Hard of Hearing ( ) Choose the setting mode you want.
SOUND & LANGUAGE CONTROL Auto Volume Leveler AVL automatically remains on the same level of volume if you change programmes. Because each broadcasting station has its own signal conditions, volume adjustment may be needed every time the channel is changed. This feature allows users to enjoy stable volume levels by making automatic adjustments for each program.
Preset Sound Settings - Sound Mode You can select your preferred sound setting; Standard, Music, Cinema, Sport or Game and you can also adjust the frequency of the equalizer. Sound Mode lets you enjoy the best sound without any Special adjustment as the TV sets the appropriate sound options based on the programme content. Standard, Music, Cinema, Sport and Game are preset for optimum sound quality at the factory. Standard Music Cinema Sport Game Offers standard-quality sound.
SOUND & LANGUAGE CONTROL Manual Sound Settings - User Mode Adjusting the audio equalizer. AUDIO Auto Volume Balance Sound Mode Move AUDIO OK : Off Move Auto Volume Balance Sound Mode 0 : Standard • SRS TruSurround XT : Off • 80Hz 0 • 220Hz 0 • 470Hz 0 • 1KHz 0 1 2 SOUND & LANGUAGE CONTROL 3 OK : Off Off 0 : Standard • SRS TruSurround XT : Off • 80Hz 0 • 220Hz 0 • 470Hz 0 • 1KHz 0 Close RED RED REDRED 4 RED GREEN Select a frequency band. GREEN GREEN GREEN RED RED Select Sound Mode.
Balance You can adjust the sound balance of the speakers to preferred levels. AUDIO Auto Volume Balance Sound Mode Move OK : Off 0 : Standard • SRS TruSurround XT : Off • 80Hz 0 • 220Hz 0 • 470Hz 0 • 1KHz 0 1 2 Move : Off 0 Balance : Standard OK 0 Close • SRS TruSurround XT : Off • 80Hz 0 • 220Hz 0 • 470Hz 0 • 1KHz 0 Select AUDIO. RED REDRED RED Select Balance. GREEN GREEN RED GREEN GREEN YELLOW YELLOW Make desired adjustment.
SOUND & LANGUAGE CONTROL TV Speakers On/Off Setup You can adjust the TV internal speaker status. In AV1, AV2, AV3, COMPONENT, RGB and HDMI1 with HDMI to DVI cable, the TV speaker can be operational even when there is no video signal. If you wish to use an external Hi-Fi system, turn off the TV internal speakers. AUDIO Digital Audio Out TV Speaker 1 2 SOUND & LANGUAGE CONTROL 3 Move • 470Hz • 1KHz • 2.2KHz • 4.7KHz • 12KHZ Reset : Dolby Digital : On AUDIO OK 0 0 0 0 0 Select AUDIO.
Selecting Digital Audio Out This function allows you to select your preferred Digital Audio Output. The TV can only output Dolby Digital if a channel is broadcast with Dolby Digital audio. When Dolby digital is available, selecting Dolby Digital in the Digital Audio Out menu will set SPDIF (Sony Philips Digital InterFace) output to Dolby Digital If Dolby Digital is selected in the digital audio out menu when dolby digital is not available, SPDIF output will be PCM (Pulse-Code Modulation).
SOUND & LANGUAGE CONTROL Audio Reset Settings of the selected Sound Mode return to the default factory settings. AUDIO Move Digital Audio Out TV Speaker 1 2 SOUND & LANGUAGE CONTROL 3 AUDIO OK 0 0 0 0 0 • 470Hz • 1KHz • 2.2KHz • 4.7KHz • 12KHZ Reset Move OK 0 • 470Hz 0 • 1KHz 0 • 2.2KHz 0 • 4.7KHz 0 Resetting• sound 12KHZmode configuration… : Dolby Digital : On Digital Audio Out TV Speaker Select AUDIO. RED RED REDRED Select Reset.
I/II Stereo/Dual Reception (In Analogue Mode Only) When a programme is selected, the sound information for the station appears with the programme number and station name. Audio Sound Mode STEREO RED MONO MONO Previous GREEN 1 REDSelect AUDIO.
SOUND & LANGUAGE CONTROL NICAM Reception (In Analogue Mode Only) If the TV is equipped with a receiver for NICAM reception, high quality NICAM (Near Instantaneous Companding Audio Multiplex) digital sound can be received. Sound output can be selected according to the type of broadcast received. ➊ When NICAM mono is received, you can select NICAM MONO or FM MONO. ➋ When NICAM stereo is received, you can select NICAM STEREO or FM MONO. If the stereo signal is weak, switch to FM MONO.
Country Selection * This function is not available in UK. If you want to change the country selection, 1 2 3 4 Select OPTION. RED REDRED RED Select Country. GREEN GREEN RED GREEN GREEN YELLOW YELLOW Select your desired country. RED GREEN RED YELLOW YELLOW Save. BLUE BLUE YELLOW GREEN GREEN BLUE BLUE • YELLOW PressYELLOW the MENU button to return to normal TV viewing. BLUE • Press the RETURN button to return to the previous screen.
SOUND & LANGUAGE CONTROL Language Selection Select the default language and the hard of hearing. 1 2 3 4 Select OPTION. 1 Select OPTION. 2 Select RED REDRED RED Select Menu Language or Audio Language or Subtitle GREEN GREEN RED GREEN GREEN Language. Hard of Hearing( 3 YELLOW YELLOW RED GREEN Select your desired language. RED YELLOW YELLOW Save. RED REDRED RED GREEN GREEN RED RED GREEN ). GREEN Select On or Off. • Press the MENU button to return to normal TV viewing.
TIME SETTING Clock Setup The clock is set automatically when receiving a digital TV signal. When you select a Time Zone city, the TV time is set by the time offset information based on Time Zone and GMT (Greenwich Mean Time) which is received with the broadcast signal and the time is set automatically by a digital signal. Once Clock is set in digital mode, you cannot change time. (You can set the clock manually only if the TV has no DTV signal.
TIME SETTING Auto On/Off Time Setting The Off time function automatically switches the TV to standby at a preset time. Two hours after the TV is switched on by the on time function it will automatically switch back to standby mode unless a button has been pressed. The Off time function overrides the On timer function if both are set to the same time. The TV must be in standby mode for the On timer to work.
Auto Shut-Off Setting If the TV is switched on and there is no input signal, it will switch off automatically after 15 minutes. TIME Clock Off Time On Time Sleep Timer Auto Sleep Time Zone 1 2 3 Move TIME OK Clock Off Time On Time Sleep Timer Auto Sleep Time Zone : Off : Off : Off : Off : London GMT Move OK : Off : Off : Off : Off Off OnGMT : London RED REDRED RED Select TIME. Select Auto Sleep. GREEN GREEN RED RED GREEN GREEN Select Off or On.
PARENTAL CONTROL / RATINGS Set Password & Lock System Enter the password, press ‘0’, ‘0’, ‘0’, ‘0’ on the remote control handset. LOCK Lock System Set Password Block Programme Parental Guidance Move RED OK : Off : Off GREEN LOCK Move Lock System Set Password Block Programme Parental Guidance OK : Off Off On : Off YELLOW 1 Select LOCK. 2 Select Lock System. GREEN GREEN GREEN RED RED 3 4 PARENTAL CONTROL / RATINGS 5 REDRED BLUE Select On.
Block Programme Blocks any programmes that you do not want to watch or that you do not want your children to watch. It is available to use this function in Lock System ”On”. Enter a password to watch a blocked programme. Block Programme LOCK Lock System Set Password Block Programme Parental Guidance Move OK : Off : Off Lock Pr. Change 1 Select Block Programme.
PARENTAL CONTROL / RATINGS Parental Control (In Digital Mode Only) This function operates according to information from the broadcasting station. Therefore if the signal has incorrect information, this function does not operate. A password is required to gain access to this menu. This set is programmed to remember which option it was last set to even if you switch the set off. Prevents children from watching certain adult’s TV programmes, according to the ratings limit set.
Key Lock The TV can be set so that the remote control is required to control it. This feature can be used to prevent unauthorized viewing. OPTION Menu Language Audio Language Subtitle Language Hard of Hearing ( ) Country Input Label Key Lock Mode Setting 1 2 3 4 OPTION OK Move : English : English : English : Off : UK Menu Language Audio Language Subtitle Language Hard of Hearing ( ) Country Input Label Key Lock Mode Setting : Off : Home Use RED REDRED RED Select Key Lock.
TELETEXT * This feature is not available in all countries. Teletext is a free service broadcast by most TV stations which gives up-to-the-minute information on news, weather, television programmes, share prices and many other topics. The teletext decoder of this TV can support the SIMPLE and FASTEXT systems. SIMPLE (standard teletext) consists of a number of pages which are selected by directly entering the corresponding page number.
Special Teletext Functions Press the T. OPT button and then use ⋀ ⋁ button to select the Text Option menu. ■ Size Text Option Selects double height text. Size i ■ Index ■ Time ■ Displays the index page. In the teletext mode, press this button to select a sub page number. The sub page number is displayed at the bottom of the screen. To hold or change the sub page, press the RED/GREEN or NUMBER buttons.
DIGITAL TELETEXT *This function works in UK only. The TV gives you access to digital teletext which is greatly improved in various aspects such as text, graphics etc. This digital teletext can access special digital teletext services and specific services which broadcast digital teletext. Teletext Within Digital Service ➊ Press the numeric or P ⋀ ⋁ button to select a digital service which broadcasts digital teletext. To know which are digital teletext services, refer to the EPG service list.
APPENDIX Troubleshooting The TV does not operate properly. The remote control does not work - Check to see if there is any object between the TV and the remote control causing an obstruction. Ensure you are pointing the remote control directly at the TV. - Ensure that the batteries are installed with correct polarity (+ to +, - to -). - Install new batteries. Power is suddenly turned off - Is the sleep timer set? - Check the power control settings. Has the Power supply been interrupted.
APPENDIX There is a problem in PC mode. (Only PC mode applied) The signal is out of range (Invalid format) - Adjust resolution, horizontal frequency, or vertical frequency. - Check the input source. Vertical bar or stripe on background & Horizontal Noise & Incorrect position - Use Auto configure or adjust clock, phase, or H/V position. (Option) Screen colour is unstable or single colour - Check the signal cable. - Reinstall the PC video card. There is a problem with PICTURE settings.
Maintenance Early malfunctions can be prevented. Careful and regular cleaning can prolong the life of your new TV. Caution: Be sure to switch the power off and unplug the power cord before you begin any cleaning. Cleaning the Screen ➊ A good way to keep the dust off your screen for a while is to wet a soft cloth in a mixture of lukewarm water and a little fabric softener or dish washing detergent. Wring the cloth until it is almost dry, and then use it to wipe the screen.
APPENDIX Product Specifications 19LU70** 22LU70** 19LU7000-ZA 22LU7000-ZA with stand 467.5 x 410.2 x 194.0 mm 18.4 x 16.15 x 7.6 inches 536.5 x 449.7 x 194.0 mm 21.1 x 17.7 x 7.6 inches without stand 467.5 x 410.2 x 161.3 mm 18.4 x 16.15 x 6.35 inches 536.5 x 449.7 x 161.3 mm 21.1 x 17.7 x 6.35 inches with stand without stand 5.1kg / 11.2lbs 5.0kg / 11.0lbs 6.2kg / 13.7lbs 6.1kg / 13.
Open Source License Open Source Software Notice The following GPL executables and LGPL libraries used in this product are subject to the GPL2.0/LGPL2.1 License Agreements: GPL EXECUTABLES: • Linux kernel 2.6 • busybox • freetype LGPL LIBRARIES: • glibc • libexif • id3lib LG Electronics offers to provide source code to you on CD-ROM for a charge covering the cost of performing such distribution, such as the cost of media, shipping and handling upon e-mail request to LG Electronics at: Opensource@lge.
APPENDIX GNU GENERAL PUBLIC LICENSE Version 2, June 1991 Copyright (C) 1989, 1991 Free Software Foundation, Inc., 51 Franklin Street, Fifth Floor, Boston, MA 02110-1301 USA Everyone is permitted to copy and distribute verbatim copies of this license document, but changing it is not allowed. Preamble The licenses for most software are designed to take away your freedom to share and change it.
1. You may copy and distribute verbatim copies of the Program’s source code as you receive it, in any medium, provided that you conspicuously and appropriately publish on each copy an appropriate copyright notice and disclaimer of arranty; keep intact all the notices that refer to this License and to the absence of any warranty; and give any other recipients of the Program a copy of this License along with the Program.
APPENDIX If distribution of executable or object code is made by offering access to copy from a designated place, then offering equivalent access to copy the source code from the same place counts as distribution of the source code, even though third parties are not compelled to copy the source along with the object code. 4. You may not copy, modify, sublicense, or distribute the Program except as expressly provided under this License.
NO WARRANTY 11. BECAUSE THE PROGRAM IS LICENSED FREE OF CHARGE, THERE IS NO WARRANTY FOR THE PROGRAM, TO THE EXTENT PERMITTED BY APPLICABLE LAW. EXCEPT WHEN OTHERWISE STATED IN WRITING THE COPYRIGHT HOLDERS AND/OR OTHER PARTIES PROVIDE THE PROGRAM “AS IS” WITHOUT WARRANTY OF ANY KIND, EITHER EXPRESSED OR IMPLIED, INCLUDING, BUT NOT LIMITED TO, THE IMPLIED WARRANTIES OF MERCHANTABILITY AND FITNESS FOR A PARTICULAR PURPOSE. THE ENTIRE RISK AS TO THE QUALITY AND PERFORMANCE OF THE PROGRAM IS WITH YOU.
APPENDIX GNU LESSER GENERAL PUBLIC LICENSE Version 2.1, February 1999 Copyright (C) 1991, 1999 Free Software Foundation, Inc. 51 Franklin Street, Fifth Floor, Boston, MA 02110-1301 USA Everyone is permitted to copy and distribute verbatim copies of this license document, but changing it is not allowed. [This is the first released version of the Lesser GPL. It also counts as the successor of the GNU Library Public License, version 2, hence the version number 2.1.
Although the Lesser General Public License is Less protective of the users’ freedom, it does ensure that the user of a program that is linked with the Library has the freedom and the wherewithal to run that program using a modified version of the Library. The precise terms and conditions for copying, distribution and modification follow. Pay close attention to the difference between a “work based on the library” and a “work that uses the library”.
APPENDIX Thus, it is not the intent of this section to claim rights or contest your rights to work written entirely by you; rather, the intent is to exercise the right to control the distribution of derivative or collective works based on the Library. In addition, mere aggregation of another work not based on the Library with the Library (or with a work based on the Library) on a volume of a storage or distribution medium does not bring the other work under the scope of this License. 3.
c) Accompany the work with a written offer, valid for at least three years, to give the same user the materials specified in Subsection 6a, above, for a charge no more than the cost of performing this distribution. d) If distribution of the work is made by offering access to copy from a designated place, offer equivalent access to copy the above specified materials from the same place. e) Verify that the user has already received a copy of these materials or that you have already sent this user a copy.
APPENDIX 13. The Free Software Foundation may publish revised and/or new versions of the Lesser General Public License from time to time. Such new versions will be similar in spirit to the present version, but may differ in detail to address new problems or concerns. Each version is given a distinguishing version number.