
User manual


Operating 25
Operating
3
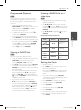
Programmed Playback
u
You can play the contents of a disc in the order
you want by arranging the order of the songs on
the disc. The program is cleared when the disc is
removed.
1. Select a desired music file then press
PROG./MEMO. on the remote control or select
"
#
” and then press ENTER
b
to add the
music file to the program list.
2. To add all music file on the disc, select “
^
“
and then press ENTER
b
.
3. Select a music file from the program list then
press ENTER
b
to start programmed playback.
4. To clear a music file from the program list, select
the music you want to clear then press CLEAR
or select “
-
“ icon and then press ENTER
b
.
To clear all music file from the program list,
select “
=
“ then press ENTER
b
.
Viewing a PHOTO file
i
This unit can play discs with photo les.
1. Select the DVD/CD or USB function by pressing
FUNCTION on the remote control or by
pressing DVD/CD or USB on the unit.
2. Press
w/s
on the remote control or
Y
/
U
on the unit to select a folder, and then press
ENTER
b
on the remote control. A list of files in
the folder appears.
If you are in a file list and want to return to the
previous folder list, use
w/s
on the remote
control or
Y
/
U
on the unit
to highlight
g
... and press ENTER
b
on the remote control
or
D
(PLAY) on the unit.
3. If you want to view a particular file, press
w/s
on the remote control or
Y
/
U
on
the unit
to highlight a file and press ENTER
b
on the remote control or
D
(PLAY) on the unit.
While viewing a file, you can press
Z
(STOP)
on the remote control or STOP on the unit to
move to the previous menu (JPEG menu).
Viewing a PHOTO file as a
slide show
i
1. Highlight the file (not folder) which you like
beginning slide show.
2. Use
w/s/a/d
on the remote control to
highlight
d
. Then, use
a/d
to select the (3s/
5s/ 8s) option you want to use and then press
ENTER
b
.
3. Use
w/s/a/d
to highlight
d
then press
ENTER
b
.
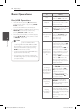
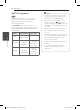
About help menu for slide show.
Menu Buttons Operation
w/s
Rotating the
picture.
a/d
Prev./ Next
a/d
Moving to
another le.
x
Close
BACK
x
Returning to the
menu.
b
Hide
ENTER
b
Hiding the help
menu.
Setting the Clock
1. Turn the power on.
2. Press CLOCK on the unit if you set the clock
function for the first time.
Press and hold CLOCK on the unit for at least
2 seconds if you have set the clock function
before.
3. Choose from either, by using
Y
/
U
.
- AM 12:00 (for an AM and PM display) or 0:00
(for a 24 hour display)
4. Press SET/CD
M
for confirm your selection.
5. Select the hours by using
Y
/
U
.
6. Press SET/CD
M
.
7. Select the minutes by using
Y
/
U
.
8. Press SET/CD
M
.
9. If you want to reset the clock, repeat steps 2-8.
10. If you want to stop while setting the clock ,
press CLOCK.
DM5320J-FU.ARUSLLK-1711-ENG.indd 25 2012-07-19 3:40:07