OWNER'S MANUAL Prior to installation, this airconditioning unit must be submitted for approval by the utility service which provides electricity (EN 61000-2, EN 61000-3 Norm). FRANÇAIS LG Multi Type Air Conditioner ENGLISH LG ESPAÑOL IMPORTANT • Please read this owner's manual carefully and thoroughly before installing and operating your room air conditioner. • Please retain this owner's manual for future reference after reading it thoroughly.
Room Air Conditioner Owner’s Manual TABLE OF CONTENTS FOR YOUR RECORDS Safety Precautions.................3 Prior to Operation ..................8 Operating Instructions...........9 Remote Controller ..............9 Remote Control Operation...........................11 Write the model and serial numbers here: Model # Serial # You can find them on a label on the side of each unit.
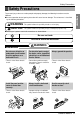
Safety Precautions Safety Precautions WARNING This symbol indicates the possibility of death or serious injury. CAUTION This symbol indicates the possibility of injury or damage to properties only. ■ Meanings of symbols used in this manual are as shown below. Be sure not to do. Be sure to follow the instruction. WARNING ■ Installation Do not use a defective or underrated circuit breaker. Use this appliance on a dedicated circuit.
Safety Precautions Do not modify or extend the power cable. • There is risk of fire or electric shock. Do not install, remove, or re-install the unit by yourself (customer). • There is risk of fire, electric shock, explosion, or injury. For installation, always contact the dealer or an Authorized Service Center. • There is risk of fire, electric shock, explosion, or injury. Be sure the installation area does not deteriorate with age.
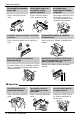
Safety Precautions If strange sounds, or small or smoke comes from product. Turn the breaker off or disconnect the power supply cable. • There is risk of fire or failure of product. • There is risk of electric shock or fire. When the product is soaked (flooded or submerged), contact an Authorized Service Center. • There is risk of fire or electric shock. Gasolin Be cautious that water could not enter the product. • There is risk of fire, electric shock, or product damage.
Safety Precautions CAUTION ■ Installation Always check for gas (refrigerant) leakage after installation or repair of product. • Low refrigerant levels may cause failure of product. Install the drain hose to ensure that water is drained away properly. • A bad connection may cause water leakage. Keep level even when installing the product. • To avoid vibration. 90° Do not install the product where the noise or hot air from the outdoor unit could be offensive to the neighborhoods or damage property.
Safety Precautions Do not block the inlet or outlet of air flow. • It may cause product failure. Use a soft cloth to clean. Do not use harsh detergents, solvents, etc. • There is risk of personal injury. ENGLISH • There is risk of fire, electric shock, or damage to the plastic parts of the product. Do not touch the metal parts of the product when removing the air filter. They are very sharp! x Wa Thinner Do not step on or put anyting on the product.
Prior to operation Prior to operation Preparing for operation 1. Contact an installation specialist for installation. 2. Connect the power cable between indoor unit and outdoor unit properly. 3. Use a dedicated circuit. 4. If the cord/plug is damaged, replace it with only an authorized replacement part. Usage 1. Being exposed to direct airflow for an extended period of time could be hazardous to your health. Do not expose occupants, pets, or plants to direct airflow for extended periods of time. 2.
Operating Instructions Operating Instructions Remote Controller ENGLISH 1. Remove the battery cover by pulling it according to the arrow direction. 2. Insert new batteries making sure that the (+) and (-) of battery are installed correctly. 3. Reattach the cover by sliding it back into position. NOTICE Use 2 AAA(1.5volt) batteries. Do not use rechargeable batteries. Storage and Tips For Using the Remote Controller • The remote control may be stored mounted on a wall.
Operating Instructions Signal Receptor Receives the signals from the remote controller.(Signal receiving sound: two short beeps or one long beep.) Operation indication lamps Operation Indication Lamps On/Off : Lights up during the system operation. Sleep Mode : Lights up during Sleep Mode Auto operation. Timer : Lights up during Timer operation. Defrost Mode : Lights up during Defrost Mode or Hot Start operation (Heat pump model only) Outdoor unit : Lights up during outdoor unit operation.
Operating Instructions Remote Control Operation The Remote Controller transmits the signals to the system. START/STOP BUTTON Operation starts when this button is pressed and stops when the button is pressed again. 2 OPERATION MODE SELECTION BUTTON Used to select the operation mode. 3 ROOM TEMPERATURE SETTING BUTTONS Used to select the room temperature. 4 INDOOR FAN SPEED SELECTOR Used to select fan speed in four steps low, medium, high and CHAOS.
Operating Instructions Cooling Operation 1 Press the Start/Stop button. The unit will respond with beep sound. 2 Open the door on the Remote Controller. To select Cooling Operation, press the Operation Mode Selection button. Each time the button is pressed, the operation mode is shifted in the direction of the arrow. Cooling Auto Healthy Dehumidification Heating (Heat pump model only) (Cooling Only (Heat Pump model) model) 3 ON Set the temperature lower than the room temperature.
Operating Instructions Auto Operation ENGLISH 1 Press the Start/Stop button. The unit will respond with beep sound. 2 Open the door on the Remote Controller. To select Auto Operation, press the Operation Mode Selection button. Each time the button is pressed, the operation mode is shifted in the direction of the arrow.
Operating Instructions Healthy Dehumidification Operation 1 Press the Start/Stop button. The unit will respond with beep sound. 2 Open the door on the Remote Controller. To select Healthy Dehumidification Operation, press the Operation Mode Selection button. Each time the button is pressed, the operation mode is shifted in the direction of the arrow. Cooling (Cooling Only (Heat Pump model) model) 3 ON Auto Healthy Heating Dehumidification (Heat pump model only) Set the fan speed.
Operating Instructions Heating Operation(Heat pump model only) ENGLISH 1 Press the Start/Stop button. The unit will respond with beep sound. 2 Open the door on the Remote Controller. To select Heating Operation, press the Operation Mode Selection button. Each time the button is pressed, the operation mode is shifted in the direction of the arrow. Cooling 3 Auto Healthy Heating Dehumidification (Heat pump model only) Set the temperature higher than the room temperature.
Operating Instructions Jet Cool 1 Press the Start/Stop button. The unit will respond with beep sound. 2 Press the Jet Cool button to operate the speed cooling/heating mode and the unit will operate in super high fan speed on cooling/heating mode for 30/60 minutes.
Operating Instructions NEO PLASMA Purification Operation(Optional) Press the Start/Stop button. The unit will respond with beep sound. 2 Open the door on the Remote Controller. Press the PLASMA air purifying operation ON/OFF button. Operation will start when the button is pressed and stop when the button is pressed again. 3 Set the fan speed. You can select the fan speed in four steps-low, medium, high or CHAOS. Each time the button is pressed, the fan speed mode is shifted.
Operating Instructions 2nd F Operation 1 Press the Start/Stop button. The unit will respond with beep sound. 2 Open the door of the Remote Controller and press the 2nd F button to operate functions printed in blue at bottom of buttons. (Check the indication of 2nd function on Remote Controller display.
Additional features Additional features Sleep Mode To cancel the Sleep Mode, press the sleep Mode Auto button several times until the star ( ) disappears from the operation display. 2. The Timer is programmed in one-hour increments by pressing the Sleep Mode Auto button 1 to 7 times. The sleep mode is available for 1 to 7 times. To alter the time period in steps of 1 hour, press the Sleep Mode Button while aiming at air conditioner.
Additional features Vertical Airflow Direction Control Standard, Artcool Mirror Type The up/down airflow (Vertical Airflow) can be adjusted by using the remote control. NOTICE ❏ If you press the CHAOS swing button, the horizontal airflow direction is changed automatically based on the CHAOS algorithm to distribute the air in the room evenly and at the same time to make the human body feel most comfortable, as if enjoying a natural breeze.
Additional features Horizontal Airflow Direction Control (Optional) The left/right(Horizontal Airflow) can be adjusted by using the remote control. 2. Open the door on the remote control. Press the Airflow Direction Start/Stop button and the louvers will swing left and right. Press the Horizontal Airflow Direction Control Button again to set the horizontal louver at the desired airflow direction. The up/down airflow (Vertical airflow) can be adjusted by using the remote controller.
Additional features Forced Operation The operation will be started operation if the power button is pressed without remote controller. If you want to stop operation, re-press the button. ON/OFF button Power button Heat pump Model Room Temp. ≥ 24°C(76°F) 21°C(70°F) ≤ Room Temp. < 24°C(76°F) Room Temp.
Maintenance and Service Maintenance and Service CAUTION: Before performing any maintenance, turn off the main power to the system. Grille, Case, and Remote Control ❏ Turn the system off before cleaning. To clean, wipe with a soft, dry cloth. Do not use bleach or abrasives. NOTICE Supply power must be disconnected before cleaning the indoor unit. ❏ Never use any of the followings: • Water hotter than 40°C(104°F) Could cause deformation and/or discoloration.
Maintenance and Service Replacement of purifying filter (Optional) Recommended use period : About 2 years Open the front panel as shown. Then pull the filter tab slightly forward to remove the air filter. After removing the air filter remove the plasma and deodorizer filter by slightly pulling forward. Deodorizer filter Plasma filter Artcool Type Indoor Unit Grille, Case, and Remote Control ❏ Turn the system off before cleaning. To clean, wipe with a soft, dry cloth. Do not use bleach or abrasives.
Maintenance and Service Cleaning of Purifying Filter • Recommended use period : About 3 months Front Panel Air Filter ENGLISH 1. Lift the front panel, hold it up and pull the Air filter. 2. Remove the Plasma Filter. Plasma Purifier Filter 3. Put in Plasma Filters in the neutral detergent for 1~2 hours and then raise them. 4. Insert the Plasma Filter after perfectly drying in shade. Now insert Air Filter and close the Front panel Completely by matching the hook.
Maintenance and Service When the air conditioner is not going to be used for a long time. When air conditioner is not going to be used for a long time. When the air conditioner is to be used again. 1. Operate the air conditioner on Air circulation mode (Refer to page 21) for 2 to 3 hours. • This will dry out the internal mechanisms. 1. Clean the air filter and install it in the indoor unit. (Refer to page 23~25for cleaning filters.) 2. Turn off the circuit breaker, and disconnect the power cable.
Maintenance and Service Troubleshooting Case Explanation See page 11~12, 15 The air conditioner does not operate. • Check room temperature setting? • Check if circuit breaker is on? The room has a peculiar odor. • Check that this is not a damp smell exuded by the walls, carpet, furniture, or cloth items in the room. - It seems that condensation is leaking from the air conditioner. • Check the drain hose is connected tight or if indoor unit is installed even.