ENGLISH OWNER’S MANUAL SXS REFRIGERATOR Please read this manual carefully before operating your set and retain it for future reference. www.lg.
Electrical Connections ENGLISH (In the UK Only) Important The wires in this mains lead are coloured in accordance with the following code: GREEN AND YELLOW:EARTH BLUE:NEUTRAL BROWN:LIVE This appliance must be earthed Green and Yellow (Earth) Brown(Live) Fuse Blue(Neutral) Cord grip As the colours of the wires in the mains lead of this apparatus may not correspond with the coloured markings identifying the terminals in your plug, proceed as follows: The wire which is coloured Green and Yellow must be
Table of contents Important safety instructions_______________________________________ 4 Identification of parts_____________________________________________ 6 Where to install_________________________________________________ 8 Installation Door removal___________________________________________________ 8 Door replacement_ ______________________________________________ 9 Feed water pipe installation (Dispenser model only)_____________________ 10 Door height adjustment______________________________________
Introduction Entry ENGLISH The model and serial numbers are found on the inner case on the back or one side of the refrigerator compartment of this unit. These numbers are unique to this unit and are not available to others. You should record requested information here and retain this guide as a permanent record of your purchase. Staple your receipt here. Date of purchase : Dealer purchased from : Dealer address : Dealer phone no. : Model no. : Serial no.
Introduction Child entrapment Warning DANGER: Risk of child entrapment. This appliance is not intended for use by persons (including children) with reduced physical, sensory or mental capabilities, or lack of experience and knowledge, unless they have been given supervision or instruction concerning use of the appliance by a person responsible for their safety. Children should be supervised to ensure that they do not play with the appliance.
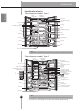
Introduction ENGLISH Identification of parts *Non dispenser model - Type 1 Freezer Compartment Refrigerator Compartment Dairy Corner Lamp /LED Panel (option) Shelf Door rack Shelf Lamp/LED Lamp (option) Door rack Shelf * Shelf (folding or normal) Shelf Shelf Ice Maker Door rack Vegetable drawer Door rack Door rack Drawer Shelf Door rack Lower cover NOTE • Parts, features, and options vary by model. Your model may not include every option.
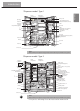
Introduction *Dispenser model - Type 1 Refrigerator Compartment Dairy Corner Space plus Lamp /LED Panel (option) Filter (Internal filter model only) Door rack Automatic ice maker Lamp/LED Lamp (option) Shelf Door rack * Shelf Refreshment Centre (optional) Shelf (folding or normal) Guide pitcher Shelf Shelf Door rack No Plumbing Ice & Water (Optional) Vegetable drawer Door rack Drawer Door rack Door rack Shelf Lower cover NOTE • Parts, features, and options vary by model.
Installation ENGLISH Where to install 1. Place your appliance where it is easy to use. 2. Avoid placing the unit near heat sources, direct sunlight or moisture. Do not operate the appliance outdoors where it can be exposed directly, or indirectly to sun, wind and rain. 3. To ensure proper air circulation around the fridge -freezer, please maintain sufficient space on both the sides as well as top and maintain at least 2 inches (5 cm) from the rear wall. 4.
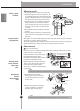
Installation Enough for water feed pipe tube to be completly pulled out Lower cover NOTE • If you have removed the refrigerator compartment door to pass the appliance through an access door, lay the door down, but be careful not to damage the feed water pipe tube. Remove the refrigerator compartment door 1) Loosen the hinge cover screws and remove the cover. Remove connection wires, if any, except for the earth line.
Installation ENGLISH Feed water pipe installation (Dispenser model only) Before installation ▪Automatic ice maker operation needs water pressure of 147~834kPa (1.5~8.5kgf/cm2) (The pressure is correct when an instant paper cup (180cc) is filled in 3 sec.). ▪If water pressure does not reach the rating 147kPa(1.5kgf/cm2) or below, it is necessary to purchase a separate pressure pump for normal automatic icing and cool water feed.
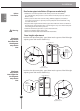
Installation Insert the transparent sheet supplied with the product wen the freezer door is lower then the refrigerator door Separate the door with the lower height, use the (+) type screwdriver to unscrew the screw at the bottom hinge as shown at Figure (① ), insert the transparent sheet as shown at Figure (② ) If the freezer compartment door is higher than the refrigerator compartment door (on some model) ENGLISH If the freezer compartment door is lower than the refrigerator compartment door (on some m
Operation Starting ENGLISH When your refrigerator is first installed, allow it to stabilize at normal operating temperatures for 2-3 hours prior to filling it with fresh or frozen foods. If operation is interrupted, wait 5 minutes before restarting. Adjusting the temperature and functions *Non dispenser model - Type 1 Refreshment Centre button (Optional) Refreshment Centre (Optional) Function display board NOTE • Your model may not include every option. •The control display is touch operated.
Operation *Non dispenser model - Type 2 ENGLISH Refreshment Centre button (Optional) Refreshment Centre (Optional) Function display board Display Power Saving Mode NOTE • Your model may not include every option. • The control display is touch operated. Excessive moisture on the display panel may result in its malfunction. Please keep the display panel dry and clean.
Operation ENGLISH *Dispenser model - Type 1 Refreshment Centre button (Optional) Water/Ice output Dispenser push switch Option Refreshment Centre (Optional) Function display board Type-1 Type-2 14 NOTE • Your model may not include every option. • The control display is touch operated. Excessive moisture on the display panel may result in its malfunction. Please keep the display panel dry and clean.
Operation *Dispenser model - Type 2 ENGLISH Refreshment Centre button (Optional) Water/Ice output Dispenser push switch Refreshment Centre (Optional) Dispenser Lamp (hidden) Option Function display board Type-1 Display Power Saving Mode Type-2 15 15 NOTE • Your model may not include every option. • The control display is touch operated. Excessive moisture on the display panel may result in its malfunction. Please keep the display panel dry and clean.
Operation ENGLISH *Dispenser model - Type 3 Refreshment Centre button (Optional) Water/Ice output Dispenser push switch Refreshment Centre (Optional) Dispenser Lamp (hidden) Option Function display board Type-1 Type-2 16 Display Power Saving Mode NOTE • Your model may not include every option. • The control display is touch operated. Excessive moisture on the display panel may result in its malfunction. Please keep the display panel dry and clean.
Operation Display Power Saving Mode You can adjust temperature of the fridge and freezer compartments How to adjust the temperature in the freezer compartment Freezer Compartment temperature adjustment Setting temperature How to adjust the temperature in the refrigerator compartment Refrigerator Compartment temperature adjustment Setting temperature *Whenever pressing button, setting is repeated in the order of (Middle )→(Middle Strong )→(Strong)→(Weak)→(Middle Weak).
ENGLISH Operation ▪ Choose from crushed ice, water, and cubed ice and depress the dispenser switch with a glass or other container. Dispenser use (on some model) Crushed Ice Select crushed ice by pressing the selection button, which will be highlighted. Water Select water by pressing the selection button, which will be highlighted.
Operation To get cold water The dispensed water will not be icy cold, but just cool or cold. If you want colder water, dispense ice before dispensing water. If you have difficulty in replacing the ice storage bin Rotate the rotary gear in 1/4 cycle as shown in the illustration and then push it back. ② ① NOTE • Figure ① and ② depends on model.
ENGLISH Operation When ice maker does not operate smoothly Ice is lumped together ▪ When ice is lumped together, take the ice lumps out of the ice storage bin, break them into small pieces, and place them back into the ice storage bin. ▪ When the ice maker produces small or lumped together ice, the amount of water supplied to the ice maker may need to be adjusted. Contact the service centre. * If ice is not used frequently, it may lump together.
Operation The other functions Diagnosis (failure detection) function ▪ The Diagnosis function automatically detects the problem when a failure is found whilst using of refrigerator. ▪ If a fault occurs, and none of the refrigerator buttons or functions are working, do not turn power off but immediately contact your local service centre. Once powered off it may not be possible for a service engineer to use the Diagnosis function to detect what caused the original fault.
ENGLISH Operation Freezer basket (two stars section) Two stars section ** (Applicable to some models only) ▪ Two stars means the temperature in the section is -12°C~ -18°C. ▪ Freezer foods for short-term storage. Refreshment centre(Applicable to some models only) How to use Open the minibar door. ▪ You can access the minibar without opening the refrigerator door, thus saving electricity.
Operation No Plumbing Ice & Water (Applicable to some models only) Turn the secure switch into “OPEN” position as shown in ①.Next to loosen the water tank hold and pull the cap of the water tank ② to loosen the water tank. The other functions To fill the water tank Lift up the clamps on both sides to open the water tank cover, and then fill the tank. Pour water up to the marked line (3ℓ or 2.1ℓ ). When the tank is full, close the tank cover and lock the clamps on both sides.
Operation Shelf (Applicable to some models only) Folding Shelf ENGLISH You can store taller items such as a gallon container or bottles by simply pushing in front half of shelf underneath back half of shelf. Pull toward you to return to a full shelf. Wine holder (Applicable to some models only) Wine holder adjustment (Type 1) Bottles can be stored laterally with this wine corner. This can be attached to any shelf.
Operation The humidity can be controlled by adjusting the humidity control switch to the left/right when storing vegetables or fruits. High humidity Low humidity Deodorizer (Applicable to some models only) This system efficiently absorbs strong odours by using an optical catalyst. This system does not have any affect on stored food. Deodorizing system Vegetable compartment Opti Temp Zone (Optional) / Fresh 0 Zone (Optional) ▪ The deodorizer is located behind the vegetable compartment.
Operation Fresh 0 Zone (Applicable to some models only) ENGLISH • “Fresh 0 Zone“ temperature can be changed by setting listed like below: • When the refrigerator room is set on 6°C, FRESH 0 ZONE has 4 ±2°C. • When the refrigerator room is set on 3°C, FRESH 0 ZONE has 0 ±2°C. • When the refrigerator room is set on 0°C, FRESH 0 ZONE has -3 ±2°C. NOTE • Store only meat, fish. • If store vegetables and fruits, they can be frozen.
Operation By pressing the button, store vegetables, fruits or other types of food such as defrosting meat, raw fish, etc. Temperature Change at Opti Temp Zone (Applicable to some models only) Method to use You can select optimum temperature range depending on types of foods stored. - 3-step of temperature selection including -3°C, -1°C and 4°C is available. Vegetables/fruits and cold storage foods requiring humidity maintenance and meats/ fishes can be more freshly stored.
Suggestion on food storage ENGLISH Location of foods (Refer to identification of parts) Wine holder Store wine. Snack drawer Store small foods such as bread, snacks, etc.. Freezer compartment shelf Store various frozen foods such as meat, fish,ice cream, frozen snacks, etc.. Freezer compartment door rack ▪ Store small packed frozen food. ▪ Temperature is likely to increase as door opens. So, do not store long-term food such ice cream, etc..
Suggestiononfoodstorage Storing foods Freezer Compartment ▪ Do not store bottles in the freezer compartment - they may break when frozen. ▪ Do not refreeze food that has been thawed. This causes loss of taste and nutrients. ▪ When storing frozen food like ice cream for a long period, place it on the freezer shelf, not in the door rack. ▪ Do not touch cold foods or containers - especially metallic containers - with wet hands or place glass products in the freezer compartment.
Care and maintenance How to dismantle parts ENGLISH NOTE • Dismantle by reversing the assembly instructions. Be sure to unplug the power plug before dismantling and assembly. Never apply severe force to dismantle parts. Parts may be damaged. Refrigerator compartment lamp Separate the lamp by pulling it out ③ while slightly pressing ① and rotating ② the lamp cover. Turn the bulb counterclockwise. OPTION 1 Use a 40-watt bulb(max.) which can be purchased at a service centre.
Careandmaintenance NOTE • Be sure to remove parts from the refrigerator door when removing the vegetable compartment,snack drawer and minibar cover. ▪ To remove the vegetable compartment cover, pull out the vegetable compartment a bit to the front ① , lift the front part of the vegetable compartment cover as shown by ②, and take it out.
ENGLISH Care and maintenance General information Vacation time During average length vacations, you will probably find it best to leave the refrigerator in operation. Place freezable items in freezer for longer life. When you plan not to operate, remove all food, disconnect the power cord, clean the interior thoroughly, and leave each door OPEN to prevent odour formation. Most power failures that are corrected in an hour or two will not affect your refrigerator temperatures.
Careandmaintenance Frequency of cleaning: every 2 months or when is needed. Procedure: 1. Before cleaning pour out water from the water tank. 2. Mix 0.5l of water with proper amount of dispenser cleaning product (and then pour it into the water tank). Do not use any harsh chemicals. 3. Dispense 1 cup of solution and leave the rest of it inside dispenser system for time shown on the cleaning product label. Do not drink water from the dispenser while all the cleaning process! 4.
Care and maintenance ENGLISH General information Before calling for service, review this list. It may save you both time and expense. This list includes common occurrences that are not the result of defective workmanship or materials in this appliance. Occurrence Running of refrigerator Possible cause Refrigerator control is off. Refrigerator Refrigerator is in defrost cycle. compressor does not run. Solution Set refrigerator control. See setting the controls.
e Careandmaintenance Occurrence Possible cause Set refrigerator control. See setting the controls. Temperatures are too cold Temperature in the Freezer control is set too cold freezer is too cold but refrigerator temperature is satisfactory. Temperature in the Refrigerator control is set too cold refrigerator is too cold but freezer temperature is satisfactory. Food stored in Refrigerator control is set too cold drawers freezes.
Care and maintenance Occurrence Possible cause Solution ENGLISH Sound and noise Louder sound levels when Today’s refrigerators have increased refrigerator is on. storage capacity and maintain more even temperatures. Louder sound levels Refrigerator operates at higher pressures when compressor during the start of the ON cycle. comes on. Vibrating or rattling Floor is uneven or weak. Refrigerator rocks on noise. the floor when it is moved slightly.
Careandmaintenance Careandmaintenance Occurrence Possible cause Solution Food with strong odour is in the refrigerator. Some containers and wrapping materials produce odours. Clean interior with sponge,warm water and baking soda. Cover food completely. Use a different container or brand of wrapping materials. Opening/Closing of doors/Drawers Door(s) will not close. Food package is keeping door open.
Care and maintenance ENGLISH Occurrence Possible cause Solution Dispenser will not Ice has melted and frozen around auger due dispense ice. to infrequent use, temperature fluctuations and/or power outrages. Ice dispenser is Ice cubes are jammed between the icemaker jammed. arm and back of the bin. Ice cubes are frozen together. Ice cubes that have been purchased or made in some other way have been used in the dispenser. Dispenser will not Household water line valve is not open. See dispense water.