Inhaltsverzeichnis Einleitung Installierung Betrieb Die Lagerung der Lebensmittel Pflege und Wartung 2 Einführung 3 Wichtiger Sicherheitshinweis 3 Beschreibung der Teile 5 Wo das Gerät installiert werden sollte 7 Die Tür entfernen 8 Die Türen wieder montieren 9 Wasserzufuhrleitung anbringen 9 Die richtige Höhe einstellen 10 Inbetriebnahme 11 Temperatur- und Funktionseinstellung 11 Hausbar (Nur bei bestimmten Modellen) 17 Ablage (Nur bei bestimmten Modellen) 18 Flaschenfach (Nur
Einleitung Einführung Modell-und Seriennummer befinden sich in der Innen- oder Rückseite vom Kühlabteil dieses Geräts. Die jeweilige Nummer ist nur für dieses eine Gerät bestimmt. Tragen Sie die entsprechenden Informationen hier bitte ein und bewahren Sie diese Bedienungsanleitung als Ankaufbeweis auf. Heften Sie den Kassenzettel bitte hier fest.
Einleitung Warnung Halten Sie die Ventilationsöffnungen der Geräteabdeckung oder eingebauten Struktur frei von Blockierungen. Verwenden Sie keine anderen mechanischen Geräte und Mittel, um den Abtauvorgang zu beschleunigen als diejenigen, die der Hersteller empfiehlt. Beschädigen Sie nicht den Kühlkreislauf. Verwenden Sie nur die elektrischen Geräte innerhalb der Kühlfächer für Nahrungsmittel, die vom Hersteller empfohlen worden sind.
Einleitung Achtung, Kinder können sich beim Spielen eventuell einsperren GEFÄHRLICH: Kinder könnten sich eventuell einsperren. Bevor Sie Ihren alten Kühl- oder Tiefkühlschrank wegwerfen, müssen Sie unbedingt: die Türen abmontieren, aber die Ablagen an ihrem Platz lassen, damit Kinder nicht so leicht hineinklettern können.
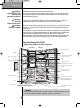
Einleitung *Modell mit Eisbereiter/Wasserspender Gefrierfach Kühlfach Milchproduktefach Lampe Regal Weinregal (Kunststoff oder Gitter) Türfach Automatischer Eisbereiter Regal oder Schublade Regal Dosenfach (Optional) Snack-Fach (Optional) Lampe Regal oder Schublade Regal (Klappregal oder Normal) Frischhaltebereich (Optional) Eierfach Gemüsefach (1 bzw. 2) Schublade Türfach Feuchtigkeitsumschalter Schubladen (2 bzw.
Installierung Wo das Gerät installiert werden sollte 1. Stellen Sie das Gerät so auf, daß es gut zu bedienen ist. Wählen Sie den richtigen Platz 2. Stellen Sie es nicht in die Nähe von Wärmequellen, in direktes Sonnenlicht oder in eine feuchte Umgebung. 3. Für eine ausreichende Luftzirkulation in der Umgebung der Kühl-Gefrierfachkombination sollte sowohl an den Seiten als auch an der Oberseite des Gerätes ein Abstand von mindestens 5 cm zu den Wänden eingehalten werden. 4.
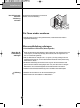
Installierung Die Tür entfernen Achtung Stromschlagrisiko Bevor Sie den Kühlschrank installieren, ziehen Sie zuerst den Stecker aus der Steckdose! Falls Sie dies vergessen, können Sie sich schwer verletzen oder sogar tödlich verunglücken. Falls Ihre Haustür für den Kühlschrank nicht breit genug ist, entfernen Sie die Tür vom Kühlschrank und transportieren den Kühlschrank quer durch die Türöffnung.
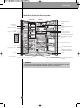
Installierung Schieben Sie den Kühlschrank quer durch die Haustür, wie auf der Abbildung. Den Kühlschrank durch die Türöffnung schieben Max 5 4 3 2 1 Min 1 FRZ TEMP 2 REF TEMP 3 4 5 Max Die Türen wieder montieren Nachdem Sie die Türen ins Haus gebracht haben, montieren Sie diese wieder in umgekehrter Reihenfolge.
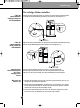
Installierung Die richtige Höhe einstellen Falls die Gefrierabteiltür niedriger hängt als die Kühlabteiltür Richten Sie diese folgendermaßen aus. Stecken Sie einen flachen Schraubenzieher in die Rille der linken Nivellierungsschraube und drehen im Uhrzeigersinn ( ). Falls die Gefrierabteiltür höher ist als die Kühlabteiltür Richten Sie diese folgendermaßen aus. Stecken Sie einen flachen Schraubenzieher in die Rille der rechten Nivellierungsschraube und drehen im Uhrzeigersinn ( ).
Betrieb Inbetriebnahme Wenn Ihr Kühlschrank erstmalig in Betrieb genommen wird, braucht er 2- 3 Stunden um die normale Temperatur zu erreichen, bevor Sie Lebensmittel (frisch oder tiefgekühlt) einlagern können. Falls der Betrieb unterbrochen wird, warten Sie zuerst 5 Minuten, bevor Sie wieder einschalten.
Betrieb *Modell mit Eisbereiter/Wasserspender • 12 HINWEIS Ihr Gerätemodell besitzt möglicherweise nicht alle genannten Funktionen.
Betrieb Mit dieser Funktion kann die Anzeige in den Stromsparmodus versetzt werden Halten Sie die Tasten FREEZER und EXPRESS FRZ. gleichzeitig ca. 5 Sekunden lang gedrückt, bis ein Ding-Signal ertönt. Sämtliche LEDs/LCDs werden daraufhin EINGESCHALTET und dann AUSGESCHALTET. Bei aktiviertem Stromsparmodus bleibt die Anzeige ausgeschaltet, bis eine Tür geöffnet wird. Die Anzeige bleibt 20 Sekunden lang nach dem Schließen der Tür oder nach dem Drücken einer Taste eingeschaltet.
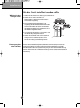
Betrieb Benutzung vom Spender (bei bestimmten Modellen) Wählen Sie zuerst zerkleinertes Eis, Wasser oder Eiswürfel und drücken dann mit einem Glas oder einem anderen Behälter gegen den Druckschalter vom Spender. Eiswürfel Betätigen Sie die Wahltaste, bis das Lämpchen bei Eiswürfeln aufleuchtet. • Wasser Betätigen Sie die Wahltaste, bis das Lämpchen bei Wasser aufleuchtet. Zerkleinertes Eis Betätigen Sie die Wahltaste, bis das Lämpchen bei zerkleinertem Eis aufleuchtet.
Betrieb Das Eis klumpt zusammen. Falls das Eis zusammenklumpt, nehmen Sie es aus dem Vorratsbehälter, brechen die Klumpen in Stückchen und geben diese wieder in den Behälter hinein. Falls der Eisbereiter zu kleine oder zusammengeklumpte Eiswürfel produziert, muß die Wassermenge angepaßt werden. Wenden Sie sich an den Kundendienst. ❈ Falls Eis selten verwendet wird, kann das vorhandene Eis im Eisbereiter ebenfalls zusammenklumpen. Stromausfall Es kann eventuell Eis ins Gefrierabteil fallen.
Betrieb Signal bei geöffneter Tür Falls die Kühlschranktür länger als eine Minute offen gelassen wird, ertönt dreimal alle 30 Sekunden ein Warnsignal. Falls das Signal auch bei geschlossener Tür weiterhin ertönt, wenden Sie sich bitte an den Kundendienst. Weitere Funktionen Diagnosefunktion (Fehlerspezifizierung) Durch die Diagnosefunktion werden Fehler automatisch gefunden, wenn diese während des Betriebes im Gerät auftreten.
Betrieb Hausbar (Nur bei bestimmten Modellen) Benutzung Um die Hausbar zu öffnen, ziehen Sie vorsichtig am Griff. Sie können die Hausbar benutzen, ohne die Tür vom Kühlschrank aufzumachen, und verbrauchen so weniger Strom. Die Innenlampe im Kühlabteil leuchtet auf, sobald die Tür der Hausbar geöffnet wird, damit Sie den Inhalt gut sehen können. Benutzung der Tür als Ablage Benutzen Sie die Tür nie als Schneidebrett oder ähnliches.
Betrieb Ablage (Nur bei bestimmten Modellen) Klappregal Größere Gegenstände, wie z. B. große Behälter oder Flaschen, können gelagert werden, indem die vordere Hälfte des Regalbodens nach hinten unter die hintere Hälfte geklappt wird. Um den ganzen Regalboden zu nutzen, klappen Sie das Brett wieder nach vorne zurück. Flaschenfach (Nur bei bestimmten Modellen) Bei diesem Flaschenfach können die Flaschen auch seitlich gelagert werden. Sie können es an jede beliebige Ablage anbringen.
Betrieb Feuchtigkeitsregelung im Gemüsefach Wenn Sie Obst oder Gemüse im Kühlschrank aufbewahren, können Sie die Feuchtigkeit mit dem entsprechenden Regler einstellen. Schieben Sie ihn einfach nach links oder nach rechts.
Betrieb Frischesafetaste (Nur bei bestimmten Modellen) Drücken Sie die Taste zur Lagerung von Gemüse, Obst oder anderen Nahrungsmitteln wie tiefgefrorenem Fleisch, rohem Fisch usw. Einstellung der Frischesafe-Temperatur (Nur bei bestimmten Modellen) Vorgehensweise Sie können für verschiedene Nahrungsmittel die jeweils optimale Temperatur einstellen. - Die Temperatur kann in drei Schritten (-3°C, -1°C und 4°C) gewählt werden.
Die Lagerung der Lebensmittel Was kommt wohin? (Siehe die Beschreibung der Teile) Lagerung von Weinflaschen Flaschenfach Für Brot, Häppchen, usw… Imbißschublade Ablage im Gefrierabteil Für Tiefkühlprodukte wie Fleisch, Fisch, Speiseeis, Tiefkühlgerichte usw. Türablage im Gefrierabteil Schublade im Gefrierabteil Für Tiefkühlprodukte in kleinen Packungen. Bei jedem Öffnen der Tür wird die Temperatur höher.
Die Lagerung der Lebensmittel Hinweise für die Lagerung Frische Lebensmittel werden im Kühlabteil aufbewahrt. Das richtige Einfrieren und Auftauen ist für die Erhaltung von Geruch und Geschmack der Lebensmittel sehr wichtig. Bewahren Sie bestimmte Lebensmittel, wie z.B. Bananen und Melonen, die bei niedrigen Temperaturen leicht verderben, nicht im Kühlschrank auf. Lassen Sie warme Speisen zuerst abkühlen, bevor Sie sie in den Kühlschrank einlagern.
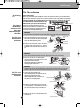
Pflege und Wartung Teile abmontieren HINWEIS • Lämpchen Gefrierabteil Beim Abmontieren müssen Sie die gleichen Handlungen wie bei der Montage ausführen, aber in umgekehrter Reihenfolge. Achten Sie immer darauf, daß der Netzstecker gezogen sein muß, bevor Sie Teile abmontieren oder installieren. Wenden Sie beim Entfernen der Teile nie Gewalt an, um diese nicht zu beschädigen. Ziehen Sie das Lämpchen heraus (➂) während Sie die Abdeckung (➀, ➁) etwas anheben.
Pflege und Wartung Um die Abdeckung vom Lämpchen zu entfernen, drücken Sie die Wölbung unter der Lampenabdeckung nach vorne und ziehen die Abdeckung heraus. Drehen Sie die Glühbirne gegen den Uhrzeigersinn. Es wird eine Kühlschrank-Glühbirne benötigt von max. 40W, erhältlich beim Kundendienst. Lämpchen im Kühlabteil 1 Nehmen Sie den Behälter nach oben heraus. Nehmen Sie das obere Regal des Frischhaltebereichs ab und ziehen Sie die Abdeckung heraus.
Pflege und Wartung Allgemein Urlaub Normalerweise werden Sie den Kühlschrank wohl eingeschaltet lassen. Zum Einfrieren geeignete Lebensmittel können dann im Gefrierabteil länger aufbewahrt werden. Falls Sie das Gerät aber ausschalten möchten, entfernen Sie alle Lebensmittel, ziehen den Stecker, machen das Innere gründlich sauber und lassen die Tür OFFEN, damit sich keine Gerüche bilden.
Pflege und Wartung Problemlösungen Bevor Sie den Kundendienst anrufen, lesen Sie zuerst diese Liste. Hierdurch können Sie eventuell Zeit und Kosten sparen. Auf dieser Liste finden Sie alltägliche Problemchen, die nicht auf Material- oder Verarbeitungsfehler zurückzuführen sind. Vorfall Eventuelle Ursache Lösung Normalbetrieb Kühlabteil Kompressor außer Betrieb Kühlschrank zu oft oder zu lang in Betrieb Kühlschrank ausgeschaltet. Schalten Sie den Kühlschrank ein. Kühlschrank taut ab.
Pflege und Wartung Lösung Eventuelle Ursache Vorfall Kompressor des Kühlschranks läuft nicht Der Thermostat hält den Kühlschrank auf einer konstanten Temperatur. Dies ist normal. Der Kühlschrank schaltet sich ein und aus, um die Temperatur konstant zu halten. Temperatur zu niedrig im Gefrierabteil, aber richtig im Kühlschrank. Temperatur im Kühlabteil zu niedrig, aber im Gefrierabteil richtig. Gefrierabteil ist zu kalt eingestellt.
Pflege und Wartung Vorfall Eventuelle Ursache Lösung Wenn der Kühlschrank in Betrieb ist, ist er ziemlich laut. Heutzutage haben Kühlschränke eine höhere Leistung und halten eine konstante Temperatur. Deswegen ist es normal, daß sie auch etwas lauter sind. Es gibt mehr Geräusche, wenn der Kompressor eingeschaltet wird. Der Kühlschrank arbeitet unter höherem Druck, wenn er EINgeschaltet wird. Dies ist normal. Der Geräuschpegel wird niedriger, wenn der Kühlschrank länger läuft.
Pflege und Wartung Vorfall Eventuelle Ursache Lösung Gerüche im Kühlschrank Das Innere vom Kühlschrank muß sauber gemacht werden. Es befinden sich stark riechende Lebensmittel im Kühlschrank Reinigen Sie das Innere mit einem Schwamm, warmem Wasser und Natriumbikarbonat. Decken Sie diese Lebensmittel ganz zu. Bestimmte Behälter und Verpackungsfolien haben einen Eigengeruch. Benutzen Sie einen anderen Behälter oder Folie von einer anderen Marke. Tür(en) schließt(en)nicht.
Pflege und Wartung Vorfall Eventuelle Ursache Lösung Eisspender gibt kein Eis ab. Das Eis ist geschmolzen und dann wieder zusammengefroren, weil es nur selten benutzt wird, durch Temperaturschwankungen u./od. Stromausfall. Nehmen Sie den Vorratsbehälter für das Eis heraus, werfen das alte Eis weg, machen den Behälter sauber, trocknen ihn ab und geben ihn wieder hinein. Sobald das neue Eis fertig ist, sollte der Spender funktionieren. Eisspender verstopft.
Garantieurkunde Für dieses Gerät übernehmen wir 24 Monate Garantie! Wir verpflichten uns, während der 24-monatigen Garantiezeit lhr Gerät kostenlos instandzusetzen bzw. Ihrem Fachhändler die Ersatzteile kostenlos zur Verfügung zu stellen, wenn es infolge eines Fabrikations - oder Materialfehlers versagen sollte. Weitergehende Ansprüche gegen uns sind ausgeschlossen. Beschädigungen durch höhere Gewalt oder auf dem Transportweg.
Garantiebedingungen für Kühlschränke 1. Die Garantiezeit beginnt mit dem Kaufdatum und erstreckt sich über 24 Monate. Der Beginn der Garantiezeit gilt als nachgewiesen, wenn der Käufer den Kaufbeleg (Quittung / Kassenzettel) zusammen mit der vom Verkäufer ausgefüllten und unterschriebenen Garantiekarte vorlegt. Die Seriennummer des Produkts muß mit der eingetragenen Nummer auf der Garantiekarte übereinstimmen! 2.
Table of contents Introduction Installation Operation Suggestion on food storage Care and maintenance 34 Entry 35 Important safety instruction 35 Identification of parts 37 Where to install 39 Door removal 40 Door replacement 41 Feed water pipe installation 41 Height adjustment 42 Starting 43 Adjusting the temperatures and functions 43 Refreshment center (Applicable to some models only) 49 Shelf (Applicable to some models only) 50 Wine holder (Applicable to some models only) 5
Introduction Entry The model and serial numbers are found on the inner case or back of refrigerator compartment of this unit. These numbers are unique to this unit and not available to others. You should record requested information here and retain this guide as a permanent record of your purchase. Staple your receipt here. Date of purchase Dealer purchased from Dealer address Dealer phone no. Model no. Serial no.
Introduction Warning Keep ventilation openings, in the appliance enclosure or in the built-in structure, clear of obstruction. Do not use mechanical devices or other means to accelerate the defrosting process, other than those recommended by the manufacturer. Do not damage the refrigerant circuit. Do not use electrical appliances inside the food storage compartments of the appliance, unless they are of the type recommended by the manufacturer.
Introduction Child entrapment warning DANGER: Risk of child entrapment. Before you throw away your old refrigerator or freezer: Take off the doors but leave the shelves in place so that children may not easily climb inside. The appliance is not intended for use by young children or infirm persons without supervision. Young children should be supervised to ensure that they do not play with the appliance.
Introduction *Dispenser model Freezer Compartment Refrigerator Compartment Milk product corner Lamp Shelf Wine holder (Plastic or wire) Door Rack Automatic Icemaker Shelf or Drawer Shelf Can Server (Optional) Snack drawer (Optional) Lamp Shelf or Drawer Shelf (Folding or Normal) Refreshment center (Optional) Egg Box Vegetable Drawer (1 or 2) Drawer Door rack Humidity switch Drawer (2 or 3) Miracle Zone (Optional) Fresh compartment (Optional) Door Rack Door rack Conversion switch (Meats/Vegetabl
Installation Where to Install 1. Place your appliance where it is easy to use. Select a good location 2. Avoid placing the unit near heat sources, direct sunlight or moisture. 3. To ensure proper air circulation around the fridge -freezer, please maintain sufficient space on both the sides as well as top and maintain at least 2 inches (5 cm) from the rear wall. 4. To avoid vibrations, the appliance must be leveled. 5. Don't install the appliance below 5°C. It may cause affect the performance.
Installation Door removal Electric Shock Hazard Disconnect electrical supply to refrigerator before installing. Failure to do so could result in death or serious injury. If your access door is too narrow for the refrigerator to pass through, remove the refrigerator door and pass the refrigerator laterally. Remove the lower cover by lifting upward, and remove clip, and then pull up the feed water tube while pressing area shown in the figure to the right.
Installation Pass the refrigerator laterally through the access door as shown in the right figure. Pass the refrigerator Max 5 4 3 2 1 Min 1 FRZ TEMP 2 REF TEMP 3 4 5 Max Door replacement Mount them in the reverse sequence of removal after they pass through the access door. Feed water pipe installation (*Dispenser model only) Before installation Automatic ice maker operation needs water pressure of 147~834 kPa (1.5~8.
Installation Height adjustment If the freezer compartment door is lower than the refrigerator compartment door Level the door by inserting flat ( - type) driver into the groove of the left height adjusting screw and rotate it clockwise ( ). If the freezer compartment door is higher than the refrigerator compartment door Level the door by inserting flat ( - type) driver into the groove of the right height adjusting screw and rotate it clockwise ( ).
Operation Starting When your refrigerator is first installed, allow it to stabilize at normal operating temperatures for 2-3 hours prior to filling it with fresh or frozen foods. If operation is interrupted, wait 5 minutes before restarting.
Operation *Dispenser model Refreshment Center Button Refreshment Center (hidden) Function display board Optional Type-1 Display Power Saving Mode Type-2 NOTE • 44 Your model may not include every option.
Operation This function save the display power Press the FREEZER and EXPRESS FRZ. buttons simultaneously and hold them for 5 seconds until the Ding sounds. All LED/LCDs will then turn ON, then OFF. When the power saving mode is activated, the display will remain off until the next time the door is opened. Then, it will come on whenever a door is opened or a button is pressed and remain on for 20 seconds after the last door opening or button selection.
Operation Dispenser use (on some model) Select among crushed ice, water, and cubed ice and press the push switch with a glass or other container. Crushed Ice Light the crushed ice lamp by pressing the selection button. • Water Light the water lamp by pressing the selection button. Cubed Ice Light the cubed ice lamp by pressing the selection button. Reference : Hold your cup in place for a couple of seconds after dispensing ice or water so the last few drops go in to your cup instead of the floor.
Operation Ice is lumped together When ice is lumped together, take the ice lumps out of the ice storage bin, break them into small pieces, and then place them into the ice storage bin again. When the ice maker produces too small or lumped together ice, the amount of water supplied to the ice maker need to adjusted. Contact the service center. ❈ If ice is not used frequently, it may lump together. When ice maker does not operate smoothly Power failure Ice may drop into the freezer compartment.
Operation The other functions Door open warning 3 times of warning sounds at the interval of 30 seconds if a minute passes with the door of refrigerator and the hombar door opened or completely closed. Please contact with the local service center if warning continue to sound even after closing the door. Diagnosis (failure detection) function Diagnosis function automatically detects failure when failure is found in product during the use of refrigerator.
Operation Refreshment center (Applicable to some models only) How to use Open the refreshment center door. You can access the refreshment center without opening refrigerator door and thus saving electricity. Inner lamp is lit in refrigerator compartment when the refreshment center door opens. Thus it is easy to identify the contents. Never use the refreshment center door as a chopping board and take care not to damage it with sharp tools. Never rest your arms or severely press on it.
Operation Shelf (Applicable to some models only) Folding Shelf You can store taller items such as a gallon container or bottles by simply pushing in front half of shelf underneath back half of shelf. Pull toward you to return to a full shelf. Wine holder (Applicable to some models only) Wine holder adjustment (Type 1) Bottles can be stored laterally with this wine corner. This can be attached to any shelf.
Operation Humidity control in the vegetable compartment The humidity can be controlled by adjusting the humidity control switch to the left/right when storing vegetables or fruits.
Operation Miracle Zone Temperature Transition Corner (Applicable to some models only) By pressing the button, store vegetables, fruits or other types of food such as meat to be defrosted, raw fish, etc. Temperature Change at Miracle Zone (Applicable to some models only) Method to Use You can select optimum temperature range depending on types of foods stored. - 3-step of temperature selection including -3°C, -1°C and 4°C is available.
Suggestion on food storage Location of foods (Refer to identification of parts) Wine holder Store wine. Snack drawer Store small foods such as bread, snacks, etc.. Freezer compartment shelf Store various frozen foods such as meat, fish, ice cream, frozen snacks, etc.. Freezer compartment door rack Freezer compartment drawer Store small packed frozen food. Temperature is likely to increase as door opens. So, do not store long-term food such ice cream, etc.. Store meat, fish, chicken, etc.
Suggestion on food storage Storing foods Store fresh food in the refrigerator compartment. How food is frozen and thawed is an important factor in maintaining its freshness and flavor. Do not store food which goes bad easily at low temperatures, such as bananas, and melons. Allow hot food to cool prior to storing, placing hot food in the refrigerator could spoil other food, and lead to higher energy consumption. When storing the food, cover it with vinyl wrap or store in a container with a lid.
Care and maintenance How to dismantle parts NOTE • Dismantling is done in the reverse sequence of assembly. Be sure to unplug the power plug before dismantling and assembly. Never apply severe force to dismantle parts. Parts may be damaged. Separate the lamp by pulling it out ➂ while slightly pressing ➀ and rotating ➁ the lamp cover. Turn the bulb counterclockwise. Use a 40-watt bulb (max.) which can be purchased at a service center.
Care and maintenance To remove the lamp cover, press the protrusion under the lamp cover to the front and then pull the lamp cover out. Turn the bulb counterclockwise. Max. 40 W bulb for refrigerator is used and can be purchased at a service center. Lamp in refrigerator compartment Refreshment center 1 Separate the bin ( ) to upward. Separate the upper rack of the refreshment center and then pull out the refreshment center cover ( ). The refreshment center can be removed by pulling it upwards.
Care and maintenance General information Vacation time During average length vacations, you will probably find it best to leave the refrigerator in operation. Place freezable items in freezer for longer life. When you plan not to operate, remove all food, disconnect the power cord, clean the interior thoroughly, and leave each door OPEN to prevent odor formation. Power failure Most power failures that are corrected in an hour or two will not affect your refrigerator temperatures.
0 Care and maintenance 0 Suggestion on food storage Trouble shooting Before calling for service, review this list. It may save you both time and expense. This list includes common occurrences that are not the result of defective workmanship or materials in this appliance. Occurrence Possible cause Solution Runing of refrigerator Refrigerator compressor does not run. Refrigerator runs too much or too long Refrigerator control is off. Set refrigerator control. See setting the controls.
Care and maintenance Occurrence Possible cause Refrigerator compressor does not run. Thermostat is keeping the refrigerator at a constant temperature. This is normal. The refrigerator goes on and off to keep the temperature constant. Freezer control is set too cold Set the freezer control to a warmer setting until the freezer temperature is satisfactory. Refrigerator control is set too cold. Set the refrigerator control to a warmer setting Refrigerator control is set too cold. See above solution.
Care and maintenance Possible cause Occurrence Solution Sound and noise Louder sound levels when refrigerator is on. Today’s refrigerators have increased storage capacity and maintain more even temperatures. It is normal for sound levels to be higher. Louder sound levels when compressor comes on. Refrigerator operates at higher pressures during the start of the ON cycle. This is normal. The sound will level off as the refrigerator continues to run. Vibrating or rattling noise.
Care and maintenance Occurrence Possible cause Solution Odors in refrigerator Interior needs to be cleaned. Clean interior with sponge,warm water and baking soda. Food with strong odor is in the refrigerator. Cover food completely. Some containers and wrapping materials produce odors. Use a different container or brand of wrapping materials. Door(s) will not close. Food package is keeping door open. Move packages that keep door from closing. Door(s) will not close.
Care and maintenance Occurrence Possible cause Dispenser will not dispense ice. Ice has melted and frozen around auger due to infrequent use, temperature fluctuations and/or power outrages. Remove ice storage bin, and thaw and the contents. Clean bin, wipe dry and replace in proper position. When new ice is made, dispenser should operate. Ice dispenser is jammed. Ice cubes are jammed between the ice maker arm and back of the bin. Remove the ice cubes that are jamming the dispenser.
Warranty Certificate For offer a 24-month warranty for this apparatus During the 24-month warranty period, we will repair your apparatus at no cost to you or make available spare parts to your dealer free, if this apparatus fails due to manufacturing or material defects. Further claims are excluded. We are not liable for damages due to acts of providence or damages occurring during transport. The buyer assumes shipping and packaging costs.
Warranty conditions for refrigerator 1. The warranty period begins on the purchase date and is valid for 24 months. Begin of warranty period is proven if, the buyer submits purchase receipt together with the warranty card, filled in and signed by the seller. The serial number of the product must agree with the number entered onto the warranty card. 2. During the warranty period, we will correct any defects at no cost to you, if it can be proven that these are attributed to manufacturing or material defects.
Table des matières Introduction Installation Fonctionnement Conseils pour la conservation des aliments Nettoyage et entretien 66 Enregistrement 67 Instructions importantes pour la sécurité 67 Identification des pièces 69 Où installer l'appareil 70 Comment enlever la porte 71 Comment replacer de la porte 72 Installation du tube d'alimentation en eau 72 Réglage de la hauteur 73 Mise en marche 74 Réglage des températures et fonctions 74 Compartiment fraîcheur (sur certains modèles uniq
Introduction Enregistrement Les numéros de modèle et de série se trouvent à l'intérieur ou à l'arrière du compartiment réfrigérateur de l'unité. Ces numéros ne concernent que cette unité et ne se trouvent pas sur d'autres appareils. Vous pouvez noter ici les informations nécessaires et conserver ce manuel comme un enregistrement permanent de votre achat. Agrafez votre reçu ici.
Introduction Attention Faites attention à ce que les ouvertures d’aération de votre unité ne soient pas obstruées. Ne pas utiliser de dispositif mécanique ou autres moyens pour accélérer le procédé de décongélation. Ne pas endommager le circuit réfrigérant. Ne pas utiliser de dispositifs électriques à l’intérieur des compartiments du stockage de nourriture, excepté s’ils sont du même type recommandé par le fabricant.
Introduction Avertissement concernant les enfants Attention DANGER: Risque d'enfermement d'un enfant. Avant de jeter votre vieux réfrigérateur ou congélateur: Enlevez les portes mais laissez les étagères en place afin d'empêcher des enfants de se glisser facilement à l'intérieur. Cet appareil n'est pas destiné à être utilisé par des enfants ou des personnes moins valides sans surveillance. Il est interdit de laisser les enfants jouer avec l'appareil.
Introduction *Modèle avec distributeur Compartiment congélateur Compartiment réfrigérateur Compartiment laitages Lampe Étagère Support bouteille de vin (Plastique ou métallique) Clayette de porte Machine à glaçons automatique Étagère ou tiroir Étagère Plateau métallique (Optionnel) Tiroir collation (Optionnel) Étagère (Pliante ou normale) Casier rafraîchissement (Optionnel) Lampe Étagère ou tiroir Compartiment à oeufs Tiroir à légumes (1 ou 2) Tiroir Clayette de porte Commutateur d’humidité Tiroir
Installation Où installer l'appareil 1. Placez votre appareil dans un endroit où il est facile à utiliser. Choisissez un bon emplacement. 2. Evitez de placer l'appareil à proximité d'une source de chaleur, de la lumière directe du soleil ou d'une source d'humidité. 3. Pour garantir une bonne circulation de l'air autour du réfrigérateur, veuillez aménager suffisamment d'espace des deux côtés comme au-dessus de l’appareil et conserver un intervalle de 5 cm entre l’arrière de l’unité et le mur. 4.
Installation Comment enlever la porte Attention Risque de décharge électrique Veillez à couper l'alimentation électrique de votre appareil avant de l'installer. Ne pas le faire peut provoquer de sérieuses blessures, voire entraîner la mort. Si l'ouverture de la porte est trop étroite, vous pouvez ôter la porte du réfrigérateur et faire passer celui-ci latéralement.
Installation Faites passer le réfrigérateur latéralement par la porte d'accès, comme indiqué sur le schéma de droite. Faites passer le réfrigérateur Max 5 4 3 2 1 Min 1 FRZ TEMP 2 REF TEMP 3 4 5 Max Comment replacer de la porte Replacez les portes suivant l'ordre inverse du démontage après les avoir fait passer par la porte d'accès.
Installation Réglage de la hauteur Si la porte du compartiment congélateur est plus basse que la porte du compartiment réfrigérateur Mettez la porte à niveau en insérant un tournevis plat dans la gorge de la vis de nivellement de gauche et tournez dans le sens des aiguilles d'une montre ( ).
Fonctionnement Mise en marche Une fois que votre réfrigérateur est installé, laissez-lui 2-3 heures pour se stabiliser à la température normale de fonctionnement avant de le remplir avec de la nourriture fraîche ou congelée. Si la fiche d'alimentation a été débranchée, attendez 5 minutes avant de le remettre en marche.
Fonctionnement *Modèle avec distributeur NOTE • 76 Il se peut que votre modèle ne soit pas pourvu de toutes les fonctions.
Fonctionnement Cette fonction économise l’énergie d’affichage Appuyer simultanément sur les touches FREEZER (congélateur) et EXPRESS FRZ. durant 5 secondes jusqu’à ce que vous entendiez Ding. Tous les LED/LCD (indicateurs lumineux) s’allumeront (ON) puis s’éteindront (OFF). Si le mode d’économie d’énergie est activé, l’affichage restera en off jusqu’à la prochaine ouverture de porte.
Fonctionnement Comment utiliser le distributeur (sur quelques modèles) Choisissez ou bien la glace pilée ou les glaçons en cube ou l' eau, poussez légèrement sur le bouton avec un verre ou tout autre récipient. Glaçons en cube L'indicateur lumineux pour les glaçons en cube s'allumera en appuyant sur le bouton choisi. • Eau L'indicateur lumineux pour l'eau s'allumera en appuyant sur le bouton choisi. Glace pilée. L'indicateur lumineux pour la glace pilée s'allumera en appuyant sur le bouton choisi.
Fonctionnement Les glaçons sont collés. Quand les glaçons sont collés, prenez les morceaux de glace dans le bac à glace et cassez-les en petits morceaux, puis replacez-les dans le bac à glace. Quand le distributeur de glaçons produit des glaçons trop petits ou collés l'alimentation de la quantité d'eau dans le distributeur a besoin d'être réglée. Entrez en contact avec le centre de réparation. ❈ Si les glaçons ne sont pas utilisés fréquemment, il peut arriver qu'ils soient collés.
Fonctionnement Autres fonctions Avertissement de porte ouverte Une tonalité d'avertissement retentira 3 fois par des intervalles de trente secondes si la porte du réfrigérateur ou du congélateur est laissée ouverte pendant plus de soixante secondes. Veuillez contacter votre centre de service après-vente si cette tonalité d’avertissement continue à retentir même après fermeture des portes.
Fonctionnement Compartiment fraîcheur (sur certains modèles uniquement) Utilisation Ouvrir la porte du compartiment fraîcheur Vous pouvez avoir accès au compartiment fraîcheur sans ouvrir la porte du réfrigérateur et donc économiser de l'énergie. La lampe intérieure s'allume dans le compartiment réfrigérateur lorsque la porte du compartiment fraîcheur est ouverte, ce qui permet d'identifier aisément son contenu.
Fonctionnement Etagèresr (sur certains modèles uniquement) Étagère pliante Vous pouvez stocker des articles plus grands tels qu'un récipient ou des bouteilles de grand volume en poussant simplement la moitié avant de l'étagère sous la moitié arrière de l'étagère. Tirez vers vous au retour à une pleine étagère. Porte-bouteillesr (sur certains modèles uniquement) Réglage du porte-bouteilles (Type 1) Ce support permet de placer les bouteilles à l'horizontale. Il peut se fixer sur n'importe quelle étagère.
Fonctionnement Contrôle de l'humidité dans le bac à légumes Le taux d'humidité peut être contrôlé en réglant l'interrupteur de contrôle d'humidité vers la gauche ou la droite lorsque vous stockez des légumes ou des fruits.
Fonctionnement Compartiment de transition thermique Zone Miracle (sur certains modèles uniquement) Après avoir appuyé sur la touche, vous pouvez conserver des légumes, des fruits ou d’autres produits alimentaires comme par exemple de la viande à décongeler, du poisson cru, etc. Changement de la température dans la Zone Miracle (sur certains modèles uniquement) Méthode d’utilisation Vous pouvez sélectionner le diapason optimal de température, en fonction du type des produits alimentaires conservés.
Conseils pour la conservation des aliments Emplacement des aliments (se référer à l'identification des pièces) Porte-bouteilles Conserver une bouteille de vin Compartiment snacks Conserver de petits aliments (pain, snacks, etc.) Etagère du compartiment congélateur Conserver divers aliments congelés (viande, poisson, crème glacée, snacks surgelés, etc.) Conserver des aliments congelés en petit conditionnement. La température est susceptible de monter lorsque la porte est ouverte.
Conseils pour la conservation des aliments Conservation des aliments Conservez les aliments frais dans le compartiment réfrigérateur. La manière dont les aliments sont congelés et décongelés est importante pour préserver leur fraîcheur et leur goût. Ne conservez pas des aliments périssables comme les bananes, le melon à de basses températures. Laissez refroidir la nourriture chaude avant de la mettre au réfrigérateur.
Nettoyage et entretien Démontage des différentes pièces NOTE • Lampe du compartiment congélateur Le démontage se fait dans l'ordre inverse du montage. Veillez à débrancher le câble d'alimentation électrique avant de procéder au démontage ou au montage. Ne forcez jamais les pièces pour les démonter, vous risqueriez de les endommager. Enlevez la lampe en la tirant (➂) tout en soulevant légèrement le cache de la lampe (➀, ➁) . Dévissez la lampe en tournant dans le sens contraire des aiguilles d'une montre.
Nettoyage et entretien Pour enlever le cache de la lampe, appuyez sur la saillie inférieure du cache et tirez celui-ci vers l'avant. Dévissez la lampe en tournant dans le sens contraire des aiguilles d'une montre. Les lampes utilisées sont des lampes pour réfrigérateur de 40 W max. Elles sont disponibles auprès de votre réparateur. Lampe du compartiment réfrigérateur Compartiment fraîcheur 1 Faites glisser le caisson vers le haut pour le séparer.
Nettoyage et entretien Informations générales Vacances Pendant des absences de durée moyenne, vous préférerez probablement laisser fonctionner votre réfrigérateur. Placez les aliments pouvant être congelés dans le compartiment congélateur de manière à pouvoir les conserver plus longtemps.. Si vous souhaitez éteindre l'appareil, enlevez tous les aliments, débranchez le câble d'alimentation, nettoyez soigneusement l'intérieur et laissez les portes de l'appareil OUVERTES pour éviter les odeurs.
Nettoyage et entretien Recherche des pannes Avant d'appeler un service de réparation, consultez cette liste. Elle peut vous permettre d'économiser du temps et de l'argent. Cette liste reprend les pannes les plus courantes qui ne résultent pas d'un défaut de main-d'œuvre ou de matériel. Problème Cause possible Solution Fonctionnement du réfrigérateur Le compresseur du réfrigérateur ne fonctionne pas La commande du réfrigérateur est éteinte. Réglez la commande du réfrigérateur.
Nettoyage et entretien Problème Cause possible Le compresseur du réfrigérateur ne fonctionne pas Solution Le thermostat maintient le réfrigérateur à une température constante. Ceci est normal. Le réfrigérateur s'allume et s'éteint pour maintenir la température constante. La température du congélateur est trop basse, mais la température du réfrigérateur est correcte La commande du congélateur est réglée sur une température trop basse.
Nettoyage et entretien Cause possible Problème Solution Bruits Niveau de bruit plus élevé lorsque le réfrigérateur fonctionne Les réfrigérateurs actuels ont un plus grand volume et maintiennent des températures plus constantes. Il est normal que le niveau sonore soit plus élevé. Niveau de bruit plus élevé lorsque le compresseur fonctionne Le réfrigérateur fonctionne à une pression plus élevée pendant le début du cycle ON. Ceci est normal.
Nettoyage et entretien Problème Cause possible Solution Odeurs dans le réfrigérateur L'intérieur a besoin d'être nettoyé. Nettoyez l'intérieur avec une éponge, de l'eau chaude et du bicarbonate de soude. Des aliments ayant une forte odeur sont conservés dans le réfrigérateur. Couvrez complètement les aliments. Certains récipients et matériaux d'emballage provoquent des odeurs. Utilisez un autre récipient ou une autre marque de matériau d'emballage. Des aliments empêchent la porte de se fermer.
Nettoyage et entretien Problème Cause possible Solution Le distributeur ne distribue pas de glace La glace a fondu puis regelé autour de l'embout suite à un usage trop peu fréquent, des variations de température ou des coupures de courant. Retirez le compartiment à glace et sortez son contenu. Nettoyez le compartiment, séchez-le et replacez-le correctement. Dès que la glace est prête, le distributeur devrait fonctionner.
Certificat de garantie Cet appareil est couvert par une garantie de 24 mois ! Nous nous engageons, pendant la durée de garantie de 24 mois, à réparer gratuitement votre appareil et/ou à fournir gratuitement à votre revendeur les pièces de rechange, en cas de panne due à un vice de fabrication ou de matière. Des revendications plus importantes à notre encontre sont exclues.
Conditions de garantie du réfrigérateur 1. La période de garantie prend cours à la date d'achat et s'étend sur 24 mois. Le début de la période de garantie est considéré comme attesté lorsque l'acheteur présente la preuve d'achat (reçu / ticket de caisse) avec la carte de garantie complétée et signée par le revendeur. Le numéro de série du produit doit coïncider avec le numéro figurant sur la carte de garantie ! 2.
Introduzione Dati I numeri di modello e di serie sono riportati all’interno o sul retro dello scomparto frigorifero dell’apparecchio. Questi numeri sono unici per ogni singolo apparecchio. È bene annotare i dati richiesti e tenere questa guida come riferimento permanente del proprio acquisto. Graffare la ricevuta di acquisto a fianco di questi dati. Data di acquisto Rivenditore Indirizzo del rivenditore N° tel.
Introduzione * Modello con dispenser Scomparto congelatore Scomparto frigorifero Scomparto prodotti caseari Luce Ripiano Scomparto vino (plastica o metallo) Scomparto porta Produttore automatico di ghiaccio Ripiano o cassetto Ripiano Dispenser di lattine (opzionale) Cassetto snack (opzionale) Luce Ripiano o cassetto Ripiano (pieghevole o normale) Centro rinfresco (opzionale) Scomparto uova Cassetto verdure (1 o 2) Cassetto Scomparto porta Interruttore umidità Cassetto (2 o 3) Vano Miracle (opzion
Installazione Ambiente di installazione 1. Posizionare l’apparecchio dove risulta facile da usare. Scegliere una posizione adatta 2. Non collocare l’apparecchio vicino a sorgenti di calore, luce solare diretta o umidità. 3. Per garantire una corretta circolazione dell’aria attorno al frigorifero/congelatore, prevedere uno spazio sufficiente a entrambi i lati e nella parte superiore pari ad almeno 5 cm dalla parete posteriore. Tenetelo a una distanza corretta 4.
Installazione Rimozione delle porte Attenzione Pericolo di scossa elettrica Prima dell’installazione scollegare l’alimentazione elettrica al refrigeratore. In caso contrario vi è il rischio di morte o di lesioni gravi. Se la porta di accesso del locale è troppo stretta per consentire il passaggio del refrigeratore, rimuovere le porte e far passare il refrigeratore lateralmente.
Installazione Fare passare il frigorifero lateralmente attraverso la porta di ingresso come mostrato nella figura a fianco. Passaggio del frigorifero Max 5 4 3 2 1 Min 1 FRZ TEMP 2 REF TEMP 3 4 5 Max Rimontaggio delle porte Montarle seguendo all’inverso la procedura di smontaggio dopo averle fatte passare dalla porta di ingresso.
Installazione Livellamento Se la porta dello scomparto congelatore è più bassa della porta dello scomparto frigorifero Livellare la porta inserendo un cacciaviti a punta piatta nella scanalatura della vite di livellamento sinistra e ruotarla in senso orario ( ). Se la porta dello scomparto congelatore è più alta della porta dello scomparto frigorifero Livellare la porta inserendo un cacciaviti a punta piatta nella scanalatura della vite di livellamento destra e ruotarla in senso orario ( ).
Funzionamento Avviamento Prima di utilizzare il frigorifero dopo la prima installazione, lasciare che si stabilizzi alle normali temperature di funzionamento per 2-3 ore prima di introdurvi cibi freschi o congelati. Nel caso il funzionamento venga interrotto, attendere 5 minuti prima di riavviare.
Funzionamento * Modello con dispenser Pulsante scomparto degli alimenti freschi Spia del dispenser (nascosta) Opzionale Pannello delle funzioni a display Tipo-1 Modalit risparmio energetico display Tipo-2 NOTA • 107 Il modello in uso potrebbe non includere tutte le opzioni.
Funzionamento Questa funzione consente un risparmio energetico sul display Tenere premuti contemporaneamente i tasti FREEZER ed EXPRESS FRZ. per 5 secondi fino a udire il suono Ding. Tutti i LED/LCD si accendono, quindi si spengono nuovamente. Quando la modalità di risparmio energetico è attivata, il display rimane spento fino alla successiva apertura della porta.
Funzionamento Come utilizzare l'erogatore (su alcuni modelli) Selezionare una delle opzioni fra ghiaccio tritato, acqua e ghiaccio in cubetti, e premere leggermente il pulsante a pressione con il bicchiere o con un altro contenitore Ghiaccio a cubetti Accendere l'indicatore del ghiaccio a cubetti premendo il pulsante selezionatore. • Acqua Accendere l'indicatore dell'acqua premendo il pulsante selezionatore.
Funzionamento Il ghiaccio è prodotto in blocchi Quando il ghiaccio è prodotto in blocchi, togliere i blocchi di ghiaccio dal contenitore del ghiaccio, romperli in piccoli pezzi, dopodiché inserirli nuovamente nel contenitore del ghiaccio. Quando la funzione produce pezzi di ghiaccio troppo piccoli o in blocchi, è necessario regolare la quantità di acqua fornita per la produzione del ghiaccio. Rivolgersi al centro di assistenza. ❈ Se il ghiaccio non viene usato spesso, può formare dei blocchi.
Funzionamento Allarme sportello aperto Un avvisatore acustico verrà emesso per 3 volte a intervalli di 30 secondi se la porta del frigorifero o del congelatore rimane aperta per oltre 60 secondi. Si consiglia di contattare l’assistenza clienti della propria zona se il segnale di allarme continua a funzionare anche dopo aver chiuso lo sportello. Altre funzioni Funzione di autodiagnosi (rilevamento guasto).
Funzionamento Vano refrigerante (in dotazione solo ad alcuni modelli) Come utilizzarlo Aprire lo sportello del vano refrigerante. Il vano refrigerante è accessibile senza dover aprire la porta del frigorifero e fa quindi risparmiare energia elettrica. Quando si apre lo sportello del vano refrigerante la luce interna dello scomparto frigorifero si accende, consentendo di identificarne agevolmente il contenuto.
Funzionamento Ripiani (in dotazione solo ad alcuni modelli) Ripiano pieghevole Potete immagazzinare oggetti più grandi in altezza, quali contenitori da un gallone o bottiglie, semplicemente spingendo la metà frontale della mensola al di sotto della metà posteriore della mensola stessa. Tirate verso di voi per riportare la mensola in configurazione piena.
Funzionamento Regolazione dell’umidità nello scomparto delle verdure Quando si conservano verdure o frutta l’umidità può essere regolata spostando verso destra/sinistra l’interruttore di regolazione dell’umidità. Umidità alta HIGH HUMIDITY CONTROL LOW LOW HIGH LOW Umidità bassa H HIG HUMIDITY CONTROL HIGH LOW Conversione in scomparto verdure o carne (in dotazione solo ad alcuni modelli) Il cassetto inferiore del frigorifero può essere convertito in scomparto per la verdura o la carne.
Funzionamento Angolo di transizione temperatura Area multiuso (in dotazione solo ad alcuni modelli) Premere questo pulsante per conservare verdura, frutta o altri tipi di alimenti da scongelare, come carne, pesce crudo ecc.
Suggerimenti per la conservazione degli alimenti Collocazione degli alimenti (in base alle varie parti del frigorifero) Porta bottiglie Conservare il vino Cassetto snack Conservare alimenti di piccole dimensioni come pane, spuntini ecc. Ripiani scomparto congelatore Conservare vari alimenti congelati come carne, pesce, gelato, cibi pronti ecc. Mensole scomparto congelatore Cassetto scomparto congelatore Contenitore latticini Conservare latticini come burro, formaggio ecc.
Suggerimentiperlaconservazionedeglialimenti Conservazione degli alimenti Conservare gli alimenti freschi nello scomparto frigorifero. Le modalità di congelamento e scongelamento degli alimenti rappresentano un fattore importante per la conservazione della loro freschezza e del loro sapore. Non conservare alimenti che deperiscono facilmente a basse temperature, come banane e meloni. Lasciare raffreddare gli alimenti caldi prima di procedere alla conservazione.
Cura e manutenzione Come smontare i componenti NOTA • Lampada dello scomparto congelatore Lo smontaggio viene effettuato nell’ordine inverso del montaggio. Prima di procedere ad operazioni di smontaggio e montaggio accertarsi di staccare il cavo di alimentazione elettrica. Nello smontaggio delle parti non esercitare mai una forza eccessiva onde evitare di danneggiarle. Svitare la lampada (➂) tenendo contemporaneamente sollevato leggermente il coperchio (➀, ➁). Ruotare la lampadina in senso antiorario.
Cura e manutenzione Lampada dello scomparto frigorifero Vano refrigerante Per rimuovere il coperchio della lampada, premere sulla sporgenza sotto il coperchio nella parte anteriore e quindi sfilare il coperchio. Per il frigorifero si utilizza una lampadina di max. 40 W acquistabile presso un centro assistenza. 1 Sollevare il vassoio . Sollevare il ripiano superiore, quindi estrarre il coperchio dello scomparto degli alimenti freschi . Per rimuovere lo scomparto, tirarlo verso l’alto.
Cura e manutenzione Informazioni Generali Vacanze Interruzioni di corrente In caso di trasloco Tubo anticondensa Durante un normale periodo di vacanza, la soluzione migliore può esser quella di lasciare il frigorifero in funzione. Sistemare gli articoli congelabili nel congelatore per prolungarne la conservazione.
Cura e manutenzione Ricerca guasti Prima di chiamare il servizio di assistenza, controllare questa lista. Si può risparmiare tempo e denaro! Questa lista contiene i problemi più comuni che non sono dovuti a difetti di manodopera o del materiale. Problema Possibili cause Soluzione Funzionamento del frigorifero Il compressore del frigorifero non funziona. Il frigorifero funziona troppo a lungo. 121 Il frigorifero è spento. Accendere il frigorifero. Vedere regolazione dei comandi.
Cura e manutenzione Problema Possibili cause Soluzione Le temperature sono troppo fredde. La temperatura nel congelatore è troppo fredda mentre quella del frigorifero è soddisfacente. La temperatura nel frigorifero è troppo fredda mentre quella del congelatore è soddisfacente. Regolazione del congelatore troppo fredda. Impostare una temperatura del congelatore meno fredda fino ad ottenere un raffreddamento soddisfacente. Regolazione del frigorifero troppo fredda.
Cura e manutenzione Possibili cause Problema Soluzione Suoni e rumori Rumorosità più elevata quando il frigorifero è in funzione. Rumorosità più elevata quando il compressore entra in funzione. Vibrazioni o rumori sordi. I frigoriferi odierni hanno una maggiore capacità di conservazione e mantengono temperature più costanti. Una rumorosità più elevata è normale. Il frigorifero funziona a una pressione maggiore all’inizio del ciclo di raffreddamento. È normale.
Cura e manutenzione Possibili cause Problema Soluzione Odori nel frigorifero È necessario pulire l’interno del frigorifero. Pulire l’interno con una spugna, acqua tiepida e bicarbonato di sodio. Presenza di alimenti molto odorosi nel frigorifero. Coprire completamente gli alimenti. Alcuni contenitori o materiali da imballo producono odore. Usare contenitori o marche di materiali da imballo diversi. Un alimento confezionato sta tenendo aperta la porta.
Cura e manutenzione Problema Il distributore non eroga ghiaccio. Distributore del ghiaccio intasato. Il distributore non eroga acqua. L’acqua ha un odore / sapore strano. Possibili cause Soluzione Il ghiaccio si è fuso e congelato attorno alla spirale a causa dell’uso poco frequente, di fluttuazioni della temperatura o di interruzioni dell’elettricità. Rimuovere il serbatoio del ghiaccio e far scongelare il suo contenuto. Pulire il serbatoio, asciugarlo e rimontarlo nella posizione corretta.