HCS6320 CodePlus™ Series MUX/MOD Feature Card Installation & Setup Guide Warranty © Copyright 2012 LG Electronics U.S.A., Inc.
For Customer Support/Service, please call:1-888-865-3026 The latest product information and documentation is available online at: www.LGsolutions.com/products WARNING RISK OF ELECTRIC SHOCK DO NOT OPEN WARNING: TO REDUCE THE RISK OF ELECTRIC SHOCK DO NOT REMOVE COVER (OR BACK). NO USER-SERVICEABLE PARTS INSIDE. REFER TO QUALIFIED SERVICE PERSONNEL. ALL CARDS MUST BE INSERTED AND REMOVED BY QUALIFIED SERVICE PERSONNEL ONLY.
IMPORTANT SAFETY INSTRUCTIONS Important safeguards for you and your new product THIS PRODUCT HAS BEEN MANUFACTURED AND TESTED WITH SAFETY IN MIND. IMPROPER USE, HOWEVER, CAN RESULT IN POTENTIAL ELECTRICAL SHOCK OR FIRE HAZARDS. TO AVOID DEFEATING THE SAFEGUARDS THAT HAVE BEEN BUILT INTO THIS PRODUCT, PLEASE READ AND OBSERVE THE FOLLOWING SAFETY POINTS WHEN INSTALLING AND USING THIS PRODUCT. 1. Read these instructions. Read all the safety and operating instructions before operating the product. 2.
IMPORTANT SAFETY INSTRUCTIONS (Continued from previous page) d. If the product has been dropped or the cabinet has been damaged. e. If the product exhibits a distinct change in performance. Caution: Refer all servicing to qualified service personnel. 13. Servicing Caution: These servicing instructions are for use by qualified service personnel only.
Table of Contents Safety Warnings . . . . . . . . . . . . . . . . . . . . . . . . 2 Set HCS6320 RF Channels. . . . . . . . . . . . . 31 Important Safety Instructions. . . . . . . . . . . . 3 – 4 Print the RF Channel Map. . . . . . . . . . . . . . 31 Table of Contents . . . . . . . . . . . . . . . . . . . . . . . 5 Display a List of the Transcoder Cards Installed in the Chassis . . . . . . . . . . . . . . . . 32 Setup Information . . . . . . . . . . . . . . . . . . . . . . .
Setup Information Check the following items before you begin HCS6320 installation and setup procedures. HCS6320 __ The HCS6320 feature card must be installed in a CodePlus™ HCS6150 card frame with one or more CodePlus series HCS7720 transcoder cards. Refer to the Installation & Setup Guide for the card frame to verify that the chassis is installed properly. Note: All cards must be used in an LG-approved card frame for this product. __ The HCS6320 must be installed in the card frame CONTROLLER slot.
HCS6320 Product Description The HCS6320 MUX/MOD controller is one of the LG CodePlus series feature cards.
Transcoder Product Description Typical HD Transcoder System Overview The LG HCS6320 MUX/MOD feature card, when used with LG CodePlus series transcoders in a CodePlus card frame, represents an eight-program HDTV solution for commercial and institutional MATV systems (hotels, hospitals, etc.). A typical Transcoder System with MUX/MOD functionality includes: • An HCS6320 MUX/MOD feature card.
HCS6320 Card Description HCS6320 Retaining Screw Install after inserting HCS6320 card ETHERNET ETHERNET Connection for network or local communication SERVICE PORT TTL-USB serial port connection (use FTDI TTL-232R-5V-AJ cable) SERVICE PORT RESET STATUS RESET Resets card RF OUT RF OUT DTV signal output STATUS Blinking pattern indicates condition of card Retaining Screw Install after inserting HCS6320 card 206-4183 9
HCS6320 Functional Blocks The HCS6320 consists of four main functional blocks: • MUX: Four parallel multiplexers, each of which can combine up to two encrypted transport streams into a single 38 Mbps transport stream. The transport streams from the transcoder cards are supplied to the HCS6320 through the internal backplane circuit board of the card frame. • MOD: Four parallel 256-QAM modulators that take the MUX output streams and produce four modulated outputs.
Installing a CodePlus Feature Card Slot 6 Slot 5 HCS6320 Slot 1 HCS7720 ASI OUT HDMI-IN Slot 2 HCS7720 ASI OUT HDMI-IN Slot 3 HCS6400 Slot 7 Slot 4 HCS7720 ASI OUT CONTROLLER Slot HCS6720 ETHERNET ASI OUT HCS6400 RESET HCS7720 ASI OUT SERVICE PORT HDMI-IN Slot 9 Slot 10 Slot 11 Slot 12 Slot 8 HCS7720 ASI OUT HDMI-IN HDMI-IN STATUS HCS6400 HCS7720 ASI OUT HDMI-IN HCS7720 ASI OUT HDMI-IN RESET RESET RESET RESET RESET RESET RESET RESET STATUS STATUS STATUS STATUS
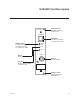
Satellite STB & HCS6320 Initialization & Setup Connections HD STB (1 Per Program) 60 V AC~TTS 12085 WA Hz ET ERN ETH EO VID io Aud ital T Dig TPU OU EO VID NE PHO MI HD O IDE S-V IO AUD IO AUD E IN LLIT SATE E IN LLIT SATE RF Feed from Satellite HDMI and X-Port Links HCS6320 in CONTROLLER Slot HCS6 320 HCS77 20 HCS77 HCS67 20 00 X PORT ASI OUT ETHE HCS64 00 LINK ASI OUT HDMI-I N RESET STATUS SERVICE PORT X PORT LINK SERVICE PORT HDMI-I N RESET RESET STATUS STATUS SERVICE PORT X
System Setup Typical HCS6320 System Installation (see also Typical Setup Flow Chart on the following page) 1. Verify that the individual transcoder cards are installed and set up as described in the appropriate Installation & Setup Guide. 2. Plug in the power to the CodePlus card frame containing the newly installed feature card and transcoder card(s). The green STATUS LED on the HCS6320 front panel will blink approximately once every second while the HCS6320 card boots up.
HD STB PC (1 Per 2 Programs) Service Port or Ethernet Connection Out HCS6720 (Cont.
Network and Communication Setup The HCS6320 feature card and the transcoder cards installed in the CodePlus card frame contain several internal registers for different configuration options. This document describes configuration options via a network or direct connection to the HCS6320. Refer to the Installation & Setup Guide for HCS7720 transcoder cards for information on performing configuration via a direct connection to the HCS7720 Service Port.
Configuration Options via GUI Caution: Do NOT initiate simultaneous menu sessions to run commands. Doing so will interfere with active processes and may corrupt the system configuration and/or cause the HCS6320 card to cease normal operation. Access the CodePlus Transcoder Series Web GUI Note: The HCS6320 must be connected to an IP network for GUI access. See “Network and Communication Setup” on page 15 for further information. 1.
Configuration Options via GUI (Cont.) Example: Controller Menu View HCS6320 System Information With the Controller Menu on display, click on the Read button at the right of the System Information field to display HCS6320 hardware and software information.
Configuration Options via GUI (Cont.) Set HCS6320 RF Channels With the Controller Menu on display, type the appropriate RF start channel number in the data entry field at the right of the Set Start RF Channel field. Then, click on the Set button. The remaining channels will be automatically assigned per EIA-542 STD CATV frequency allocation standards, and the system will display the channel assignments for the card slots (see example under “Read the RF Channel Map” below).
Configuration Options via GUI (Cont.) Example: List Card Details Display card# 1: 2: 3: 4: 5: 6: 7: 8: 9: 10: 11: 12: card type [HCS7720] [HCS7720] [-] [HCS7720] [HCS7720] [-] [-] [HCS7720] [HCS7720] [-] [HCS7720] [HCS7720] hardware id os version [7720-v1.1-2011-1026] [HCS7720-943-2011-1025] [7720-v1.1-2011-1026] [HCS7720-943-2011-1025] app [2.5] [2.5] [enc] [1.2] [1.2] [7720-v1.1-2011-1026] [HCS7720-943-2011-1025] [7720-v1.1-2011-1026] [HCS7720-943-2011-1025] [2.5] [2.5] [1.2] [1.2] [7720-v1.
Configuration Options via GUI (Cont.) Example: MUX Bitrates Display Slot #1 Bitrate 19.035 Mbit/s (unfiltered 19.065 Mbit/s) Slot #2 Bitrate 12.658 Mbit/s (unfiltered 12.694 Mbit/s) Mux #1 Output Bitrate 31.746 Mbit/s Data currently in use by the MUX Slot #4 Bitrate 19.335 Mbit/s (unfiltered 19.359 Mbit/s) Unprocessed data Slot #5 Bitrate 14.679 Mbit/s (unfiltered 14.715 Mbit/s) Mux #2 Output Bitrate 34.051 Mbit/s Slot #8 Bitrate 13.013 Mbit/s (unfiltered 13.049 Mbit/s) Slot #9 Bitrate 13.
Configuration Options via GUI (Cont.) (Continued from previous page) The system will display the New Channel Map, for example: New Channel Map: -------+----------RF | Card Slot -------+----------54-1 | 1 54-2 | 2 55-1 | 11 55-2 | 12 56-1 | 8 56-2 | 9 57-1 | 4 57-2 | 5 -------+----------- Set the HCS6320 IP Address 1. With the Controller Menu on display, click on the Set button at the right of the Set IP Address field. 2.
Configuration Options via GUI (Cont.) (Continued from previous page) 3. Click on the Submit button when you are ready to continue. The system will display an overview of the settings and then prompt you to reset the HCS6320, for example: DHCP mode selected Reset the Controller card to activate new IP settings. or Static IP mode selected IP address: Subnet mask: Default gateway: xxx.xxx.xxx.xxx xxx.xxx.xxx.xxx xxx.xxx.xxx.xxx Reset the Controller card to activate new IP settings. 4.
Configuration Options via GUI (Cont.) Update HCS6320 and/or Transcoder Firmware via TFTP If you are not sure of the current firmware version, view and record the System Information for the HCS6320 and/or the transcoder card(s) before you initiate the firmware update. See “View HCS6320 System Information” on page 17 and/or “View Hardware Information for a Selected Transcoder” on page 24, as necessary. The firmware update requires that you set up a TFTP server on the same IP network as the HCS6320.
Configuration Options via GUI (Cont.) Transcoder Menu Commands The following subsections describe how to access and use the Transcoder Menu commands. Access the Transcoder Menu 1. Access the CodePlus Transcoder Series web GUI as described on page 16. 2. With the Homepage on display, click on the Transcoder menu tab or link. The Transcoder Menu (see example below) enables you to view and modify selected transcoder card configuration settings.
Configuration Options via GUI (Cont.) View Software Information for a Selected Transcoder 1. With the Transcoder Menu on display, click on the down arrow at the right of the Card Select field, and select the appropriate transcoder card from the drop-down list of options. 2. Click on the Read button at the right of the Read Software Version field to view the selected card’s software versions, for example: Card 1: OS version: HCS7720-943-2011-1025 Encoder version: 1.2 Application version: 2.
Configuration Options via GUI (Cont.) Reload the Pro:Idiom Key on a Selected Transcoder This command reloads the Pro:Idiom encryption key on a single transcoder card. Note that a password is required to initiate this command. 1. With the Transcoder Menu on display, click on the down arrow at the right of the Card Select field, and select the appropriate transcoder card from the drop-down list of options. 2. Click on the Reload button at the right of the Reload PI Key field. 3.
Configuration Options via GUI (Cont.) Example: Satellite STB Menu Read the STB Channel and Status This option enables you to display the STB channel, as well as the lock status of the satellite signal (i.e., the STB is or is not locked to the satellite) and the satellite signal strength (displayed as a percentage) at the Satellite In jack on the satellite STB. 1.
Configuration Options via GUI (Cont.) Read STB Information This option enables you to display the STB model number, software version, serial number, and smart card number. 1. With the Satellite STB Menu on display, click on the down arrow at the right of the Card Select field, and select the appropriate transcoder card from the drop-down list of options. 2.
Configuration Options via GUI (Cont.) Schedule an STB Update The STB Software Update feature enables the STB to check for and download software updates on a one-time, user-defined basis. An STB Update should periodically be scheduled in conjunction with software updates from the satellite service provider. Note: At the time an update is scheduled to begin, the STB will be switched to standby in order to enable it to download the update.
Configuration Options via Command Line Caution: Do NOT initiate simultaneous menu sessions to run commands. Doing so will interfere with active processes and may corrupt the system configuration and/or cause the HCS6320 card to cease normal operation. Access the HCS6320 Main Menu Note: The HCS6320 must be connected to an IP network for Telnet access. For direct access to the HCS6320 Service Port, use the FTDI TTL-USB cable (P/N TTL-232R-5V-AJ).
Configuration Options via Command Line (Cont.) View HCS6320 System Information 1. Access the HCS6320 Main Menu as described on the previous page. 2. At the [Main] Command > prompt, type info and press Enter to display HCS6320 hardware and software information.
Configuration Options via Command Line (Cont.) Display a List of Transcoder Cards Installed in the Chassis 1. Access the HCS6320 Main Menu as described on page 30. 2. At the [Main] Command > prompt, type list and press Enter.
Configuration Options via Command Line (Cont.) Set the HCS6320 IP Address 1. Access the HCS6320 Main Menu as described on page 30. 2. At the [Main] Command > prompt, type setip and press Enter. 3. At the Using DHCP (y/n)? prompt, either: • Type y and press Enter if using DHCP. The system will display: IP address has been set. Go to step 5. • Type n and press Enter to assign a static IP address to the HCS6320. Then, continue with step 4. 4. At each of the following prompts, type the information requested.
Configuration Options via Command Line (Cont.) (Continued from previous page) Caution: Do NOT initiate simultaneous menu sessions while a Pro:Idiom key installation is in progress. Doing so will interfere with the active processes and may corrupt the system configuration and/or cause the HCS6320 card to cease normal operation. 1. Confirm the directory location of the Pro:Idiom key (.hex) file. Note: For a TFTP file transfer, the key file must be available on the same machine as the TFTP server. 2.
Configuration Options via Command Line (Cont.) Reload the Pro:Idiom Key on All Transcoders This command reloads the Pro:Idiom encryption key on all the transcoders installed in the chassis. To reload the Pro:Idiom key on a single transcoder, see “Reload the Pro:Idiom Key on the Selected Transcoder” on page 41. 1. Access the HCS6320 Main Menu as described on page 30. 2. At the [Main] Command > prompt, type pr and press Enter to initiate the reload immediately.
Configuration Options via Command Line (Cont.) (Continued from previous page) Xmodem File Transfer a) The system will request a configuration (.cfg) file. Transfer the new configuration file using Xmodem protocol. For example, in HyperTerminal, select Transfer and then Send File.... In the Send File window, enter or select the appropriate configuration file in the Filename field, and select Xmodem in the Protocol field. b) Upon receipt of the configuration file, the system will request a package (.
Configuration Options via Command Line (Cont.) Example: MUX Bitrates Display Slot #1 Bitrate 15.696 Mbit/s (unfiltered 15.732 Mbit/s) Slot #2 Bitrate 12.658 Mbit/s (unfiltered 12.694 Mbit/s) Mux #1 Output Bitrate 31.746 Mbit/s Slot #4 Bitrate 19.335 Mbit/s (unfiltered 19.359 Mbit/s) Slot #5 Bitrate 14.679 Mbit/s (unfiltered 14.715 Mbit/s) Mux #2 Output Bitrate 34.051 Mbit/s Slot #8 Bitrate 13.013 Mbit/s (unfiltered 13.049 Mbit/s) Slot #9 Bitrate 13.903 Mbit/s (unfiltered 13.
Configuration Options via Command Line (Cont.) (Continued from previous page) 1. 2. 3. 4. 5. 6. 7. 8. RF RF RF RF RF RF RF RF 58-1 58-2 59-1 59-2 60-1 60-2 61-1 61-2 <-<-<-<-<-<-<-<-- Slot Slot Slot Slot Slot Slot Slot Slot #1 #2 #4 #5 #8 #9 #11 #12 Do you wish to change the mapping of physical slots to RF channels (y/n)? 3. To change the RF channel mapping, type y and press Enter. Note: Type n and press Enter to return to the Main Menu prompt without changing the channel mapping. 4.
Configuration Options via Command Line (Cont.) Transcoder Menu Commands The following subsections describe how to access and use the Transcoder Menu commands. Note: Refer to the Installation & Setup Guide for the applicable transcoder cards for further information on transcoder configuration options. Access the Transcoder Menu 1. Access the HCS6320 Main Menu as described on page 30. 2. At the [Main] Command > prompt, type card and press Enter. 3.
Configuration Options via Command Line (Cont.) View Hardware Information for the Selected Transcoder At the [HCS7720 (#)] Command > prompt, type hwid and press Enter to view the selected card’s hardware ID (firmware version), for example: Card HWID# is: 7720-v1.1-2011-1026 View Software Information for the Selected Transcoder At the [HCS7720 (#)] Command > prompt, type ver and press Enter to view the selected card’s software versions, for example: OS version: HCS7720-943-2011-1025 Encoder version: 1.
Configuration Options via Command Line (Cont.) (Continued from previous page) Note: The process of updating the encryption key will synchronize the decryption key in any receiver tuned to the cards’ output. If the target receiver is turned off or viewing content from a different card, the synchronization will not occur, and the output will be scrambled. Ensure that all encrypters and decrypters in a system are synchronized to the same key. 1. Confirm the directory location of the Pro:Idiom key (.
Configuration Options via Command Line (Cont.) Access the Satellite Receiver Menu for the Selected Transcoder See “Satellite Receiver Menu Commands” on pages 43 to 47 for detailed information on satellite STB configuration options. Update Firmware on the Selected Transcoder This command updates the firmware on the selected transcoder card. To update firmware on all transcoders or on the HCS6320, see “Update HCS6320 and/or Transcoder Firmware” on page 35.
Configuration Options via Command Line (Cont.) Satellite Receiver Menu Commands The following subsections describe how to access and use the Satellite Receiver Menu commands. Access the Satellite Receiver Menu 1. Access the card menu for the selected transcoder (see “Access the Transcoder Menu” on page 39). 2. At the [HCS7720 (#)] Command > prompt, type stb and press Enter. 3. At the [Satellite (#)] Command > prompt, either: • Press Enter to display the Satellite Receiver Menu (see example below).
Configuration Options via Command Line (Cont.) Read the Current STB Channel At the [Satellite (#)] Command > prompt, type getch and press Enter to display the currently selected satellite STB channel number, for example: Card 1: Current STB channel is 200 If you receive an error message, it may be necessary to reset the satellite STB either using the “Reset Satellite STB” command described on page 45 or using the RESET button on the STB front panel. Set the STB Channel 1.
Configuration Options via Command Line (Cont.
Configuration Options via Command Line (Cont.) Read STB Update Parameters At the [Satellite (#)] Command > prompt, type getupd and press Enter to display the current STB update status, for example: STB Update is scheduled to begin in 12 hours 0 minutes with duration 25 minutes or STB Update is not scheduled. or STB Update is in progress. It will end in 1 minutes (total duration 25 minutes). Set STB Update Parameters 1. At the [Satellite (#)] Command > prompt, type setupd and press Enter. 2.
Configuration Options via Command Line (Cont.) (Continued from previous page) After you enter a valid maintenance window duration, the system will display confirmation, for example: Configured STB Update...
Troubleshooting This section provides troubleshooting information for the HCS6320. You can find additional troubleshooting help at www.dishnetwork.com. Equipment Setup Review • Make sure all connectors and connections are tight and secure on all entertainment system components. • Check the Ethernet connection; is it viable and working? - Observe the green and amber LEDs on the Ethernet connector. - The green LED should blink rapidly. - The amber LED should stay lit constantly.
Specifications Dimensions Height: Width: Depth: Weight: 3U (130.20 mm) 1.102362 inches (28.00 mm) 9.055118 inches (230.00 mm) 0.5 pounds (0.221 kgrms) Est.
Document Revision History / Notes Document Revision History Date Description August 2012 Revision A: New document Product documentation is available online at: www.LGsolutions.com/products. From the Products page, select TVs, Systems & Solutions, then Head End Systems, then CodePlus Transcoder Series (click Show [+] to view the list of products), then the applicable Modular System option.
Open Source Software Notice The following GPL executables used in this product are subject to the GPL Version 2.0 License Agreements. GPL EXECUTABLES: Linux kernel 2.6.26, boa 0.94, busybox 1.10.1, dhcpcd 0.70, eraseall 1.7, inetd 1.0, lrzsz 0.12.20, simpleinit 1.21 To obtain the source code under GPL, LGPL, MPL and other open source licenses that are contained in this product, please visit http://opensource.lge.com.
LG HCS6320 MUX/MOD Feature Card Warranty Broadcast Products Welcome to the LG family! We believe that you will be pleased with your new HCS6320 MUX/MOD feature card. Please read this warranty carefully, it is a “LIMITED WARRANTY” as defined under Federal Law. This warranty gives you specific legal rights, and you may also have other rights that vary from state-to-state within the U.S.A.