LG External HDD External Hard Disk Drive - Thank you for purchasing this product. - This user manual contains instructions on how to use the product properly. - Please read this manual carefully. - Be sure to follow the instructions and notices. - Backup Program (PC Clone EX) and its manual are in the external HDD or Install CD. - Appearance of product may differ from the image.
Warning & Caution During Use Check before use - This user manual contains instructions on how to use the product properly. - Please read this manual carefully. - Be sure to follow the instructions and notices. z Notes are divided into “Warning” and “Caution”, each denotes the following: Warning Failure to follow the instructions below may result in injuries or product damage. Caution Failure to follow the instructions below may result in serious injuries or product damage.
Warranty & Caution During Use Caution - LG Electronics will replace this product if it is faulty due to a manufacturing or materials defect, except where damage is caused by your use or negligence. - LG EXCLUDES LIABILITY FOR ALL CONSEQUENTIAL AND OTHER LOSS, INCLUDING LOSS OF DATA. Warranty 1. Any defect found after normal use and during the warranty period shall be repaired free of charge. 2.
Table of Contents z Warning & Caution During Use 2 z Table of Contents 4 z Package Contents 5 z Name of Parts & Connect Cable 5 z USB Port Connect - Windows User - Mac OS User 6 z Safely remove 8 z Partition Creation and Format 9 zMac Format 10 z Backup Program (PC Clone EX) 11 z Troubleshooting 19 z LG Service Site 20 LG External HDD Manual 4
Package Contents Components 1. LG External HDD 2. Quick Guide 3. Install CD 4. USB Y-cable ※ The components are subject to change without prior notice. ※ Appearance of product may differ from the image. ※ Windows 98/SE user must install the driver in the Install CD or Website. (www.lgservice.com, www.lge.com) Name of Parts & Connect Cable Name of parts z USB Model ① ① USB port [LED Operation Status] ② LED - LED flashes during reading from or writing to the external HDD.
USB Port Connect Windows User - Windows 98/ME/2000/XP/Vista, Windows 7 z Connecting to Windows ME/2000/XP/VISTA, Windows 7 - When connected to a computer using the USB cable, the external HDD is recognized and can be used immediately. ※ When installing on Windows ME, and files such as usbntmap.sys are being requested, specify the base2.cab file in the Win9X folder on the Windows ME original CD to enable automatic installation.
USB Port Connect Mac User - Mac OS z Connecting to Mac OS 1. There is no need to install an additional driver on Mac OS 10.0 or later. 2. When using Mac OS, format as extended Mac format (HFS+). ※ If formatted as NTFS, the external HDD can be recognized by Mac; data cannot be copied to/from it, however. Format as FAT32 to enable use in both PC and Mac. Format on the PC using the program provided with the Install CD or on Mac using Disk Utilities.
Safely remove (Unplug) z Safely remove (unplug) ※ Removing the external HDD from the PC without following the safe removal instruction may cause problem to the stored data or operation of the external HDD. 1. Double-click the Safely Remove Hardware Icon in the notification area. 2. On the window, click the Stop button followed by OK. 3. When the message indicates that is safe to remove the device appears, click OK and remove the external HDD after checking LED Operation Status.
Partition Creation and Format z Windows 2000/XP User - LG external HDD is already NTFS-formatted, but if you want to create or divide partition, follow this instruction. (Attention: all data in external HDD will be deleted if you use this function.) 1. Left button click “My Computer” and Click “Manage”. 2. Click the Disk Management. 3. Choose the Disk Drive you want to delete partition and click “Delete Partition”. 4. Choose the Disk Drive which is partition deleted and click “ New Partition”. 5.
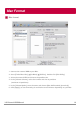
Mac Format Mac format 1. Connect the external HDD to your Mac. 2. Go to [Finder Menu Bar] Æ [Go Menu] Æ [Utilities], double click [Disk Utility]. 3. Select the external HDD and choose the partition tab. 4. In the [Volume Scheme], select the number and size of partitions (maximum 16 partitions). 5. In the [Volume Option], enter the name and choose [Mac OS Extended (journaled)]. 6. Click [Apply], to start formatting. It could take several minutes depending on your Mac.
Backup Program (PC Clone EX) Software Installation 1.Please put the Install CD into CD ROM drive, the program directly goes on the autorun program. (In case the screen doesn’t come out, please operate the window box of “setup.exe”) 2. Click “Backup Program” and click “install”. 3. Please read the license agreement in detail. 4. If users accept the agreement, please click “Agree” to install. 5. Please setup the installing pathway, and then click “Install” to next. 6.
Backup Program (PC Clone EX) FAT32 Format Utility For the current HDD capacity is getting bigger, the Fat32 Format Utility in Windows 2000 / XP is not able to support the HDD size exceeding 32GB; FNet recommends FNet Fat 32 Format Utility, which can format the large capacity to be FAT32 Format rapidly and fully, the size even maximums up to 4 TB (4000GB). (Attention: all data in external HDD will be deleted if you use this function) 1. Please plug external HDD, and turn on the computer. 2.
Backup Program (PC Clone EX) Quick Launch 1.Quick Launch. 2. File Backup. 3. File Manager. 4. Setup. 5. File Backup. 6. Minimized. 7. About. 8. Help. File Manager ※ PCClone EX Lite Manager function is the same as Windows Explorer. PC users can directly drag the files forward and backward between the fixed device & USB device. ※ It is convenient for users who manage or check their files without clicking the icon of “Windows Explorer” or “My Computer”.
Backup Program (PC Clone EX) Quick File Backup Users can directly execute “File Backup” from Quick Launch, only one step, and the system data will be backed up easily. (For the first time using, please refer to the subject of “File Backup”) 1. Please plug the external HDD into PC 2. Execute PCClone EX Lite. 3. Go on PCClone EX Lite /Quick Launch Screen. 4. Click “File Backup”. 5. Appearing a dialog screen, please click “OK” to backup. 6.
Backup Program (PC Clone EX) File Backup 1. File Backup. 2. File Restore. 1. Please plug the USB HDD into the computer, and turn on the power. 2. Execute PCClone EX Lite. 3. Click“File backup”. 4. Select folders / drives from the fix device. 5. Set one of USB devices for backup. (Please refer to “Setup”, and then set some options for the first time using.) 6. Select “Backup” and press “OK” to start.
Backup Program (PC Clone EX) 7. Backup is completed, please press “OK”. 8. The selected folders have been moved from the fixed devise to the USB device successfully. 9. There is a hidden root directory F: FNet in the USB device, all the file backups are kept in there. Be careful, don’t delete it carelessly.
Backup Program (PC Clone EX) File Restore 1. Please plug the external HDD. 2. Execute PCClone EX Lite. 3. Go on the PCClone EX Lite screen. 4. Click “File Backup”. 5. Select folders/files of USB Device you would like to restore. 6. Click “Restore”, then press “OK” to start. 7. When “Restore” is finished, please press “OK”. Erase File Backup 1. Please plug external HDD. 2. Execute PCClone EX Lite. 3. Go on PCClone EX Lite screen. 4.
Backup Program (PC Clone EX) Setup ※ Hot Key setup : When users click “ Edit”, which can be made up of their own hot key by choosing “Ctrl”, “shift”, “Alt” and Added a number, or a letter, or function key, or whatever they want to consist of a hot key. Thus, every user has their own edited key to do file backup.
Troubleshooting 1. Once connected, the external HDD is recognized but not displayed. Make sure that the mounted external HDD is initialized, partitioned, and formatted. 2. Files larger than 2GB cannot be copied to the external HDD on Mac. The partition of the external HDD is FAT 32. Set the partition to extended partition (HFS+) on Mac OS. 3. During the installation of an external HDD on Windows ME, files such as usbntmap.sys are requested. The files are in the base2.
LG Service Site LG External HDD Manual 20
LG Service Site LG External HDD Manual 21