ENGLISH ESPAÑOL OWNER’S MANUAL VACUUM CLEANER Please read this manual carefully before operating your vacuum and retain it for future reference. LcV800R P/No.: MFL62076025 www.lg.
CONTENTS LG VACUUM CLEANER WARRANTY CARE & CLEANING 3 13 Storing the Vacuum Cleaner 13 Dust Tank and Dust Separator Component 14 Emptying the Dust Tank 14 Cleaning the Dust Tank 15 Cleaning the Foam Pre Filter 16 Cleaning the HEPA Filter 17 Removing Clogs 18 Cleaning the Exterior of the Vacuum Cleaner LG VACUUM CLEANER WARRANTY IMPORTANT SAFETY INFORMATION 4-5 IMPORTANT SAFETY INFORMATION PARTS AND FEATURES 6 PARTS AND FEATURES ASSEMBLY TROUBLESHOOTING 7 Unpacking the Vacuum Clean
LG VACUUM CLEANER WARRANTY WARRANTY PERIOD: HOW SERVICE IS HANDLED: Five Year From the date of the original purchase Any part of the vacuum cleaner which fails due to a defect in materials or workmanship. During this full five-year warranty, LG will also provide, free of charge, all labor and shop service to replace the defective part.
IMPORTANT SAFETY INFORMATION READ ALL INSTRUCTIONS BEFORE USE IMPORTANT SAFETY INSTRUCTIONS Read and follow all instructions before using your vacuum cleaner to prevent the risk of fire, electric shock, personal injury, or damage when using the vacuum cleaner. This guide does not cover all possible conditions that may occur. Always contact your service agent or manufacturer about problems that you do not understand. This is the safety alert symbol.
IMPORTANT SAFETY INFORMATION • Do not insert objects into vacuum openings. Failure to follow this instruction could result in product damage. • Do not use the vacuum if any of the openings are blocked. Keep vacuum openings free of dust, lint, hair and anything that may reduce air flow. Failure to follow this instruction could result in product damage. • Do not use the vacuum cleaner without the tank and/or filters properly installed. Failure to follow this instruction could result in product damage.
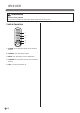
PARTS AND FEATURES It is important to know your vacuum cleaner’s parts and features to assure its proper and safe use. Review these before using your vacuum cleaner. Common Replacement Parts HEPA Filter ADQ73133301 Foam Filter MDJ49551601 Filter Frame Accessory Tools MDQ61906202 To order these parts call 1-800-243-0000 (U.S.A.
ASSEMBLY ENGLISH To reduce the risk of shipping damage, your vacuum cleaner is shipped partially unassembled. Unpacking the Vacuum Cleaner Carefully unpack the vacuum cleaner and make sure that you have all parts before discarding any of the packaging. Remove any tape and protective film before assembly. Assembly Parts 1. Canister Items that are packed in the box: 1. Canister 2. Hose 3. Telescopic Wand 4. Additional Foam Filter 5. Carpet / Hard Floor Nozzle 2. Hose 3. Telescopic Wand 6.
ASSEMBLY The Vacuum Cleaner Assembly Hose Canister 1. I nsert the hose into the canister until it locks into place. To remove the hose from the canister, press the release button and pull the hose out. 1. Inspect Canister 2. Check to see that Dust Tank is properly installed. See the "Emptying the Dust Tank" section for instructions. 3. Check to see that the dust separator and exhaust filters are properly installed. See the "Cleaning the Foam Pre Filter" section for instructions.
ASSEMBLY ENGLISH WARNING Personal Injury and Product Damage Hazard! DO NOT use outlets above counters. Damage to items in the surrounding area could occur. Cord Storage To release the cord: Grasp the plug and pull cord to desired cord length. To store the cord: Hold plug and press on the cord rewind button on the rear side of handle. To prevent cord from whipping, hold plug until cord is rewound.
OPERATION WARNING Personal Injury Hazard Do not set the vacuum on the stairs, always keep the unit on the floor. Control Operation 1 2 3 4 5 1. FLOOR : For maximum suction of the vacuum cleaner. 2. CARPET : For vacuuming carpet. 3. SOFA : For vacuuming sofa or mattresses. 4. CURTAIN : For minimum suction of the vacuum cleaner. 5. OFF : To turn the canister off.
OPERATION Dusting Brush The dusting brush and upholstery nozzle are useful when cleaning furniture. Crevice Tool The crevice tool can be used for tight corners, between cushions and other hard to reach places. Mini Turbine Nozzle This tool can be used on stairs and other hard to reach places.
OPERATION Installing Attachments Tips and Tricks Using the Dusting Brush Carpet Edges and Corners: Slide the Dusting Brush over the end of the wand or fit it into the hose handle. For tight corners, carpet edges and along base boards, use the dusting brush. Use the crevice tool for especially hard to reach areas. Using the Crevice Tool Slide the crevice tool over the end of the wand or fit it into the handle.
CARE & CLEANING ENGLISH Always follow all safety precautions when cleaning and servicing the vacuum cleaner. Storing the Vacuum Cleaner When not in use, store the vacuum cleaner upright or on its wheels. Insert the nozzle clip into its slot on canister bottom and on side of the body. Dust tank and Dust Separator Component The dust tank and dust separator consist of several key components. Always make sure that all parts are properly reinstalled after emptying the dust tank.
CARE & CLEANING Emptying the Dust Tank Cleaning the Dust Tank For optimal performance, clean the dust tank regularly. WARNING Electrical shock and personal injury hazard. Always unplug the power cord from the electrical outlet before servicing or performing maintenance on the vacuum cleaner. Failure to do so could result in electrical shock or personal injury. To Clean the Dust Tank: 1. R emove the dust tank from the vacuum cleaner. 2. Wash the dust tank and cover of dust tank. 3.
CARE & CLEANING CAUTION ENGLISH Cleaning the Foam Pre Filter 3. O pen the dust separator lid by pulling the lid cover lever and remove dirt. A wet filter can cause permanent damage to the vacuum cleaner. Be sure filters are completely dry before reinstalling. For optimal performance, check the filters every 2 months and clean when necessary. To Clean the foam pre filter: 1. Grasp the handle of canister and then push the dust separator release button. Open the cover of canister. Dust Separator Lid 4.
CARE & CLEANING 5. Shake out any excess dust or debris and rinse the foam pre filter & filter frame with clean water. Cleaning the HEPA Filter For optimal performance, check the filter every 6 months and clean when necessary. To Clean the HEPA Filter: 1. Remove the HEPA filter cover. Lever 6. Dry completely away from sunlight. Exhaust filter cover 2. Separate the HEPA filter by pushing the button.
CARE & CLEANING WARNING ENGLISH Removing Clogs 4. Separate the wand and hose and check for clogging. Electrical shock and personal injury hazard. Always unplug the vacuum cleaner before servicing. Failure to do so could result in electrical shock or personal injury. If you notice a loss in suction, first check the filters as described on Page 15 and 16. If the filters are clean, there may be a clog. The arrows show areas where clogs are most likely to occur. To check for clogs: 1.
CARE & CLEANING Cleaning the Exterior of the Vacuum Cleaner WARNING Electrical shock and personal injury hazard. Always unplug the vacuum cleaner before servicing. Failure to do so could result in electrical shock or personal injury. Wipe the exterior of the vacuum cleaner with a clean, soft cloth that has been dipped in water and wrung dry. DO NOT allow water to enter any openings in the vacuum cleaner. DO NOT clean tools in a dishwasher or clothes washer.
TROUBLESHOOTING WARNING Electrical shock and personal injury hazard. Always unplug the vacuum cleaner before servicing. Failure to do so could result in electrical shock or personal injury. PROBLEM POSSIBLE CAUSE POSSIBLE SOLUTION Vacuum cleaner will not run • Unplugged at wall outlet • Make sure cord is plugged into a functioning outlet. • Remove the hose from the body and reconnect it properly. • Empty dust tank and clean filters.
MEMO
ESPAÑOL MANUAL DEL USUARIO ASPIRADORA Lea este manual detenidamente antes de poner en marcha su aspiradora y guárdelo para futuras referencias. LcV800R P/No.: MFL62076025 www.lg.
ÍNDICE GARANTÍA DE LA ASPIRADORA LG CUIDADO Y LIMPIEZA 3 13 Guardar la aspiradora 13 Depósito y separador de polvo 14 Vaciar el depósito de polvo 14 Limpieza del depósito 15 Limpiar el pre filtro de espuma.
GARANTÍA DE LA ASPIRADORA LG LG Electronics Inc. reparará o sustituirá, gratuitamente, su producto si resulta defectuoso en materiales o en mano de obra bajo condiciones normales de uso durante el periodo de garantía mencionado más abajo, efectivo a partir de la fecha de compra del producto original por parte del consumidor. Esta garantía limitada sólo es válida para el comprador original del producto, y efectiva sólo cuando éste se utilice dentro de los Estados Unidos y Canadá.
INSTRUCCIONES IMPORTANTES DE SEGURIDAD LEA TODAS LAS INSTRUCCIONES ANTES DE UTILIZAR EL PRODUCTO INSTRUCCIONES IMPORTANTES DE SEGURIDAD Lea y siga todas las instrucciones antes de utilizar su aspiradora para evitar riesgo de incendios, descargas eléctricas, lesiones personales o daños cuando la utilice. Esta guía no cubre todos los casos posibles que pueden ocurrir. Contacte siempre con su técnico de servicio o con el fabricante para solucionar problemas que no entienda.
INSTRUCCIONES IMPORTANTES DE SEGURIDAD ADVERTENCIA • Tenga especial cuidado a la hora de limpiar las escaleras. • La manguera contiene cables eléctricos. No utilice la manguera si esta está dañada, cortada o perforada. Existe riesgo de muerte o de descarga eléctrica. • No acerque los dedos al engranaje. Existe el riesgo de lesiones personales. Engranaje PRECAUCIÓN • No inserte ningún objeto en las aberturas de la aspiradora. Podría causar daños en el producto.
PIEZAS Y CARACTERÍSTICAS Es importante conocer las partes y las características de la aspiradora para garantizar su uso adecuado y seguro. Revíselos antes de utilizar su aspiradora.
MONTAJE Para reducir el riesgo de daños durante el envío, su aspiradora se envía parcialmente desmontada. Desembalar la aspiradora 1. Aspiradora ESPAÑOL Desembale cuidadosamente la aspiradora y asegúrese de que están todas las piezas antes de tirar partes del envoltorio. Elimine cualquier celo o plástico protector antes de proceder con el montaje. Piezas de montaje Piezas embaladas en la caja: 1. Aspiradora 2. Manguera 3. Tubo telescópico 4. Filtro de espuma adicional 5.
MONTAJE El montaje de la aspiradora Manguera Aspiradora 1. I nserte la manguera en la ranura de la aspiradora hasta que se quede asegurada. Para extraer la manguera, pulse el botón de liberación y tire de ella. 1. Inspeccione la aspiradora 2. Compruebe que el depósito de polvo está bien instalado. Consulte la sección de “Vaciar el depósito de polvo” para leer las instrucciones. 3. Compruebe que el separador de polvo y los filtros de escape están bien instalados.
MONTAJE ADVERTENCIA ESPAÑOL Existe riesgo de lesiones personales y de daños en el producto. NO UTILICE tomas de corriente situados encima de superficies. Existe riesgo de daños materiales en el área. Almacenamiento del cable Para extraer el cable: Tire de la clavija y del cable hasta obtener la longitud deseada. Para guardar el cable: Sostenga la clavija y pulse el botón para rebobinar el cable en la parte trasera del mango.
FUNCIONAMIENTO ADVERTENCIA Riesgo de lesiones personales No coloque la aspiradora en las escaleras. Mantenga siempre la unidad en el suelo. Control de funcionamiento 1 2 3 4 5 1. SUELO: Para una succión máxima de la aspiradora. 2. ALFOMBRA: Para aspirar alfombras. 3. SILLÓN: Para aspirar sillones o edredones. 4. CORTINA: Para una succión mínima de la aspiradora. 5. OFF: Para desconectar la aspiradora.
FUNCIONAMIENTO Accesorios ESPAÑOL Cepillo para desempolvar El cepillo para desempolvar y el cabezal para tapicería son muy útiles para limpiar los muebles. Esquinero El esquinero se utiliza para esquinas estrechas, para limpiar entre cojines y otros lugares difíciles de alcanzar. Cabezal mini turbina Esta herramienta puede utilizarse para limpiar las escaleras y otros lugares difíciles de alcanzar.
FUNCIONAMIENTO Instalar los accesorios Consejos y trucos Utilizar el cepillo para desempolvar Extremos de las alfombras y esquinas Deslice el cepillo por el extremo del tubo o encájelo en el mango de la manguera. Para esquinas difíciles, bordes de las alfombras y zócalos, utilice el cepillo para desempolvar. Utilice el esquinero para áreas especialmente difíciles de alcanzar. Utilizar el esquinero Deslice el cepillo por el extremo del tubo o encájelo en el mango.
CUIDADO Y LIMPIEZA Siga siempre todas las precauciones de seguridad a la hora de limpiar y utilizar la aspiradora. Depósito y separador de polvo Cuando no vaya a utilizarla, guarde la aspiradora levantada o sobre sus ruedas. Inserte el clip del cabezal en su ranura en la parte inferior de la aspiradora y en el lateral del cuerpo. El depósito de polvo y el separador de polvo están formados de varios componentes clave.
CUIDADO Y LIMPIEZA Vaciar el depósito de polvo ADVERTENCIA Peligro de descarga eléctrica y de lesiones personales. Desconecte el cable de alimentación de la toma de corriente antes de realizar el mantenimiento de la aspiradora. Existe el riesgo de descarga eléctrica y de lesiones personales. Limpieza del depósito Para un funcionamiento óptimo, limpie el depósito regularmente. Para limpiar el depósito de polvo: 1. Extraiga el depósito de polvo de la aspiradora. 2. Limpie el depósito de polvo y su tapa.
CUIDADO Y LIMPIEZA Limpiar el pre filtro de espuma. ESPAÑOL PRECAUCIÓN 3. Abra la tapa del separador de polvo tirando de la palanca de la tapa y deseche la suciedad. Un filtro húmedo podría causar daños permanentes en la aspiradora. Compruebe que los filtros están completamente secos antes de reinstalarlos. Para un funcionamiento óptimo, compruebe los filtros cada 2 meses y límpielos cuando sea necesario. Para limpiar el pre filtro de espuma: 1.
CUIDADO Y LIMPIEZA 5. Sacuda el exceso de polvo o los restos y limpie el pre filtro y el marco del filtro con agua limpia. Limpiar el filtro HEPA Para un uso óptimo, compruebe el filtro cada 6 meses y límpielo cuando sea necesario. Limpiar el filtro HEPA 1. Abra la tapa del filtro HEPA. Palanca 6. Deje que se sequen por completo alejados de la luz solar. Tapa del filtro de escape 2. Extraiga el filtro HEPA pulsando el botón. Botón NUNCA utilice la aspiradora con los filtros o los componentes húmedos.
CUIDADO Y LIMPIEZA Eliminar obstrucciones ESPAÑOL ADVERTENCIA 3. Extraiga el separador de polvo y compruebe la entrada del separador donde ésta se conecta con la aspiradora. Existe riesgo de descarga eléctrica y de lesiones personales. Desenchufe siempre la aspiradora antes de realizar el mantenimiento. Existe riesgo de descarga eléctrica y de lesiones personales. Si advierte una disminución de la potencia de succión, compruebe primero los filtros como se describe en las págs. 15 y 16.
CUIDADO Y LIMPIEZA Limpieza del exterior de la aspiradora ADVERTENCIA Existe el riesgo de descargas eléctricas y de lesiones personales. Desenchufe siempre la aspiradora antes de realizar el mantenimiento. Existe riesgo de descarga eléctrica y de lesiones personales. Frote el exterior de la aspiradora con un paño húmedo limpio y suave. NO permita que entre agua por las aberturas de la aspiradora. NO lave las piezas ni en el lavavajillas ni en la lavadora.
SOLUCIÓN DE PROBLEMAS Consulte esta tabla para hallar soluciones para problemas de funcionamiento menores. Cualquier tipo de mantenimiento o reparación necesarios que no esté descrito en este Manual del usuario deberá realizarse en un centro de servicio técnico de LGE. Existe el riesgo de descargas eléctricas y de lesiones personales. Desenchufe siempre la aspiradora antes de realizar el mantenimiento. Existe riesgo de descarga eléctrica y de lesiones personales.
LG Customer Information Center 1-800-243-0000 USA, Consumer User 1-888-865-3026 USA, Commercial User 1-888-542-2623 CANADA Register your product Online! www.lg.