ENGLISH ESPAÑOL OWNER’S MANUAL FRENCH DOOR REFRIGERATOR Please read this owner’s manual thoroughly before operating and keep it handy for reference at all times. Model Name/Nombre del modelo**=color number/número de color GF24BG* LFC22770** P/No.: MFL67851601-1 LFC24770** LFC24786** www.lg.
TABLE OF CONTENTS 3 4 PRODUCT FEATURES IMPORTANT SAFETY INSTRUCTIONS 26 HOW TO USE 26 Before Use 27 Control Pad 27 - Control Pad Features 28 Automatic Icemaker ENGLISH TABLE OF CONTENTS 7 COMPONENTS 28 - Turning the Automatic Icemaker On or Off 7 Refrigerator Exterior 29 - When You Should Turn the Icemaker Off Refrigerator Interior 29 - Normal Sounds You May Hear 29 - Preparing for Vacation 30 Storing Food 30 - Food Preservation Location 31 - Food Storage Tips 31 - Storing
3 PRODUCT FEATURES ENGLISH PRODUCT FEATURES * Depending on the model, some of the following functions may not be available. DOOR ALARM The Door Alarm function is designed to prevent refrigerator malfunctioning that could occur if a refrigerator door or freezer drawer remains open. If a refrigerator door or freezer drawer is left open for more than 60 seconds, a warning alarm sounds at 30 second intervals.
IMPORTANT SAFETY INSTRUCTIONS 4 READ ALL INSTRUCTIONS BEFORE USING THE APPLIANCE. This guide contains many important safety messages. Always read and obey all safety messages. This is the safety alert symbol. It alerts you to safety messages that inform you of hazards that can kill or hurt you or others, or cause damage to the product. All safety messages will be preceded by the safety alert symbol and the hazard signal word WARNING or CAUTION.
5 IMPORTANT SAFETY INSTRUCTIONS ENGLISH READ ALL INSTRUCTIONS BEFORE USING THE APPLIANCE. To reduce the risk of fire, electric shock, or personal injury when using your product, basic safety precautions should be followed, including the following: This product is not to be used for special purposes such as the storage of medicine or test materials or for use on ships, etc. Unplug the power plug before cleaning or repairing the refrigerator.
IMPORTANT SAFETY INSTRUCTIONS To reduce the risk of fire, electric shock, or personal injury when using your product, basic safety precautions should be followed, including the following: CAUTION Installation The refrigerator must be properly installed in accordance with the Installer Instructions that were taped to the front of the refrigerator. Be careful when you unpack and install the refrigerator. Immediately dispose of plastic and other packing materials out of the reach of children.
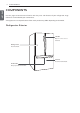
7 COMPONENTS ENGLISH COMPONENTS Use this page to become more familiar with the parts and features of your refrigerator. Page references are included for your convenience. *The appearance and specifications of the actual product may differ depending on the model. Refrigerator Exterior Handle Opens and closes the door. Refrigerator Preserves food. Freezer Ez Handle Easily open the freezer door. Preserves frozen food.
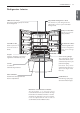
COMPONENTS 8 Refrigerator Interior ENGLISH LED interior lamps The interior lamps light up the inside of the refrigerator. Adjustable Refrigerator Shelf The shelves in your refrigerator are adjustable to meet your individual storage needs. Dairy Product Bin U s e d t o p r e s e r ve dairy products. Fixed Door Bin Modular Door Bins Used to preserve ch i l l e d fo o d o r drinks. Interchangeable bins can be arranged to suit your storage needs.
9 INSTALLATION ENGLISH INSTALLATION Installation Overview Please read the following installation instructions first after purchasing this product or transporting it to another location.
INSTALLATION 10 Specifications Dimensions Width 32 7/8 in. (833 mm) Width 29 3/4 in. (755.65 mm) Net weight Width 32 7/8 in. (833 mm) Width 29 3/4 in. (755.65 mm) 32 7/8" (W) X 35 1/2" (D) X 69 7/8" (H), 46" (D w/ door open) 833 mm (W) X 901 mm (D) X 1775.5 mm (H), 1168.4 mm (D w/ door open) 29 3/4" (W) X 34 7/8" (D) X 68 1/2" (H), 44 3/4" (D w/ door open) 755.65 mm (W) X 885.825 mm (D) X 1739.9 mm (H), 1136.65 mm (D w/ door open) 253 lb. (115 kg) 237.4 lb. (107.
11 INSTALLATION Unpacking Your Refrigerator ENGLISH WARNING Use two or more people to move and install the refrigerator. Failure to do so can result in back or other injury. Your refrigerator is heavy. When moving the refrigerator for cleaning or service, be sure to protect the floor. Always pull the refrigerator straight out when moving it. Do not wiggle or walk the refrigerator when trying to move it, as floor damage could occur.
INSTALLATION Ambient Temperature Measuring the Clearances Too small of a distance from adjacent items may result in lowered freezing capability and increased electricity consumption charges. Allow at least 24 inches (61 cm) in front of the refrigerator to open the doors, and at least 2 inches (5.08 cm) between the back of the refrigerator and the wall.
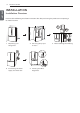
13 INSTALLATION ENGLISH Removing/Assembling the Freezer Drawer Handle Removing/Assembling the Doors and Drawers Removing the Handle When it is necessary to move the refrigerator through a narrow opening, removing the doors is the recommended procedure. 1 Loosen the set screws located on the lower side of the handle with a 1/8 in. Allen wrench and remove the handle. 2 Loosen the mounting fasteners that connect to the freezer drawer and handle using a 1/4 in.
INSTALLATION 14 Removing the Left Refrigerator Door . Lift the hook (not visible), located at the bottom . with a flatof the front side of the cover head screwdriver. 4 Remove the three bolts using a 10mm or 13/32-inch socket wrench and lift off the top hinge. Set parts aside. 2 2 Disconnect the wire harness 3 R emove the grounding screw 3. 4. 1 CAUTION When lifting the hinge, be careful that the door does not fall forward. 5 Lift the door from the middle hinge pin and remove the door.
15 INSTALLATION Removing the Right Refrigerator Door ENGLISH 1 R emove the top hinge cover screws . Lift the hook (not visible), located at the bottom . with a flatof the front side of the cover head screwdriver. 3 Lift the door from the middle hinge pin and remove the door. 2 CAUTION 2 Remove the three bolts using a 10mm or 13/32-inch socket wrench and lift off the top hinge. Set parts aside. CAUTION When lifting the hinge, be careful that the door does not fall forward.
INSTALLATION 16 ENGLISH Assembling the Right Refrigerator Door Install the right-side door first. 1 Make sure that the plastic sleeve is inserted in the bottom of the door. Lower the door onto the middle hinge pin as shown in the figure. 4 Replace the hinge cover tighten the cover screws 2 2 Align the door with the cabinet 3 Line up the holes in the top hinge with the holes in the top of the refrigerator. Insert and tighten the three bolts in the hinge. . Insert and .
17 INSTALLATION ENGLISH Assembling the Left Refrigerator Door Install the left refrigerator door after the right door is installed. 1 Make sure that the plastic sleeve is inserted in the bottom of the door. Inst all the refrigerator door onto the middle hinge. 4 Replace the grounding screw 5 Reconnect the wire harness 6 Replace the hinge cover tighten the cover screws 3. 4. 5 . Insert and 6.
INSTALLATION 18 Removing the Freezer Drawers 4 Slide out the bar. CAUTION Use two or more people to remove and install the freezer drawer. Failure to do so can result in back or other injury. Do not hold the handle when removing or replacing the drawer. The handle may come off, causing personal injury. Be careful of sharp hinges on both sides of the drawer. When you lay the drawer down, be careful not to damage the floor. Do not sit or stand on the freezer drawer.
19 INSTALLATION Assembling the Freezer Drawers ENGLISH The top, middle and bottom drawers are all assembled in the same way. 1 3 Reinstall the bar in the drawer supports. Using t wo hands, pull out both rails simultaneously until they are fully extended. 4 Lower the door into its final position and tighten the screws located on both sides. 2 Grasp the drawer on each side and hook the 3 drawer supports into the rail tabs located on both sides.
INSTALLATION 20 Connecting the Water Line This water line installation is not covered by the refrigerator warranty. Follow these instructions carefully to minimize the risk of expensive water damage. Water hammer (water banging in the pipes) in house plumbing can cause damage to refrigerator parts and can lead to water leakage or flooding. Call a qualified plumber to correct water hammer before installing the water supply line to the refrigerator.
21 INSTALLATION ENGLISH If your existing copper water line has a flared fitting at the end, you will need an adapter (available at plumbing supply stores) to connect the water line to the refrigerator OR you can cut off the flared fitting with a tube cutter and then use a compression fitting. Shutoff valve to connect to the cold water line. The shutoff valve should have a water inlet with a minimum inside diameter of 5/32 in. at the point of connection to the COLD WATER LINE.
INSTALLATION 22 Water Line Installation Instructions When using any electrical device (such as a power drill) during installation, be sure the device is battery powered, double insulated or grounded in a manner that will prevent the hazard of electric shock. I n s t a l l t h e s h u t o ff va l ve o n t h e n e a r e s t frequently used drinking water line. 1 SHUT OFF THE MAIN WATER SUPPLY Turn on the nearest faucet to relieve the pressure on the line.
23 INSTALLATION 7 CONNECT THE TUBING TO THE VALVE 10 TURN THE WATER ON AT THE ENGLISH Place the compression nut and ferrule (sleeve) for copper tubing onto the end of the tubing and connect it to the shutoff valve. Make sure the tubing is fully inserted into the valve. Tighten the compression nut securely. Saddle-Type Shutoff Valve SHUTOFF VALVE Tighten any connections that leak.
INSTALLATION 24 Leveling and Door Alignment 1 Plug in the refrigerator. Leveling After installing, plug the refrigerator’s power cord into a 3-prong grounded outlet and push the refrigerator into the final position. Your refrigerator has two front leveling legs— one on the right and one on the left. Adjust the legs to alter the tilt from front-to-back or side-toside.
25 INSTALLATION ENGLISH Door Alignment (Type 1) Door Alignment (Type 2) Both the left and right refrigerator doors have an adjustable nut, located on the bottom hinge, to raise and lower them to align properly. If the space between your doors is uneven, follow the instructions below to align the doors evenly: If the spacing between the doors is uneven, follow the instructions below to align them: Use the wrench (included with the Owner’s Manual) to turn the nut in the door hinge to adjust the height.
HOW TO USE 26 Before use Clean the refrigerator. Clean your refrigerator thoroughly and wipe off all dust that accumulated during shipping. CAUTION Do not scratch the refrigerator with a sharp object or use a detergent that contains alcohol, a flammable liquid or an abrasive when removing any tape or adhesive from the refrigerator,. Do not peel off the model or serial number label or the technical information on the rear surface of the refrigerator.
27 HOW TO USE Control Pad ENGLISH * Depending on the model, some of the following functions may not be available. Control Pad Features LED Display Indicator Control Button Refrigerator Temperature Indicates the set temperature of the refrigerator compartment in Celsius (°C) or Fahrenheit (°F). Freezer Temperature Indicates the set temperature of the freezer compartment in Celsius (°C) or Fahrenheit (°F).
HOW TO USE 28 ENGLISH Automatic Icemaker (Freezer Room) * Depending on the model, some of the following functions may not be available. Ice is made in the automatic icemaker and sent to the dispenser. The icemaker will produce 12 cubes per cycle—approximately 120 cubes in a 24-hour period, depending on freezer compartment temperature, room temperature, number of door openings and other operating conditions. It takes about 12 to 24 hours for a newly installed refrigerator to begin making ice.
29 HOW TO USE Automatic Icemaker (continued) ENGLISH CAUTION The first ice produced may include particles or odor from the water supply line or the water tank. Throw away the first few batches of ice (about 24 cubes). This is also necessary if the refrigerator has not been used for a long time. Never store beverage cans or other items in the ice bin for the purpose of rapid cooling. Doing so may damage the icemaker or the containers may burst.
HOW TO USE 30 Storing Food Each compartment inside the refrigerator is designed to store different types of food. Store your food in the optimal space to enjoy the freshest taste. Dairy product bin Vegetable storage (Crispers) Preserve vegetables and fruit. Adjustable refrigerator shelf Adjustable shelves to meet your individual storage needs. Ice bin Stores ice. Durabase ® Largest storage space in the freezer.
31 HOW TO USE Food Storage Tips ENGLISH * The following tips may not be applicable depending on the model. Wrap or store food in the refrigerator in airtight and moisture-proof material unless otherwise noted. This prevents food odor and taste transfer throughout the refrigerator. For dated products, check date code to ensure freshness. Food How To Butter or Margarine Keep opened butter in a covered dish or closed compartment. When storing an extra supply, wrap in freezer packaging and freeze.
HOW TO USE 32 Storing Frozen Food (continued) Successful freezing depends on correct packaging . When you close and seal the package, it must not allow air or moisture in or out. If it does, you could have food odor and taste transfer throughout the refrigerator and could also dry out frozen food.
33 HOW TO USE ENGLISH Detaching and Assembling the Storage Bins Pantry Drawer and Humidity Controlled Crispers To Remove the Glass (Pantry drawer not shown for clarity) Lift up the glass under the crisper cover, and pull up and out. To remove the Humidity Controlled Crispers pull out the Crisper or Pantry Drawer to full extension, lift the front up, and pull straight out. and the Pantry Drawer, Door Bins The door bins are removable for easy cleaning and adjustment.
HOW TO USE 34 The shelves in your refrigerator are adjustable to meet your individual storage needs. Your model may have full or split shelves. Adjusting the shelves to fit items of different heights will make finding the exact item you want easier. Doing so will also reduce the amount of time the refrigerator door is open which will save energy. Detaching the Shelf Tilt up the front of the shelf and then lift the shelf straight up. Pull the shelf out.
35 MAINTENANCE MAINTENANCE ENGLISH Cleaning Both the refrigerator and freezer sections defrost automatically; h about once a month to prevent odors. Wipe up spills immediately. Always unplug the refrigeration before cleaning. General Cleaning Tips Unplug refrigerator or disconnect power. Remove all removable parts, such as shelves, crispers, etc. Use a clean sponge or soft cloth and a mild detergent in warm water. Do not use abrasive or harsh cleaners.
SMART DIAGNOSIS 36 Should you experience any problems with your refrigerator, it has the capability of transmitting data via your telephone to the LG ser vice center. This gives you the capability of speaking directly to our trained specialists. The specialist records the data transmitted from your machine and uses it to analyze the issue, providing a fast and effective diagnosis. If you experience problems with your refrigerator, call 1-800-243- 0000.
37 TROUBLESHOOTING ENGLISH TROUBLESHOOTING Review the Troubleshooting section before calling for service; doing so will save you both time and money. P r oble m Refrigerator and Freezer section are not cooling. Cooling System runs too much. P os s ible C aus e s S olutions The refrigerator control is set to OFF (some models). Turn the control ON. Refer to the Setting the Controls section for proper temperature settings. Refrigerator is in the defrost cycle.
TROUBLESHOOTING P r oble m S olutions Refrigerator was recently installed. It may take up to 24 hours for each compartment to reach the desired temperature. The air vents are blocked. Cold air circulates from the freezer to the fresh food section and back again through air vents in the wall dividing the two sections. Locate air vents by using your hand to sense airflow and move all packages that block vents and restrict airflow. Rearrange items to allow air to flow throughout the compartment.
39 TROUBLESHOOTING P r oble m ENGLISH Interior moisture buildup. Food is freezing in the refrigerator compartment. Frost or ice crystals form on frozen food (outside of package). Refrigerator or Freezer section is too cold. P os s ible C aus e s S olutions Doors are opened often or for long periods of time. When the doors are opened often or for long periods of time, warm, humid air enters the compartment. This raises the temperature and moisture level within the compartment.
TROUBLESHOOTING 40 P r oble m P os s ible C aus e s S olutions Condensation from food with a high water content has frozen inside of the food package. This is normal for food items with a high water content. Food has been left in the freezer for a long period of time. Do not store food items with high water content in the freezer for a long period of time. Icemaker is not making enough ice. Demand exceeds ice storage capacity.
41 TROUBLESHOOTING P r oble m ENGLISH Icemaker is not making enough ice (continued). Ice has bad taste or odor. Icemaker is making too much ice. P os s ible C aus e s S olutions Refrigerator was recently installed or icemaker recently connected. It may take up to 24 hours for each compartment to reach the desired temperature and for the icemaker to begin making ice. Icemaker not turned on. Locate the icemaker ON/OFF switch and confirm that it is in the ON (I) position.
TROUBLESHOOTING 42 P r oble m P os s ible C aus e s S olutions The defrost control will click when the automatic defrost cycle begins and ends. The thermostat control (or refrigerator control on some models) will also click when cycling on and off. Normal Operation Rattling Rattling noises may come from the flow of refrigerant, the water line on the back of the unit, or items stored on top of or around the refrigerator. Normal Operation Refrigerator is not resting solidly on the floor.
43 TROUBLESHOOTING ENGLISH P r oble m Doors will not close correctly or pop open. P os s ible C aus e s S olutions Food packages are blocking the door open. Rearrange food containers to clear the door and door shelves. Ice bin, crisper cover, pans, shelves, door bins, or baskets are out of position. Push bins all the way in and put crisper cover, pans, shelves and baskets into their correct positions. See the Using Your Refrigerator section for more information.
WARRANTY 44 LG ELECTRONICS U.S.A., INC. LG REFRIGERATOR LIMITED WARRANTY - U.S.A. WARRANTY PERIOD Sealed System (Condenser, Dryer, Connecting Tube, Refrigerant and Evaporator) Refrigerator Linear Compressor One (1) year from the date One (1) year from the date Seven (7) years from Ten (10) years from the date of of original retail purchase. of original retail purchase. the date of original retail original retail purchase. purchase.
45 WARRANTY LG ELECTRONICS CANADA, INC. LG REFRIGERATOR LIMITED WARRANTY - Canada ENGLISH WARRANTY: Should your LG Refrigerator (“Product”) fail due to a defect in material or workmanship under normal home use during the warranty period set forth below, LG Canada will at its option repair or replace the Product upon receipt of proof of original retail purchase.
NOTES
NOTES
1 ESPAÑOL MANUAL DEL USUARIO REFRIGERADOR DE PUERTA FRANCESA Lea cuidadosamente este manual del usuario antes de poner en funcionamiento el refrigerador, y téngalo a mano de referencia en todo momento. www.lg.
2 TABLA DE CONTENIDOS TABLA DE CONTENIDOS 3 FUNCIONES DEL PRODUCTO 24 Nivelación y alineación de las puertas 24 - Nivelación INSTRUCCIONES IMPORTANTES DE SEGURIDAD 25 - Alineación de las puertas 26 INSTRUCCIONES DE USO 7 COMPONENTES 26 Antes de usar 7 Parte exterior del refrigerador 27 Panel de control 8 Parte interior del refrigerador 27 - Funciones del panel de control 28 Máquina de hielo automática 9 INSTALACIÓN 28 - Encendido y apagado de la máquina de hielo automática 9 In
FUNCIONES DEL PRODUCTO 3 FUNCIONES DEL PRODUCTO * Dependiendo del modelo, algunas de las siguientes funciones puede no estar disponible. ALARMA DE LA PUERTA CAJONES CON CONTROL DE HUMEDAD Los cajones con control de humedad están diseñados para ayudar a mantener las frutas y las verduras frescas. Para controlar la cantidad de humedad en los cajones, ajuste las configuraciones entre Low (Bajo) y High (Alto).
4 INSTRUCCIONES IMPORTANTES DE SEGURIDAD INSTRUCCIONES IMPORTANTES DE SEGURIDAD LEA TODAS LAS INSTRUCCIONES ANTES DE UTILIZAR EL ELECTRODOMÉSTICO. Este manual contiene muchos mensajes de seguridad importantes. Lea y cumpla siempre todos los mensajes de seguridad. Este es el símbolo de alerta de seguridad. Le avisa de mensajes de seguridad que le informan de peligros de muerte o lesiones para usted o los demás, o que puedan dañar el producto.
INSTRUCCIONES IMPORTANTES DE SEGURIDAD 5 LEA TODAS LAS INSTRUCCIONES ANTES DE UTILIZAR EL ELECTRODOMÉSTICO. Para reducir el riesgo de incendio, descarga eléctrica o lesiones personales al utilizar el producto, se deben respetar una serie de precauciones básicas de seguridad, entre las que se incluyen las siguientes: Este producto no debe ser utilizado para fines especiales, como ser para almacenar medicamentos o materiales de prueba, usar en barcos, etc.
6 INSTRUCCIONES IMPORTANTES DE SEGURIDAD LEA TODAS LAS INSTRUCCIONES ANTES DE UTILIZAR EL ELECTRODOMÉSTICO.
COMPONENTES 7 COMPONENTES Use esta página para familiarizarse con los componentes y funciones del refrigerador. Para su comodidad, se incluyen referencias a las páginas. * La apariencia y especificaciones del producto real pueden diferir dependiendo del modelo. Parte exterior del refrigerador Abre y cierra la puerta Refrigerador Conserva los alimentos. Congelador Manija Ez Permite abrir fácilmente la puerta del congelador. Conser va los alimentos congelados.
8 COMPONENTES Parte interior del refrigerador Lámparas interiores LED Las lámparas interiores iluminan el interior del refrigerador. Estante de refrigerador ajustable Los estantes del refrigerador son ajustables para satisfacer sus necesidades personales de almacenamiento. ESPAÑOL Bandeja para lácteos Permite conservar los productos lácteos. Bandejas de puerta modulares Bandeja de puerta fija Las bandejas intercambiables pueden acomodarse para adaptarse a sus necesidades de almacenamiento.
INSTALACIÓN 9 INSTALACIÓN Instrucciones generales de instalación Luego de comprar este producto o trasladarlo a otro lugar, lea primero las siguientes instrucciones de instalación. ESPAÑOL 1 Desembalaje del refrigerador 2 Cómo elegir la ubicación más adecuada 4 Conexión del suministro de agua y del conducto de agua 5 Nivelación y alineación de las puertas 3 Montaje y desmontaje 32 7/8" (W) X 35 1/2" (D) X 69 7/8" (H), 46" (D w/ door open) 833 mm (W) X 901 mm (D) X 1775.5 mm (H), 1168.
10 INSTALACIÓN Especificaciones La apariencia y especificaciones indicadas en este manual pueden variar debido a las constantes mejoras en el producto. Dimensiones Ancho 32 7/8 in. (833 mm) ESPAÑOL Ancho 29 3/4 in. (755,65 mm) Peso neto Ancho 32 7/8 in. (833 mm) Ancho 29 3/4 in. (755,65 mm) 32 7/8" (ancho) X 35 1/2" (prof.) X 69 7/8" (alto), 46" (prof. c/ puerta abierta) 833 mm (ancho) X 901 mm (prof.) X 1775,5 mm (alto), 1168,4 mm (prof. c/puerta abierta) 29 3/4" (ancho) X 34 7/8" (prof.
INSTALACIÓN Desembalaje del refrigerador ADVERTENCIA El desplazamiento e instalación del refrigerador deben realizarse entre dos o más personas. Si no se respeta esta advertencia, podrá sufrir lesiones en la espalda o de otro tipo. Su refrigerador es pesado. Al desplazarlo para su limpieza o mantenimiento, Antes de su uso, retire la cinta adhesiva y todas las etiquetas temporales del refrigerador.
12 INSTALACIÓN Temperatura ambiente Instale este electrodoméstico en una zona donde la temperatura esté entre los 13°C (55°F) y 43°C (110°F). Si la temperatura alrededor del electrodoméstico es demasiado baja o demasiado alta, la capacidad de refrigeración se verá gravemente afectada. Cómo medir la distancia de separación mínima ENGLISH Una distancia demasiado pequeña con los elementos adyacentes puede dar como resultado una reducción de la capacidad de congelación y un aumento del consumo eléctrico.
INSTALACIÓN Montaje y desmontaje de la manija del cajón del congelador Montaje y desmontaje de las puertas y cajones Desmontaje de la manija Se recomienda desmontar las puertas cuando sea necesario trasladar el refrigerador a través de una abertura angosta. 1 Afloje los tornillos de presión ubicados en la parte inferior de la manija con una llave Allen de 3,1 mm (1/8 pulg.) y retire la manija.
14 INSTALACIÓN Desmontaje de la puerta izquierda del refrigerador 1 R etire los tornillos de la cubierta de la bisagra superior . Levante el enganche (no visible), ubicado en la parte inferior del lado . con un destornillafrontal de la cubierta dor plano. ESPAÑOL 2 2 Desconecte el mazo de cables 4 Retire los tres pernos con una llave de tubo de 10mm o 13/32 pulg. y extraiga hacia arriba la bisagra superior. Separe las piezas.
INSTALACIÓN Desmontaje de la puerta derecha del refrigerador 1 R etire los tornillos de la cubierta de la bis- 15 3 Levante la puerta del pasador de la bisagra central y retire la puerta. . Levante el enganche (no agra superior visible), ubicado en la parte inferior del lado . con un destornillafrontal de la cubierta dor plano. PRECAUCIÓN Coloque la puerta, con el interior hacia arriba, sobre una superficie que no raye. 2 Retire los tres pernos con una llave de tubo de 10mm o 13/32 pulg.
16 INSTALACIÓN Montaje de la puerta derecha del refrigerador Instale primero la puerta del lado derecho. 1 Asegúrese de que el manguito plástico esté colocado en la parte inferior de la puerta. Baje la puerta sobre el pasador de la bisagra central, tal como se muestra en la imagen. 4 Vuelva a colocar la cubierta de la bisagra Inserte y apriete los tornillos de la cubierta . 2 ESPAÑOL 2 Alinee la puerta con el cuerpo del refrigerador.
INSTALACIÓN 17 Montaje de la puerta izquierda del refrigerador Instale la puerta izquierda del refrigerador luego de instalar la puerta derecha. 1 Asegúrese de que el manguito plástico esté colocado en la parte inferior de la puerta. Instale la puerta del refrigerador sobre la bisagra central. 4 Retire el tornillo de conexión a tierra 5 Reconecte el mazo de cables 3. 4. 6 Vuelva a colocar la cubierta de la bisagra 6 5 2 Alinee la puerta con el cuerpo del refrigerador.
18 INSTALACIÓN Desmontaje de los cajones del congelador Todos los cajones superior, medio e inferior se retiran del mismo modo. En las figuras siguientes, no se muestra el cajón extraíble situado por encima del cajón del congelador para que la imagen sea más clara. 4 Deslice la barra hacia afuera. PRECAUCIÓN ESPAÑOL El desplazamiento e instalación del cajón del congelador deben realizarse entre dos o más personas.
INSTALACIÓN 19 Montaje de los cajones del congelador Todos los cajones superior, medio e inferior se colocan del mismo modo. 1 3 Vuelva a colocar la barra en los soportes del cajón. Con ambas manos, tire hacia afuera ambos rieles de manera simultánea hasta que se extiendan por completo. apriete los tornillos ubicados a ambos lados. 2 Sujete el cajón por cada lado y enganche los 3 soportes del mismo en las pestañas de los rieles ubicadas en ambos lados.
20 INSTALACIÓN Conexión de los conductos de agua Antes de empezar Esta instalación del conducto de agua no está cubierta por la garantía del refrigerador. Siga estas instrucciones con cuidado para minimizar el riesgo de costosos daños debidos al agua. ESPAÑOL El golpe de ariete (golpeteo del agua en las tuberías) en la fontanería de la casa podría dañar componentes del refrigerador y provocar una fuga o una inundación de agua.
INSTALACIÓN NOTA No se debe usar una válvula de agua de tipo de montura autoperforante. ADVERTENCIA Riesgo de descarga eléctrica: Si usa un dispositivo eléctrico (como un taladro) durante la instalación, asegúrese de que esté alimentado por batería y que tenga doble aislamiento o que esté correctamente conectado a tierra de manera que evite el riesgo de una descarga eléctrica.
22 INSTALACIÓN Instrucciones para la instalación del conducto de agua ADVERTENCIA Si usa un dispositivo eléctrico (como un taladro) durante la instalación, asegúrese de que esté alimentado por batería y que tenga doble aislamiento o que esté correctamente conectado a tierra de manera que evite el riesgo de una descarga eléctrica. ESPAÑOL Instale la válvula de corte cerca del conducto de agua potable que más se usa. 1 .
INSTALACIÓN 7 . CONECTE LA TUBERÍA A LA VÁLVULA 10 ABRA EL PASO DE AGUA EN LA Coloque la tuerca de compresión y la abrazadera para la tubería de cobre en el extremo de la tubería y conéctela a la válvula de corte. Asegúrese de que la tubería está completamente insertada en la válvula. Apriete la tuerca de compresión con fuerza. Saddle-Type Shutoff Valve VÁLVULA DE CORTE Apriete las conexiones que goteen.
24 INSTALACIÓN Encendido 1 Enchufe el refrigerador. Nivelación y alineación de las puertas Nivelación Tras la instalación, enchufe el cable de alimentación del refrigerador en una toma de corriente de 3 clavijas con conexión a tierra y empuje el refrigerador hasta su posición definitiva. ESPAÑOL PRECAUCIÓN Conecte a una toma de corriente de potencia nominal. Haga que un electricista certificado verifique la toma de corriente y cableado para una conexión a tierra adecuada.
INSTALACIÓN 25 Alineación de las puertas (Tipo 1) Alineación de las puertas (Tipo 2) Ambas puertas del refrigerador tienen una tuerca ajustable, ubicada en la bisagra inferior, que puede levantar y bajar para alinearlas correctamente. Si el espacio entre las puertas es desigual, siga estas instrucciones para alinear las puertas de forma uniforme: Si el espacio entre sus puertas es desigual, siga las siguientes instrucciones para la alineación de las puertas: 2.
26 INSTRUCCIONES DE USO INSTRUCCIONES DE USO Antes de usar Limpie el refrigerador. Limpie bien el refrigerador y quite todo el polvo acumulado durante el transporte. PRECAUCIÓN ESPAÑOL No raye el refrigerador con un objeto punzante ni utilice un detergente que contenga alcohol, un líquido inflamable o un abrasivo cuando retire cualquier cinta adhesiva o pegamento del mismo.
INSTRUCCIONES DE USO 27 Panel de control * Dependiendo del modelo, algunas de las siguientes funciones puede no estar disponible. Funciones del panel de control LED Display Indicator Temperatura del refrigerador Indica la temperatura del compartimiento del refrigerador en grados Celsius (°C) o Fahrenheit (°F). Temperatura del congelador Indica la temperatura del compartimiento del congelador en grados Celsius (SDgrC) o Fahrenheit (SDgrF).
28 INSTRUCCIONES DE USO Máquina de hielo automática (Compartimiento del congelador) * Dependiendo del modelo, algunas de las siguientes funciones puede no estar disponible. ESPAÑOL El hielo se fabrica en la máquina de hielo automática y se envía al dispensador.
INSTRUCCIONES DE USO Máquina de hielo automática (continuación) PRECAUCIÓN Cuándo se debe apagar la máquina de hielo Cuando el suministro de agua vaya a estar interrumpido durante varias horas. Cuando se retire el depósito de hielo durante más de uno o dos minutos. Cuando no se vaya a usar el refrigerador durante varios días. NOTA Se debe vaciar el depósito de hielo cuando el interruptor de on/off (encendido/apagado) de la máquina de hielo cambie a la posición OFF .
30 INSTRUCCIONES DE USO Almacenamiento de alimentos Lugar de conservación de los alimentos Cada compartimiento del refrigerador está diseñado para almacenar diferentes tipos de alimentos. Almacene sus alimentos en el espacio óptimo para disfrutar de los sabores más frescos. Bandeja para lácteos ESPAÑOL Almacenamiento de vegetales (cajones) Conservan los vegetales y las frutas. Depósito de hielo Almacena hielo. Durabase ® Es el espacio de almacenamiento más grande del congelador.
INSTRUCCIONES DE USO Sugerencias para el almacenamiento de alimentos * Las siguientes sugerencias podrían no ser de aplicación en su caso dependiendo del modelo del refrigerador. Alimento Mantequilla o margarina Queso Cómo Conserve la mantequilla abierta en un plato cubierto o en un compartimiento cerrado. Cuando almacene una cantidad extra, envuélvala en una bolsa para congelar y congélela. Almacene en el envoltorio original hasta que esté listo para consumirlo.
32 INSTRUCCIONES DE USO Almacenamiento de alimentos congelados (continuación) Cajones con control de humedad y Glide'N'Serve Empaquetamiento Cajón con control de humedad Una congelación correcta depende de un empaquetamiento adecuado. Cuando se cierra y sella el paquete, no debe dejar que entre ni salga aire ni humedad. Si eso sucede, es posible que el olor y el sabor de los alimentos se transfieran por todo el refrigerador y también se podrían resecar los alimentos congelados.
INSTRUCCIONES DE USO Montaje y desmontaje de los depósitos de almacenamiento Cajón con control de temperatura y cajones con control de humedad 33 Para quitar el vidrio (Para mayor claridad, no se muestra el cajón) Levante el vidrio que está debajo de la cubierta del cajón, y tire del mismo hacia arriba y hacia afuera. Para extraer los cajones con control de humedad y el cajón con control de temperatura, tire Bandejas de puerta Las bandejas de puerta son extraíbles para facilitar su limpieza y ajuste.
34 INSTRUCCIONES DE USO Ajuste de los estantes del refrigerador Los estantes del refrigerador son ajustables para satisfacer sus necesidades personales de almacenamiento. Dependiendo del modelo, los estantes pueden ser de vidrio o de rejilla metálica. ESPAÑOL Organizar los estantes para que se ajusten a las diferentes alturas de los artículos hará que le resulte más fácil encontrar lo que busca. Con ello también reducirá el tiempo que permanece la puerta del refrigerador abierta y ahorrará energía.
MANTENIMIENTO 35 MANTENIMIENTO Limpieza Tanto las secciones refrigerador como congelador se descongelan de forma automática; sin embargo, se recomienda limpiar ambas secciones una vez al mes para evitar la aparición de olores. Seque los derrames inmediatamente. Siempre desenchufe el refrigerador antes de limpiarlo. Sugerencias generales de limpieza Para ayudarle a eliminar los olores, puede lavar el interior del refrigerador con una mezcla de bicarbonato sódico y agua templada.
36 DIAGNÓSTICO INTELIGENTE SMART DIAGNOSISTM (DIAGNÓSTICO INTELIGENTE) ESPAÑOL Si tiene algún problema con su refrigerador, puede transmitir datos a través de su teléfono al centro de servicios LG. Esto le otorga la capacidad de hablar directamente con nuestros especialistas capacitados. El especialista registra los datos transmitidos desde su máquina y los utiliza para analizar el problema, brindándole un diagnóstico rápido y efectivo.
SOLUCIÓN DE PROBLEMAS 37 SOLUCIÓN DE PROBLEMAS Consulte la sección Solución de problemas antes de llamar al centro de servicios; hacerlo le hará ahorrar tiempo y dinero. P r oble m a El sistema de refrigeración funciona demasiado. S oluc ione s El control del refrigerador está en posición OFF (apagado) (algunos modelos). Ponga el control en posición ON (encendido). Consulte la sección deAjuste de los controles para ver los ajustes de temperatura apropiados.
38 SOLUCIÓN DE PROBLEMAS P r oble m a La sección de refrigerador o congelador está demasiado cálida. ESPAÑOL La sección de refrigerador o congelador está demasiado fría. C aus as pos ible s S oluc ione s El refrigerador se instaló recientemente. Puede tomar hasta 24 horas para que cada compartimiento alcance la temperatura deseada. Las ventilaciones de aire están bloqueadas.
SOLUCIÓN DE PROBLEMAS P r oble m a Acumulación de humedad en el interior. Se forma escarcha o cristales de hielo sobre los alimentos congelados (fuera del envase). S oluc ione s Las puertas se abren a menudo o durante mucho tiempo. Cuando las puertas se abren a menudo o durante mucho tiempo, el aire cálido y húmedo ingresa en el compartimiento. Esto aumenta la temperatura y el nivel de humedad dentro del compartimiento.
40 SOLUCIÓN DE PROBLEMAS P r oble m a C aus as pos ible s S oluc ione s ESPAÑOL Se forma escarcha o cristales de hielo sobre los alimentos congelados (dentro del envase sellado). La condensación de los alimentos con alto contenido de agua se congeló dentro del envase. Esto es normal para aquellos alimentos que tienen alto contenido de agua. El alimento ha estado en el congelador durante mucho tiempo.
SOLUCIÓN DE PROBLEMAS P r oble m a La máquina de hielo no hace suficiente hielo (continuación). La máquina de hielo está haciendo demasiado hielo. S oluc ione s El refrigerador se instaló recientemente o la máquina de hielo se conectó recientemente. Puede tomar hasta 24 horas para que cada compartimiento alcance la temperatura deseada y para que la máquina de hielo comience a hacer hielo. La máquina de hielo no está encendida.
42 SOLUCIÓN DE PROBLEMAS P r oble m a C aus as pos ible s S oluc ione s El control de descongelamiento hará un chasquido cuando comience y finalice el ciclo de automático de descongelamiento. El control del termostato (o control del refrigerador en algunos modelos) también hará un chasquido al encenderse y apagarse el ciclo.
SOLUCIÓN DE PROBLEMAS P r oble m a Las puertas no se cierran correctamente o se abren. C aus as pos ible s S oluc ione s Reordene los contenedores de alimento para dejar libre la puerta y los estantes. El contenedor de hielo, la tapa del cajón para verduras, las bandejas, los estantes, los contenedores de las puertas o los canastos no están en su posición.
44 GARANTÍA LG ELECTRONICS U.S.A., INC. FRIGORÍFICO LG GARANTÍA LIMITADA - U.S.A. En caso de que su Frigorífico LG (“Producto”) falle por defectos de material o mano de obra bajo circunstancias de uso doméstico normal durante el período de garantía descrito a continuación, LG, a su criterio, reparará o reemplazará el producto.
N05"4
NOTAS
LG Customer Information Center For inquiries or comments, visit www.lg.com or call: 1-800-243-0000 1-888-865-3026 1-888-542-2623 USA, Consumer User USA, Commercial User CANADA Register your product Online! www.lg.