ENGLISH FRANÇAIS ESPAÑOL OWNER’S MANUAL FRENCH DOOR REFRIGERATOR Please read this owner's manual thoroughly before operating and keep it handy for reference at all times. LFX25976** LFX21976** P/NO : MFL63728513 www.lg.
IMPORTANT SAFETY INFORMATION Basic Safety Precautions ........................................3 CFC Disposal ..........................................................4 How to Connect Electricity ......................................5 PARTS AND FEATURES Congratulations on your purchase Special Features .....................................................6 Key Parts and Components ....................................7 and welcome to the LG family.
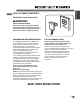
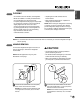
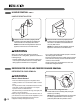
ENGLISH BASIC SAFETY PRECAUTIONS This guide contains many important safety messages. Always read and obey all safety messages. w This is the safety alert symbol. It alerts you to safety messages that inform you of hazards that can kill or hurt you or others or cause damage to the product. All safety messages will be preceded by the safety alert symbol and the hazard signal word DANGER, WARNING, or CAUTION.
BASIC SAFETY PRECAUTIONS (CONT.) • Do not use drier to dry the inside, nor light a candle to remove odor. • Install in places away from the fire such as the place where flammable gas is leaked. • This appliance is not intended for use by persons (including children) with reduced physical, sensory or mental capabilities, or lack of experience and knowledge, unless they have been given supervision or instruction concerning use of the appliance by a person responsible for their safety.
ENGLISH HOW TO CONNECT ELECTRICITY IMPORTANT: Please read carefully. wWARNING Electrical Shock Hazard For personal safety, this appliance must be properly grounded. Have the wall outlet and the circuit checked by a qualified electrician to make sure the outlet is properly grounded. RECOMMENDED GROUNDING METHOD USE OF EXTENSION CORDS The refrigerator should always be plugged into its own individual properly grounded electrical outlet rated for 120 volts, 60 Hz, AC only, and fused at 20 amperes.
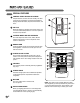
SPECIAL FEATURES 1 CONTROL PANEL LED DISPLAY SCREEN Simple electronic controls are user-friendly. The LED screen shows refrigerator and freezer temperatures, displays water filter status, dispenser information, and more. 1 3 2 2 ICE PLUS 4 When this feature is activated, the freezer section will run at the coldest temperature for a 24- hour period to increase ice production. 3 FILTERED WATER AND ICE DISPENSER The water dispenser offers fresh, chilled, filtered water through the door.
ENGLISH KEY PARTS AND COMPONENTS In addition to the special features and components outlined in the Special Features section, there are several other important components that are referenced in this manual. 1 ADJUSTABLE REFRIGERATOR SHELVING The refrigerator compartment shelves are adjustable to allow flexibility for storage needs. 4 LED INTERIOR LAMPS Refrigerator interior is lit by the LED array.
CHOOSE THE PROPER LOCATION wWARNING Excessive Weight Hazard Two or more people are required when moving and unpacking the appliance. • Store and install the refrigerator where it will not be exposed to temperatures below freezing or exposed to outdoor weather conditions. • Install this appliance in an area where the temperature is between 55°F (13°C) and 110°F (43°C). If the temperature around the appliance is too low or too high, cooling ability may be adversely affected.
• To minimize noise and vibration, the refrigerator MUST be installed on a solidly constructed floor. • To avoid vibration, the unit must be level. If required, adjust the leveling legs to compensate for unevenness of the floor. The front should be slightly higher than the rear to aid in door closing. The leveling legs can be turned easily by pushing against the top of the refrigerator to take the weight off the feet. Turn the leveling legs clockwise to raise the unit or counterclockwise to lower it.
HANDLE REMOVAL (CONT.) HANDLE REINSTALLATION Mounting Fasteners 1 Place the handle on the door by aligning handle footprints to fit mounting fasteners and tighten the set screws with a 2.5 mm (3/32") Allen wrench. NOTE: If the handle mounting fasteners need to be tightened or removed use a 1/4" Allen wrench 2 Place the handle on the door by aligning handle footprints to fit mounting fasteners and tighten the set screws on the bottom of the handle with a 3.1 mm (1/8") Allen wrench.
ENGLISH REFRIGERATOR DOOR AND FREEZER DRAWER REMOVAL (CONT.) REFRIGERATOR DOOR REMOVAL (CONT.) (2) (1) (2) (1) (3) (3) (5) (4) (4) (5) (6) (7) (8) 2 • Open the door. Remove the top hinge cover screw (1 ). • Use a flat blade screwdriver to lift the tabs on the front underside of the cover(2). Lift up the cover. • Remove the cover. Pull out the tube (3). • Disconnect all the wire harnesses (4). • Remove the grounding screw(5) • Rotate hinge lever (6) counterclockwise.
REFRIGERATOR DOOR AND FREEZER DRAWER REMOVAL (CONT.) REFRIGERATOR DOOR REINSTALLATION (4) (5) (3) (2) (1) 1 Install the right-side door first. • Lower the door onto the middle hinge pin as shown. • Make sure the plastic sleeve is inserted in the bottom of the door. 2 • Fit the top hinge (1) over the hinge lever latch (2) and into place. Rotate the lever (3) counterclockwise to secure the hinge. • Hook the tab on the door-switch side of the cover (4) under the edge of the wire opening in the cabinet top.
ENGLISH REFRIGERATOR DOOR AND FREEZER DRAWER REMOVAL (CONT.) REFRIGERATOR DOOR REINSTALLATION (CONT.) Cover Screw Cover (6) 5 • Push the water supply tube (6) into the hole on the top case and pull it through the backplate. 6 Insert the water supply tube into the connector. • Insert the tube at least 5/8 in. (15 mm) into the connector. • Hook the tab on the door-switch side of the cover under the edge of the wire opening in the cabinet top. Position the cover into place.
REFRIGERATOR DOOR AND FREEZER DRAWER REMOVAL (CONT.) FREEZER DRAWER REMOVAL wCAUTION • Care should be taken to avoid product or property damage when removing the freezer door. It maybe necessary to have assistance with the following insturctions. • To avoid damage do not hold the handle when removing the door. It could come off and cause and injury. 1 To remove the freezer drawer, pull the drawer open to full extension. Remove the lower DuraBase ® basket by lifting the basket from the rail system.
ENGLISH REFRIGERATOR DOOR AND FREEZER DRAWER REMOVAL (CONT.) FREEZER DRAWER REINSTALLATION wCAUTION wWARNING • To avoid possible injury or product or property damage, you will need two people to perform the following instructions. It maybe necessary to have assistance with the following instructions. Risk of Child Entrapment • To prevent accidental child and pet entrapment or suffocation risk, DO NOT allow them to play inside of the freezer drawer. • DO NOT step or sit on the freezer drawer.
LIGHT REPLACEMENT To Change Refrigerator Light To Change Freezer Light This model has special LED interior lighting and service should be performed by a qualified technician. 1. Unplug refrigerator power cord form outlet. 2. Use a screwdriver to remove the cover screw. (Save the cover screw) 3. Using a flat instrument, gently pry the lamp cover loose in the front as shown. Rotate downward to remove the rear tabs. 4. Make sure the bulb is cool to the touch. Turn the bulb counterclockwise to remove. 5.
wWARNING Connect to safe drinking water supply only. • The water pressure must be between 20 and 120 p.s.i. (1.4~8.4 kgf/cm2 ) on models without a water filter and between 43 and 121 p.s.i. (3~8.5 kgf/cm2) on models with a water filter. • If water pressure does not reach 20 psi (1.4 kgf/cm2) or falls below, it is necessary to purchase a separate pressure pump for normal automatic icemaker and water dispensing operation. • It is recommended that the total length of the water feed tube does not exceed 26 ft.
CONNECTING THE WATER LINES IMPORTANT: Before connecting the tubing to the water line, unplug the refrigerator or disconnect the power. • Turn off the main water supply and open the nearest faucet to relieve pressure in the line. Opening an outside faucet may help drain water from the line in the house. • Find a 1/2-in. vertical COLD water pipe near the refrigerator. NOTE: A horizontal pipe will work, but the following precaution must be taken: drill on the top of the pipe, not the bottom.
ENGLISH LEVELING THE REFRIGERATOR DOORS wWARNING wCAUTION Electrical Shock Hazard • To avoid possible injury or product or property damage, you will need two people to perform the following instructions. • Be careful when you work with the hinges, base grille, and stopper. You may be injured. • Do not put hands, feet, or metal items into the air vents, base grille, or the bottom of the refrigerator. You may be injured or receive an electrical shock.
LEVELING THE REFRIGERATOR DOORS (CONT.) DOOR ALIGNMENT • Use the wrench (Included with the User Manual) to adjust the bolt in the door hinge to adjust the height. (counter clockwise to raise or clockwise to lower) STARTING Before loading your refrigerator with fresh foods: • Remove tape and any temporary labels from your refrigerator before using. To remove any remaining adhesive residue, rub the area briskly with your thumb, or rub a small amount of liquid dish soap over the adhesive with your fingers.
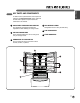
ENGLISH CONTROL PANEL FEATURES For complete details on button functions, see pages 22–25. NOTE: The shape of the buttons may not match your model. 1 LED DISPLAY The LED display shows the temperature settings, dispenser options, water filter, door alarm, and locking status messages. 2 ICE TYPE BUTTON The ICE TYPE button is used to select Cubed Ice or Crushed Ice. 3 FREEZER BUTTON Press the FREEZER button to adjust the temperature in the freezer compartment.
THE LED DISPLAY The LED display shows the temperature settings, dispenser options, water filter, door alarm, and locking status messages. 1 DISPENSER SELECTION INDICATOR 1 Shows Cubed ice or Crushed Ice selection that will be dispensed when the push switch is pressed. 2 2 FREEZER TEMPERATURE Indicates the set temperature of the freezer compartment in Celsius or Fahrenheit.
ENGLISH ADJUSTING THE TEMPERATURES AND DISPLAY Adjust Freezer Temperature Power Saving Mode To adjust the temperature in the freezer compartment, press the FREEZER button to cycle through the the range of available settings. Adjust Refrigerator Temperature To adjust the temperature in the refrigerator compartment, press the REFRIGERATOR button to cycle through the range of available settings.
OPERATING THE DISPENSER DISPENSING CRUSHED ICE Press the ICE TYPE button to illuminate the Crushed Ice icon. Press the push ice switch with a glass or other container and crushed ice will be dispensed. DISPENSING WATER Press the push water switch with a glass or other container and chilled water will be dispensed. When the water switch is pressed, the light will be illuminated. CONTROLLING THE DISPENSER LIGHT DISPENSING CUBED ICE Press the LIGHT/FILTER button to turn the dispenser light on and off.
ENGLISH SETTING THE FUNCTIONS Press the button for the desired function to view and select other settings. SETTING THE DISPENSER LOCK Press and hold the ALARM/LOCK button for three seconds to lock the dispenser and all of the other control panel functions. Press and hold again for 3 seconds to unlock. SETTING THE DOOR ALARM The ALARM/LOCK button also controls the door alarm that sounds three times in 30-second intervals when a compartment door is left open for more than 60 seconds.
SPACEPLUS ICE SYSTEM wCAUTION • Keep hands and tools out of the ice compartment door and dispenser chute. You could break something or injure yourself. The icemaker will stop producing ice when the ice bin is full. If you need more ice, empty the ice bin into the extra ice bin in the freezer compartment so the icemaker can keep producing ice. Shake the ice bin occasionally to level the ice in it.
ENGLISH AUTOMATIC ICEMAKER Ice is made in the automatic icemaker and sent to the dispenser. The automatic icemaker can make 14 ice cubes at a time, above 140 cubes per 24-hour period. This quantity may vary by circumstance, including freezer compartment temperature, room temperature, number of door openings, freezer load, and other operating conditions. • It takes about 12 to 24 hours for a newly installed refrigerator to make ice. • Icemaking stops when the ice storage bin is full.
STORING FOODS • Store fresh food in the refrigerator compartment. • How food is frozen and thawed is an important factor in maintaining freshness and flavor. • Do not store food that spoils easily, such as bananas and melons, at low temperatures. • Allow hot food to cool prior to storing; placing hot food in the refrigerator could spoil other food and lead to higher energy consumption. • When storing food, cover it with vinyl wrap or store in a container with a lid.
ENGLISH LOCATION OF FOODS 1 4 7 5 2 6 3 1 REFRIGERATOR COMPARTMENT SHELVES Store larger food items, platters, and containers on the expansive refrigerator compartment shelves. 2 CRISPERS Store vegetables or fruits with humidity control. 3 FREEZER PULL-OUT DRAWER Store small packed frozen food, or store meat, fish, and chicken after wrapping them with thin foil. Store dry. 5 GALLON STORAGE BINS Store small packed food or beverages such as condiments, salad dressings, baby foods, milk, or juice.
SHELF HEIGHT ADJUSTMENT The shelves in your refrigerator are adjustable to meet your individual storage needs. Storing similar food items together in your refrigerator and adjusting the shelves to fit different heights of items will make finding the exact item you want easier; it will also reduce the amount of time the refrigerator door is open, saving energy. IMPORTANT: Do not clean glass shelves with warm water when they are cold.
ENGLISH REMOVING AND REPLACING COMPONENTS NOTE: When reinstalling components, reverse the order of steps for removal. To prevent damage, never use excessive force when removing or reinstalling components. wCAUTION Dairy Bin Gallon Storage Bins To remove the dairy bin, simply lift it and pull straight out. To replace the dairy bin, slide it into place and push down until it stops. NOTE: The dairy bin will only fit in the top space on the right-hand door.
REMOVING AND REPLACING COMPONENTS (CONT.) Crisper humidity control To remove the glass You can control the amount of humidity in the moisture-sealed crispers. Store vegetables or fruits requiring more or less humidity in separate crispers. Adjust the control to any setting between HIGH and LOW. • LOW lets moist air out of the crisper for best storage of fruits. • HIGH keeps moist air in the crisper for best storage of fresh, leafy vegetables.
ENGLISH REMOVING AND REPLACING COMPONENTS (CONT.) To replace Glide‘N’Serve wCAUTION • When you close the refrigerator door with GLIDE'N'SERVE DRAWER opened, that the drawer could be broken. 1 • To remove, pull the drawer out to full extension. • Lift the front of the drawer up, then pull it straight out. • To install, slightly tilt up the front and insert the drawer into the frame and push it back into place. NOTE: Removing the fixed door bin is recommended to reduce the risk of door bin scratches.
REMOVING AND REPLACING COMPONENTS (CONT.) Tilt-Out Door Basket 1 To remove the tilt-out door basket, press in on the end bracket, then pull up on the end of the basket to remove. 2 To replace the tilt-out door basket, insert the bracket into one side and hook one end of the basket into the bracket. Next, hook the other basket end into the other bracket and push the bracket downward into place. NOTE: Be sure the back of the basket is positioned behind the retention tab on each bracket.
ENGLISH CLEANING THE REFRIGERATOR wWARNING Explosion Hazard • Use nonflammable cleaner. • Failure to do so can result in death, explosion, or fire. Both the refrigerator and freezer sections defrost automatically. However, clean both sections about once a month to prevent odors. Wipe up spills immediately. • Unplug the refrigerator. • Remove all removable parts, such as shelves and crispers. • Use a clean sponge or soft cloth and a mild detergent in warm water. Do not use abrasive or harsh cleaners.
REPLACING THE WATER FILTER It is recommended that you replace the filter approximately every 6 months, when the water filter indicator reaches 0 months, or when the ice and water dispenser noticeably decreases out-put. 1. Remove the old cartridge. 1 Press the push button to open the filter cover. NOTE : Replacing the filter causes a small amount of water (around 1 oz. or 25 cc) to drain. Place a cup under the filter hole to catch any waste. 3 Pull out the filter cartridge.
ENGLISH REPLACING THE WATER FILTER (CONT.) 2. Replace with a new cartridge. 1 Take the new cartridge out of its packing and remove the protective cover from the o-rings. With cartridge ears in the horizontal position, push the new filter cartridge into the manifold hole until it stops. NOTE: After replacing the filter, flush 2.5 gallons through filter before use (flush for approximately 5 minutes). Check the filter for leaks. 2 Firmly lock in the cartridge. The cover will click back into place.
Performance Data Sheet Use Replacement Cartridge: ADQ36006101 Model: LG ADQ36006101-S The concentration of the indicated substances in water entering the system was reduced to a concentration less than or equal to the permissible limit for water leaving the system as specified in NSF/ANSI Standard 42 and Standard 53. System tested and certified by NSF International against NSF/ANSI Standard 42 and Standard 53 for the reduction of substances listed below.
Service Flow 0.5 gpm (1.9 lpm) Water Supply Potable Water Water Pressure 20 -120 psi (138 - 827 kPa) Water Temperature 33°F - 100°F (0.6°C - 38°C) It is essential that the manufacturer’s recommended installation, maintenance and filter replacement requirements be carried out for the product to perform as advertised. Note: While the testing was performed under standard laboratory conditions, actual performance may vary.
State of California Department of Public Health Water Treatment Device Certificate Number 09 - 2018 Date Issued: December 15, 2009 Trademark/Model Designation ADQ36006101-S Replacement Elements ADQ36006101 Manufacturer: Cuno Inc.
Before calling for service, review this list. It may save you both time and expense. This list includes common occurrences that are not the result of defective workmanship or materials in this appliance. Problem Possible Causes Solutions Refrigerator compressor does not run. • Refrigerator control is off. • Set the refrigerator control. • Refrigerator is in defrost cycle. • This is normal for a fully automatic defrosting refrigerator. The defrost cycle occurs periodically.
BEFORE CALLING FOR SERVICE (CONT.) Problem Possible Causes Solutions Food stored in refrigerator drawers freezes. • Refrigerator control is set too cold. • Adjust the refrigerator to a warmer setting. Temperatures in the refrigerator or freezer are too warm. • Freezer or refrigerator control is set too warm. • Adjust the freezer or refrigerator control to a colder setting until the freezer or refrigerator temperature is satisfactory.
ENGLISH BEFORE CALLING FOR SERVICE (CONT.) Problem Possible Causes Solutions Moisture forms on the dispenser. • Moisture may form when the temperature or humidity are high. • Wipe off the moisture. Odors in the refrigerator. • Interior needs to be cleaned. • Clean interior with sponge, warm water, and baking soda. Be sure the soda is completely dissolved so it will not act as an abrasive compound. • Food with strong odor is in the refrigerator. • Cover food completely.
BEFORE CALLING FOR SERVICE (CONT.) 44 Problem Possible Causes Solutions The icemaker is not producing ice or not enough ice • New installation. • Wait 24 hours after ice maker installation for ice production to begin. Wait 72 hours for full ice production. • Refrigerator is not connected to a water supply and the supply shutoff valve is not turned on. • Connect refrigerator to water supply and turn water shutoff valve fully open.
ENGLISH BEFORE CALLING FOR SERVICE (CONT.) Problem Possible Causes Solutions Not dispense ice • All the doors are not closed completely. • If any door is not closed completely, any ice is not dispensed. • The dispenser is locked on display. • If the dispenser is locked, ice will not dispense. Look at the right side of the control panel to see if the lock is engaged. Press and hold the lock button on the control panel until there is a “ding” sound. Try to dispense again.
BEFORE CALLING FOR SERVICE (CONT.) Problem Possible Causes Solutions Not dispense water • New installation. • Flush and fill the water system. • Freezer door is not closed completely. • If any door is not closed completely, the ice is never dispensed. • Refrigerator is not connected to a water supply and the supply shutoff valve is not turned on. • Connect refrigerator to water supply and turn water shutoff valve fully open. • The water pressure is not more than 20 psi.
The appearance and specifications listed in this guide may vary due to constant product improvements. Bottom-Freezer Refrigerator Models LFX25976 Description French Door Refrigerator Electrical Requirements 115 VAC @ 60 Hz Min. / Max. Water Pressure 20~120 PSI (1.4~8.4 kgf/cm2) Dimensions 35 3/4" (W) X 34 1/4" (D) X 69 3/4" (H), 46 1/2" (D w/ door open) 908 mm (W) X 870 mm (D) X 1772 mm (H), 1181 mm (D w/ door open) Net Weight 328 lb. (149 kg) Refrigerator Storage Capacity 17.6 cu. ft.
LG ELECTRONICS U.S.A., INC. LG REFRIGERATOR LIMITED WARRANTY - U.S.A. Should your LG Refrigerator ("Product") fail due to a defect in materials or workmanship under normal home use, during the warranty period set forth below, LG will at its option repair or replace the product. This limited warranty is valid only to the original retail purchaser of the product and applies only when purchased and used within the United States including U.S. Territories.
LG ELECTRONICS CANADA, INC.
ENGLISH 51
LG Customer Information Center For inquires or comments, visit www.lg.com or call; 1-800-243-0000 USA, Consumer User 1-888-865-3026 USA, Commercial User 1-888-542-2623 CANADA Register your product Online! www.lg.