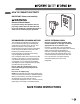
To contact LG Electronics, 24 hours a day, 7 days a week: 1-800-243-0000 Or visit us on the Web at: us.lge.com Pour contacter LG Electronics, 24 heures par jour, 7 jours par semaine: 1-800-243-0000 Ou visitez notre site Web à l’adresse: us.lge.com Para comunicarse con LG Electronics, 24 horas al día, 7 días a la semana: 1-800-243-0000 O visítenos en la Web en: us.lge.com Please read this guide thoroughly before operating and keep it handy for reference at all times.
IMPORTANT SAFETY INFORMATION Basic Safety Precautions ........................................3 CFC Disposal ..........................................................4 How to Connect Electricity ......................................5 PARTS AND FEATURES THANK YOU! Congratulations on your purchase Key Parts and Components ....................................6 and welcome to the LG family. INSTALLATION Your new LG French Door Choose the Proper Location ..................................7 Clearances ..
BASIC SAFETY PRECAUTIONS This guide contains many important safety messages. Always read and obey all safety messages. w This is the safety alert symbol. It alerts you to safety messages that inform you of hazards that can kill or hurt you or others or cause damage to the product. All safety messages will be preceded by the safety alert symbol and the hazard signal word DANGER, WARNING, or CAUTION.
BASIC SAFETY PRECAUTIONS (CONT.) • DO NOT refreeze frozen foods which have thawed completely. The United States Department of Agriculture in Home and Garden Bulletin No. 69 says: …You may safely refreeze frozen foods that have thawed if they still contain ice crystals or if they are still cold—below 40°F (4°C). …Thawed ground meats, poultry, or fish that have any off-odor or off-color should not be refrozen and should not be eaten. Thawed ice cream should be discarded.
HOW TO CONNECT ELECTRICITY IMPORTANT: Please read carefully. wWARNING Electrical Shock Hazard For personal safety, this appliance must be properly grounded. Have the wall outlet and the circuit checked by a qualified electrician to make sure the outlet is properly grounded. RECOMMENDED GROUNDING METHOD USE OF EXTENSION CORDS The refrigerator should always be plugged into its own individual properly grounded electrical outlet rated for 120 volts, 60 Hz, AC only, and fused at 20 amperes.
KEY PARTS AND COMPONENTS 1 ADJUSTABLE REFRIGERATOR SHELVING The refrigerator compartment shelves are adjustable to allow flexibility for storage needs. 2 MODULAR DOOR BINS 4 DIGITAL SENSOR CONTROL 5 INTERIOR LAMP 6 FIXED DOOR BIN Three interchangeable bins can be arranged to suit your storage needs. 7 AUTOMATIC ICEMAKER 3 REMOVABLE ICE STORAGE BIN The ice storage bin can be removed to fill ice buckets, coolers, or pitchers.
CHOOSE THE PROPER LOCATION wWARNING Excessive Weight Hazard Two or more people are required when moving and unpacking the appliance. • Store and install the refrigerator where it will not be exposed to temperatures below freezing or exposed to outdoor weather conditions. • Install this appliance in an area where the temperature is between 55°F (13°C) and 110°F (43°C). If the temperature around the appliance is too low or too high, cooling ability may be adversely affected.
FLOORING • To minimize noise and vibration, the refrigerator MUST be installed on a solidly constructed floor. • To avoid vibration, the unit must be level. If required, adjust the leveling legs to compensate for unevenness of the floor. The front should be slightly higher than the rear to aid in door closing. The leveling legs can be turned easily by pushing against the top of the refrigerator to take the weight off the feet.
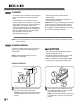
HANDLE REMOVAL (CONT.) HANDLE REINSTALLATION Mounting Fasteners 1 Place the handle on the door by aligning handle footprints to fit mounting fasteners and tighten the set screws with a 2.5 mm (3/32") Allen wrench. NOTE: If the handle mounting fasteners need to be tightened or removed use a 1/4" Allen wrench 2 Place the handle on the door by aligning handle footprints to fit mounting fasteners and tighten the set screws on the bottom of the handle with a 3.1 mm (1/8") Allen wrench.
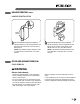
DOOR AND DRAWER REMOVAL (CONT.) DOOR REMOVAL (CONT.) (1) (2) (2) (1) (5) (6) (7) (4) (3) (4) (5) (3) (6) (7) 1 • Open the door. Remove the top hinge cover screw (1 ). • Use a flat-head screwdriver to pry back the hooks (not shown) on the front underside of the cover (2). Lift up the cover. • Disconnect all the wire harnesses (3). • Remove the grounding screw(4). • Rotate hinge lever (5) counterclockwise. Lift the top hinge (6) free of the hinge lever latch (7).
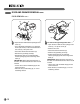
DOOR AND DRAWER REMOVAL (CONT.) DOOR REINSTALLATION (6) (7) (3) (2) (1) (5) (4) 1 Install the right-side door first. • Lower the door onto the middle hinge pin as shown. 2 • Fit the top hinge (1) over the hinge lever latch (2) and into place. Rotate the lever (3) counterclockwise to secure the hinge. • Connect the wire harness (4). • Install the grounding screw (5). • Hook the tab on the door-switch side of the cover (6) under the edge of the wire opening in the cabinet top.
DOOR AND DRAWER REMOVAL (CONT.) FREEZER DRAWER REMOVAL wCAUTION • To avoid possible injury or product or property damage, you will need two people to perform the following instructions. • When you remove the drawer, do not hold the handle. It may come off and could cause injury. • When laying the drawer down, be careful not to damage the floor or hurt your feet with the sharp edges on the hinge side. TOP DRAWER 1 To remove the freezer drawer, pull the drawer open to full extension.
DOOR AND DRAWER REMOVAL (CONT.) FREEZER DRAWER REMOVAL (CONT.) wCAUTION • To avoid possible injury or product or property damage, you will need two people to perform the following instructions. • When you remove the drawer, do not hold the handle. It may come off and could cause injury. • When laying the drawer down, be careful not to damage the floor or hurt your feet with the sharp edges on the hinge side. BOTTOM DRAWER 1 To remove the freezer drawer, pull the drawer open to full extension.
DOOR AND DRAWER REMOVAL (CONT.) FREEZER DRAWER REINSTALLATION wCAUTION wWARNING • To avoid possible injury or product or property damage, you will need two people to perform the following instructions. Risk of Child Entrapment • To prevent accidental child and pet entrapment or suffocation risk, DO NOT allow them to play inside of the freezer drawer. • DO NOT step or sit on the freezer drawer.
DOOR AND DRAWER REMOVAL (CONT.) FREEZER DRAWER REINSTALLATION (CONT.) wCAUTION wWARNING • To avoid possible injury or product or property damage, you will need two people to perform the following instructions. Risk of Child Entrapment • To prevent accidental child and pet entrapment or suffocation risk, DO NOT allow them to play inside of the freezer drawer. • DO NOT step or sit on the freezer drawer.
LIGHT BULB REPLACEMENT wWARNING Electrical Shock Hazard Before replacing a burned-out light bulb, either unplug the refrigerator or turn off power at the circuit breaker or fuse box. NOTE: Moving the control to the OFF position does not remove power to the light circuit. NOTE: • Not all appliance bulbs will fit your refrigerator. Be sure to replace the bulb with one of the same size, shape and wattage. • The light bulbs will turn off if door is left open for seven continuous minutes.
CONNECTING THE WATER SUPPLY wWARNING Connect to safe drinking water supply only. • The water pressure must be between 21 and 121 p.s.i. (1.5~8.5 kgf/cm2 ) on models without a water filter and between 43 and 121 p.s.i. (3~8.5 kgf/cm2) on models with a water filter. • If water pressure does not reach 21 psi (1.5kgf/cm2) or falls below, it is necessary to purchase a separate pressure pump for normal automatic icemaker and water dispensing operation.
CONNECTING THE WATER LINES BEFORE YOU BEGIN This water line installation is not warranted by the refrigerator or icemaker manufacturer. Follow these instructions carefully to minimize the risk of expensive water damage. Water hammer (water banging in the pipes) in house plumbing can cause damage to refrigerator parts and lead to water leakage or flooding. Call a qualified plumber to correct water hammer before installing the water supply line to the refrigerator.
CONNECTING THE WATER LINES (CONT.) INSTALLATION INSTRUCTIONS Install the shutoff valve on the nearest frequently used drinking water line. 1. SHUT OFF THE MAIN WATER SUPPLY Turn on the nearest faucet to relieve the pressure on the line. 2. CHOOSE THE VALVE LOCATION Choose a location for the valve that is easily accessible. It is best to connect into the side of a vertical water pipe.
CONNECTING THE WATER LINES (CONT.) INSTALLATION INSTRUCTIONS (CONT.) 8. FLUSH OUT THE TUBING Turn the main water supply on and flush out the tubing until the water is clear. Shut the water off at the water valve after about one quart of water has been flushed through the tubing. 10. TURN THE WATER ON AT THE SHUTOFF VALVE Tighten any connections that leak. Reattach the compressor compartment access cover. 9. CONNECT THE TUBING TO THE REFRIGERATOR Removing and Replacing Valve Cover.
LEVELING THE REFRIGERATOR DOORS wWARNING wCAUTION Electrical Shock Hazard • To avoid possible injury or product or property damage, you will need two people to perform the following instructions. • Be careful when you work with the hinges, base grille, and stopper. You may be injured. • Do not put hands, feet, or metal items into the air vents, base grille, or the bottom of the refrigerator. You may be injured or receive an electrical shock.
LEVELING THE REFRIGERATOR DOORS (CONT.) DOOR ALIGNMENT 1 • With one hand, lift up the door you want to raise at middle hinge. • With other hand, use pliers to insert snap ring as shown. • Insert additional snap rings until the doors are aligned. (Three snap rings are provided with unit.) STARTING Before loading your refrigerator with fresh foods: • Remove tape and any temporary labels from your refrigerator before using.
ENSURING PROPER AIR CIRCULATION In order to ensure proper temperatures, air must flow between the refrigerator and freezer sections. As shown in the illustration below, air enters at top of the freezer and circulates down. From the bottom of the freezer, air is forced up to the top of the refrigerator. Air enters refrigerator through the top vent, then circulates and exists at the bottom, where it returns to the freezer. MULTI-FLOW • Multi-Flow means powerful and effective cooling operation.
AUTOMATIC ICEMAKER wWARNING When you should set the icemaker power switch to O (off) Personal Injury Hazard • When the water supply will be shut off for several hours. • When the ice storage bin is removed for more than a minute or two. • When the refrigerator will not be used for several days. • DO NOT insert your hands in to the Icemaker in operation. It may cause to injure you. Operation instructions A newly-installed refrigerator may take 12 to 24 hours to begin making ice.
STORING FOODS • Store fresh food in the refrigerator compartment. • How food is frozen and thawed is an important factor in maintaining freshness and flavor. • Do not store food that spoils easily, such as bananas and melons, at low temperatures. • Allow hot food to cool prior to storing; placing hot food in the refrigerator could spoil other food and lead to higher energy consumption. • When storing food, cover it with vinyl wrap or store in a container with a lid.
LOCATION OF FOODS 3 1 2 4 5 1 REFRIGERATOR COMPARTMENT SHELVES Store larger food items, platters, and containers on the expansive refrigerator compartment shelves. 2 CRISPERS Store vegetables or fruits with humidity control. 3 DAIRY CORNER Store milk products such as butter and cheese. 26 4 MODULAR REFRIGERATOR DOOR BINS Store small packed food or beverages such as condiments, salad dressings, baby foods, milk, or juice.
SHELF HEIGHT ADJUSTMENT The shelves in your refrigerator are adjustable to meet your individual storage needs. Storing similar food items together in your refrigerator and adjusting the shelves to fit different heights of items will make finding the exact item you want easier; it will also reduce the amount of time the refrigerator door is open, saving energy. IMPORTANT: Do not clean glass shelves with warm water when they are cold.
REMOVING AND REPLACING COMPONENTS NOTE: When reinstalling components, reverse the order of steps for removal. To prevent damage, never use excessive force when removing or reinstalling components. • Crispers, Door Bins and interior shelves are not dishwasher safe. • Personal injury can occur if the door bins are not firmly assembled. NOTE: DO NOT adjust a loaded bin. • DO NOT allow children to play with baskets. The sharp corners on the baskets could cause injury.
REMOVING AND REPLACING COMPONENTS (CONT.) Crisper humidity control To remove the glass You can control the amount of humidity in the moisture-sealed crispers. Store vegetables or fruits requiring more or less humidity in separate crispers. Adjust the control to any setting between HIGH and LOW. • LOW lets moist air out of the crisper for best storage of fruits. • HIGH keeps moist air in the crisper for best storage of fresh, leafy vegetables.
REMOVING AND REPLACING COMPONENTS (CONT.) To replace Glide‘N’Serve 1 • To remove, pull the drawer out to full extension. • Lift the front of the drawer up, then pull it straight out. • To install, slightly tilt up the front and insert the drawer into the frame and push it back into place. wCAUTION wWARNING • Pinch hazard! Keep hands and feet clear of the bottom of the door when opening and closing.
CLEANING THE REFRIGERATOR wWARNING Explosion Hazard • Use nonflammable cleaner. • Failure to do so can result in death, explosion, or fire. Both the refrigerator and freezer sections defrost automatically. However, clean both sections about once a month to prevent odors. Wipe up spills immediately. • Unplug the refrigerator. • Remove all removable parts, such as shelves and crispers. • Use a clean sponge or soft cloth and a mild detergent in warm water. Do not use abrasive or harsh cleaners.
BEFORE CALLING FOR SERVICE Before calling for service, review this list. It may save you both time and expense. This list includes common occurrences that are not the result of defective workmanship or materials in this appliance. Problem Possible Causes Solutions Refrigerator compressor does not run. • Refrigerator control is off. • Set the refrigerator control. • Refrigerator is in defrost cycle. • This is normal for a fully automatic defrosting refrigerator. The defrost cycle occurs periodically.
BEFORE CALLING FOR SERVICE (CONT.) Problem Possible Causes Food stored in refrigerator drawers freezes. • Refrigerator control is set too cold. • Adjust the refrigerator to a warmer setting. Temperatures in the refrigerator or freezer are too warm. • Freezer or refrigerator control is set too warm. • Adjust the freezer or refrigerator control to a colder setting until the freezer or refrigerator temperature is satisfactory. • Doors are opened too frequently or for too long.
BEFORE CALLING FOR SERVICE (CONT.) Problem Possible Causes Solutions Odors in the refrigerator. • Interior needs to be cleaned. • Clean interior with sponge, warm water, and baking soda. Be sure the soda is completely dissolved so it will not act as an abrasive compound. • Food with strong odor is in the refrigerator. • Cover food completely. • Some containers and wrapping materials produce odors. • Use a different container or brand of wrapping materials. • Food package is keeping the door open.
KEY DIMENSIONS AND SPECIFICATIONS The appearance and specifications listed in this guide may vary due to constant product improvements. Bottom-Freezer Refrigerator Model LMC25780 Description French Door Refrigerator Electrical Requirements 115 VAC @ 60 Hz Min. / Max. Water Pressure 21~121 PSI (1.5~8.5 kgf/cm2) Dimensions 35 3/4" (W) X 34 1/4" (D) X 69 3/4" (H), 46 1/2" (D w/ door open) 908 mm (W) X 870 mm (D) X 1772 mm (H), 1181 mm (D w/ door open) Net Weight 315 lb.
LG ELECTRONICS, INC. LG REFRIGERATOR LIMITED WARRANTY - USA Should your LG Refrigerator ("Product") fail due to a defect in materials or workmanship under normal home use, during the warranty period set forth below, LG will at its option repair or replace the product. This limited warranty is valid only to the original retail purchaser of the product and applies only when purchased and used within the United States including U.S. Territories.
LG ELECTRONICS CANADA, INC. LG REFRIGERATOR LIMITED WARRANTY - Canada WARRANTY: Should your LG Refrigerator ("Product") fail due to a defect in material or workmanship under normal home use during the warranty period set forth below, LG Canada will at its option repair or replace the Product upon receipt of proof of original retail purchase.
P/No.