BOTTOM FREEZER REFRIGERATOR Owner’s Manual Please read this guide thoroughly before operating and keep it handy for reference at all times. REFRIGERADOR CON CONGELADOR INFERIOR Manual de Usuario Lea detenidamente estas instrucciones antes de usar el refrigerador y guárdelas como referencia para el futuro. Models / Modelos LRBN2051#** LRBC2051#** LDC2272#** LBC2252#** P/No.
TABLE OF CONTENTS English Version 2 Spanish Version 36 Warranty (U.S.A.
LG Electronics visit our web site/http://www.lgservice.com LIMITED WARRANTY United States of America LG Electronics will repair or at its option replace, without charge, your product which proves to be defective in material or workmanship under normal use during the warranty period listed below from the date of original purchase. This warranty is good only to the original purchaser of the product during the warranty period as long as it is in the U.S. including Alaska, Hawaii, and U.S. Territories.
LG Electronics Visite nuestro sitio web/http://www.lgservice.com GARANTÍA LIMITADA Estados Unidos de América LG Electronics reparará o en su defecto reemplazará sin cargo, el producto defectuoso en material o mano de obra bajo uso normal durante el periodo de garantía que se menciona a continuación desde la fecha original de compra. Esta garantía es válida solo para el comprador original del producto durante el periodo de garantía mientras permanezca en los E.E. U.U.
IMPORTANT SAFETY INSTRUCTIONS SAFETY MESSAGES This guide contains many important safety messages. Always read and obey all safety messages. This is the safety alert symbol. It alerts you to safety messages that inform you of hazards that can kill or hurt you or others, or cause damage to the product. All safety messages will be preceded by the safety alert symbol and the hazard signal word DANGER, WARNING, CAUTION.
DANGER: RISK OF CHILD ENTRAPMENT Child entrapment and suffocation are not problems of the past. Junked or abandoned refrigerators are still dangerous... even if they will sit for “just a few days”. If you are getting rid of your old refrigerator, please follow the instructions at right to help prevent accidents. BEFORE YOU THROW AWAY YOUR OLD REFRIGERATOR OR FREEZER Take off the doors. Leave the shelves in place so that children may not easily climb inside.
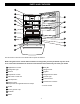
PARTS AND FEATURES A B L C D M E N F O G H P I Q R J K Use this section to become more familiar with the parts and features. NOTE: This guide covers several different models. The refrigerator you have purchased may have some or all of the items listed below. The locations of the features shown below may not match your model.
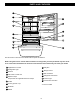
PARTS AND FEATURES A B J C K D L E M F N G H I O Use this section to become more familiar with the parts and features. NOTE: This guide covers several different models. The refrigerator you have purchased may have some or all of the items listed below. The locations of the features shown below may not match your model.
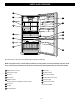
PARTS AND FEATURES A B I C J D K E L F M G H N Use this section to become more familiar with the parts and features. NOTE: This guide covers several different models. The refrigerator you have purchased may have some or all of the items listed below. The locations of the features shown below may not match your model.
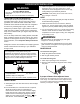
REFRIGERATOR INSTALLATION WARNING Excessive Weight Hazard Use two or more people to move and install refrigerator. Failure to do so can result in back or other injury. UNPACKING YOUR REFRIGERATOR Remove tape and any temporary labels from your refrigerator before using. Do not remove any warningtype labels, the model and serial number label, or the TechSheet that is attached to back wall of the refrigerator. To remove any remaining tape or glue, rub the area briskly with your thumb.
REFRIGERATOR INSTALLATION HOW TO REMOVE DOOR HANDLES TOOLS YOU MAY NEED 10 mm 1/4 in 3/8 in Hex head socket wrench 1/4 in 3/32 in Phillips screwdriver Flat head screwdriver IMPORTANT: Before you begin, turn the refrigerator OFF and unplug it. Remove food and any adjustable door or utility bins from doors. HOW TO REVERSE DOOR OPENING DIRECT ION (when converting from the left-opening type to rightopening type) 1. Removing Refrigerator Door • Remove the top hinge cover (1).
REFRIGERATOR INSTALLATION 3. Replacing Refrigerator Handle • Turn handle upside down (5) • Place the handle (2) on the door by adjusting handle footprints to fit mounting fastners and tighten the set screws (1) with the 3/32 ” Allen wrench. 4. Installing Refrigerator Door • Install the middle hinge (1) on the opposite side with the screws (2), and the screw (3). • Install the door (4) so that it fits onto the middle hinge pin (5). • Install the top hinge (6) with screws. • Reinstall top hinge cover (7).
REFRIGERATOR INSTALLATION HOW TO REMOVE AND INSTALL THE PULLOUT DRAWER • With both hands, hold both sides of the door and pull it up to separate it from the rails. IMPORTANT: To avoid possible injury, product or property damage, you will need two people to perform the following instructions. 1. Removing Pullout Drawer • Pull the drawer open to full lower extension. Remove the lower basket (1) by lifting basket from rail system. 1 • Press both hangers with yours thumbs to lift it up.
REFRIGERATOR INSTALLATION HOW TO REMOVE AND INSTALL THE PULL OUT DRAWER • Make sure you have a right rail cover for each side. Right Rail cover IMPORTANT: To avoid possible injur or product or property damage, you will need two people to perform the following instructions. Left Rail cover 2. Installing Pullout Drawer • With both hands, hold the center of the bar and pull it out to let both rails out to full extension simultaneously.
REFRIGERATOR INSTALLATION REMOVING, REVERSING AND REPLACING REFRIGERATOR DOORS (OPTIONAL) NOTE: See the Parts and Features section to match your model. TOOLS NEEDED: 10mm hex-head socket wrench, No. 2 Phillips screwdriver, flat-head screwdriver, 10mm open-end wrench, flat 2-inch putty knife. IMPORTANT: Before you begin, turn the refrigerator OFF and unplug it. Remove food and any adjustable door or utility bins from doors.
REFRIGERATOR INSTALLATION Use an adjustable wrench to remove the handle mounting screws (3). Carefully pry off the plug buttons (4). Install the plug buttons (4) on left side. Install the handle mounting screw (3) on the right side Hold the handle so the masking tape is at the bottom. Align keyhole slots (2) on the top and bottom of the back of the handle with the screws (3) mounted on the front of the door.
REFRIGERATOR INSTALLATION AFTER COMPLETING THE JOB Make sure that the four corners of the door gasket are not folded over. To ensure a good seal, apply a small NOTE: Having someone push against the top of the refrigerator takes some weight off the leveling screws. This makes it easier to adjust the screws. 3. Open both doors again and check to make sure that they close easily. If not, tilt the refrigerator slightly more to the rear by turning both leveling screws clockwise.
USING YOUR REFRIGERATOR ENSURING PROPER AIR CIRCULATION SETTING THE CONTROLS In order to ensure proper temperatures, air must flow between the refrigerator and freezer sections. As shown in the illustration below, cool air enters through the bottom of the freezer section and moves up. Most of the air then flows through the freezer section vents and recirculates under the freezer floor. The rest of the air enters the refrigerator section through the top vent.
USING YOUR REFRIGERATOR Middle Models (Identifier your control type) Refrigerator control: position 1 to 7 (32°F to 47°F or 0°C to 8°C) The higher the number setting, the colder the refrigerator compartment will become.
USING YOUR REFRIGERATOR FOOD STORAGE GUIDE Storing Fresh Food Wrap or store food in the refrigerator in airtight and moisture-proof material unless otherwise noted. This prevents food odor and taste transfer throughout the refrigerator. For dated products, check date code to ensure freshness. Butter or margarine Keep opened butter in a covered dish or closed compartment. When storing an extra supply, wrap in freezer packaging and freeze. Cheese Store in the original wrapping until you are ready to use it.
USING YOUR REFRIGERATOR REFRIGERATOR SHELVES The shelves in your refrigerator are adjustable to meet your individual storage needs. These units are all glass shelves. Sliding Out Shelves (optional on some models) You can slide some glass shelves in and out of your refrigerator as follows. To slide the shelf out, carefully pull front of shelf toward you.
USING YOUR REFRIGERATOR CHEF FRESH / SNACK PAN CRISPER HUMIDITY CONTROL (on some models) While holding the chef fresh with one hand, pull it forward slightly. Lift slightly and pull it out. You can control the amount of humidity in the moisturesealed crispers. Adjust the control to any setting between and . lets moist air out of the crisper for best storage of fruits. keeps moist air in the crisper for best storage of fresh, leafy vegetables. To remove the glass: 1.
USING YOUR REFRIGERATOR CRISPER COVER WITH LATTICE ON INNER SURFACE (on some models) DOOR RACKS The door racks may be removed for easier cleaning. To remove the crisper cover: Snap-on Door Racks 1. Remove both crisper drawers. 2. While holding the crisper cover support (2), pull the cover up and out(1). To remove the racks: 1. Remove all items in the door racks. 2. Push the rack against the inside wall of the door (A) and lift up the door rack (B).
USING YOUR REFRIGERATOR DAIRY BIN DURABASE (on some models) 1. To remove the dairy bin, simply lift it and pull straight out. 1. To remove the Durabase, push it back to the end as much as possible. Tilt up the front of the Durabase and pull straight out. 2. To replace the dairy bin, slide it in above the desired location and push down until it stops. 2. To install, insert the Durabase in rail assembly. 1 2 EGG BOX (on some models) Store Egg Box on interior shelf, not on door shelf.
USING YOUR REFRIGERATOR WIRE DURABASE (on some models) GLIDE - OUT DRAWER BASKET (on some models) 1. To remove wire Durabase, pull wire durabase out to full extension. Tilt up the front of the wire Durabase and pull it straight out. 1. To remove, lift basket up and pull out straight out. 2. To install, insert the wire Durabase into frame rails and push back into place. 1 2 2. To Install, pull both rails out to full extension.
CARE AND CLEANING PLASTIC PARTS (covers and panels) WARNING Do not use paper towels, window sprays, abrasive cleansers, or flammable fluids. These can scratch or damage the material. CONDENSER COILS Remove grille base. (See the grille base section) Explosion Hazard Use non-flammable cleaner. Failure to do so can result in death, explosion, or fire. Both the refrigerator and freezer sections defrost automatically. However, clean both sections about once a month to prevent odors.
CARE AND CLEANING 5. To assemble, first insert the hooks at the back and then push up the light shield. WHEN YOU GO ON VACATION If you choose to leave the refrigerator on while you are away, follow these steps to prepare your refrigerator before you leave. 1. Use up any perishables and freeze other items. 2. Empty the ice bin. To change the freezer light: If you choose to turn the refrigerator off before you leave, follow these steps. 1. Unplug refrigerator or disconnect power. 1.
ABOUT THE AUTOMATIC ICEMAKER NOTE: Automatic Ice Maker feature is included only in certain models. Please check your product specification. WARNING Personal Injury Hazard Avoid contact with the moving parts of the ejector mechanism, or with the heating element that releases the cubes. DO NOT place fingers or hands on the automatic icemaking mechanism while the refrigerator is plugged in. NOTE: If the cube size is smaller or larger than you expected, you can regulate the size with the cube size button.
CONNECTING THE WATER LINE NOTE: Water line installation is needed when the Automatic Ice Maker and/or Water Dispenser features are available on your product. Two 1/4” outer diameter compression nuts and 2 ferrules (sleeves) to connect the copper tubing to the shutoff valve and the refrigerator water valve.
CONNECTING THE WATER LINE INSTALLATION INSTRUCTIONS (CONTINUED) 7. CONNECT THE TUBING TO THE VALVE Place the compression nut and ferrule (sleeve) for copper tubing onto the end of the tubing and connect it to the shutoff valve. Make sure the tubing is fully inserted into the valve. Tighten the compression nut securely. 4. FASTEN THE SHUTOFF VALVE Fasten the shutoff valve to the cold water pipe with the pipe clamp.
CONNECTING THE WATER LINE 9. CONNECT THE TUBING TO THE REFRIGERATOR 11. PLUG IN THE REFRIGERATOR Arrange the coil of tubing so that it does not vibrate against the back of the refrigerator or against the wall. Push the refrigerator back to the wall. NOTES: Before making the connection to the refrigerator, be sure the refrigerator power cord is not plugged into the wall outlet. If your refrigerator does not have a water filter, we recommend installing one.
TROUBLESHOOTING GUIDE UNDERSTANDING SOUNDS YOU MAY HEAR Your new refrigerator may make sounds that your old one didn’t make. Because the sounds are new to you, you might be concerned about them. Most of the new sounds are normal. Hard surfaces, like the floor, walls and cabinets, can make the sounds seem louder than they actually are. The following describes the kinds of sounds and what may be making them. The defrost timer will click when the automatic defrost cycle begins and ends.
TROUBLESHOOTING GUIDE COMPRESSOR MOTOR SEEMS TO RUN TOO MUCH Check if... Then... The refrigerator that was replaced was an older model. Modern refrigerators with more storage space require more operating time. The room temperature is hotter than normal. The motor will run longer under warm conditions. At normal room temperatures, expect your motor to run about 40% to 80% of the time. Under warmer conditions, expect it to run even more often.
TROUBLESHOOTING GUIDE ICE HAS OFF-TASTE OR ODOR Check if... Then... The icemaker was recently installed. Discard first few batches of ice to avoid discolored or off-flavored ice. The ice has been stored for too long. Throw away old ice and make new supply. The food has not been wrapped tightly in either compartment. Rewrap foods since odors may migrate to the ice if food is not wrapped properly. The water supply contains minerals such as sulfur.
TROUBLESHOOTING GUIDE AUTOMATIC ICEMAKER DOES NOT WORK Check if... Then... Icemaker power switch in the O (off) position. Move the switch to the I (on) position. Water supply turned off or not connected. See the Connecting the Water Line section. Freezer compartment too warm. Wait 24 hours for the freezer to reach its ideal temperature. Piled up cubes in the storage bin cause the icemaker to shut off. Level cubes by hand. TEMPERATURE IS TOO WARM OR THERE IS INTERIOR MOISTURE BUILDUP Check if...
TABLE OF TABLA DE CONTENTS CONTENIDO Versión en Inglés Versión en Español Garantía (Estados Unidos de América) Instrucciones Importantes de Seguridad Requerimientos Eléctricos 2 36 4 37-38 38 Partes y Características 39-41 Instalación 42-49 Desempaque 42 Instalación 42 Parrilla Inferior 42 Anaqueles de las Puertas 55 Design-A-Door 55 Compartimento para Lácteos Recipiente para Hielos 56 56 DuraBase Separador DuraBase 56 56 Puerta Inclinable 57 Durabase de Alambre (Modelos tipo Swing)
INSTRUCCIONES IMPORTANTES DE SEGURIDAD MENSAJES DE SEGURIDAD Hemos incluido muchos mensajes importantes de seguridad en este manual. Lea y obedezca siempre todos los mensajes de seguridad. Este es el símbolo de advertencia de seguridad. Este símbolo le llama la atención sobre peligros potenciales que pueden ocasionar la muerte o una lesión a usted y a los demás, así como daños al producto.
PELIGRO: LOS NIÑOS PUEDEN QUEDAR ENCERRADOS ANTES DE TIRAR SU REFRIGERADOR O CONGELADOR CUANDO YA NO SE USE: El atrapamiento y asfixia de niños no es un problema del pasado. Los refrigeradores tirados y abandonados son un peligro, aún si van a quedar ahí “por unos cuantos días”. Si Ud. está por deshacerse de su refrigerador viejo, por favor siga las instrucciones que se dan a continuación para prevenir accidentes.
PARTES Y CARACTERÍSTICAS PARTS AND FEATURES A B L C D M E N F O G H P I Q R J K Use esta sección para que Ud. se familiarice con las partes y características de su nuevo refrigerador. NOTA: Esta guía cubre distintos modelos. Su refrigerador puede tener algunos o todas las características y partes que se muestran en la siguiente lista. Algunas de las localizaciones de las partes tal vez no concuerden con su modelo.
PARTES Y CARACTERISTICAS A B J C K D L E M F N G H I O Use esta sección para que Ud. se familiarice con las partes y características de su nuevo refrigerador. NOTA: Esta guía cubre distintos modelos. Su refrigerador puede tener algunos o todas las características y partes que se muestran en la siguiente lista. Algunas de las localizaciones de las partes tal vez no concuerden con su modelo.
PARTES Y CARACTERISTICAS A B I C J D K E L F M G H N Use esta sección para que Ud. se familiarice con las partes y características de su nuevo refrigerador. NOTA: Esta guía cubre distintos modelos. Su refrigerador puede tener algunos o todas las características y partes que se muestran en la siguiente lista. Algunas de las localizaciones de las partes tal vez no concuerden con su modelo.
INSTALACION 3. Instale el refrigerador en un área que se encuentre entre 55°F (13°C) y 110°F (43°C). Si la temperatura se encuentra fuera de las temperaturas mencionadas, el enfriamiento del aparato puede afectarse. ADVERTENCIA Peligro de Peso Excesivo Use dos o más personas para mover e instalar el refrigerador.. No seguir esta instrucción puede ocasionar una lesión en la espalda u otrotipo de lesiones. Precaución: Evite colocar el refrigerador cerca de fuentes de energía, luz solar o humedad.
INSTALACION PUERTAS DEL REFRIGERADOR: CÓMO QUITARLAS, CAMBIARLES EL SENTIDO DE APERTURA (OPCIONAL) HERRAMIENTAS QUE USTED PUEDE NECESITAR 10 mm 1/4 in 3/8 in Llave tubular de cabeza hexagonal 1/4 in 3/32 in Destornillador Phillips IMPORTANTE: Antes de empezar, gire el control del refrigerador a OFF (apagado), desenchufe el refrigerador o desconecte el suministro de energía. Quite todos los alimentos y cualquier recipiente ajustable o de uso múltiple de las puertas.
INSTALACION 3. Para colocar la jaladera del refrigerador • Gire completamente la jaladera (5) • Sujete la jaladera (2) a los tornillos de montaje y ajuste los tornillos de fijación (1) con una llave Allen de 3/32 ”. 4. Cómo Instalar la Puerta del Refrigerador Instale la bisagra central (1) en el lado opuesto junto con los tornillos (2) y (3). Instale la puerta (4) de tal manera que ésta se ajuste en el perno de la bisa gra central (5). Coloque la bisagra superior (6) junto con los tornillos.
INSTALACION CÓMO RETIRAR E INSTALAR EL CAJÓN DESLIZABLE • Con ambas manos, sujete los dos lados de la puerta y tire hacia arriba para separarla . IMPORTANTE: Para evitar una posible lesi ón, daño al producto o a la propiedad, Ud. necesitará dos personas para ejecutar las instrucciones siguientes 1. Para Retirar el Cajón Deslizable • Jale el cajón abierto al máximo. Retire la canasta inferior (1) levantándola del sistema de rieles. 1 • Presione las dos perchas con los pulgares para elevarla.
INSTALACION CÓMO RETIRAR E INSTALAR EL CAJÓN DESLIZABLE • Compruebe la parte izquierda y derecha de la guía de la cubierta. Guía IMPORTANTE: Para evitar una posible lesión, daño al producto o a la propiedad, Ud. necesitará dos personas para ejecutar las instrucciones siguientes derecha Guía 2. Instalación del Cajón Deslizable izquierda • Con ambas manos, sujete el centro de la barra y tire hacia fuera para que las dos guías salgan a la vez.
INSTALACION PUERTAS DEL REFRIGERADOR: CÓMO QUITARLAS, CAMBIARLES EL SENTIDO DE APERTURA (OPCIONAL) NOTA: Ver la sección Partes y Características, para ver su tipo de modelo. HERRAMIENTAS NECESARIAS:Llave tubular de cabeza hexagonal 10mm, destornillador Phillips No.2, destornillador de cabeza plana, cuchillo para masilla de 2 pulgadas. IMPORTANTE: Antes de empezar, gire el control del refrigerador a OFF (apagado) y desenchúfelo. Quite todos los alimentos de los recipientes de las puertas.
INSTALACION · Use una llave ajustable para quitar las manijas de los tornillos (3). · Cuidadosamente retire los tapones (4). · Instale los tapones (4) del lado izquierdo. · Instale los tornillos (3) del lado derecho. · Sostenga la manija, de manera que la cinta esté en el la parte de abajo. · Alinee las ranuras (2) superior e inferior que están detrás de la manija con los tornillos (3) que están sobre el frente de la puerta.
INSTALACION AL FINALIZAR LA INSTALACIÓN NOTA: Para facilitar la nivelación del refrigerador, haga que alguien levante un poco la parte superior del refrigerador. Esto quitará algo de peso sobre los tornillos niveladores. Asegúrese de que las cuatro esquinas de los sellos de las puertas no se encuentren doblados. Para asegurar un buen sellado, aplique una pequeña capa de silicón en los sellos. 3. Abra ambas puertas y asegúrese que cierran con facilidad.
USO DEL REFRIGERADOR AJUSTE DE LOS CONTROLES CIRCULACIÓN APROPIADA DE AIRE Su refrigerador cuenta con dos controles que le permiten regular la temperatura en los compartimentos del refrigerador y congelador. Para obtener temperaturas estables, el aire debe flui r entre las secciones del congelador y refrigerador. Como se muestra en la ilustración de abajo, el aire frío entra a través de la parte inferior y circula hacia arriba.
USO DEL REFRIGERADOR Modelo Medio CONDICIÓN/RAZÓN Control del Refrigerador: Posición 1 a 7 (32°F a 47°F o 0°C a 8° C) A mayor valor de ajuste, el compartimiento del refrigerador estará mas frío. REFRIGERATOR TEMP ADJUST WARMER 4 IS RECOMMENDED Control del Congelador: Posición 1 a 7 (-6°F a 8°F o -21°C a -13°C) Cuando el valor de ajuste sea mayor, el congelador se encontrará más frío. Sin embargo, el compartimIento del refrigerador estará menos frío debido a que fluye menor cantidad de aire frío.
USO DEL REFRIGERADOR GUÍA PARA ALMACENAR ALIMENTOS Empaque Una buena congelación depende de un empaque correcto. Cuando Ud. cierra y sella el empaque, no permitirá el acceso del aire y humedad a los alimentos. Un mal empaque resultará en la transmisión de olores y sabores dentro del refrigerador, así como la resequedad de los alimentos congelados. Recomendaciones de empaque: Usar contenedores plásticos con tapas rígidas. Utilizar envases o jarras de superficies lisas.
USO DEL REFRIGERADOR ESTANTES DEL REFRIGERADOR Los estantes de su refrigerador se ajustan para cumplir con sus necesidades de almacenamiento. Su modelo puede incluir estantes de vidrio o alambre. Almacenar apropiadamente los alimentos en su refrigerador, y ajustando los estantes para que tengan distintas alturas hará más fácil la búsqueda de los artículos que Ud. necesita. Esto también reducirá el tiempo en el que se encuentran abiertas las puertas, lo que ahorrará energía.
USO DEL REFRIGERADOR CHAROLA DE CARNES FRIAS CONTROL DE HUMEDAD DE LOS CAJONES (en algunos modelos) Jale hacia usted la charola de carnes frías mientras la sostiene con una mano. Levántela un poco y jale. Ud. puede controlar la cantidad de humedar en los cajones, ajustando el control en cualq uier posición entre y Permite que el aire salga del cajón de vegetales para la mejor conservación de frutas. Mantiene la mayor cantidad de aire en el cajón para la mejor conservación de vegetales frescos.
USING USO YOUR DELREFRIGERATOR REFRIGERADOR CANASTAS DE LAS PUERTAS CUBIERTA DE LOS CAJONES CON REJILLA INTERIOR (en algunos modelos) Las canastas se pueden quitar para una mejor limpieza. Canastas a Presión Para quitar la cubierta de los cajones de vegetales: 1. Quite ambos cajones. 2. Jale la cubierta mientras sostiene el soporte (2). Jale hacia arriba y después hacia fuera (1) Para quitar las canastas realice lo siguiente: 1. Quite el contenido que se encuentre en la canasta. 2.
USING USO YOUR DELREFRIGERATOR REFRIGERADOR COMPARTIMENTO PARA LÁCTEOS DURABASE (en algunos modelos) 1. Para sacar el recipiente para lácteos, levante el recipiente y jálelo hacia fuera. 1. Para quitar la Durabase (base durable), empuje hacia atrás lo más que pueda. Levante la parte de enfrente de la Durabase y jale hacia afuera. 2. Para volver a poner el recipiente para lácteos, deslícelo en el soporte seleccionado y empuje hacia abajo hasta que tope. 2.
USING USO YOUR DELREFRIGERATOR REFRIGERADOR DURABASE DE ALAMBRE (en algunos modelos) CAJÓN DE ALAMBRE DESLIZABLE (en algunos modelos) 1. Para quitar la Durabase de alambre, jálela hacia afuera hasta su máxima extensión. Incline un poco la parte frontal y jale para sacarla. 1. Para quitar la canasta, levántela jale hacia afuera 2. Para volver a colocarla, inserte la Durabase de alambre en el marco de rieles y empuje hasta que tope en el fondo. 1 2 2.
CUIDADO DE SU REFRIGERADOR PARTES PLÁSTICAS (cubiertas y paneles) ADVERTENCIA No utilice toallas de papel, aspersores para vidrio, limpiadores abrasivos, o fluidos inflamables. Estos pueden rayar o dañar el material SERPENTIN DEL CONDENSADOR Quite la vista inferior. (Vea la sección de la vista inferior) Utilice una aspiradora con una extensión para limpiar los serpentines. Peligro de Explosión Utilice limpiadores no inflamables. No seguir esta instrucción puede ocasionar la muerte, explosión o incendio.
CARE CUIDADO DEAND SU REFRIGERADOR 5. Para ensamblar, primero inserte los ganchos de la parte de atrás y después empuja la lámpara hacia arriba. VACACIONES Si Ud. decide dejar el refrigerador funcionando mientras está ausente, siga estos pasos para preparar su refrigerador antes de irse. 1. Consuma todos los artículos perecederos y congele el resto. 2. Vacíe el recipiente para hielos. Para cambiar la bombilla (foco) del Congelador Si Ud. decide apagar el refrigerador antes de irse, siga estos pasos: 1.
ACERCA DE LA FÁBRICA DE HIELO AUTOMÁTICA NOTA: La Fábrica de hielos Automática la incluyen solo algunos modelos. Revise la especificación del suyo. NOTA: Si el tamaño del hielo es más pequeño o más grande de lo que usted esperaba, puede regular el tamaño del cubo presionando el botón selector. La presión del agua afecta considerablemente estos resultados. ADVERTENCIA Cada vez que presione el botón selector, un indicador de luz se encenderá.
CÓMO CONECTAR LA TUBERÍA DE AGUA NOTA: La línea de agua es necesaria instalarla cuando las características del dispensador de agua y/o del dispensador de hielo están disponibles en su producto. ANTES DE COMENZAR La instalación de la tubería de agua no está garantizada por el fabricante del refrigerador o de la fábrica de hielos. Siga las instrucciones cuidadosamente para minimizar el riesgo de daños al producto.
CÓMO CONECTAR LA TUBERÍA DE AGUA INSTRUCCIONES DE INSTALACIÓN (CONTINUACIÓN) 7. CONECTE LA TUBERÍA A LA VÁLVULA Ponga la tuerca de compresión y la férula para la tubería de cobre al final de la tubería y conéctela a la válvula. Asegúrese de que la tubería está completamente insertada en la válvula. Apriete la tuerca con precaución. 4. APRIETE LA VÁLVULA Apriete la válvula a la tubería de agua fría con una trampa para tubos.
CÓMO CONECTAR LA TUBERÍA DE AGUA 9. CONECTE LA TUBERÍA AL REFRIGERADOR 11. CONECTE EL REFRIGERADOR Arregle la tubería de agua de tal manera que ésta no pueda vibrar con el refrigerador o la pared. Empuje el refrigerador hacia la pared. NOTAS: Antes de hacer la conexión al refrigerador, asegúrese de que éste no esté conectado al suministro de energía. Si su refrigerador no cuenta con filtro de agua, le recomendamos que instale uno.
GUÍA DE SOLUCIÓN DE PROBLEMAS El cronómetro del ciclo de deshielo sonará cuando el ciclo automático de deshielo comience y termine. Además, el Control del Termostato (o Control del Refrigerador, dependiendo del modelo), emitirá un sonido cuando comience y termine el ciclo de refrigeración. Se puede escuchar un cascabeleo, el cual es debido al flujo del refrigerante, la tubería de agua, u objetos colocados en la parte superior del refrigerador.
GUÍA DE SOLUCIÓN DE PROBLEMAS EL COMPRESOR PARECE ESTAR ENCENDIDO POR MUCHO TIEMPO Verifique si... Entonces... El refrigerador que fue reemplazado era un modelo antiguo. Los refrigeradores modernos con mayor capacidad de almacenaje requieren mayor tiempo de operación. La temperatura ambiente está más caliente de lo normal. El motor seguirá en operación cuando la temperatura ambiente sea alta. El motor puede estar encendido entre un 40% y 80% del tiempo.
GUÍA DE SOLUCIÓN DE PROBLEMAS EL HIELO TIENE SABOR Y OLOR EXTRAÑOS Verifique si... La fábrica de hielos ha sido instalada recientemente. Entonces... No utilice los primeros hielos que se produzcan. El hielo ha sido almacenado por mucho tiempo. Deshágase del hielo viejo y haga una nueva provisión. La comida no se ha empacado bien en cada compartimiento Vuelva a envolver la comida, ya que los olores se pueden transferir al hielo si la comida no está bien empacada.
GUÍA DE SOLUCIÓN DE PROBLEMAS LA FÁBRICA DE HIELO NO FUNCIONA Verifique si... La fábrica de hielo está encendida. El suministro de agua se ha cortado o no está conectada. La temperatura del congelador está tibia. Los cubos de hielo fabricados apagan la fábrica de hielos. Entonces... Encienda la fábrica de hielos (posición I ) Vea la sección Cómo Conectar la Tubería de Agua. Espere 24 h para que el congelador alcance su temperatura ideal. Nivele los cubos a mano.