BOTTOM FREEZER REFRIGERATOR Owner’s Manual Please read this guide thoroughly before operating and keep it handy for reference at all times. REFRIGERADOR CON CONGELADOR INFERIOR Manual de Usuario Lea detenidamente estas instrucciones antes de usar el refrigerador y guárdelas como referencia para el futuro. Models / Modelos LRBN2051#** LBN2251#** LDN2272#** LDN2273#** LBC2251#** LRBC2051#** LDC2272#** LRBC2252#** LBC2051#** P/No.
TABLE OF CONTENTS English Version 2 Spanish Version 36 Warranty (U.S.A.
LG Electronics visit our web site/http://www.lgservice.com LIMITED WARRANTY United States of America LG Electronics will repair or at its option replace, without charge, your product which proves to be defective in material or workmanship under normal use during the warranty period listed below from the date of original purchase. This warranty is good only to the original purchaser of the product during the warranty period as long as it is in the U.S. including Alaska, Hawaii, and U.S. Territories.
LG Electronics Visite nuestro sitio web/http://www.lgservice.com GARANTÍA LIMITADA Estados Unidos de América LG Electronics reparará o en su defecto reemplazará sin cargo, el producto defectuoso en material o mano de obra bajo uso normal durante el periodo de garantía que se menciona a continuación desde la fecha original de compra. Esta garantía es válida solo para el comprador original del producto durante el periodo de garantía mientras permanezca en los E.E. U.U.
IMPORTANT SAFETY INSTRUCTIONS SAFETY MESSAGES This guide contains many important safety messages. Always read and obey all safety messages. This is the safety alert symbol. It alerts you to safety messages that inform you of hazards that can kill or hurt you or others, or cause damage to the product. All safety messages will be preceded by the safety alert symbol and the hazard signal word DANGER, WARNING, CAUTION.
DANGER: RISK OF CHILD ENTRAPMENT Child entrapment and suffocation are not problems of the past. Junked or abandoned refrigerators are still dangerous... even if they will sit for “just a few days”. If you are getting rid of your old refrigerator, please follow the instructions at right to help prevent accidents. BEFORE YOU THROW AWAY YOUR OLD REFRIGERATOR OR FREEZER Take off the doors. Leave the shelves in place so that children may not easily climb inside.
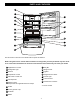
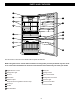
PARTS AND FEATURES A B L C D M E N F O G H P I Q R J K Use this section to become more familiar with the parts and features. NOTE: This guide covers several different models. The refrigerator you have purchased may have some or all of the items listed below. The locations of the features shown below may not match your model.
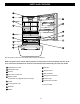
PARTS AND FEATURES A B J C K D L E M F N G H I O Use this section to become more familiar with the parts and features. NOTE: This guide covers several different models. The refrigerator you have purchased may have some or all of the items listed below. The locations of the features shown below may not match your model.
PARTS AND FEATURES A B I C J D K E L F M G H N Use this section to become more familiar with the parts and features. NOTE: This guide covers several different models. The refrigerator you have purchased may have some or all of the items listed below. The locations of the features shown below may not match your model.
REFRIGERATOR INSTALLATION WARNING Excessive Weight Hazard Use two or more people to move and install refrigerator. Failure to do so can result in back or other injury. UNPACKING YOUR REFRIGERATOR Remove tape and any temporary labels from your refrigerator before using. Do not remove any warningtype labels, the model and serial number label, or the TechSheet that is attached to back wall of the refrigerator. To remove any remaining tape or glue, rub the area briskly with your thumb.
REFRIGERATOR INSTALLATION REMOVING, REVERSING AND REPLACING REFRIGERATOR DOORS (OPTIONAL) NOTE: See the Parts and Features section to match your model. NOTE: Reversing the refrigerator door is not possible on water dispenser models TOOLS NEEDED: 10mm hex-head socket wrench, No. 2 Phillips screwdriver, flat-head screwdriver,10mm open-end wrench, flat 2-inch putty knife. 9 8 IMPORTANT: Before you begin, turn the refrigerator OFF and unplug it. Remove food and any adjustable door or utility bins from doors.
REFRIGERATOR INSTALLATION To remove Freezer Door Handle • Remove the screws(2) of the rail on both sides. •Grasp the handle tightly with both hands,and slide the handle to the right, until align keyholes back on handle with the screws mounted in front of the door. Then pull out the handle. (This may require some force). •Assembly is the reverse order of disassembly. CAUTION: When you remove the drawer, do not hold handle. If it comes off, it could cause personal injury.
REFRIGERATOR INSTALLATION HOW TO REMOVE AND INSTALL THE PULLOUT DRAWER • Make sure you have a right rail cover for each side. IMPORTANT: To avoid possible injur or product or property damage, you will need two people to perform the following instructions. 2. Installing Pullout Drawer • With both hands, hold the center of the bar and pull it out to let both rails out to full extension simultaneously.
REFRIGERATOR INSTALLATION REMOVING, REVERSING AND REPLACING REFRIGERATOR DOORS (OPTIONAL) NOTE: See the Parts and Features section to match your model. TOOLS NEEDED: 10mm hex-head socket wrench, No. 2 Phillips screwdriver, flat-head screwdriver, 10mm open-end wrench, flat 2-inch putty knife. IMPORTANT: Before you begin, turn the refrigerator OFF and unplug it. Remove food and any adjustable door or utility bins from doors.
REFRIGERATOR INSTALLATION 3. Removing Refrigerator Handle NOTE: To assist in installing the handle on the right side, place a small piece of masking tape near the top of the handle before removing. Grasp the handle tightly with both hands and slide the handle up (1)(this may require some force). The keyhole slots (2) on the back of the handle allow the handle to separate from the mounting screws (3). Use an adjustable wrench to remove the handle mounting screws (3). Carefully pry off the plug buttons (4).
REFRIGERATOR INSTALLATION INSTALLATION 4. Removing Freezer Handle NOTE: Before start, check handle type in your model. Handle Type 1 Remove the cap (1) and the 2 caps (2) using a slotted screwdriver. Loosen the 2 screws (3), take of f the handle (4), and install it on the right. Attach the caps you removed earlier [figures (1) and (2)]. Handle Type 2 For this handle type is not neccesary remove it. 5. Installing Freezer Door Install the base grille (1). Install the door (3) onto the bottom hinge pin.
REFRIGERATOR INSTALLATION AFTER COMPLETING THE JOB Make sure that the four corners of the door gasket are not folded over. To ensure a good seal, apply a small amount of silicon grease on the gasket. NOTE: Having someone push against the top of the refrigerator takes some weight off the leveling screws. This makes it easier to adjust the screws. 3. Open both doors again and check to make sure that they close easily.
USING YOUR REFRIGERATOR ENSURING PROPER AIR CIRCULATION SETTING THE CONTROLS In order to ensure proper temperatures, air must flow between the refrigerator and freezer sections. As shown in the illustration below, cool air enters through the bottom of the freezer section and moves up. Most of the air then flows through the freezer section vents and recirculates under the freezer floor. The rest of the air enters the refrigerator section through the top vent.
USING YOUR REFRIGERATOR Middle Models (Identifier your control type) Refrigerator control: position 1 to 7 (32°F to 47°F or 0°C to 8°C) The higher the number setting, the colder the refrigerator compartment will become.
USING YOUR REFRIGERATOR FOOD STORAGE GUIDE Storing Fresh Food Wrap or store food in the refrigerator in airtight and moisture-proof material unless otherwise noted. This prevents food odor and taste transfer throughout the refrigerator. For dated products, check date code to ensure freshness. Butter or margarine Keep opened butter in a covered dish or closed compartment. When storing an extra supply, wrap in freezer packaging and freeze. Cheese Store in the original wrapping until you are ready to use it.
USING YOUR REFRIGERATOR REFRIGERATOR SHELVES The shelves in your refrigerator are adjustable to meet your individual storage needs. These units are all glass shelves. Sliding Out Shelves (optional on some models) You can slide some glass shelves in and out of your refrigerator as follows. To slide the shelf out, carefully pull front of shelf toward you.
USING YOUR REFRIGERATOR CHEF FRESH / SNACK PAN CRISPER HUMIDITY CONTROL (on some models) While holding the chef fresh with one hand, pull it forward slightly. Lift slightly and pull it out. You can control the amount of humidity in the moisturesealed crispers. Adjust the control to any setting between and . lets moist air out of the crisper for best storage of fruits. keeps moist air in the crisper for best storage of fresh, leafy vegetables. To remove the glass: 1.
USING YOUR REFRIGERATOR CRISPER COVER WITH LATTICE ON INNER SURFACE (on some models) DOOR RACKS The door racks may be removed for easier cleaning. To remove the crisper cover: Snap-on Door Racks 1. Remove both crisper drawers. 2. While holding the crisper cover support (2), pull the cover up and out(1). To remove the racks: 1. Remove all items in the door racks. 2. Push the rack against the inside wall of the door (A) and lift up the door rack (B).
USING YOUR REFRIGERATOR DAIRY BIN DURABASE (on some models) 1. To remove the dairy bin, simply lift it and pull straight out. 1. To remove the Durabase, push it back to the end as much as possible. Tilt up the front of the Durabase and pull straight out. 2. To replace the dairy bin, slide it in above the desired location and push down until it stops. 2. To install, insert the Durabase in rail assembly. EGG BOX (on some models) Store Egg Box on interior shelf, not on door shelf.
USING YOUR REFRIGERATOR WIRE DURABASE (on some models) GLIDE - OUT DRAWER BASKET (on some models) 1. To remove wire Durabase, pull wire durabase out to full extension. Tilt up the front of the wire Durabase and pull it straight out. 1. To remove, lift basket up and pull out straight out. 2. To install, insert the wire Durabase into frame rails and push back into place. 2. To Install, pull both rails out to full extension. Hook the basket supports into the rail tabs and push to the back of compartment.
CARE AND CLEANING PLASTIC PARTS (covers and panels) WARNING Do not use paper towels, window sprays, abrasive cleansers, or flammable fluids. These can scratch or damage the material. CONDENSER COILS Remove grille base. (See the grille base section) Explosion Hazard Use non-flammable cleaner. Failure to do so can result in death, explosion, or fire. Both the refrigerator and freezer sections defrost automatically. However, clean both sections about once a month to prevent odors.
CARE AND CLEANING 5. To assemble, first insert the hooks at the back and then push up the light shield. WHEN YOU GO ON VACATION If you choose to leave the refrigerator on while you are away, follow these steps to prepare your refrigerator before you leave. 1. Use up any perishables and freeze other items. 2. Empty the ice bin. To change the freezer light: If you choose to turn the refrigerator off before you leave, follow these steps. 1. Unplug refrigerator or disconnect power. 1.
ABOUT THE AUTOMATIC ICEMAKER NOTE: Automatic Ice Maker feature is included only in certain models. Please check your product specification. WARNING Personal Injury Hazard Avoid contact with the moving parts of the ejector mechanism, or with the heating element that releases the cubes. DO NOT place fingers or hands on the automatic icemaking mechanism while the refrigerator is plugged in. NOTE: If the cube size is smaller or larger than you expected, you can regulate the size with the cube size button.
CONNECTING THE WATER LINE NOTE: Water line installation is needed when the Automatic Ice Maker and/or Water Dispenser features are available on your product. Two 1/4” outer diameter compression nuts and 2 ferrules (sleeves) to connect the copper tubing to the shutoff valve and the refrigerator water valve.
CONNECTING THE WATER LINE INSTALLATION INSTRUCTIONS (CONTINUED) 7. CONNECT THE TUBING TO THE VALVE Place the compression nut and ferrule (sleeve) for copper tubing onto the end of the tubing and connect it to the shutoff valve. Make sure the tubing is fully inserted into the valve. Tighten the compression nut securely. 4. FASTEN THE SHUTOFF VALVE Fasten the shutoff valve to the cold water pipe with the pipe clamp.
CONNECTING THE WATER LINE 9. CONNECT THE TUBING TO THE REFRIGERATOR 11. PLUG IN THE REFRIGERATOR Arrange the coil of tubing so that it does not vibrate against the back of the refrigerator or against the wall. Push the refrigerator back to the wall. NOTES: Before making the connection to the refrigerator, be sure the refrigerator power cord is not plugged into the wall outlet. If your refrigerator does not have a water filter, we recommend installing one.
TROUBLESHOOTING GUIDE UNDERSTANDING SOUNDS YOU MAY HEAR The defrost timer will click when the automatic defrost cycle begins and ends. The thermostat control (or refrigerator control, depending on the model) will also click when cycling on and off. Your new refrigerator may make sounds that your old one didn’t make. Because the sounds are new to you, you might be concerned about them. Most of the new sounds are normal.
TROUBLESHOOTING GUIDE COMPRESSOR MOTOR SEEMS TO RUN TOO MUCH Check if... Then... The refrigerator that was replaced was an older model. Modern refrigerators with more storage space require more operating time. The room temperature is hotter than normal. The motor will run longer under warm conditions. At normal room temperatures, expect your motor to run about 40% to 80% of the time. Under warmer conditions, expect it to run even more often.
TROUBLESHOOTING GUIDE ICE HAS OFF-TASTE OR ODOR Check if... Then... The icemaker was recently installed. Discard first few batches of ice to avoid discolored or off-flavored ice. The ice has been stored for too long. Throw away old ice and make new supply. The food has not been wrapped tightly in either compartment. Rewrap foods since odors may migrate to the ice if food is not wrapped properly. The water supply contains minerals such as sulfur.
TROUBLESHOOTING GUIDE AUTOMATIC ICEMAKER DOES NOT WORK Check if... Then... Icemaker power switch in the O (off) position. Move the switch to the I (on) position. Water supply turned off or not connected. See the Connecting the Water Line section. Freezer compartment too warm. Wait 24 hours for the freezer to reach its ideal temperature. Piled up cubes in the storage bin cause the icemaker to shut off. Level cubes by hand. TEMPERATURE IS TOO WARM OR THERE IS INTERIOR MOISTURE BUILDUP Check if...