PART NUMBER: MFL62884305 DESCRIPTION: OWNER’S, MANUAL DIMENSIONS (mm): W(200±3 ), H(270±3) PROJECT: SABER GOOD&BETTER DATE: MARCH 01, 10 NOTES: 1. PRINTING MEANS: OFFSET 2. PRINTING COLOR: BLACK FREE FROM BLUR, BLOTTING AND BREAKING OF LINES 3. TYPE OF PAPER: BOND 4. GRAMAJE: 63 gr 5. QUANTITY OF SHEET: 15 6. THE PART SHOULD NOT CONTAIN PROHIBITED SUBSTANCES (Pb, Cd, Hg, Cr+6, PBB, PBDE) AND DETAILS SHOULD COMPLY WITH STANDARD LG(61)-A-9101. NOTAS: 1. METODO DE IMPRESION: OFFSET 2.
LSC23924** REFRIGERATOR Owner´s Manual Please read this guide thoroughly before operating and keep it handy for reference at all times. REFRIGERADOR Manual de Usuario Lea detenidamente estas instrucciones antes de utilizar el refrigerador y guárdelas como referencia para el futuro.
TABLE OF CONTENTS Care and Cleaning 19-21 Important Safety Instructions 3 Grounding Requirements 4 General Cleaning Tips 19 Refrigerator Features 5 Outside 19 Inside Walls 19 Refrigerator Installation 6 - 10 Unpacking you Refrigerator 6 Door Liners and Gaskets 19 Installation 6 Plastic Parts 19 Base Grille Installation 6 Back Cover 19 Handle Removal 7 Lamp Replacement 19-20 8-9 Power Interruptions 20 When you go on vacation 20 When you move 20 Operations Instructions
IMPORTANT SAFETY INSTRUCTIONS This guide contains many important safety messages. Always read and obey. This is the safety alert symbol. It alerts you to safety messages that inform you of hazards that can kill or hurt you or others, or cause damage to the product. All safety messages will be preceded by the safety alert symbol and the hazard signal word DANGER, WARNING, or CAUTION. These words mean: You will be killed or seriously injured if you don’t follow instructions.
DANGER: RISK OF CHILD ENTRAPMENT This appliance is not intended for use by persons (including children) with reduced physical, sensory or mental capabilities, or lack of experience and knowledge, unless they have been given supervision or instruction concerning use of the appliance by a person responsible for their safety. Child entrapment and suffocation are not problems of the past. Junked or abandoned refrigerators are still dangerous… even if they will sit for “just a few days”.
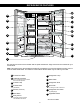
REFRIGERATOR FEATURES G A H B I J C K D H A L M E A L F Use this page to become more familiar with the parts and features. Page references are included for your convenience. Note: This guide covers several different models.The refrigerator you have purchased may have some or all of the items listed below. The locations of the features shown below may not match your model.
REFRIGERATOR INSTALLATION WARNING INSTALLATION 1. Avoid placing unit near heat sources, direct sunlight or moisture. 2. To minimize noise and vibration, the refrigerator MUST be installed on a solidly constructed floor. 3. Carpeting and soft tile surfaces are not recommended. 4. NEVER install the refrigerator on a platform or a weakly supported structure. 5. Install this appliance in an area where the temperature is between 41 °F (5 °C) and 110 °F (43 °C).
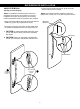
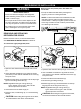
REFRIGERATOR INSTALLATION • Loosen the set screws with a 3/32” (2.38 mm) Allen wrench and remove the handle. HANDLE REMOVAL (Identify your handle type) NOTE: If the handle mounting fasteners need to be tightened or moved, use a 1/4” (6.35 mm) Allen wrench. NOTE: It is ALWAYS recommended to remove the refrigerator doors when it is necessary to move the refrigerator through a narrow opening. If necessary, follow the directions below to remove the door handles.
REFRIGERATOR INSTALLATION Removing the left (freezer) door with water line connection. WARNING Electric Shock Hazard • Pull up the water feed tube while pressing area (Figure 1) as shown in the figure below. • Disconnect electrical supply to the refrigerator before installing. Failure to do so could result in death or serious injury. • NOTE: If a tube end is deformed or abraded, trim the part away. Disconnecting the tube under the door causes about 1.5 liters (0.13 gallons) water to flow out.
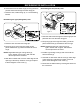
REFRIGERATOR INSTALLATION 6. Lift the door from the lower hinge pin being careful to pull the water lines through the lower hinge pin. Reinstalling the left (Freezer) door 7. Place the door, inside facing up, on a nonscratching surface. (2) (1) Reinstalling the rigth (Refrigerator) door (3) (4) (7) (1) (5) (6) (2) (5) (6) (7) (3) (3) (4) (4) Type 1 Type 1 Rivet (5) Rivet Type 2 1. Feed the water tubes through the lower hinge pin and place the door onto the lower hinge pin.
REFRIGERATOR INSTALLATION DOOR ALIGNMENT Adjust the level when the refrigerator door is lower than the freezer door during the installation of the refrigerator. Before adjust the doors, remove the Base Grille. See BASE GRILLE INSTALLATION for reference.
USING YOUR REFRIGERATOR ENSURING PROPER AIR CIRCULATION NEXT In order to ensure proper temperatures, air must flow between the refrigerator and freezer sections. As shown in the illustration below, cool air enters through the refrigerator of the freezer section and moves up. Most of the air then flows through the freezer section vents and recirculates under the freezer floor. The rest of the air enters the refrigerator section through the top vent. 1.
USING YOUR REFRIGERATOR Display Off Mode ICE PLUS The display lights up and stays lit when the refrigerator is plugged in for 60 seconds. After the display lights all off except the dispenser icon selected (CRUSH, WATER or CUBE) and the display only lights when door is opened or display button is pressed. Display turn off 20 seconds after door is closed or display button pressed. You can change the display always ON pressing “FREEZER” and “ICE PLUS” buttons at the same time for 5 seconds.
USING YOUR REFRIGERATOR ADJUSTING CONTROL SETTINGS FOOD STORAGE GUIDE Give the refrigerator time to cool down completely before making final adjustments. It is best to wait 24 hours before doing this. The initial settings mentioned in CONTROL PANEL FEATURES section should be correct for normal household refrigerator use. The controls are set correctly when milk or juice is as cold as you like and when ice cream is firm.
USING YOUR REFRIGERATOR STORING FROZEN FOOD WATER DISPENSER NOTE: For further information about preparing food for freezing or food storage times, check a freezer guide or a reliable cookbook. Your refrigerator has a mechanism that dispatch cool water and ice cubes without open the door. • Tray can be easily removed by pressing and pulling it. Packaging Successful freezing depends on correct packaging. When you close and seal the package, it must not allow air or moisture in or out.
USING YOUR REFRIGERATOR ICEMAKER COVER C A U T I O N If you need acces to the Icemaker, follow these steps: When opening the container with the small opening, use it near the opening of the water or ice dispenser as close as possible. • Remove the ice storage bin. See ICE STORAGE BIN for reference. • Lift the icemaker cover and pull it out as shown in the figure below. ICE STORAGE BIN The ice bin stores the ice cubes made by the ice maker.
USING YOUR REFRIGERATOR CRISPER AND CRISPER COVER REFRIGERATOR SHELVES CAUTION The crisper allows a better conservation of the fruits and vegetables, letting keep moisture in the interior easily. • To remove the crisper compartment cover, pull out the crisper compartment a bit to the front , lift the front part of the cover as shown in ‚, and take it out l. Make sure to keep shelf horizontal while removing; otherwise it may drop.
USING YOUR REFRIGERATOR FREEZER SHELF ►Shelf Freezer wire (Identify your Shelf freezer type) • Pull the shelf towards the front . The shelf hook will contact the support on the guide. Lift the shelf so the hook clears the guide support (view detail). To assemble or disassemble the freezer shelf (Wire or Glass), follow the next steps: Support guide Hook Shelf Freezer glass 1 Hook Detail Shelf Freezer wire • Tilt the shelf (as shown in figure) ‚, and then pull it toward you ƒ.
USING YOUR REFRIGERATOR Installing the water filter Remove red cap from the filter and insert the two tabs on the filter tip into the two slots in the refrigerator filter receptacle. You should feel the filter entering completely. Turn the filter to the right a quarter turn clockwise to lock it into place. The locked symbol will be lined up with the indicator arrow. WATER FILTER Before removing or installing water filter: 1. Take out the top shelf and move it to the lowest level. 2.
CARE AND CLEANING DOOR LINERS AND GASKETS WARNING Do not use cleaning waxes, concentrated detergent, bleaches, or cleaners containing petroleum on plastic refrigerator parts. Use a clean sponge or soft cloth and a mild detergent in warm water. Wash, rinse and dry all surfaces thoroughly. PLASTIC PARTS (covers and panels) Explosion Hazard Do not use windows sprays, abrasive cleaners, or flammable fluids. These can scratch or damage the material.
CARE AND CLEANING To change the refrigerator and freezer lamp: Remove cover by pressing upward on bottom and rotating outward ‚ turn the bulb counterclockwise. Replace with 40 watt (maximum) appliance bulb. • DO NOT refreeze frozen foods which have thawed completely. The United States Department of Agriculture in Home and Garden Bulletin No. 69 says: ...You may safely refreeze frozen foods that have thawed if they still contain ice crystals or if they are still cold-below 39 °F (4 °C). ...
CARE AND CLEANING 6. Take out all removable parts, wrap them well and tape together so they don’t shift and rattle during the move. Refer to sections in Using your Refrigerator for removal instructions. 7. Depending on the model, raise the front of the refrigerator so it rolls more easily OR screw in the leveling legs all the way so they don’t scrape the floor. See the DOOR ALIGNMENT section. 8. Tape the doors shut and tape the power cord to the refrigerator cabinet.
CONNECTING THE WATER LINE BEFORE YOU BEGIN WHAT YOU WILL NEED This water line installation is not warranted by the refrigerator or icemaker manufacturer. Follow these instructions carefully to minimize the risk of expensive water damage. Copper Tubing, 1/4” (6.35 mm) outer diameter to connect the refrigerator to the water supply. Be sure both ends of the tubing are cut square.
CONNECTING THE WATER LINE 5. TIGHTEN THE PIPE CLAMP INSTALLATION INSTRUCTIONS Install the shutoff valve on the nearest frequently used drinking water line. Tighten the clamp screws until the sealing washer begins to swell. CAUTION NOTE: Do not overtighten or you may crush the tubing. Washer Only connect to the potable water provision. Pipe Clamp 1. SHUTOFF THE MAIN WATER SUPPLY Inlet End Clamp Screw Turn on the nearest faucet to relieve the pressure on the line. 2.
CONNECTING THE WATER LINE 8. FLUSH OUT THE TUBING Turn the main water supply on and flush out the tubing until the water is clear. 1 Tubing Clamp Shut the water off at the water valve after about one quart of gallon of water has been flushed through the tubing. 1/4" (6.35 mm) Tubing 1/4" (6.35 mm) Compression Nut 2 Ferrule (Sleeve) 9.
TROUBLESHOOTING GUIDE • The defrost timer will click when the automatic defrost cycle begins and ends. The thermostat control (or refrigerator control, depending on the model) will also click when cycling on and off. UNDERSTANDING SOUNDS YOU MAY HEAR Your new refrigerator may make sounds that your old one didn’t make. Because the sounds are new to you, you might be concerned about them. Most of the new sounds are normal.
TROUBLESHOOTING GUIDE LAMPS DO NOT WORK Check if... Light bulb has burned out. Then... Replace with an appliance bulb of the same wattage, size and shape available at your local hardware store. (See the LAMP REPLACEMENT section.) Turn the temperature control to the OFF position and unplug the refrigerator prior to replacement. COMPRESSOR MOTOR SEEMS TO RUN TOO MUCH Check if... Then... The refrigerator that was replaced was an older model.
TROUBLESHOOTING GUIDE THE ICEMAKER IS NOT PRODUCING ICE OR ICE CUBES ARE FREEZING TOO SLOWLY Check if... Then... The freezer temperature is cold enough to produce ice. Wait 24 hours after hook-up for ice production. See the CONTROL PANEL FEATURES section. Door left open. Check to see if something is holding the door open. CUBES PRODUCED BY ICEMAKER ARE TOO SMALL Check if... Water shutoff valve connecting refrigerator to water line may be clogged. Then... Call a plumber to clear the valve.
TROUBLESHOOTING GUIDE TEMPERATURE IS TOO WARM OR THERE IS INTERIOR MOISTURE BUILDUP (CONTINUED) Check if... Then... The doors are opened often. When the door is opened, warm humid air is allowed into the refrigerator. The more the door is opened, the faster the humidity builds up, and the more warm air the refrigerator must cool.
TROUBLESHOOTING GUIDE ICE HAS OFF-TASTE OR ODOR Check if... Then... The icemaker was recently installed. Discard first few batches of ice to avoid discolored or off-flavored ice. The ice has been stored for too long. Throw away old ice and make new supply. The food has not been wrapped tightly in either compartment. Rewrap foods since odors may migrate to the ice if food is not wrapped properly. The water supply contains minerals such as sulfur.
WARRANTY LG Electronics Visit our web site/http://www.lgservice.com LIMITED WARRANTY United States of America LG Electronics will repair or at its option replace, without charge, your product which proves to be defective in material or workmanship under normal use during the warranty period listed below from the date of original purchase. This warranty is good only to the original purchaser of the product during the warranty period as long as it is in the U.S. including Alaska, Hawaii, and U.S.
TABLA DE CONTENIDO Cuidado y Limpieza 48-50 Instrucciones Importantes de Seguridad 32 Requerimientos de Conexión a Tierra 33 Consejos Generales de Limpieza 48 Partes y Funciones 34 Exterior 48 Paredes Internas 48 Instalación del Refrigerador 35-39 Desempaque del Refrigerador 35 Revestimiento de las Paredes 48 Instalación 35 Partes Plásticas 48 Instalación de la Cubierta Inferior 35 Tapa Posterior 48 Desinstalación de la manija 36 Cambio de Lámpara Desinstalación y Reemplazo de
INSTRUCCIONES IMPORTANTES DE SEGURIDAD Esta guía contiene muchos mensajes importantes de seguridad. Siempre lea y obedezca todos los mensajes de seguridad. Este es el símbolo de advertencia de seguridad. Le avisa de mensajes de seguridad que le informan sobre peligros potenciales que pueden ocasionar la muerte o una lesión a usted y a los demás, o causar daño al producto. Todos los mensajes serán precedidos por el símbolo de alerta de seguridad y de la palabra PELIGRO, ADVERTENCIA o PRECAUCION.
PELIGRO: LOS NIÑOS SE PUEDEN QUEDAR ENCERRADOS El quedar atrapado y asfixia de niños no es un problema del pasado. Los refrigeradores tirados y abandonados son un peligro, aún si van a quedar ahí “por unos cuantos días”. Si Ud. está por deshacerse de su refrigerador viejo, por favor siga las instrucciones que se dan a continuación para prevenir accidentes. Antes de tirar su refrigerador o congelador cuando ya no se use: • Saque las puertas.
PARTES Y FUNCIONES G A H B I J C K D H A L M E A L F Utilice esta sección para familiarizarse con las puertas y funciones. Se incluyen las referencias de páginas para su conveniencia. NOTA: Esta guía cubre varios modelos distintos. El refrigerador que se ha comprado puede contener algunos o todos los artículos mencionados abajo. La ubicación de las funciones presentadas puede que no sean iguales que su modelo.
INSTALACIÓN DEL REFRIGERADOR ADVERTENCIA INSTALACIÓN 1. Evite colocar la unidad cerca de fuentes de calor, sol directo o humedad. 2. Para minimizar el ruido y la vibración, el refrigerador TIENE que estar instalado sobre un piso sólidamente construido. 3. No se recomiendan superficies con alfombras o de losas suaves. 4. NUNCA instale el refrigerador sobre una plataforma o una estructura con soporte débil. 5. Instale este producto en un área donde la temperatura este entre 41 °F (5 °C) y 110 °F (43 °C.
INSTALACIÓN DEL REFRIGERADOR • Afloje los tornillos de fijación con llave Allen de 3/32” (2,38 mm) y retire la manija. DESINSTALACION DE LA MANIJA (Identifique su tipo de manija) NOTA: Es recomendable remover las puertas del refrigerador solo cuando sea necesario moverlo a través de un área estrecha. Es necesario, seguir las instrucciones para remover las manija de las puertas. • Agarre la manija firmemente con ambas manos y hágala deslizar hacia arriba (1) (esto puede requerir bastante fuerza).
INSTALACIÓN DEL REFRIGERADOR 5. Coloque la puerta con la parte exterior hacia arriba, sobre una superficie lisa para evitar rayarla. ADVERTENCIA Peligro de descarga eléctrica PRECAUCION: Cuando levante y libere la bisagra, • Desconecte el suministro eléctrico al refrigerador antes de instalar. El no hacerlo puede dar como resultado una lesión seria o la muerte. • No ponga las manos o los pies u otros objetos en las salidas de aire, la parrilla inferior, o debajo del refrigerador.
INSTALACIÓN DEL REFRIGERADOR Reinstale la puerta izquierda (Congelador): 5. Gire el ajustador de la bisagra (5) en contra de las manecillas del reloj . Levante la bisagra superior (6) retire la palanca de la bisagra (7). (2) NOTA: Independientemente del tipo de ajustador de bisagra que tenga (5); tipo1: sin remache ó tipo 2: con remache el proceso de desensamble es el mismo. (1) P R E C A U C I O N : Cuando levante y libere la bisagra, tenga cuidado de que la puerta no caiga hacia adelante. (7) 7.
REFRIGERATOR INSTALACIÓN DEL INSTALLATION REFRIGERADOR ALINEAMIENTO DE PUERTAS Ajuste el nivel cuando la puerta del refrigerador este más abajo que la puerta del congelador durante la instalación del refrigerado.r. Antes de ajustar las puertas, remueva la Cubierta Inferior. Para referencia vea la sección INSTALACION DE LA CUBIERTA INFERIOR. Herramientas que necesitas • Llave de tuercas de 5/16 in (8 mm). • Llave de tuercas de 3/4 in (19 mm).
REFRIGERATOR INSTALLATION USO DEL REFRIGERADOR SIGUIENTE PASO ASEGURANDO EL FLUJO DE AIRE ADECUADO Para asegurar las temperaturas adecuadas, el aire debe fluir entre las secciones del refrigerador y congelador. Como se muestra en la ilustración de abajo, el aire frío entra por la sección del congelador y se mueve hacia arriba. La mayor parte del aire entonces fluye por los conductos y recircula bajo el piso del congelador. El resto del aire entra a la sección del refrigerador por el conducto superior. 1.
REFRIGERATOR INSTALLATION USO DEL REFRIGERADOR Modo de apagado del Control de temperatura Aviso de puerta abierta El panel se ilumina y permanece encendida durante 60 segundos cuando el refrigerador se ha conectado. Después las luces del panel se apagarán a excepción de la opción que tenga seleccionada [CRUSH (hielo triturado), WATER (agua) ó CUBES (cubos de hielo)] y el panel solo enciende cuando se abre la puerta o se presiona algún botón.
REFRIGERATOR INSTALLATION USO DEL REFRIGERADOR AJUSTE DE LOS CONTROLES De tiempo a su refrigerador de enfriar completamente antes de hacer ajustes. Es mejor esperar 24 horas antes de hacer algún cambio. Las configuraciones recomendadas en la sección de PANEL DE CONTROL deberán ser apropiadas para el uso normal de un refrigerador de casa. Los controles están ajustados correctamente cuando la leche o el jugo estén tan fríos como usted quiere o cuando el helado esté firme.
REFRIGERATOR INSTALLATION USO DEL REFRIGERADOR DISPENSADOR DE AGUA ALMACENAMIENTO DE ALIMENTOS CONGELADOS Su refrigerador cuenta con un sistema que le permite tener agua fria y hielos sin necesidad de abrir la puerta del refrigerador. NOTA: Para más información sobre como congelar alimentos o tiempos para almacenar alimentos, revise una guía para el congelador o un libro de cocina confiable. Empaque • La bandeja se remueve fácilmente presionando y extrayéndola.
REFRIGERATOR INSTALLATION USO DEL REFRIGERADOR CUBIERTA DE LA FABRICA DE HIELO Si usted necesita tener acceso a la fábrica de hielo, siga los siguentes pasos: P R E C A U C I O N Cuando abra el compartimiento ligeramente, manténgase lo más cerca posible de la salida del agua o del dispensador de hielo. • Remueva la bandeja para hielo. Vea la sección BANDEJA PARA HIELO para referencia. • Levante la bandeja para hielo y jale hacia afuera como se muestra en la figura.
REFRIGERATOR INSTALLATION USO DEL REFRIGERADOR COMPARTIMIENTO Y TAPA PARA VERDURAS ESTANTES DEL REFRIGERADOR PRECAUCION Este compartimiento permite una mejor conservación de las frutas y verduras. Cerciórese de que el estante no contenga ningún alimento antes de moverlo. • Para retirar la cubierta del compartimiento de verduras saque un poco el compartimiento para verduras , levante un poco la cubierta por la parte de enfrente como se muestra en la figura ‚, y retírela l.
USO DEL REFRIGERADOR ►Estante de alambre del congelador ESTANTE DEL CONGELADOR (Identifique su tipo de estante) Jale el estante hacia usted j. Usted sentirá que el estante se atora, esto quiere decir que el gancho del estante está en la parte plana de la guía que soporta la bandeja (Ver detalle).
USO DEL REFRIGERADOR FILTRO PARA AGUA Antes de remover o instalar el filtro de agua: 1. Extraiga el estante superior y coloquelo en el nivel más bajo. 2. IMPORTANTE: Cierre el abastecimiento de agua de la casa. Instalando el filtro de agua: Remueva la tapa roja del filtro e inserte las dos costillas del filtro en las dos ranuras del receptáculo del filtro del refrigerador. Debe sentir que el filtro entra completamente.
REFRIGERATOR CUIDADO Y INSTALLATION LIMPIEZA -2 cucharadas de bicarbonato de sodio a 1 cuarto de agua (26 g de sodio a 1 litro de agua). Asegúrese que el bicarbonato de sodio se disuelva completamente para que no raye las superficies del refrigerador. ADVERTENCIA REVESTIMIENTOS DE LAS PUERTAS No utilice limpiadores de ceras, detergentes concentrados, blanqueadores o limpiadores que contengan petróleo en partes plásticas. Utilice una esponja limpia o un paño suave con detergente suave en agua tibia.
REFRIGERATOR CUIDADO Y INSTALLATION LIMPIEZA Para cambiar la lámpara del refrigerador y del congelador: Remueva la cubierta presionando hacia arriba y gire hacia abajo ‚ gire la lámpara en contra de las manecillas del reloj. Reemplace con una lámpara de 40 watt (máximo). ADVERTENCIA No vuelva a congelar la comida que se ha descongelado completamente. El Departamento de Agricultura en Casa de los Estados Unidos en su boletín No. 69 indica: ...
REFRIGERATOR CUIDADO Y INSTALLATION LIMPIEZA 3. Limpie el refrigerador y séquelo bien. 4. Vacíe el agua de la bandeja de descongelar. 5. Limpie y seque completamente. 6. Saque todas las partes desmontables, envuélvalas bien y júntelas para que no se muevan durante la mudanza. Para referencia vea la sección USO DEL REFRIGERADOR. 7. Dependiendo del modelo, levante la parte frontal del refrigerador para que ruede más fácilmente ó atornille las patas niveladoras completamente para que no rayen el piso.
REFRIGERATOR INSTALLATION CONEXIÓN DE LA TUBERÍA DE AGUA QUÉ NECESITARÁ ANTES DE COMENZAR La instalación de la tubería de agua no está garantizada • Tubos de cobre, de 1/4” (6,35 mm) de diámetro por el fabricante del refrigerador o de la fábrica de hielos. externo para conectar el refrigerador al Siga las instrucciones cuidadosamente para minimizar suministro de agua. Asegúrese el r iesgo de daños al producto. que ambos lados del tubo están cortados equitativamente.
REFRIGERATOR INSTALLATION CONEXIÓN DE LA TUBERÍA DE AGUA NOTA: Se adjudica el Código de Fontanería 248CMR del Estado de Massachusetts. Las Válvulas tipo silla son ilegales y no se permiten en Massachusetts. Consulte a su fontanero con licencia. INSTRUCCIONES DE INSTALACIÓN Instale la válvula de cierre en la tubería más cercana utilizada para agua potable. P R E C A U C I O N 5. APRIETE LA ABRAZADERA PARA TUBERÍA Conectar solamente al suministro de agua potable.
REFRIGERATOR INSTALLATION CONEXIÓN DE LA TUBERÍA DE AGUA 8. ENJUAGANDO LA TUBERÍA Abrazadera para tubería Gire el suministro principal de agua hacia la derecha y drene la tubería hasta que el agua esté clara. 2 Férula (manga) 9. CONECTE LA TUBERÍA AL REFRIGERADOR • Si su refrigerador no tiene un filtro de agua, le recomendamos que instale uno si su suministro de agua contiene arena o partículas que puedan tapar la capa de la válvula de agua del refrigerador.
REFRIGERATOR GUÍA DE SOLUCIÓNINSTALLATION DE PROBLEMAS ENTENDIENDO LOS SONIDOS QUE ESCUCHA • El cronómetro de descongelación suena cuando el ciclo automático de descongelación comienza y termina. El control del termostato (o control del refrigerador, dependiendo el modelo) también sonará cuando el ciclo comience y termine. • Sonidos ruidosos puede venir del flujo del refrigerante, de la tubería de agua o de artículos almacenados encima del refrigerador.
REFRIGERATOR GUÍA DE SOLUCIÓNINSTALLATION DE PROBLEMAS LAS LÁMPARAS NO FUNCIONAN Revise si... Entonces... El cable de electricidad está desconectado. Firmemente conecte el cable en un receptáculo con el voltaje adecuado. El foco de luz está suelto. Desconecte el refrigerador o corte la corriente de electricidad en el cortacircuito o la caja de fusibles. Cuidadosamente quite la lámpara y vuélvalo a poner. Luego conecte el refrigerador y reajuste los controles del refrigerador.
REFRIGERATOR GUÍA DE SOLUCIÓNINSTALLATION DE PROBLEMAS LAS PUERTAS NO CIERRAN COMPLETAMENTE Revise si... Entonces... El refrigerador no esta nivelado. Vea la sección INSTALACIÓN DEL REFRIGERADOR y ALINEAMIENTO DE PUERTAS. Paquetes de alimentos están bloqueando la puerta. Reorganice los envases de comida para limpiar un poco la puerta y los anaqueles de la puerta. El recipiente de hielo, la tapa del compartimiento de verduras, estantes, anaqueles de las puertas están fuera de posición.
REFRIGERATOR GUÍA DE SOLUCIÓNINSTALLATION DE PROBLEMAS LA FÁBRICA DE HIELO NO FUNCIONA Revise si... Entonces... El interruptor de la fábrica está en la posición OFF (apagado). Mueva el interruptor a la posición de ON (encendido). El suministro de agua está apagado o no está conectado. Vea la sección de CONEXIÓN DE LA TUBERÍA DE AGUA. El compartimiento del congelador está muy caliente. Espere 24 horas para que el congelador alcance la temperatura ideal.
REFRIGERATOR GUÍA DE SOLUCIÓNINSTALLATION DE PROBLEMAS ESCARCHA O CRISTALES DE HIELO EN LOS ALIMENTOS CONGELADOS Revise si... Entonces... La puerta no está cerrando adecuadamente. . Vea la sección “Las puertas no cierran completamente”. La puerta está abierta frecuentemente. Cuando la puerta está abierta, entra aire caliente y húmedo al congelador causando la escarcha. EL HIELO TIENE MAL OLOR O SABOR Revise si... Entonces... La máquina de hielo se instaló recientemente.
REFRIGERATOR INSTALLATION GARANTÍA LG Electronics Visite nuestro sitio web/http://www.lgservice.com GARANTÍA LIMITADA Estados Unidos de América LG Electronics reparará o en su defecto reemplazará sin cargo, el producto defectuoso en material o mano de obra bajo uso normal durante el periodo de garantía que se menciona a continuación desde la fecha original de compra. Esta garantía es válida solo para el comprador original del producto durante el periodo de garantía mientras permanezca en los E.E. U.U.
Part No.