ENGLISH ESPAÑOL OWNER’S MANUAL SIDE BY SIDE REFRIGERATOR Please read this manual carefully before operating your set and retain it for future reference. MANUAL DE USUARIO REFRIGERADOR DE DOS PUERTAS Lea detenidamente este manual antes de empezar a utilizar el refrigerador y guárdelo como referencia para el futuro. Model Name/Nombre de Modelo**=color number/número de color LSC27925** P/No. MFL63719704 www.lg.
WARRANTY Visit our web site http://www.lg.com LG Electronics LIMITED WARRANTY United States of America LG Electronics will repair or at its option replace, without charge, your product which proves to be defective in material or workmanship under normal use during the warranty period listed below from the date of original purchase. This warranty is good only to the original purchaser of the product during the warranty period as long as it is in the U.S. including Alaska, Hawaii, and U.S. Territories.
TABLE OF CONTENTS Warranty (USA) 1-2 English Version 3-26 Spanish Version 27-50 Important Safety Instructions Requirements for Ground Connection 4-5 5 Refrigerator Installation Unpacking your Refrigerator Installation Base Grille Installation Handle Removal Handle Installation Removing and Replacing Refrigerator Doors Door Alignment Connecting the Water Line 6-11 6 6 6 7 7 Refrigerator Features Using your Refrigerator Ensuring Proper Air Circulation Prior to Use Control Panel Features Refrigerat
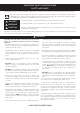
IMPORTANT SAFETY INSTRUCTIONS SAFETY MESSAGES This manual contains several important safety notices. Always read and obey all of the following safety messages. This is the safety alert symbol. This symbol is a warning to potential dangers that could cause death, injury or damage to you, others or the product. All safety messages will follow after this warning symbol and the word “DANGER”, “CAUTION” or “WARNING”.
CAUTION This appliance is not intended for use by children, persons with physical or mental disabilities, persons with reduced sensory or mental capacity, or persons with lack of experience or know-how, unless they have supervision or instruction in relation to the use of the appliance by the person responsible for their safety. Children should be supervised to assure that they do not play with the appliance.
REFRIGERATOR INSTALLATION is between 41 °F (5 °C) and 110 °F (43 °C). If the temperature around the appliance is too low or high, cooling ability may be adversely affected. WARNING EXCESSIVE WEIGHT HAZARD Use the assistance of two or more persons to move or install the refrigerator. Not following these instructions may cause injury to the back and other parts of the body.
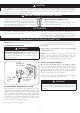
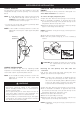
REFRIGERATOR INSTALLATION HANDLE REMOVAL REMOVING AND REPLACING REFRIGERATOR DOORS You may have to remove the door handles to move the refrigerator through a narrow opening. See instructions below. Before removing the doors, remove the base grille. See “Base Grille Installation” for reference. NOTE: To avoid damaging door surfaces when moving the refrigerator through narrow openings, it is ALWAYS recommended to remove the doors as instructed in the next two pages.
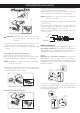
REFRIGERATOR INSTALLATION 1. Feed the water tubes through the lower hinge pin and place the door onto the lower hinge pin. 2. Fit top hinge (6) over hinge lever latch (7) and into place. Rotate lever (5) clockwise to secure hinge. Figure 1 NOTE: Regardless of hinge lever type, reinstallation process is the same. (2 ) (1 ) (5) (3) (4) 3. Install the grounding screw (4) and connect all the wire harnesses (3). 4. Hook tab on door switch side of cover (2) under edge of wire opening in cabinet top.
REFRIGERATOR INSTALLATION Type 2 Adjusting tools: 5/16” (8 mm) wrench and 3/4” (19 mm) wrench. Height difference When using any electrical device (such as a power drill) during installation, be sure the device is double insulated or grounded in a manner to prevent the hazard of electric shock, or is battery-powered. All installations MUST be in accordance with local plumbing code requirements. Keeper Nut Wrench Height Adjustment difference hinge pin NOTE: Wear eye protection.
REFRIGERATOR INSTALLATION • Two 1/4” (6,35 mm) outer diameter compression nuts and 2 ferrules (sleeves) to connect the copper tubing to the shutoff valve and the refrigerator water valve. 4. FASTEN THE SHUTOFF VALVE Fasten the shutoff valve to the cold water pipe with the pipe clamp.
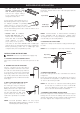
REFRIGERATOR INSTALLATION Back of refrigerator Tubing Clamp Saddle-Type Shutoff Valve Compression Nut 1/4” (6,35 mm) Compression Nut Packing Nut Outlet Valve 1/4” (6,35 mm) Tubing Ferrule (sleeve) Ferrule (sleeve) Figure 1 Refrigerator Connection NOTE: Commonwealth of Massachusetts Plumbing Codes 248CMR shall be adhered to. Saddle valves are illegal and use is not permitted in Massachusetts. Consult with your licensed plumber.
REFRIGERATOR FEATURES Use this page to become more familiar with the parts and features. NOTE: This guide covers several different models. The refrigerator you have purchased may have some or all of the items listed below. The locations of the features shown below may not match your model. A Freezer Door Rack H Refrigerator Lamp (LED) B Automatic Ice maker I Water Filter J Refrigerator Shelf The ice is produced in the icemaker and sent to the dispenser.
USING YOUR REFRIGERATOR ENSURING PROPER AIR CIRCULATION freezer compartment to ensure proper cooling. Your refrigerator is now ready for use. In order to ensure proper temperatures, air MUST flow between the refrigerator and freezer sections. CONTROL PANEL FEATURES • Cool air enters the freezer through the vents located at the top of the compartment and exits through the vents located behind the freezer drawers.
USING YOUR REFRIGERATOR Light up the crushed ice lamp by pressing the selection button. The icon will be illuminated. freezer, start by adjusting the refrigerator and allow 24 hours for the temperature to stabilize. If it is too warm or too cold, then adjust the freezer control. Use the settings listed in the chart below as a guide. Always remember to wait at least 24 hours between adjustments. To dispense water or ice, gently push your cup against the dispenser pad.
USING YOUR REFRIGERATOR The ice maker will produce 12 cubes per cycle, approximately 140-150 cubes in a 24 hour period, depending on freezer compartment temperature, room temperature, number of door openings and other operating conditions. If the refrigerator is used before the water connection is made to the ice maker, set the power switch to OFF (O). Throw away the first few batches of ice to allow the water line to clear. Be sure nothing interferes with the sweep of the feeler arm.
USING YOUR REFRIGERATOR NOTE: Allow hot foods to cool at room temperature for 30 minutes, then package and freeze. Cooling hot foods before freezing saves energy. place easily, twist the drive device slightly. • Hold the ice storage bin and pull it out while slightly lifting it shown in the figure. • To assemble the ice storage bin, push it while slightly lifting it . • Make sure it is fully engaged into the auger drive .
USING YOUR REFRIGERATOR SNACK PAN HUMIDITY CONTROLS • To remove the snack pan cover, pull out the snack pan compartment a bit to the front , then lift the front part of the snack pan compartment later raises a little the snack pan compartment until it leaves the top of the shelf as shown in , and take it out. You can control the amount of humidity in the moisture sealed crispers. Adjust the control to any setting between “HIGH” and “LOW”.
USING YOUR REFRIGERATOR Fixed Shelf: • Lightly lift up the front part of the shelf to pull it towards you ,then take it out while lifting the rear part of shelf . FREEZER SHELF To assemble or disassemble the freezer shelf, follow the next steps: • Lift the left part of the shelf a bit. Lift it to the direction , push the right part to the direction and take it out.
FILTER WATER FILTER • Push the water filter up into the filter receptacle and rotate it clockwise to lock it into place. Once installed correctly, the lock symbol should be facing you and you should not be able to rotate the filter clockwise anymore. Filter Reset: When the filter icon turns on, you have to change the water filter. Press the Filter button for 3 seconds to turn the icon off. Before removing or installing water filter: • IMPORTANT: Turn off household water supply.
FILTER Performance Data Sheet Models Number 5231JA2002A-S Use with replacement cartridge 5231JA2002A This system has been tested according to NSF/ANSI Standards 42 for the reduction of the substances listed below. The concentration of the indicated substances in water entering the system was reduced to a concentration less than or equal to the permissible limit for water leaving the system as specified in NSF/ANSI 42.
CARE AND CLEANING PLASTIC PARTS (covers and panels) WARNING Do not use window sprays, abrasive cleaners, or flammable fluids. These can scratch or damage the material. Use a clean sponge or soft cloth and a mild detergent in warm water. Wash, rinse and dry all surfaces thoroughly. EXPLOSION HAZARD BACK COVER Use non-flammable cleaner. Failure to do so can result in death, explosion, or fire. WARNING Both the refrigerator and freezer sections defrost automatically.
CARE AND CLEANING REMEMBER: In a power failure, a full freezer stays cold longer than a partially filled one. If you see that food contains ice crystals, it may be affected. If the condition of the food is poor, or if you feel it is unsafe, dispose of it. refrigerator so it rolls more easily OR screw in the leveling legs all the way so they don’t scrape the floor. See the “Door Alignment” section. 8. Tape the doors shut and tape the power cord to the refrigerator cabinet.
TROUBLESHOOTING GUIDE UNDERSTANDING SOUNDS YOU MAY HEAR Your new refrigerator may make sounds that your old one did not make. Because the sounds are new to you, you might be concerned about them. Most of the new sounds are normal. Hard surfaces, like the floor, walls and cabinets, can make the sounds seem louder than they actually are. The following list describes the kinds of sounds and what may be making them. Problem • The defrost timer will click when the automatic defrost cycle begins and ends.
TROUBLESHOOTING GUIDE Problem COMPRESSOR MOTOR SEEMS TO RUN TOO MUCH Possible Causes Solutions • The doors are not closed completely. • Push the doors firmly shut. If they will not shut all the way, see Doors will not close completely below. • The condenser coils are dirty. • This prevents air transfer and makes the motor work harder. Clean the condenser coils. Refer to the “Care and Cleaning” section. • The refrigerator is not level.
TROUBLESHOOTING GUIDE Problem CUBES PRODUCED BY ICE MAKER ARE TOO SMALL ICE HAS BAD TASTE OR ODOR THERE IS WATER IN THE DEFROST DRAIN PAN Possible Causes Solutions • Water shutoff valve connecting • Call a plumber to clear the valve. refrigerator to water line may be clogged. • The ice maker was recently installed. • Discard first few batches of ice to avoid discolored or off-flavored ice. • The ice has been stored for too • Throw away old ice and make new supply. long.
TROUBLESHOOTING GUIDE Problem NOT DISPENSING ICE Possible Causes Solutions • The ice dispenser is stalling while • Change the ice button from “crushed” to “cubed”. dispensing “crushed” ice. If cubed ice dispenses correctly, depress the button for“crushed” ice and begin dispensing again. • Ice maker power switch in the OFF • Move the switch to the ON (I) position. (O) position. • Water supply turned off or not • See the “Connecting the Water Line” section. connected. • The dispenser display is locked.
LG Customer Information Center 1-800-243-0000 1-888-865-3026 1-888-542-2623 USA, Consumer User USA, Commercial User CANADA Register your Product Online! www.lg.