LSC27931** REFRIGERATOR Owner´s Manual REFRIGERADOR Manual de Usuario Lea detenidamente estas instrucciones antes de utilizar el refrigerador y guárdelas como referencia para el futuro.
TABLE OF CONTENTS Care and Cleaning 17-19 Important Safety Instructions 3 Grounding Requirements 4 General Cleaning Tips 17 Refrigerator Features 5 Outside 17 Inside Walls 17 Refrigerator Installation 6-9 Unpacking you Refrigerator 6 Door Liners and Gaskets 17 Installation 6 Plastic Parts 17 Base Grille Installation 6 Back Cover 17 Handle Removal 7 Lamp Replacement 18-19 7-8 Power Interruptions 18 When you go on vacation 18 When you move 18 Operations Instructions 19
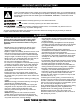
IMPORTANT SAFETY INSTRUCTIONS This guide contains many important safety messages. Always read and obey. This is the safety alert symbol. It alerts you to safety messages that inform you of hazards that can kill or hurt you or others, or cause damage to the product. All safety messages will be preceded by the safety alert symbol and the hazard signal word DANGER, WARNING, or CAUTION. These words mean: You will de killed or seriously injured if you don’t follow instructions.
DANGER: RISK OF CHILD ENTRAPMENT This appliance is not intended for use by persons (including children) with reduced physical, sensory or mental capabilities, or lack of experience and knowledge, unless they have been given supervision or instruction concerning use of the appliance by a person responsible for their safety. Child entrapment and suffocation are not problems of the past. Junked or abandoned refrigerators are still dangerous… even if they will sit for “just a few days”.
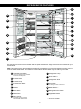
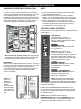
REFRIGERATOR FEATURES G H A I B J K C L B I M D N P E D N F Use this page to become more familiar with the parts and features. Page references are included for your convenience. Note: This guide covers several different models.The refrigerator you have purchased may have some or all of the items listed below. The locations of the features shown below may not match your model. A Automatic Ice Maker I Refrigerator Lamp The ice is produced in the icemaker and sent to the dispenser.
REFRIGERATOR INSTALLATION WARNING INSTALLATION 1. Avoid placing unit near heat sources, direct sunlight or moisture. 2. To minimize noise and vibration, the refrigerator MUST be installed on a solidly constructed floor. 3. Carpeting and soft tile surfaces are not recommended. 4. NEVER install the refrigerator on a platform or a weakly supported structure. 5. Install this appliance in an area where the temperature is between 41 °F (5 °C) and 110 °F (43 °C).
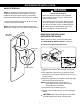
REFRIGERATOR INSTALLATION HANDLE REMOVAL WARNING NOTE: It is ALWAYS recommended to remove the refrigerator doors when it is necessary to move the refrigerator through a narrow opening. If necessary, follow the directions below to remove the door handles. Electric Shock Hazard • Disconnect electrical supply to the refrigerator before installing. Failure to do so could result in death or serious injury.
REFRIGERATOR INSTALLATION Removing the left (freezer) door with water line connection. (1) (2) • Pull up the water feed tube while pressing area (Figure 1) as shown in the figure below. (3) • NOTE:If a tube end is deformed or abraded, trim the part away. Disconnecting the tube under the door causes about 1.5 liters water to flow out. Put a large container at end of tube to prevent water from draining onto the floor.
REFRIGERATOR INSTALLATION DOOR ALIGNMENT Adjust the level when the refrigerator door is lower than the freezer door during the installation of the refrigerator. Before adjust the doors, remove the Base Grille. See BASE GRILLE INSTALLATION for reference. Tools you need • Wrench 5/16 in (8 mm) If the freezer compartment door is lower than the refrigerator compartment door, make them level by inserting flat blade screwdriver into the groove of the left leveling leg and rotating it clockwise.
USING YOUR REFRIGERATOR ENSURING PROPER AIR CIRCULATION NEXT In order to ensure proper temperatures, air must flow between the refrigerator and freezer sections. As shown in the illustration below, cool air enters through the refrigerator of the freezer section and moves up. Most of the air then flows through the freezer section vents and recirculates under the freezer floor. The rest of the air enters the refrigerator section through the top vent. 1.
USING YOUR REFRIGERATOR ICE PLUS Press this button once to activate the ice plus function. The ICE PLUS icon on the display panel will illuminate when activated. The ice plus function runs the freezer compartment at the coldest settings for a 24 hour period to increase ice making by up to about 20%, and then turn off automatically. Press the button again to cancel the Ice Plus function.
USING YOUR REFRIGERATOR ADJUSTING CONTROL SETTINGS FOOD STORAGE GUIDE Give the refrigerator time to cool down completely before making final adjustments. It is best to wait 24 hours before doing this. The initial settings mentioned in CONTROL PANEL FEATURES section should be correct for normal household refrigerator use. The controls are set correctly when milk or juice is as cold as you like and when ice cream is firm.
USING YOUR REFRIGERATOR STORING FROZEN FOOD WATER DISPENSER NOTE: For further information about preparing food for freezing or food storage times, check a freezer guide or a reliable cookbook. Your refrigerator has a mechanism that dispatch cool water and ice cubes without open the door. Packaging • Tray can be easily removed by pressing and pulling it. Successful freezing depends on correct packaging. When you close and seal the package, it must not allow air or moisture in or out.
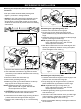
USING YOUR REFRIGERATOR CAUTION DOOR RACK AND SUPPORT When opening the container with the small opening, use it near the opening of the water or ice dispenser as close as possible. Your refrigerator features with racks where you can easily arrange packaged products. • Lift the door rack holding both sides and pull it out in ‚ direction. • Proper way to dispense water or ice.
USING YOUR REFRIGERATOR REFRIGERATOR SHELVES ICE STORAGE Carcompartment e an d Maishelf t nisenance The refrigerator adjustable so that you can place it at a height according to space requirement of foods. If you need remove the ice storage, follow the next instructions. • Hold the ice storage bin as shown in the figure and pull it out j while slightly lifting it k. • Slide shelf Pull the shelf ahead , then lift both front and rear ‚ while taking out ƒ.
USING YOUR REFRIGERATOR 2) Replace with a new cartridge. Take the new cartridge out of it’s packaging and remove protective cover from the o-rings. With cartridge knob in the vertical position, push the new filter cartridge into the cover until it stops. WATER FILTER It is recommended that you replace the filter when the water filter indicator light turns on or your water dispenser or ice maker decreases noticeably.
CARE AND CLEANING DOOR LINERS AND GASKETS WARNING Do not use cleaning waxes, concentrated detergent, bleaches, or cleaners containing petroleum on plastic refrigerator parts. Use a clean sponge or soft cloth and a mild detergent in warm water. Wash, rinse and dry all surfaces thoroughly. PLASTIC PARTS (covers and panels) Explosion Hazard Do not use windows sprays, abrasive cleaners, or flammable fluids. These can scratch or damage the material.
CARE AND CLEANING To change the refrigerator lamp: Remove cover by pressing upward on bottom and rotating outward ‚ turn the bulb counterclockwise. Replace with 40 watt (maximum) appliance bulb. • DO NOT refreeze frozen foods which have thawed completely. The United States Department of Agriculture in Home and Garden Bulletin No. 69 says: ...You may safely refreeze frozen foods that have thawed if they still contain ice crystals or if they are still cold-below 4 °C. ...
CARE AND CLEANING 6. Take out all removable parts, wrap them well and tape together so they don’t shift and rattle during the move. Refer to sections in Using your Refrigerator for removal instructions. 7. Depending on the model, raise the front of the refrigerator so it rolls more easily OR screw in the leveling legs all the way so they don’t scrape the floor. See the DOOR ALIGNMENT section. 8. Tape the doors shut and tape the power cord to the refrigerator cabinet.
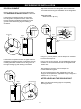
CONNECTING THE WATER LINE BEFORE YOU BEGIN WHAT YOU WILL NEED This water line installation is not warranted by the refrigerator or icemaker manufacturer. Follow these instructions carefully to minimize the risk of expensive water damage. Copper Tubing, 1/4” (6.35 mm) outer diameter to connect the refrigerator to the water supply. Be sure both ends of the tubing are cut square.
CONNECTING THE WATER LINE 5. TIGHTEN THE PIPE CLAMP INSTALLATION INSTRUCTIONS Install the shutoff valve on the nearest frequently used drinking water line. Only connect to the potable water provision. Tighten the clamp screws until the sealing washer begins to swell. NOTE: Do not overtighten or you may crush the tubing. Washer 1. SHUTOFF THE MAIN WATER SUPPLY Turn on the nearest faucet to relieve the pressure on the line. Pipe Clamp Inlet End Clamp Screw 2.
CONNECTING THE WATER LINE 8. FLUSH OUT THE TUBING Tubing Clamp Turn the main water supply on and flush out the tubing until the water is clear. 1/4" (6.35 mm) Tubing 1 Shut the water off at the water valve after about one quart of gallon of water has been flushed through the tubing. 1/4" (6.35 mm) Compression Nut 2 Ferrule (Sleeve) 9.
TROUBLESHOOTING GUIDE • The defrost timer will click when the automatic defrost cycle begins and ends. The thermostat control (or refrigerator control, depending on the model) will also click when cycling on and off. UNDERSTANDING SOUNDS YOU MAY HEAR Your new refrigerator may make sounds that your old one didn’t make. Because the sounds are new to you, you might be concerned about them. Most of the new sounds are normal.
TROUBLESHOOTING GUIDE LAMPS DO NOT WORK Check if... Light bulb has burned out. Then... Replace with an appliance bulb of the same wattage, size and shape available at your local hardware store. (See the LAMP REPLACEMENT Section.) Turn the temperature control to the OFF position and unplug the refrigerator prior to replacement. COMPRESSOR MOTOR SEEMS TO RUN TOO MUCH Check if... Then... The refrigerator that was replaced was an older model.
TROUBLESHOOTING GUIDE THE ICEMAKER IS NOT PRODUCING ICE OR ICE CUBES ARE FREEZING TOO SLOWLY Check if... Then... The freezer temperature is cold enough to produce ice. Wait 24 hours after hook-up for ice production. See the CONTROL PANEL FEATURES section. Door left open. Check to see if something is holding the door open. CUBES PRODUCED BY ICEMAKER ARE TOO SMALL Check if... Then... Smaller cube size level is selected. Select larger cube size using cube size selector.
TROUBLESHOOTING GUIDE TEMPERATURE IS TOO WARM OR THERE IS INTERIOR MOISTURE BUILDUP (CONTINUED) Check if... Then... The doors are opened often. When the door is opened, warm humid air is allowed into the refrigerator. The more the door is opened, the faster the humidity builds up, and the more warm air the refrigerator must cool.
WARRANTY LG Electronics Visit our web site/http://www.lgservice.com LIMITED WARRANTY United States of America LG Electronics will repair or at its option replace, without charge, your product which proves to be defective in material or workmanship under normal use during the warranty period listed below from the date of original purchase. This warranty is good only to the original purchaser of the product during the warranty period as long as it is in the U.S. including Alaska, Hawaii, and U.S.
TROUBLESHOOTING GUIDE ICE HAS OFF-TASTE OR ODOR Check if... Then... The icemaker was recently installed. Discard first few batches of ice to avoid discolored or off-flavored ice. The ice has been stored for too long. Throw away old ice and make new supply. The food has not been wrapped tightly in either compartment. Rewrap foods since odors may migrate to the ice if food is not wrapped properly. The water supply contains minerals such as sulfur.
: MFL48163803