EN GLI SH ESPA Ñ O L OWNER’S MANUAL ELECTRIC INDUCTION RANGE Read this owner’s manual thoroughly before operating the appliance and keep it handy for reference at all times. LSE4617** LSE4616** www.lg.com MFL68881508_05 Copyright © 20 1 6 - 20 1 8 LG Electronics Inc. All Rights Reserved.
TABLE OF CONTENTS T A BLE O F CO N T EN T S 31 31 32 3 I MPO RT A N T SA FET Y I N ST RU CT I O N S 10 PRO DU CT O V ERV I EW 1 0 1 0 Parts Accessories 11 I N ST A LLA T I O N 1 1 1 1 1 2 1 3 1 5 1 9 1 9 20 34 Installation Overview Product Specifications Before Installing the Range Installing the Range Connecting Electricity Engaging the Anti-tip D evice Optional Rear Filler Test Run 2 1 O PERA T I O N 21 23 24 28 Control Panel Overview K nob Positions Changing Oven Settings 24 Clock 24 Lockout
IMPORTANT SAFETY INSTRU CTIONS 3 Read and follow all instructions when using the range to prevent the risk of fire, electric shock, personal inj ury, or damage. This guide does not cover all possible conditions that may occur. Always contact your service agent or manufacturer about problems that you do not understand. D ownload this owner' s manual at: http: / / www.lg.com This is the safety alert symbol.
IMPORTANT SAFETY INSTRU CTIONS SA FET Y PRECA U T I O N S W A RN I N G This product contains chemicals known to the State of California to cause cancer and birth defects or other reproductive harm. Wash hands after handling. (US only) • DO N O T T O U CH H EA T I N G ELEMEN T S O R I N T ERI O R SU RFA CES O F O V EN . Heating elements may be hot even though they are dark in color. Interior surfaces of an oven become hot enough to cause burns.
IMPORTANT SAFETY INSTRU CTIONS 5 W A RN I N G Remove all packing materials from the appliance before operating. K eep plastic, clothes, paper, and other flammable materials away from parts of the appliance that may become hot. • D o not store or use flammable material in the oven or near or on the cooktop. Flammable materials include paper, plastic, pot holders, linens, wall coverings, curtains, and gasoline or other flammable vapors and liq uids such as grease or cooking oil.
IMPORTANT SAFETY INSTRU CTIONS W A RN I N G Do not leav e ch ildren alone or unsupervised near the appliance when it is in use or is still hot. Children should never be allowed to sit or stand on any part of the appliance as they could be inj ured or burned. CA U T I O N D o not store items of interest to children in cabinets above a range or on the back guard of a range – children climbing on the range to reach items could be seriously inj ured. • • • • Never let a child hang on the oven door.
IMPORTANT SAFETY INSTRU CTIONS 7 Do not leav e fats or oils to h eat unattended on th e cooktop. Spillov ers can result in a fire. • The cooktop is not intended to be operated by means of an ext ernal timer or separate remote-control system. • T urn cookw are h andles inw ard so th ey don' t ex tend ov er adj acent surface units. This reduces the risk of burns, ignition of flammable materials, and spillage due to unintentional contact with the cookware.
IMPORTANT SAFETY INSTRU CTIONS SA FET Y DU RI N G U SE CA U T I O N Supervise all cooking processes. Continuously supervise q uick cooking processes. • D uring use the appliance becomes hot. Care should be taken to avoid touching heating elements inside the oven. • D o not touch the oven racks while they are hot. • D o not block the vent opening. • Only arrange oven racks when the oven is cool.
IMPORTANT SAFETY INSTRU CTIONS 9 CO O K MEA T A N D PO U LT RY T H O RO U GH LY • To protect against food-borne illnesses, cook meat and poultry thoroughly. The U SD A has indicated the following as safe minimum internal temperatures for consumption: • G round meats: 1 6 0 ° F • Poultry: 1 6 5 ° F • Beef, veal, pork, or lamb: 1 45 ° F • Fish/ seafood: 1 45 ° F EN GLI SH • Never keep pet birds in the kitchen.
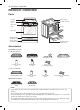
PROD U CT OV ERV IEW PRO DU CT O V ERV I EW Parts Cooktop G lass-ceramic Cooktop knob Cooktop controller Oven mode knob G asket Oven door Warming drawer (For Model: LSE46 1 7 ) Storage drawer (For Model: LSE46 1 6 ) Model and serial number plate A ccessories I ncluded A ccessories For Model: LSE46 1 7 Heavy rack (2ea) G liding rack (1 ea) Meat probe (1 ea) Spray bottle (1 ea) Non-scratch scouring pad (1 ea) Bottom rack (1 ea) Cleaner Cooktop cleaner (1 ea) For Model: LSE46 1 6 Cleaner
INSTALLATION 11 EN GLI SH I N ST A LLA T I O N I nstallation O v erv iew Please read the following installation instructions first after purchasing this product or transporting it to another location.
INSTALLATION If you did not receive an anti-tip bracket with your purchase, call 1 -8 0 0 -243-0 0 0 0 (1 -8 8 8 -542-26 23 in CANAD A) to receive one at no cost. Before I nstalling th e Range W A RN I N G W A RN I N G T ip - O v er H azard • T h e information in th is manual sh ould be follow ed ex actly. Failure to do so may result in fire, electrical shock, property damage, personal inj ury, or death. A child or adult can tip the range and be killed.
INSTALLATION 13 U npacking and Mov ing th e Range CA U T I O N • U se tw o or more people to mov e and install th e range. ( Ex cessiv e W eigh t H azard) Failure to do so can result in back or other inj ury. • Do not use th e door h andles to push or pull th e range during installation or w h en mov ing th e range out for cleaning or serv ice. D oing so can result in serious damage to the door of the range. Remove packing material, tape and any temporary labels from your range before using.
INSTALLATION Dimensions and Clearances N O T E Save for the use of the local electrical inspector. 24" (6 0 .9 cm) 3" (7 .6 cm) 3" (7 .6 cm) Acceptable electrical outlet area 25" (6 3.5 cm) Normal counter top depth Counter 36 " (9 1 .4 cm) top height A Cabinet opening W all 24" (6 0 .9 cm) 36 " (9 1 .4 cm) Center 1 5" (38 cm) Cabinet 1 1 " (28 cm) 6 " (1 5.2 cm) 29 .8 " (7 5.7 cm) 4" (1 0 cm) 9 " (23 cm) 2.5" (6 .3 cm) 5" (1 3 cm) 4" (1 0 cm) 6 " (1 5.2 cm) 9 " (23 cm) 2.5" (6 .
INSTALLATION 15 W A RN I N G T ip - O v er H azard First check direction . A child or adult can tip the range and be killed. V erify the anti-tip bracket has been installed. Ensure the anti-tip bracket is engaged when the range is moved. D o not operate the range without the anti-tip bracket in place. Failure to follow these instructions can result in death or serious burns to children and adults. Then check direction .
INSTALLATION W A RN I N G • A llow 2 to 3 ft ( 61. 0 cm to 9 1. 4 cm) of slack in th e line so th at th e range can be mov ed if serv icing is ev er necessary. • T h e pow er supply cord and plug sh ould not be modified. I f it w ill not fit th e outlet, h av e a proper outlet I nstalled by a q ualified electrician. U se the cord/ conduit connection plate to install the power cord or conduit. Leave the connection plate as installed for power cord installations.
INSTALLATION 17 4- W ire Connection : Pow er Cord W A RN I N G W A RN I N G • T h e middle ( neutral or ground) w ire, w h ich is w h ite, of a 3- w ire pow er cord or a 3- w ire conduit h as to be connected to th e middle post of th e main terminal block. T h e remaining tw o w ires of th e pow er cord or conduit h av e to be connected to th e outside posts of th e main terminal connection block. Failure to do so can result in electrical shock, severe personal inj ury or death.
INSTALLATION 3- W ire Connection: Conduit 4- W ire Connection: Conduit I nstall th e conduit as follow s: W A RN I N G Remove the conduit connection plate from the rear of the oven and rotate it. The conduit hole (1 1 / 8 " ) must be used. • T h e w h ite middle ( neutral) w ire of th e pow er cord or 4- w ire conduit h as to be connected to th e middle post of th e main terminal block.
INSTALLATION 19 O ptional Rear Filler • Move the range close enough to the opening to plug into the receptacle. If the counter does not bridge the opening at the rear wall the rear filler kit, that is provided with the slide in range, will be needed. • Slide the range into position ensuring that the back leg slides under the anti-tip bracket. The range should sit flush against the back wall when properly installed.
2 0 INSTALLATION 3 Attach the rear bracket and filler assembly as shown, using four of the six screws removed in step 1 . T est Run Check if the range is properly installed and run a test cycle. 1 Turn the oven mode knob to the O ff position to start test. 2 Fill an induction-capable pot with water and place it on a surface element. Turn on the surface element. The LED bar should show the setting and the water should heat. The LED bar should not fluctuate. Repeat for all surface elements.
OPERATION 2 1 EN GLI SH O PERA T I O N Control Panel O v erv iew For Model: LSE4617 1 11 :L )L 3UHVV DQG KROG VHF IRU H[WUD IXQFWLRQV 2 3 4 5 6 7 8 9 10 14 5 6 15 8 9 10 For Model: LSE4616 1 12 13
2 2 OPERATION 1 Smart DiagnosisT M • U se during the Smart D iagnosis feature. 2 Cook T ime / Clock ( For Model: LSE4617) • Press the button to set the desired amount of time for food to cook. The oven shuts off when the set cooking time runs out. • Press and hold button for three seconds to set the time of day. 3 Start T ime / Setting ( For Model: LSE4617) • Press the button to set the delayed timed cook. The oven starts at the set time.
OPERATION 2 3 After cleaning the oven knobs, make sure to replace each knob in the correct position. Failure to do so can result in improper operation of the burners. 1 2 HI/Boost HI/Boost Simmer Induction Simmer Oven Mode Warm Induction 1 Burner O n I ndicator The Burner O n indicator light turns on when the knob is turned even if the cooktop element does not operate. 2 H ot Surface I ndicator The hot surface indicator light glows as long as any surface cooking area is too hot to touch.
2 4 OPERATION Ch anging O v en Settings Clock The clock must be set to the correct time of day in order for the automatic oven timing functions to work properly. 1 Set the oven mode knob to the O ff position. 2 Press and hold Cook T ime for three seconds (LSE46 1 7 model only) or press Clock. CLO shows in the display. 3 4 Minimum & Settings All of the features listed have a minimum and a maxi mum time or temperature setting that may be entered into the control.
OPERATION 2 5 Settings The Timer feature serves as an ext ra timer in the kitchen that beeps when the set time has run out. It does not start or stop cooking. Set the oven mode knob to the O ff position. Press and hold Start T ime for three seconds (LSE46 1 7 model only) or press Setting. Then press the Start T ime (LSE46 1 7 model only) or Setting key repeatedly to toggle through and change oven settings. The Timer feature can be used during any of the oven control functions.
2 6 OPERATION A dj usting th e O v en T emperature A dj usting th e O v en Beeper V olume Y our new oven may cook differently from the one it replaced. U se your new oven for a few weeks to become more familiar with it before changing the temperature settings. If after familiarizing yourself with the new oven, you still think that it is too hot or too cold, you can adj ust the oven temperature yourself. 1 Set the oven mode knob to the O ff position.
OPERATION 2 7 Cook T ime ( T imed Cook) The automatic timer of the D elayed Timed Cook function turns the oven on and off at the time you select. This feature can be used with the Bake, Conv . Bake and Conv . Roast modes. Set the oven to cook for a specific length of time using the Timed Cook feature. This feature can only be used with the Bake, Conv . Bake and Conv . Roast modes.
2 8 OPERATION I nduction Cookw are U sing th e Cooktop N O T E Cooking A reas The cooktop is eq uipped with four induction cooking elements of different sizes and a radiant heat warming zone. The wattage ratings below are maxi mum outputs. The second rating is the maxi mum output for Boost mode. 5 3 4 1 2 Before using the induction cooking elements, carefully read and follow these cookware recommendations and the instructions in the pan sensing sections.
OPERATION 2 9 Mov ing Cookw are on th e Cooktop U se the proper cookware and place it correctly on the cooktop. One or more of the cooking elements will not heat if any of the incorrect conditions shown is detected by the sensors located below the ceramic cooktop surface. Correct the problem before attempting to use the cooktop. Always use heavier gauge, high-q uality cookware on the cooking elements and do not slide it on the ceramic cooktop surface.
OPERATION Minimum and Max imum Pan Size There are four cooking elements on the induction cooktop. Each element req uires a minimum pan size to be used effectively. The inner ring of each cooking element is a guide to the minimum pan size. The bottom of the pan must fully cover the inner ring for proper cooking to occur. H ome Canning CA U T I O N Canning can generate large amounts of steam. U se ext reme caution to prevent burns. Raise the lid so that steam is vented away from you.
OPERATION 31 EN GLI SH Setting Surface Controls • Cooking Element LED Bar The range provides an LED bar for each cooking element on the cooktop. Check messages in the display window and use the LED s with the corresponding control knobs to monitor the power levels of the elements. Lo Simmer 3 U sing th e Cooking Elements 4 MED CA U T I O N 6 Before Cooking 7 • D o not place or store flammable or heatsensitive items on the induction cooktop, even when the cooktop is not in use.
OPERATION T urning O n Cooking Elements ( Ex cept W arming Z one) Pan Preh eat Recommendations 1 Push the control knob in. Induction cooking may decrease the amount of time req uired to preheat cookware compared to cooking on a radiant element cooktop or gas surface burner. 2 Turn the knob in either direction to select the desired setting. A short beep sounds and the cooking element’ s LED bar shows its current setting.
OPERATION 33 T urning O n W arming Z one The cooking zones, which consist of paired cooking elements, are restricted to drawing a certain maxi mum amount of power. 1 Push the control knob in. 2 Turn the knob in either direction to select the desired setting. If you turn on the Boost function for one element while its paired element is in use, the Power Management function may automatically reduce the power of both elements.
OPERATION U sing th e O v en U sing O v en Racks Before U sing th e O v en The racks have a turned-up back edge that prevents them from being pulled out of the oven cavity. N O T E • Because the oven temperature cycles, an oven thermometer placed in the oven cavity may not show the same temperature that is set on the oven. Remov ing Racks Pull the rack straight out until it stops. 2 Lift up the front of the rack and pull it out.
OPERATION 35 T ips for Conv ection Baking • Baking time and temperature will vary depending on the characteristics, size, and shape of the baking pan used. • U se Convection Bake for faster and more even multiple-rack cooking of pastries, cookies, muffins, biscuits, and breads of all kinds. • Check for food doneness at the minimum recipe time. • Bake cookies and biscuits on pans with no sides or very low sides to allow heated air to circulate around the food.
OPERATION Recommended Baking and Roasting Guide Baking rack guide Baking results will be better if baking pans are centered in the oven as much as possible. If cooking on multiple racks, place the oven racks in the positions shown.
OPERATION 37 Smoking The Broil function uses intense heat from the upper heating element to cook food. Broiling works best for tender cuts of meat, fish, and thinly cut vegetables. D ue to the intense heat associated with broiling, it is normal to exp erience smoke during the cooking process. This smoke is a natural byproduct of searing and should not cause you to worry. If you are exp eriencing more smoke than you are comfortable with, use the following tips to reduce the amount of smoke in your oven.
OPERATION Recommended Broiling Guide The size, weight, thickness, starting temperature, and your preference of doneness will affect broiling times. This guide is based on meats at refrigerator temperature. For best results when broiling, use a pan designed for broiling. Food Q uantity and/ or T h ickness Second Side ( minutes) Comments 3-6 2-4 Space evenly. For 1 -4 patties, use Speed Broil. For more than 4 patties, use Broil.
OPERATION 39 Proof Beef This feature maintains a warm oven for rising yeast leavened products before baking. • Steaks and chops should always be allowed to rest for five minutes before being cut into and eaten. This allows the heat to distribute evenly through the food and creates a more tender and j uicy result. Setting th e Proof Function 1 U se rack position 2 or 3 for proofing. 2 Turn the oven mode knob to select Proof. 3 4 Press Start.
OPERATION Meat Probe ( For model: LSE4617) I MPO RT A N T N O T E The meat probe accurately measures the internal temperature of meat, poultry and casseroles. It should not be used during broiling, self clean, warming or proofing. Always unplug and remove the meat probe from the oven when removing food. Before using, insert the probe into the center of the thickest part of the meat or into the inner thigh or breast of poultry, away from fat or bones.
OPERATION 41 If the appliance is registered on a home Wi-Fi network, this function starts or stops the pre-heating function of the appliance. Follow the instructions on page 43 to register the appliance on the network. O perating th e W arming Draw er ( For model: LSE4617) Set the oven mode knob to the Remote Start position to use the function. For Model: LSE46 1 7 For Model: LSE46 1 6 Setting Remote Start 1 Open the oven door to make sure the oven is empty and ready for pre-heating.
OPERATION W arming Draw er food/ pow er lev el recommendations Setting Food I tem • V egetables • Rice Low 1 40 ° F (6 0 ° C) • Pasta • Breakfast pastries (coffee cake, muffins) • D inner rolls • Plates of food • Heat-sensitive foods* (pancakes, pizza, eggs) • Meat* (if warming for 1 -2 hours) Medium 1 6 0 ° F (7 1 ° C) • Smaller casseroles • Bacon or sausage • Warming empty ovenproof plates or serving dishes High 1 8 0 ° F (8 2 ° C) • Meat* (if warming for less than an hour) • Large casseroles
SMART FU NCTIONS 43 LG SmartT h inQ A pplication The LG SmartThinQ application allows you to communicate with the appliance using a smartphone. Before U sing LG SmartT h inQ • For appliances with the 1 or logo U se a smartphone to check the strength of the wireless router (Wi-Fi network) near the appliance. • If the distance between the appliance and the wireless router is too far, the signal strength becomes weak. It may take a long time to register or installation may fail.
SMART FU NCTIONS LG SmartT h inQ A pplication Features • For appliances with the or logo Cleaning This function helps you to check the energy efficiency, U sage and guide of EasyClean® . Smart Diagnosis™ Function Should you exp erience any problems with the appliance, it has the capability of transmitting data via your telephone to the LG Customer Information Center. NFC or Wi-Fi eq uipped models can also transmit data to a smartphone using the LG SmartThinQ application.
SMART FU NCTIONS 45 Smart Diagnosis™ • For appliances with the or logo U se the Smart D iagnosis feature in the LG SmartThinQ application for help diagnosing issues with the appliance without the assistance of the LG Customer Information Center. Follow the instructions in the LG SmartThinQ application to perform a Smart D iagnosis using your smartphone. 1 Open the LG SmartThinQ smart phone. 2 Select the appliance and then the menu on upper right side.
SMART FU NCTIONS FCC N otice The following notice covers the transmitter module contained in this product. This eq uipment has been tested and found to comply with the limits for a Class B digital device, pursuant to Part 1 5 of the FCC Rules and also Part 1 8 of the FCC Rules. These limits are designed to provide reasonable protection against harmful interference in a residential installation.
MAINTENANCE 47 Burned- O n Residue Cleaning th e Glass- Ceramic Cooktop 1 CA U T I O N While the cooktop is still hot, remove any burnt on deposits or spilled food from the glass-ceramic cooking surface with a suitable metal razor scraper. (Similar to scraping paint off of a windowpane, it will not damage the decorated cooking surface.) Hold the scraper at an approxi mate 30 ° angle to the cooktop. • D o not use scrub pads or abrasive cleaning pads. They may damage your cooktop surface.
MAINTENANCE Metal Marks and Scratch es 1 Be careful not to slide pots and pans across the cooktop. D oing so will leave metal markings on the cooktop surface. 2 To help remove these marks, use a ceramic cooktop cleaner with a cleaning pad for ceramic cooktops. CA U T I O N Cookware with rough or uneven bottoms can mark or scratch the cooktop surface. EasyClean® LG ’ s EasyClean® enamel technology provides two cleaning options for the inside of the range.
MAINTENANCE 49 Suggested Cleaning Meth od Ex ample of O v en Soiling Soil Pattern T ypes of Soils Common Food I tems T h at Can Soil Y our O v en Small drops or spots Cheese or other ingredients Pizza Steaks, broiled EasyClean® Light splatter Fish, broiled Fat/ grease Meat roasted at low temperatures Medium to heavy splatter Self Clean* Fat/ grease Meat roasted at high temperatures Filling or sugar based soils Pies Cream or tomato sauce Casseroles D rops or spots * The Self Clean cycle
5 0 MAINTENANCE 5 Spray or pour the remaining water (8 oz or 240 ml) onto the bottom center of the oven cavity. The indentation on the oven bottom should be fully covered to submerge all soils. Add water if necessary. N O T E If cleaning multiple ovens, use an entire bottle of water to clean each oven. D o not spray water directly on the door. D oing so will result in water dripping to the floor. 6 Close the oven door. Turn the oven mode knob to select EasyClean® . Press Start.
MAINTENANCE 5 1 D uring the Self Clean cycle, the cooktop elements and warming drawer cannot be used. The Self Clean cycle uses ex tremely hot temperatures to clean the oven cavity. While running the Self Clean cycle, you may notice smoking or an odor. This is normal; especially if the oven is heavily soiled. N O T E • Remove oven racks and accessories before starting the Self Clean cycle. D uring Self Clean, the kitchen should be well ventilated to minimize the odors from cleaning.
5 2 MAINTENANCE CA U T I O N D o not force the oven door open when the lock icon is displayed. The oven door remains locked until the oven temperature has cooled. Forcing the door open will damage the door. Setting Self Clean w ith a Delayed Start 1 Remove all racks and accessories from the oven. 2 Turn the oven mode knob to select Self Clean. The oven defaults to the recommended four-hour self clean for a moderately soiled oven.
MAINTENANCE 5 3 Cleaning th e Ex terior The oven light is a standard 40 -watt, 1 20 V appliance bulb. It turns on when the oven door is open. When the oven door is closed, press Ligh t to turn it on or off. Painted and Decorativ e T rim 1 U nplug the range or disconnect power. 2 Turn the glass bulb cover in the back of the oven counterclockwise to remove. 3 Turn the bulb counterclockwise to remove it from the socket. 4 Insert the new bulb and turn it clockwise.
5 4 MAINTENANCE Broiler Pan and Grid Remov ing and Replacing th e Lift- O ff O v en Doors and Draw er CA U T I O N • D o not store a soiled broiler pan or grid anywhere in the range. • Be careful w h en remov ing and lifting th e door. • D o not clean the broiler pan or grid in a self-cleaning mode. • Do not lift th e door by th e h andle. The door is very heavy. • Remove the grid from the pan. Carefully pour out the grease from the pan into a proper container.
MAINTENANCE 5 5 1 2 Remov ing th e Draw er Firmly grasp both sides of the door at the top. EN GLI SH Replacing th e Door CA U T I O N D isconnect the electrical power to the range at the main fuse or circuit breaker panel. Failure to do so can result in severe personal inj ury, death, or electrical shock. With the door at the same angle as the removal position, seat the indentation of the hinge arms into the bottom edge of the hinge slots.
5 6 TROU BLESHOOTING T RO U BLESH O O T I N G During conv ection cooking th e fan stops w h en I open th e door. I s th at normal? FA Q s Y es, this is normal. When the door is opened, the convection fan will stop until the door is closed. W h at types of cookw are are recommended for use w ith th e cooktop? • Look for cookware that is marked " induction ready" or " induction capable" or that is specifically designed for induction cooking. • The cookware must have a magnetic metallic base.
TROU BLESHOOTING Make sure that the range is not in Lockout mode. The will show in the display if Lockout is activated. lock To deactivate Lockout, press Probe (LSE46 1 7 model only), or Clock for three seconds. The unlock melody sounds and Loc appears in the display until the controls are unlocked. A re th ere any tricks to getting some of th e stubborn soils out? Scraping the soils with a plastic scraper before and during hand-cleaning is recommended.
5 8 TROU BLESHOOTING Before Calling for Serv ice Before you call for service, review this list. It may save you time and exp ense. The list includes common occurrences that are not the result of defective workmanship or materials in this appliance. Symptoms Possible Causes / Solutions Range is not lev el. • Poor installation. Place oven rack in center of oven. Place a level on the oven rack. Adj ust leveling legs at base of range until the oven rack is level.
TROU BLESHOOTING Possible Causes / Solutions Freq uent cycling on and off of surface units • This is normal. - The element will cycle on and off to maintain the heat setting. O v en w ill not w ork • Plug on range is not completely inserted in the electrical outlet. - Make sure electrical plug is plugged into a live, properly grounded outlet. • A fuse in your home may be blown or the circuit breaker tripped. - Replace the fuse or reset the circuit breaker. • Oven controls improperly set.
TROU BLESHOOTING Symptoms Possible Causes / Solutions O v en temperature too h ot or too cold • Oven sensor needs to be adj usted. - See Oven Temperature Adj ustment in the Features section. Scratch es or abrasions on cooktop surface • Coarse particles such as salt or sand between cooktop and utensils can cause scratches. Be sure the cooktop surface and bottoms of utensils are clean before using. Small scratches do not affect cooking and will become less visible with time.
TROU BLESHOOTING Possible Causes / Solutions T h e ov en does not clean after a Self Clean cycle • Oven controls not properly set. - See the Self Clean section. • Oven was heavily soiled. - Clean up heavy spillovers before starting the clean cycle. Heavily soiled ovens may need to Self Clean again or for a longer period of time. CLEA N and door flash in th e display • The Self Clean cycle has been selected, but the door is not closed. - Close the oven door.
LIMITED WARRANTY LI MI T ED W A RRA N T Y ( U SA ) ARBITRATION NOTICE: THIS LIMITED WARRANTY CONTAINS AN ARBITRATION PROV ISION THAT REQ U IRES Y OU AND LG TO RESOLV E D ISPU TES BY BIND ING ARBITRATION INSTEAD OF IN COU RT, U NLESS Y OU CHOOSE TO OPT OU T. IN ARBITRATION, CLASS ACTIONS AND JU RY TRIALS ARE NOT PERMITTED . PLEASE SEE THE SECTION TITLED “ PROCED U RE FOR RESOLV ING D ISPU TES” BELOW.
LIMITED WARRANTY 63 • Replacement of light bulbs, filters, or any consumable parts. • When Product is used for other than normal and proper household use (e.g. commercial or industrial use, offices, and recreational facilities or vehicles) or contrary to the instructions outlined in the Product’ s owner’ s manual. • Costs associated with removal and reinstallation of your Product for repairs.
LIMITED WARRANTY Problem Cause Prev ention • Surface is not level 1 . Range not leveled • Oven is tipping 2. Anti-tip device not installed correctly Level both sides of range Approxi mately 0 .6 5" (1 6 .5 mm) • Check with installer first Anti-tip bracket Screw must enter wood or concrete Wall plate U se carpenter’ s level to check level. 2 1 T h e cost of repair or replacement under th ese ex cluded circumstances sh all be borne by th e consumer.
LIMITED WARRANTY 65 Gov erning Law . The law of the state of your residence shall govern this Limited Warranty and any disputes between us exce pt to the ext ent that such law is preempted by or inconsistent with applicable federal law. Fees/ Costs. Y ou do not need to pay any fee to begin an arbitration.
MEMO MEMO
ESPA Ñ O L MANUAL DEL PROPIETARIO COCINA INDUCCIÓN ELÉCTRICA Lea detenidamente el manual del propietario antes de poner el aparto en funcionamiento y consérvelo a mano en todo momento para su referencia. LSE4617** LSE4616** www.lg.com MFL68881508_05 Copyright © 20 1 6 - 20 1 8 LG Electronics Inc. Todos los D erechos Reservados.
2 Í ND ICE Í N DI CE 30 30 30 31 31 31 32 3 I N ST RU CCI O N ES I MPO RT A N T ES DE SEGU RI DA D 10 DESCRI PCI Ó N GEN ERA L DEL PRO DU CT O 1 0 1 0 Piezas Accesorios 11 I N ST A LA CI Ó N 1 1 1 1 1 2 1 3 1 5 1 9 1 9 20 D escripció n general de la instalació n Especificaciones del producto Antes de instalar la cocina Instalació n de la cocina Conex ió n de la electricidad Colocació n del dispositivo antivuelco Barra Trasera Opcional Prueba de funcionamiento 34 2 1 FU N CI O N A MI EN T O 21 23 24
INSTRU CCIONES IMPORTANTES D E SEG U RID AD 3 I N ST RU CCI O N ES I MPO RT A N T ES DE SEGU RI DA D D escargue este manual del propietario en: http: / / www.lg.com Este es el sí mbolo de alerta de seguridad. Este sí mbolo le advierte sobre posibles riesgos q ue pueden ocasionar dañ os materiales, lesiones personales graves o la muerte. El sí mbolo de alerta de seguridad siempre estará acompañ ado de las palabras " AD V ERTENCIA" o " PRECAU CIÓ N" .
4 INSTRU CCIONES IMPORTANTES D E SEG U RID AD PRECA U CI O N ES DE SEGU RI DA D A DV ERT EN CI A Este producto contiene q uimicos conocidos por el Estado de California de causar cá ncer y defectos de nacimiento u otros dañ os reproductivos. L á v ese las m anos desp u é s de m anip u lar. (Solo E E UU) • N O T O Q U E LA S H O RN A LLA S N I LA S SU PERFI CI ES I N T ERI O RES DEL H O RN O . Las hornallas podrí an estar calientes incluso cuando presenten un color oscuro.
INSTRU CCIONES IMPORTANTES D E SEG U RID AD 5 • Para eliminar el riesgo de q uemaduras o incendios por pasar por encima de la superficie de las unidades calientes, debe evitarse la colocació n de gabinetes de almacenamiento sobre las unidades. Si se instalará un gabinete de almacenamiento, el riesgo puede reducirse mediante la instalació n de una campana q ue se proyecte, de forma horizontal, un mí nimo de 5 pulgadas má s allá de la parte inferior de los gabinetes.
6 INSTRU CCIONES IMPORTANTES D E SEG U RID AD SEGU RI DA D DE LO S N I Ñ O S • No toq ue la superficie caliente entre la parte inferior de la puerta del horno y la parte superior del caj ó n, en el frente del horno, mientras está en funcionamiento. La superficie se calienta y puede causar q uemaduras y otras lesiones. • No dej e a los niñ os sin supervisió n cerca del horno.
INSTRU CCIONES IMPORTANTES D E SEG U RID AD 7 • Baterí a de cocina v idriada. Solo determinados tipos de vidrio, cerá mica vidriada, cerá mica, recipientes de cocció n de barro y otros utensilios de cocina vidriados son aptos para uso en las hornallas de la cocina sin q uebrarse, debido al cambio abrupto de temperatura. • Nunca cocine directamente sobre el vidrio. U tilice siempre baterí a de cocina. • Siempre apague las hornallas antes de retirar la baterí a de cocina. No se confí e del sensor de ollas.
8 INSTRU CCIONES IMPORTANTES D E SEG U RID AD SEGU RI DA D DU RA N T E EL U SO PRECA U CI Ó N Supervise todos los procesos de cocció n. Supervise constantemente los procesos de cocció n rá pida. • D urante el uso, el artefacto se calienta. Tenga cuidado de no tocar los elementos de calentamiento ubicados en el interior del horno. • No toq ue los estantes del horno mientras está n calientes. • No bloq uee la abertura de ventilació n. • Acomode los estantes del horno solo cuando el horno esté frí o.
INSTRU CCIONES IMPORTANTES D E SEG U RID AD 9 MO DO CO RRECT O DE CO CI N A R CA RN ES Y A V ES • Para evitar enfermedades transmitidas por los alimentos, cocine bien las carnes roj as y aves.
10 D ESCRIPCIÓ N G ENERAL D EL PROD U CTO DESCRI PCI Ó N GEN ERA L DEL PRO DU CT O Piezas Placa de cocció n V itrocerá mica Perilla de la placa de cocció n Controlador de la placa de cocció n Perilla de modo del horno Ju nta Puerta del horno Caj ó n de calentamiento (Para los modelos: LSE46 1 7 ) Caj ó n de almacenamiento (Para los modelos: LSE46 1 6 ) Placa de nú mero de serie y modelo A ccesorios A ccesorios incluidos Para los modelos: LSE46 1 7 Estante pesado (2 c/ u) Estante deslizante (1
INSTALACIÓ N 11 I N ST A LA CI Ó N Descripció n general de la instalació n Lea las siguientes instrucciones de instalació n en primer lugar, después de comprar este producto o transportarlo a otra ubicació n.
12 INSTALACIÓ N A ntes de instalar la cocina Si no recibió un soporte antivuelco con su compra, llame al 1 -8 0 0 -243-0 0 0 0 (1 -8 8 8 -542-26 23 en Canadá ) para recibir uno sin costo. A DV ERT EN CI A A DV ERT EN CI A Riesgo de v uelco Es posible q ue un niñ o o un adulto inclinen la cocina y el vuelco consecuente les produzca la muerte. V erifiq ue q ue se haya instalado el soporte antivuelco. Asegú rese de q ue el soporte antivuelco esté conectado cuando se mueva la cocina.
INSTALACIÓ N 13 I nstalació n de la cocina Desembalaj e y traslado de la cocina PRECA U CI Ó N • N o utilice las manij as de la puerta para empuj ar ni para tirar de la cocina durante la instalació n o al mov er la cocina para tareas de limpieza o reparaciones. Hacerlo podrí a causar dañ os graves a la puerta de la cocina. Retire el material de embalaj e, la cinta y cualq uier etiq ueta temporaria de la cocina, antes de usarla.
14 INSTALACIÓ N Dimensiones y espacios libres N O T A G uarde para el uso del inspector eléctrico local.
INSTALACIÓ N 15 I nstalació n del dispositiv o antiv uelco A DV ERT EN CI A U tilice un nivelador para verificar sus aj ustes. U biq ue el nivelador en diagonal sobre el estante el horno y verifiq ue en todas direcciones para nivelar. Riesgo de v uelco Primero verifiq ue la direcció n Es posible q ue un niñ o o un adulto inclinen la cocina y el vuelco consecuente les produzca la muerte. V erifiq ue q ue se haya instalado el soporte antivuelco.
16 INSTALACIÓ N A DV ERT EN CI A • Dej e de 2 a 3 pies ( 61, 0 cm a 9 1, 4 cm) de lugar libre en la lí nea, para q ue se pueda mov er la cocina si es necesario h acer reparaciones. • N o se deben modificar ni el cable de alimentació n ni el ench ufe. Si el ench ufe no entra en el tomacorriente, debe solicitar q ue un electricista calificado instale un tomacorriente adecuado. • Se proh í be utilizar un cable de ex tensió n para conectar la cocina a la energí a eléctrica.
INSTALACIÓ N 17 Conex ió n con cable de 3 h ilos: Cable de alimentació n Conex ió n con cable de 4 h ilos: Cable de alimentació n A DV ERT EN CI A A DV ERT EN CI A • Solo debe utilizar un j uego de cable de alimentació n de 4 conductores con un v alor nominal de 12 0 / 2 40 v oltios, 5 0 amperios y marcado para uso en cocinas de conectores de circuito cerrado o talones de cable pala de ex tremo abierto con puntas h acia arriba.
18 INSTALACIÓ N Conex ió n con cable de 3 h ilos: Conducto Conex ió n con cable de 4 h ilos: Conducto I nstale el conducto de la siguiente manera: A DV ERT EN CI A Retire la placa de conex ió n de conductos de la parte posterior del horno y gí rela. Se debe utilizar el orificio para conductos (1 1 / 8 " ). • El h ilo medio ( neutro) del cable de alimentació n o conducto de 4 h ilos se debe conectar al poste medio del bloq ue de bornes principal.
INSTALACIÓ N 19 Colocació n del dispositiv o antiv uelco • Mueva la cocina para q ue q uede cerca de la abertura para enchufar en el receptá culo. • Con cuidado, intente inclinar la cocina hacia delante para asegurarse de q ue el soporte antivuelco esté colocado correctamente. Si está bien instalado, el soporte antivuelco evitará q ue la cocina se incline.
2 0 INSTALACIÓ N 3 Coloq ue el soporte posterior y relleno como se muestra, usando cuatro de seis tornillos q ue ha removido en el paso 1 . Prueba de funcionamiento V erifiq ue q ue la cocina esté bien instalada y realice un ciclo de prueba. 1 G ire la perilla de modo del horno hasta la posició n O ff para comenzar la prueba. 2 Llene una olla con capacidad de inducció n con agua y coló q uela sobre una hornalla. Encienda la hornalla.
FU NCIONAMIENTO 2 1 FU N CI O N A MI EN T O Descripció n general del panel de control Para los modelos: LSE4617 ESPA Ñ O L 1 11 :L )L 3UHVV DQG KROG VHF IRU H[WUD IXQFWLRQV 2 3 4 5 6 7 8 9 10 5 6 15 8 9 10 Para los modelos: LSE4616 1 12 13 14
2 2 FU NCIONAMIENTO 1 Smart DiagnosisT M • U so durante la funció n Smart D iagnosis. 2 Cook T ime ( T iempo de cocció n) / Clock ( Reloj ) ( Para los modelos: LSE4617) • Presione el botó n para configurar la cantidad de tiempo q ue se desea cocinar la comida. El horno se apaga cuando se agota el tiempo de cocció n establecido. • Mantenga presionado el botó n durante tres segundos para configurar la hora del dí a.
FU NCIONAMIENTO 2 3 Posició n de la perilla D espués de limpiar las perillas del horno, asegú rese de volver a colocarlas en la posició n correcta; de lo contrario podrí a ocasionar un mal funcionamiento de los q uemadores. ESPA Ñ O L 1 2 HI/Boost HI/Boost Simmer Induction Simmer Modo del horno Warm Induction 1 I ndicador de q uemador encendido La luz del Indicador de q uemador encendido se enciende cuando la perilla se gira, incluso si el elemento de la placa de cocció n no funciona.
2 4 FU NCIONAMIENTO Cambio de las configuraciones del h orno Clock ( Reloj ) El reloj se debe configurar en la hora correcta del dí a para q ue las funciones automá ticas del temporizador del horno funcionen de manera adecuada. 1 Coloq ue la perilla de modo del horno en la posició n O ff. 2 Mantenga presionado el botó n Cook T ime durante tres segundos (Para los modelos: LSE46 1 7 ) o presione Clock. CLO se muestra en la pantalla.
FU NCIONAMIENTO 2 5 T imer O n/ O ff ( T emporizador encendido/ apagado) La funció n Temporizador encendido/ apagado sirve de temporizador adicional en la cocina y emite un tono cuando el tiempo configurado se ha agotado. No inicia ni detiene la cocció n. Coloq ue la perilla de modo del horno en la posició n O ff. Mantenga presionado Start T ime durante tres segundos (Para los modelos: LSE46 1 7 ) o presione Setting.
2 6 FU NCIONAMIENTO A j uste de temperatura del h orno A j uste del v olumen del indicador sonoro El horno nuevo podrí a cocinar de manera diferente a su horno anterior. U se el horno nuevo durante algunas semanas para familiarizarse con él antes de cambiar los aj ustes de temperatura. Si, después de familiarizarse con el horno, sigue pensando q ue la temperatura es muy alta o muy baj a puede aj ustarla. 1 Coloq ue la perilla de modo del horno en la posició n O ff.
FU NCIONAMIENTO 2 7 Configuració n de la Cocció n temporizada retardada Por ej emplo, para hornear a 30 0 ° F y retardar el inicio del proceso de horneado hasta las 4 h 30 m, primero debe configurar el reloj en la hora correcta del dí a. Cook T ime [ T iempo de cocció n] ( T imed Cook) [ Cocció n temporizada] ) G ire la perilla de modo del horno hasta seleccionar el modo Bake. 350 ° F aparece en la pantalla. 2 Aj uste la temperatura: presione menos( - ) hasta q ue aparezca 30 0 ° F en la pantalla.
2 8 FU NCIONAMIENTO U so de la placa de cocció n Á reas de cocció n La placa de cocció n está eq uipada con cuatro hornallas por inducció n de diferentes tamañ os y una zona de calentamiento de calor radiante. Las potencias en vatios ex presadas a continuació n son las potencias má x imas. La segunda es la potencia má x ima para el modo Boost.
FU NCIONAMIENTO 2 9 Mov imiento de los recipientes sobre la placa de cocció n U tilice el recipiente adecuado y coló q uelo correctamente sobre la placa de cocció n. Las hornallas no se calentará n si los sensores situados debaj o de la superficie de la placa de cerá mica detectan alguna de las condiciones incorrectas q ue se ilustran a continuació n. Corrij a el problema antes de intentar usar la placa de cocció n.
30 FU NCIONAMIENTO T amañ o má x imo y mí nimo del recipiente Hay cuatro hornallas en la placa de cocció n por inducció n. Para ser utilizada con eficacia, cada hornalla req uiere un tamañ o mí nimo para el recipiente. El anillo interior de cada hornalla sirve de guí a para el tamañ o mí nimo del recipiente. El fondo del recipiente debe cubrir completamente el anillo interior para q ue se produzca una cocció n adecuada.
FU NCIONAMIENTO 31 Configuraci n de os contro es de a su erficie ESPA Ñ O L • Barra LED de la h ornalla La cocina cuenta con una barra de LED para cada una de las hornallas de la placa de cocció n. Preste atenció n a los mensaj es q ue aparecen en la pantalla y utilice los LED con las perillas de control correspondientes para monitorear los niveles de potencia de las hornallas.
32 FU NCIONAMIENTO Có mo encender una h ornalla 1 Empuj e hacia dentro la perilla de control. 2 G ire la perilla en cualq uier direcció n hasta seleccionar el aj uste deseado. Se escuchará un breve sonido de alerta y la barra de LED de la hornalla mostrará su configuració n actual. 3 Para activar el modo Boost, gire la perilla directamente de Off a Boost.
FU NCIONAMIENTO 33 Manej o de energí a Para encender la zona de calentamiento Las zonas de cocció n, q ue consisten en pares de hornallas, tienen un lí mite de consumo de una determinada cantidad má x ima de energí a. 1 Empuj e hacia dentro la perilla de control. 2 G ire la perilla en cualq uier direcció n hasta seleccionar el aj uste deseado.
34 FU NCIONAMIENTO U so del h orno U so de los estantes del h orno A ntes de usar el h orno Los estantes tienen un borde posterior doblado hacia arriba q ue evita q ue salgan de la cavidad del horno. N O T A Ex tracció n de los estantes • Como la temperatura del horno es cí clica, el termó metro q ue esté dentro de la cavidad del horno podrí a no indicar la misma temperatura q ue está configurada. 1 Tire del estante hacia afuera, sin inclinarlo, hasta q ue se detenga.
FU NCIONAMIENTO 35 Sugerencias para h ornear por conv ecció n • El tiempo y la temperatura de horneado variará n segú n las caracterí sticas, el tamañ o y la forma del recipiente q ue se utilice para hornear. • U se el horneado por convecció n para cocinar má s rá pido y de manera má s parej a en varios estantes: pasteles, galletas, muffins, bizcochos y panes de todo tipo. • V erifiq ue el punto de cocció n de los alimentos en el tiempo mí nimo de la receta.
36 FU NCIONAMIENTO Guí a de recomendaciones para h ornear y rostizar Los resultados del horneado será n mej ores si las bandej as está n centradas en el horno lo mej or posible. Si se cocina en varios estantes del horno, coló q uelos en la posició n q ue se ilustra.
FU NCIONAMIENTO 37 H umo La funció n Asar utiliza el calor intenso de los q uemadores superiores para cocinar la comida. Este método de cocció n es ideal para cortes de carne tiernos, pescados y verduras finamente cortadas. D ebido al calor intenso q ue se produce cuando se asa, es normal q ue haya humo durante el proceso de cocció n. Este humo es un subproducto natural del chamuscado y no es motivo de preocupació n.
38 FU NCIONAMIENTO Guí a de recomendaciones para asar El tamañ o, el peso, el espesor, la temperatura inicial y su preferencia de cocció n afectará n el tiempo de asado. Esta guí a se basa en carnes a temperatura de refrigerador. Para obtener mej ores resultados al asar, use una bandej a especial para asar.
FU NCIONAMIENTO 39 Consej os para asar Proof ( Leudar) Filete Esta caracterí stica mantiene el horno tibio para leudar productos con levadura antes de hornearlos. • Los bistecs y las chuletas siempre se deben dej ar reposar durante cinco minutos antes de cortarlos y comerlos. Esto permite q ue el calor se distribuya uniformemente en el alimento y resulta má s tierno y j ugoso. Configuració n de la funció n Leudar U se el estante en la posició n 2 o 3 para el leudado.
40 FU NCIONAMIENTO Sonda para carne ( Para los modelos: LSE4617) La sonda para carne mide con precisió n la temperatura interna de la carne, las aves y los estofados. No debe utilizarse durante las funciones de asar, autolimpieza o leudar. D esenchufe y ex traiga siempre la sonda para carne del horno cuando retire la comida. Antes de usar, inserte la sonda en el centro de la parte má s gruesa de la carne o en el muslo interno o la pechuga de las aves, alej ada de la grasa o los huesos.
FU NCIONAMIENTO 41 Remote Start ( I nicio remoto) Si el artefacto está registrado en una red de Wi-Fi doméstica, esta funció n inicia o detiene la funció n de precalentamiento del artefacto. Siga las instrucciones de la pá gina 43 para registrar el artefacto en la red. Funcionamiento del caj ó n de calentamiento ( Para los modelos: LSE4617) Para los modelos: LSE46 1 7 ESPA Ñ O L Configure perilla de modo del horno en la posició n Remote Inicio remoto para utilizar la funció n.
42 FU NCIONAMIENTO Recomendaciones sobre los alimentos y el niv el de potencia del caj ó n de calentamiento A limento • Masas para el desayuno (pastel para el café, muffins) • No coloq ue los alimentos ni el papel de aluminio directamente sobre la superficie o la base del caj ó n de calentamiento. Esto podrí a ocasionar dañ os en el caj ó n y arruinar la comida.
FU NCIONES INTELIG ENTES 43 FU N CI O N ES I N T ELI GEN T ES N O T A • Para verificar la conex ió n Wi-Fi, revise q ue el í cono W iFi en el panel de control esté encendido. A plicació n LG SmartT h inQ Prev io a utilizar LG SmartT h inQ • Para electrodomésticos con el 1 o logo U tilice un teléfono inteligente para verificar la potencia del enrutador (Red Wi-Fi) cerca del electrodoméstico. • Si la distancia entre el electrodoméstico y el enrutador inalá mbrico es muy grande, la señ al será débil.
44 FU NCIONES INTELIG ENTES Funciones de la aplicació n LG SmartT h inQ • Para electrodomésticos con el o logo Limpieza Esta funció n lo ayuda a controlar la eficiencia en el consumo de energí a, uso, guí a de EasyClean™ . Funció n Smart Diagnosis™ ( Diagnó stico I nteligente) En caso de ex perimentar algú n problema con el aparato, el mismo tiene la capacidad de transmitir datos a través de su teléfono al Centro de informació n del cliente de LG .
FU NCIONES INTELIG ENTES 45 LG SmartT h inQ Smart Diagnosis™ • Para electrodomésticos con el o logo U se la funció n de diagnó stico inteligente en la aplicació n LG SmartThinQ para ayudar a diagnosticar problemas sin la ayuda del Centro de informació n del cliente de LG . 1 Abra la aplicació n LG SmartThinQ en el teléfono inteligente. 2 Seleccione el artefacto y luego el menú en la parte superior del lado derecho. 3 Seleccione Smart Diagnosis, luego presione el botó n Start Smart Diagnosis.
46 FU NCIONES INTELIG ENTES A v iso de la FCC El siguiente aviso abarca el mó dulo transmisor contenido en este producto. Este eq uipo fue probado y se determinó q ue cumple con los lí mites para los dispositivos digitales de Clase B, en conformidad con la Parte 1 5 de las normas de la FCC y también con la Parte 1 8 de dichas normas. Estos lí mites está n diseñ ados para ofrecer una protecció n razonable contra interferencias dañ inas en una instalació n residencial.
MANTENIMIENTO 47 MA N T EN I MI EN T O Residuo q uemado Limpieza de la placa de cocció n de v itrocerá mica 1 • Por su seguridad, pó ngase un guante para horno o una agarradera cuando use una espá tula en la superficie de cocció n caliente. • Lea y siga las instrucciones y advertencias de la etiq ueta de la crema de limpieza. N O T A U se limpiador para placas de cocció n cerá micas en la superficie de vidrio.
48 MANTENIMIENTO Rayas y marcas del metal 1 Tenga cuidado de no deslizar las ollas ni las sartenes por la placa de cocció n. Si lo hace, el metal dej ará marcas en la superficie. 2 Para q uitar esas marcas, use limpiador para placas de cocció n cerá micas con una esponj a para placas de cerá mica. PRECA U CI Ó N La baterí a de cocina con fondo desigual o disparej o puede marcar o rayar la superficie de la placa de cocció n.
MANTENIMIENTO 49 Cuá ndo usar EasyClean® Método sugerido de limpieza Ej emplo de suciedad en el h orno Forma de la suciedad T ipos de suciedad A limentos comunes q ue pueden ensuciar el h orno G otitas o manchitas Q ueso u otros ingredientes Pizza Salpicadura leve Pescado, asado G rasa/ aceite Carne rostizada a baj a temperatura Salpicadura mediana a grande Self Clean* ( A utolimpieza) G otas o manchas G rasa/ aceite Carne rostizada a alta temperatura Relleno o suciedad de alimentos con azú c
5 0 MANTENIMIENTO 5 Atomice o eche 4/ 5 (8 oz o 240 ml) de agua abaj o, en el centro de la cavidad. La superficie abaj o de la estufa debe estar completamente cubierta para moj ar todos los residuos. Añ ade agua si es necesario. N O T A Si limpia varias estufas, use del bote entero lleno de agua para limpiar cada estufa. No rocí e agua directamente en la puerta. Si lo hace, el agua chorreará al piso. 6 Cierre la puerta del horno.
MANTENIMIENTO 5 1 Self Clean ( A utolimpieza) D urante el ciclo de Autolimpieza, no se pueden usar las hornallas de la placa de cocció n ni el caj ó n calentador. El ciclo de Autolimpieza usa temperaturas sumamente altas para limpiar la cavidad del horno. Mientras se ej ecute el ciclo de Autolimpieza, es posible q ue perciba humo u olor. Esto es normal; especialmente si el horno está muy sucio. N O T A • Q uite los estantes del horno y los accesorios antes de iniciar el ciclo de Autolimpieza.
5 2 MANTENIMIENTO Después del ciclo de A utolimpieza PRECA U CI Ó N No fuerce la puerta del horno para abrirla cuando vea el icono del candado. La puerta permanece trabada hasta q ue baj a la temperatura del horno. Si abre la puerta a la fuerza, se dañ ará . Configuraci n de uto i inicio retardado ie a con 1 Q uite todos los estantes y los accesorios del horno. 2 G ire la perilla de modo del horno hasta seleccionar el modo Self Clean.
MANTENIMIENTO 5 3 Cambio de la luz del h orno Limpieza del ex terior La luz del horno es una bombilla está ndar para electrodomésticos de 40 vatios, 1 20 V . Se enciende cuando se abre la puerta del horno. Cuando la puerta del horno está cerrada, presione el botó n Ligh t para encenderla o apagarla. Reborde decorativ o y pintado D esenchufe la cocina o desconecte la electricidad.
5 4 MANTENIMIENTO A sadera y rej illa Remoció n y reemplazo de la puertas remov ible del h orno y el caj ó n PRECA U CI Ó N • No guarde asaderas ni rej illas sucias en ninguna parte de la cocina. • T enga cuidado cuando q uite y lev ante la puerta. • No limpie la asadera ni la rej illa en el modo de autolimpieza. • N o lev ante la puerta de la manij a. La puerta es muy pesada. • Q uite la rej illa de la asadera. V ierta cuidadosamente la grasa de la asadera en un recipiente adecuado.
MANTENIMIENTO 5 5 Colocació n de la puerta 1 2 Remoció n del caj ó n Tome firmemente ambos lados de la puerta desde la parte superior. La mayor parte de la limpieza se puede realizar con el caj ó n puesto; sin embargo, el caj ó n puede ex traerse si se necesita realizar una limpieza adicional. U se agua caliente para limpiar a fondo. 1 Abra totalmente el caj ó n. 2 Localice las palancas de deslizamiento a ambos lados del caj ó n.
5 6 SOLU CIÓ N D E PROBLEMAS SO LU CI Ó N DE PRO BLEMA S PREGU N T A S FRECU EN T ES ¿ Q ué tipo de baterí a de cocina se recomienda para usar con la placa de cocció n? • Busq ue recipientes q ue estén identificados como aptos para inducció n o q ue estén diseñ ados especí ficamente para la cocció n por inducció n. • Los recipientes deben tener una base metá lica magnética. Consulte la secció n Tipos de recipientes para inducció n.
SOLU CIÓ N D E PROBLEMAS 5 7 ¿ Por q ué no funcionan los botones de funció n? ¿ H ay algú n truco para eliminar algo de la suciedad rebelde? Se recomienda raspar la suciedad con un raspador plá stico antes de limpiar manualmente y mientras limpia. También se recomienda saturar completamente con agua la suciedad. Sin embargo, hay suciedad q ue es má s difí cil de limpiar q ue otra. Para la suciedad rebelde, se recomienda usar el ciclo de Autolimpieza.
5 8 SOLU CIÓ N D E PROBLEMAS A ntes de llamar al serv icio técnico Antes de llamar para solicitar servicio, revise esta lista. Puede ahorrarle tiempo y gastos. La lista incluye sucesos comunes q ue no son consecuencia de problemas de fabricació n ni de los materiales de este aparato. Sí ntomas Causas / soluciones posibles La cocina no está niv elada. • Mala instalació n. Coloq ue el estante en el centro del horno. Coloq ue un nivelador en el estante del horno.
SOLU CIÓ N D E PROBLEMAS 5 9 Sí ntomas Causas / soluciones posibles • Esto es normal. - La hornalla se enciende y apaga con frecuencia para mantener el aj uste de calor. El h orno no funciona • El enchufe de la cocina no está insertado completamente en el tomacorriente. - Asegú rese de q ue el enchufe esté conectado a un toma funcional y conectado a tierra. • Es posible q ue se haya q uemado un fusible o q ue se haya disparado el disyuntor de su casa. - Reemplace el fusible o restablezca el disyuntor.
60 SOLU CIÓ N D E PROBLEMAS Sí ntomas Causas / soluciones posibles La temperatura del h orno es muy alta o muy baj a • Se debe aj ustar el sensor del horno. - Consulte la secció n Aj uste de la temperatura del horno en la secció n Funciones. H ay rayas o abrasiones en la superficie de la placa de cocció n • Las partí culas á speras como las de sal o arena entre la placa de cocció n y los utensilios pueden producir rayas.
SOLU CIÓ N D E PROBLEMAS 61 Sí ntomas Causas / soluciones posibles Limpiar y la puerta parpadean en la pantalla * • Se ha seleccionado el ciclo de Autolimpieza, pero la puerta no está cerrada. - Cierre la puerta del horno. A parece Bloq ueada en la pantalla cuando q uiere cocinar * • La puerta del horno está bloq ueada porq ue la temperatura interior no baj ó a menos de la temperatura de bloq ueo. - G ire la perilla de modo del horno hasta la posició n O ff. D ej e q ue el horno se enfrí e.
62 G ARANTÍ A LIMITAD A GA RA N T Í A LI MI T A DA ( EE. U U . ) AV ISO D E ARBITRAJ E: ESTA G ARANTÍ A LIMITAD A CONTIENE U NA CLÁ U SU LA D E ARBITRAJ E Q U E LE D EMAND A A U STED Y A LG RESOLV ER CONFLICTOS A TRAV É S D E U N ARBITRAJ E V INCU LANTE EN LU G AR D E HACERLO EN LA CORTE, A MENOS Q U E U STED D ECID A NO PARTICIPAR. EN EL ARBITRAJ E NO ESTÁ N PERMITID AS LAS ACCIONES COLECTIV AS NI LOS J U ICIOS CON J U RAD O.
G ARANTÍ A LIMITAD A 63 • Cualq uier ruido asociado con la operació n normal. • U so de accesorios, componentes, o productos de limpieza consumibles q ue no estén autorizados por LG . • Reemplazo de focos, filtros o cualq uier parte consumible. • Cuando el producto se use de otra forma q ue no sea uso doméstico usual y normal (p. ej ., uso comercial o industrial, en oficinas e instalaciones recreativas o vehí culos) o uso contrario a las instrucciones detalladas en el manual del propietario del producto.
64 G ARANTÍ A LIMITAD A Problema • La superficie es desparej a. • El horno está inclinado. Causa Prev enció n • V erifiq ue primero con el instalador. 1 . La cocina no está nivelada. 2. El dispositivo antivolcadura no se instaló correctamente. Abrazadera antivolcaduras Nivele ambos lados El tornillo debe de la cocina. penetrar la madera o el cemento. Aprox imadamente 0 .6 5 pulgadas (1 6 .5 mm) Placa de pared U se un nivel de burbuj a para comprobar la nivelació n.
G ARANTÍ A LIMITAD A 65 Legislació n v igente. La legislació n del estado de su residencia regirá esta G arantí a Limitada, así como todas las disputas entre nosotros, salvo q ue sea invalidada o inconsistente con leyes federales aplicables. T arifas / Costos. U sted no debe pagar ninguna tarifa para comenzar un arbitraj e. Al recibir su solicitud de arbitraj e por escrito, LG pagará todos los gastos administrativos rá pidamente a la AAA, a menos q ue usted solicite má s de $ 25,0 0 0 .
LG Customer Information Center 1-800-243-0000 1-888-542-2623 USA CANADA Register your product Online! www.lg.