ENGLISH ESPAÑOL OWNER’S MANUAL TOP FREEZER REFRIGERATOR Please read this manual carefully before operating your set and retain it for future reference. Model Name**=color number LTC20380** LTC24380** LTCS20220* LTCS24223* GM-T248Q* GM-U652S*DP GM-U552S*DP GM-T208Q* P/No. MFL67527903 Rev.4 www.lg.
TABLE TABLE OF CONTENTS Spanish Version Important Safety Instructions Requirements for Ground Connection Parts and Features 2-3 3 4 Refrigerator Installation Unpacking Installation How to remove and Install the Refrigerator Doors How to reverse and Install the Refrigerator Doors Closing and Aligning the doors 5-11 5 5 Using your Refrigerator Ensuring Proper Air Circulation Adjusting the Controls Adjusting Control Settings Food Storage Guide 13-15 13 13 14 14 Refrigerator Shelves Ice tray Pantry Dra
IMPORTANT SAFETY INSTRUCTIONS SAFETY MESSAGES This manual contains several important safety notices. Always read and obey all of the following safety messages. This is the safety alert symbol. This symbol is a warning to potential dangers that could cause death, injury or damage to you, others or the product. All safety messages will follow after this warning symbol and the word “DANGER”, “CAUTION” or “WARNING”.
CAUTION This appliance is not intended for use by children, persons with physical or mental disabilities, persons with reduced sensory or mental capacity, or persons that lack experience or know-how, unless they have supervision or instruction in relation to the use of the appliance by the person responsible for their safety. Children should be supervised to assure that they do not play with the appliance.
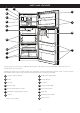
PARTS AND FEATURES A O K B C D L E F M G H N I J Use this page to become more familiar with the parts and features of your refrigerator. Page references are included or your convenience. NOTE: This guide covers several models. The refrigerator you have purchased may have some or all of the items listed below. The locations of the features shown below may not match your model.
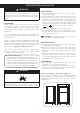
REFRIGERATOR INSTALLATION WARNING INSTALLATION EXCESSIVE WEIGHT HAZARD 1. Avoid placing the unit near heat sources, direct sunlight, or humidity. 2. To avoid vibration, the unit should be leveled. If needed, adjust the leveling screws to compensate for an unleveled floor. The front should be slightly taller than the rear to ensure that the doors close properly.
REFRIGERATOR INSTALLATION HOW TO REMOVE AND INSTALL THE REFRIGERATOR DOORS (For additional support on this topic, including helpful videos, please visit us at: www.lg.com). If entrance is lees than 35 inches wide, the refrigerator’s door will need to be removed. IMPORTANT: Before starting, turn off and unplug the refrigerator. Remove all food and the racks from the doors. TOOLS YOU MIGHT NEED OR USE 1/4 in 3/8 in 10 mm Hex Socket Wrench Phillips Screwdriver No.
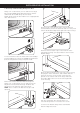
REFRIGERATOR INSTALLATION REFRIGERATOR INSTALLATION Fig. 9 Fig. 6 ţ To replace doors, begin with refrigerator door and then follow with freezer door. 4. Replacing Freezer Door ţ Set the freezer door onto the Middle Hinge pin (Figure 10). ţ Place upper hinge in the top of the freezer door and line up the hinge with the holes in top of refrigerator. Use the three bolts to fasten the hinge (See Figure 11). 3. Replacing Refrigerator Door ţ Set door on Bottom Hinge Pin (See Figure 7).
REFRIGERATOR INSTALLATION HOW TO REVERSE AND INSTALL THE REFRIGERATOR DOORS You may find it more convenient to have the doors converted from the left opening type (factory installed) to the right opening type. Directions refer to the right side as the side on your right as you face the unit. TOOLS YOU MIGHT NEED OR USE 1/4 in 3/8 in 10 mm Hex Socket Wrench Phillips Screwdriver No.
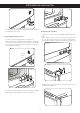
REFRIGERATOR INSTALLATION 2. Reversing and Reinstalling Refrigerator Door Using a ¼” socket wrench, loosen and remove Hinge Pin from the Middle Hinge Bracket. Remove washer underneath the middle hinge and set aside. NOTE: At this point the door will be loose. Slightly lift the door and remove it. Using a 3/8’’ socket wrench with a 2-Inch extension and screwdriver, loosen the two bolts and one screw, and remove the Bottom Hinge from right side of the housing.
REFRIGERATOR INSTALLATION Flip the Middle Hinge Bracket, (flange will now be on top) position it on left side of the refrigerator and reattach with two bolts and a Phillips screwdriver. Place the refrigerator door down over the pin on the bottom hinge. Place the washer between the refrigerator door and middle hinge and re-attach Hinge Pin to Hinge Bracket with a ¼” socket wrench. NOTE: Bracket has been flipped, but Hinge Pin stays in the same orientation with its hexagonal end facing upward.
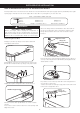
REFRIGERATOR INSTALLATION After changing doors, make sure that the corners of the Door Gaskets are not folded over. To ensure a good seal, apply a small amount of silicon grease on the corners of gaskets. Corners Corners Tighten the bolts. Force-fit Top Hinge Cover over Top Hinge. Replace cover on the top left side of the refrigerator to the right top to cover the holes. Cover is also force-fitted.
REFRIGERATOR REFRIGERATOR INSTALLATION INSTALLATION CLOSING AND ALIGNING THE DOORS Figure A To avoid vibration, the unit must be leveled. If necessary, adjust the Leveling Legs to compensate for unevenness of the floor. The front should be slightly higher than the rear to aid in door closing. Your refrigerator has three front leveling screws, one on the right and one on the left.
USING REFRIGERATOR USING YOUR YOUR REFRIGERATOR REFRIGERATOR INSTALLATION ADJUSTING THE CONTROLS ENSURING PROPER AIR CIRCULATION In order to obtain stable temperature, the air must flow between the freezer and refrigerator sections. As shown in the illustration below, the cold air enters through the bottom part and circulates upward. This air returns below the freezer floor and the rest of the air enters the refrigerator section through the top vent.
USING YOUR REFRIGERATOR FOOD STORAGE GUIDE ADJUSTING CONTROL SETTINGS Give the refrigerator time to cool down completely before adding food. It is best to wait 24 hours before adding food to the refrigerator. The mid-settings indicated in the previous section should be correct for normal household refrigerator usage. The controls are set correctly when milk or juice is cold to your liking and ice cream is firm. ITEMS The refrigerator control functions as the thermostat for the entire appliance.
USING YOUR REFRIGERATOR Freezing Packaging Recommendations: ţ UsF seBMFE QMBsUJD containers. ţ UsF QMBsUJD containers XJUI B TNPoUI surface. ţ Package XJUI BMVNJOVN fPJM oG IJHI resistance. ţ WrBQ XJUI QBQFS MByered XJUI QMBstic. ţ Use watFS QrooG QMBstic. ţ UsF recPNNFOEFE QMBsUJD CBHT tP store frozen foods. IMPORTANT: %P OoU kFFQ CottleT JO UIF freezFS cPNQBrUNFOt UIFZ NBZ FYQMPEF BGter free[JOH BOE causF EBNBHF For the NaYJNVN use of your freezer do not store excesT food.
USING YOUR REFRIGERATOR REFRIGERATOR SHELVES PANTRY DRAWER (on some models) The glass shelves in your refrigerator are adjustable to meet your individual storage needs. To remove the Pantry Drawer: Adjusting the shelves to fit different heights of items will make finding the exact item you want easier. Doing so will also reduce the amount of time the refrigerator door is open which will save energy. IMPORTANT: Do not clean glass shelves with warm water while they are cold.
USING YOUR REFRIGERATOR HUMIDITY CONTROLLED CRISPERS To remove the crisper cover: The crispers provide fresher tasting fruit and vegetables by letting you easily control humidity inside the drawer. 1. Remove both crisper drawers. 2. Remove the crisper glass. You can control the amount of humidity in the moisturesealed crispers by adjusting the control to any setting between VEGETABLES and FRUIT. 3. While holding the support and crisper cover, pull up and out.
REFRIGERATOR REFRIGERATOR CARE CARE ANDAND CLEANING CLEANING BACK COVER WARNING WARNING EXPLOSION HAZARD ELECTRICAL SHOCK HAZARD Before you begin, either unplug the refrigerator or turn off power at the circuit breaker or fuse box. Do not use flammable cleaners. Not following these instructions can cause death, explosion or fire. NOTE: Back Cover should only be removed by a qualified technician. The refrigerator, as well as the freezer, do their own de-freezing.
REFRIGERATOR REFRIGERATOR CARE CARE ANDAND CLEANING CLEANING POWER INTERRUPTIONS When your refrigerator arrives to your home, put everything back into place and read the section “Refrigerator Installation” in order to obtain installation preparation. In case your refrigerator has a factory ice maker, remember you have to reconnect the water supply. 1. In case of a black out, call your electric company and ask how long it will last. 2.
ABOUT THETHE AUTOMATIC ICE ICE MAKER ABOUT AUTOMATIC MAKER NOTE: The automatic Ice maker is only included in some models. Check your specifications of your refrigerator. WARNING PERSONAL INJURY HAZARD Avoid contact with any moving parts of the ejector mechanism or with the heater that releases the ice cubes. DO NOT place your fingers in the automatic ice maker when the refrigerator is plugged in. YOU MUST TURN THE SWITCH TO O (OFF) ţ When the water supply is interrupted for many hours.
CONNECTING THE WATER LINE NOTE: It is necessary to have a water source when both water and/or ice dispensers are available in your product. behind the refrigerator and the source of water and add to that 8 feet (2,4 m). Make sure there is sufficient pipe material to allow the free movement of the refrigerator from the wall BEFORE START The water source is not guaranteed by the refrigerator manufacturer. Follow instructions carefully in order to reduce damage. A cold water source.
CONNECTING THE WATER LINE 3. DRILL A HOLE FOR THE VALVE Drill a 1/4” (6,35 mm) diameter hole in the water pipeline. Remove jagged edges produces after perforation. Make sure water does not reach the drill. Not performing the 1/4” (6,35 mm) perforation can lead to a low or smaller ice production. Saddle Type Shutoff Valve Compression Nut Packing Nut Outlet Valve 4. TIGHTEN THE VALVE Tight the valve into the cold water pipeline with a tube trap. Ferule (sleeve) 8.
CONNECTING THE WATER LINE ţ RemovF UIF SJOH QMVH (1) fSPN UIF WBMvF MPcaUFE aU UIF UPQ oG sVDI EeWJce.
TROUBLESHOOTING GUIDE UNDERSTANDING SOUNDS YOU MAY HEAR Your new refrigerator may make sounds that your old one did not make. Most of the new sounds are normal. Hard surfaces, like the floor, walls and cabinets, can make the sounds seem louder than they actually are. The following Popping: Contraction and expansion of the inside walls. describes the kinds of sounds you may hear and what Sizzling: may be causing them.. Water dripping on the defrost heater during a defrost cycle.
TROUBLESHOOTING GUIDE Problem Possible Causes Solutions The power supply cord is unplugged. Firmly plug the cord into a live outlet with proper voltage (refer to Electrical & Grounding Requirements). An LED light has malfunctioned. Before proceeding to replace LED, unplug the refrigerator or turn off power at the circuit breaker or fuse box.
TROUBLESHOOTING GUIDE Problem Doors will not close completely. Possible Causes Solutions The refrigerator is not level. See the Leveling and Door Alignment section. Food packages are blocking the door open. Rearrange food containers to clear door and door shelves. The ice bin, crisper cover, pans, shelves, door bins or baskets are out of position. Push bins all the way in and put crisper cover, pans, shelves and baskets into their correct positions.
TROUBLESHOOTING GUIDE Problem The refrigerator seems to make too much noise. Possible Causes Solutions The sounds may be normal for your refrigerator. Refer to the Understanding Sounds You May Hear section for more information. New installation. Wait 12 to 24 hours after icemaker installation for ice production to begin. Wait 72 hours for full ice production.
TROUBLESHOOTING GUIDE Problem Possible Causes Solutions The air vents are blocked. Cold air circulates from the freezer to the fresh food section and back again through air vents in the wall dividing the two sections. Locate air vents by using your hand to sense airflow and move all packages that block vents and restrict airflow. (See air flow diagram below.) The doors are opened often.
TROUBLESHOOTING GUIDE Problem The doors are difficult to open. Frozen food in refrigerator compartment. Possible Causes Solutions The gaskets are dirty or sticky. Clean the gaskets and the surfaces that they touch. Rub a thin coat of appliance polish or kitchen wax on the gaskets after cleaning. The door is reopened within a short time after having been opened. When you open the door, warmer air enters the refrigerator. As the warm air cools, it can create a vacuum.
WARRANTY LG ELECTRONICS U.S.A., INC. LG REFRIGERATOR LIMITED WARRANTY - U.S.A. Should your LG Refrigerator (“Product”) fail due to a defect in materials or workmanship under normal home use, during the warranty period set forth below, LG will at its option repair or replace the product. This limited warranty is valid only to the original retail purchaser of the product and applies only when purchased and used within the United States including U.S. Territories.
WARRANTY LG ELECTRONICS CANADA, INC. LG REFRIGERATOR LIMITED WARRANTY - Canada WARRANTY: Should your LG Refrigerator (“Product”) fail due to a defect in material or workmanship under normal home use during the warranty period set forth below, LG Canada will at its option repair or replace the Product upon receipt of proof of original retail purchase.
For additional support including helpful videos, please visit us at: www.lg.com LG Customer Information Center 1-800-243-0000 1-888-865-3026 1-888-542-2623 USA, Consumer User USA, Commercial User CANADA Register your Product Online! www.lg.