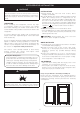
ENGLISH ESPAÑOL OWNER’S MANUAL TOP FREEZER REFRIGERATOR Please read this manual carefully before operating your set and retain it for future reference. Model Name**=color number LTC20380** LTC24380** LTCS20220* LTCS24223* GM-T248Q* GM-U652S*DP GM-U552S*DP GM-T208Q* P/No. MFL67527903 Rev.4 www.lg.
TABLE TABLE OF CONTENTS Spanish Version Important Safety Instructions Requirements for Ground Connection Parts and Features 2-3 3 4 Refrigerator Installation Unpacking Installation How to remove and Install the Refrigerator Doors How to reverse and Install the Refrigerator Doors Closing and Aligning the doors 5-11 5 5 Using your Refrigerator Ensuring Proper Air Circulation Adjusting the Controls Adjusting Control Settings Food Storage Guide 13-15 13 13 14 14 Refrigerator Shelves Ice tray Pantry Dra
IMPORTANT SAFETY INSTRUCTIONS SAFETY MESSAGES This manual contains several important safety notices. Always read and obey all of the following safety messages. This is the safety alert symbol. This symbol is a warning to potential dangers that could cause death, injury or damage to you, others or the product. All safety messages will follow after this warning symbol and the word “DANGER”, “CAUTION” or “WARNING”.
CAUTION This appliance is not intended for use by children, persons with physical or mental disabilities, persons with reduced sensory or mental capacity, or persons that lack experience or know-how, unless they have supervision or instruction in relation to the use of the appliance by the person responsible for their safety. Children should be supervised to assure that they do not play with the appliance.
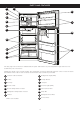
PARTS AND FEATURES A O K B C D L E F M G H N I J Use this page to become more familiar with the parts and features of your refrigerator. Page references are included or your convenience. NOTE: This guide covers several models. The refrigerator you have purchased may have some or all of the items listed below. The locations of the features shown below may not match your model.
REFRIGERATOR INSTALLATION WARNING INSTALLATION EXCESSIVE WEIGHT HAZARD 1. Avoid placing the unit near heat sources, direct sunlight, or humidity. 2. To avoid vibration, the unit should be leveled. If needed, adjust the leveling screws to compensate for an unleveled floor. The front should be slightly taller than the rear to ensure that the doors close properly.
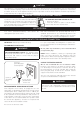
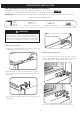
REFRIGERATOR INSTALLATION HOW TO REMOVE AND INSTALL THE REFRIGERATOR DOORS (For additional support on this topic, including helpful videos, please visit us at: www.lg.com). If entrance is lees than 35 inches wide, the refrigerator’s door will need to be removed. IMPORTANT: Before starting, turn off and unplug the refrigerator. Remove all food and the racks from the doors. TOOLS YOU MIGHT NEED OR USE 1/4 in 3/8 in 10 mm Hex Socket Wrench Phillips Screwdriver No.
REFRIGERATOR INSTALLATION REFRIGERATOR INSTALLATION Fig. 9 Fig. 6 ţ To replace doors, begin with refrigerator door and then follow with freezer door. 4. Replacing Freezer Door ţ Set the freezer door onto the Middle Hinge pin (Figure 10). ţ Place upper hinge in the top of the freezer door and line up the hinge with the holes in top of refrigerator. Use the three bolts to fasten the hinge (See Figure 11). 3. Replacing Refrigerator Door ţ Set door on Bottom Hinge Pin (See Figure 7).
REFRIGERATOR INSTALLATION HOW TO REVERSE AND INSTALL THE REFRIGERATOR DOORS You may find it more convenient to have the doors converted from the left opening type (factory installed) to the right opening type. Directions refer to the right side as the side on your right as you face the unit. TOOLS YOU MIGHT NEED OR USE 1/4 in 3/8 in 10 mm Hex Socket Wrench Phillips Screwdriver No.
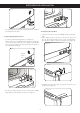
REFRIGERATOR INSTALLATION 2. Reversing and Reinstalling Refrigerator Door Using a ¼” socket wrench, loosen and remove Hinge Pin from the Middle Hinge Bracket. Remove washer underneath the middle hinge and set aside. NOTE: At this point the door will be loose. Slightly lift the door and remove it. Using a 3/8’’ socket wrench with a 2-Inch extension and screwdriver, loosen the two bolts and one screw, and remove the Bottom Hinge from right side of the housing.
REFRIGERATOR INSTALLATION Flip the Middle Hinge Bracket, (flange will now be on top) position it on left side of the refrigerator and reattach with two bolts and a Phillips screwdriver. Place the refrigerator door down over the pin on the bottom hinge. Place the washer between the refrigerator door and middle hinge and re-attach Hinge Pin to Hinge Bracket with a ¼” socket wrench. NOTE: Bracket has been flipped, but Hinge Pin stays in the same orientation with its hexagonal end facing upward.
REFRIGERATOR INSTALLATION After changing doors, make sure that the corners of the Door Gaskets are not folded over. To ensure a good seal, apply a small amount of silicon grease on the corners of gaskets. Corners Corners Tighten the bolts. Force-fit Top Hinge Cover over Top Hinge. Replace cover on the top left side of the refrigerator to the right top to cover the holes. Cover is also force-fitted.
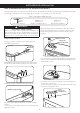
REFRIGERATOR REFRIGERATOR INSTALLATION INSTALLATION CLOSING AND ALIGNING THE DOORS Figure A To avoid vibration, the unit must be leveled. If necessary, adjust the Leveling Legs to compensate for unevenness of the floor. The front should be slightly higher than the rear to aid in door closing. Your refrigerator has three front leveling screws, one on the right and one on the left.
USING REFRIGERATOR USING YOUR YOUR REFRIGERATOR REFRIGERATOR INSTALLATION ADJUSTING THE CONTROLS ENSURING PROPER AIR CIRCULATION In order to obtain stable temperature, the air must flow between the freezer and refrigerator sections. As shown in the illustration below, the cold air enters through the bottom part and circulates upward. This air returns below the freezer floor and the rest of the air enters the refrigerator section through the top vent.
USING YOUR REFRIGERATOR FOOD STORAGE GUIDE ADJUSTING CONTROL SETTINGS Give the refrigerator time to cool down completely before adding food. It is best to wait 24 hours before adding food to the refrigerator. The mid-settings indicated in the previous section should be correct for normal household refrigerator usage. The controls are set correctly when milk or juice is cold to your liking and ice cream is firm. ITEMS The refrigerator control functions as the thermostat for the entire appliance.
USING YOUR REFRIGERATOR Freezing Packaging Recommendations: ţ UsF seBMFE QMBsUJD containers. ţ UsF QMBsUJD containers XJUI B TNPoUI surface. ţ Package XJUI BMVNJOVN fPJM oG IJHI resistance. ţ WrBQ XJUI QBQFS MByered XJUI QMBstic. ţ Use watFS QrooG QMBstic. ţ UsF recPNNFOEFE QMBsUJD CBHT tP store frozen foods. IMPORTANT: %P OoU kFFQ CottleT JO UIF freezFS cPNQBrUNFOt UIFZ NBZ FYQMPEF BGter free[JOH BOE causF EBNBHF For the NaYJNVN use of your freezer do not store excesT food.
USING YOUR REFRIGERATOR REFRIGERATOR SHELVES PANTRY DRAWER (on some models) The glass shelves in your refrigerator are adjustable to meet your individual storage needs. To remove the Pantry Drawer: Adjusting the shelves to fit different heights of items will make finding the exact item you want easier. Doing so will also reduce the amount of time the refrigerator door is open which will save energy. IMPORTANT: Do not clean glass shelves with warm water while they are cold.
USING YOUR REFRIGERATOR HUMIDITY CONTROLLED CRISPERS To remove the crisper cover: The crispers provide fresher tasting fruit and vegetables by letting you easily control humidity inside the drawer. 1. Remove both crisper drawers. 2. Remove the crisper glass. You can control the amount of humidity in the moisturesealed crispers by adjusting the control to any setting between VEGETABLES and FRUIT. 3. While holding the support and crisper cover, pull up and out.
REFRIGERATOR REFRIGERATOR CARE CARE ANDAND CLEANING CLEANING BACK COVER WARNING WARNING EXPLOSION HAZARD ELECTRICAL SHOCK HAZARD Before you begin, either unplug the refrigerator or turn off power at the circuit breaker or fuse box. Do not use flammable cleaners. Not following these instructions can cause death, explosion or fire. NOTE: Back Cover should only be removed by a qualified technician. The refrigerator, as well as the freezer, do their own de-freezing.
REFRIGERATOR REFRIGERATOR CARE CARE ANDAND CLEANING CLEANING POWER INTERRUPTIONS When your refrigerator arrives to your home, put everything back into place and read the section “Refrigerator Installation” in order to obtain installation preparation. In case your refrigerator has a factory ice maker, remember you have to reconnect the water supply. 1. In case of a black out, call your electric company and ask how long it will last. 2.
ABOUT THETHE AUTOMATIC ICE ICE MAKER ABOUT AUTOMATIC MAKER NOTE: The automatic Ice maker is only included in some models. Check your specifications of your refrigerator. WARNING PERSONAL INJURY HAZARD Avoid contact with any moving parts of the ejector mechanism or with the heater that releases the ice cubes. DO NOT place your fingers in the automatic ice maker when the refrigerator is plugged in. YOU MUST TURN THE SWITCH TO O (OFF) ţ When the water supply is interrupted for many hours.
CONNECTING THE WATER LINE NOTE: It is necessary to have a water source when both water and/or ice dispensers are available in your product. behind the refrigerator and the source of water and add to that 8 feet (2,4 m). Make sure there is sufficient pipe material to allow the free movement of the refrigerator from the wall BEFORE START The water source is not guaranteed by the refrigerator manufacturer. Follow instructions carefully in order to reduce damage. A cold water source.
CONNECTING THE WATER LINE 3. DRILL A HOLE FOR THE VALVE Drill a 1/4” (6,35 mm) diameter hole in the water pipeline. Remove jagged edges produces after perforation. Make sure water does not reach the drill. Not performing the 1/4” (6,35 mm) perforation can lead to a low or smaller ice production. Saddle Type Shutoff Valve Compression Nut Packing Nut Outlet Valve 4. TIGHTEN THE VALVE Tight the valve into the cold water pipeline with a tube trap. Ferule (sleeve) 8.
CONNECTING THE WATER LINE ţ RemovF UIF SJOH QMVH (1) fSPN UIF WBMvF MPcaUFE aU UIF UPQ oG sVDI EeWJce.
TROUBLESHOOTING GUIDE UNDERSTANDING SOUNDS YOU MAY HEAR Your new refrigerator may make sounds that your old one did not make. Most of the new sounds are normal. Hard surfaces, like the floor, walls and cabinets, can make the sounds seem louder than they actually are. The following Popping: Contraction and expansion of the inside walls. describes the kinds of sounds you may hear and what Sizzling: may be causing them.. Water dripping on the defrost heater during a defrost cycle.
TROUBLESHOOTING GUIDE Problem Possible Causes Solutions The power supply cord is unplugged. Firmly plug the cord into a live outlet with proper voltage (refer to Electrical & Grounding Requirements). An LED light has malfunctioned. Before proceeding to replace LED, unplug the refrigerator or turn off power at the circuit breaker or fuse box.
TROUBLESHOOTING GUIDE Problem Doors will not close completely. Possible Causes Solutions The refrigerator is not level. See the Leveling and Door Alignment section. Food packages are blocking the door open. Rearrange food containers to clear door and door shelves. The ice bin, crisper cover, pans, shelves, door bins or baskets are out of position. Push bins all the way in and put crisper cover, pans, shelves and baskets into their correct positions.
TROUBLESHOOTING GUIDE Problem The refrigerator seems to make too much noise. Possible Causes Solutions The sounds may be normal for your refrigerator. Refer to the Understanding Sounds You May Hear section for more information. New installation. Wait 12 to 24 hours after icemaker installation for ice production to begin. Wait 72 hours for full ice production.
TROUBLESHOOTING GUIDE Problem Possible Causes Solutions The air vents are blocked. Cold air circulates from the freezer to the fresh food section and back again through air vents in the wall dividing the two sections. Locate air vents by using your hand to sense airflow and move all packages that block vents and restrict airflow. (See air flow diagram below.) The doors are opened often.
TROUBLESHOOTING GUIDE Problem The doors are difficult to open. Frozen food in refrigerator compartment. Possible Causes Solutions The gaskets are dirty or sticky. Clean the gaskets and the surfaces that they touch. Rub a thin coat of appliance polish or kitchen wax on the gaskets after cleaning. The door is reopened within a short time after having been opened. When you open the door, warmer air enters the refrigerator. As the warm air cools, it can create a vacuum.
WARRANTY LG ELECTRONICS U.S.A., INC. LG REFRIGERATOR LIMITED WARRANTY - U.S.A. Should your LG Refrigerator (“Product”) fail due to a defect in materials or workmanship under normal home use, during the warranty period set forth below, LG will at its option repair or replace the product. This limited warranty is valid only to the original retail purchaser of the product and applies only when purchased and used within the United States including U.S. Territories.
WARRANTY LG ELECTRONICS CANADA, INC. LG REFRIGERATOR LIMITED WARRANTY - Canada WARRANTY: Should your LG Refrigerator (“Product”) fail due to a defect in material or workmanship under normal home use during the warranty period set forth below, LG Canada will at its option repair or replace the Product upon receipt of proof of original retail purchase.
ESPAÑOL MANUAL DE USUARIO REFRIGERADOR CON CONGELADOR SUPERIOR Lea detenidamente este manual antes de empezar a utilizar el refrigerador y guárdelo como referencia para el futuro. www.lg.
TABLA TABLA DE DE CONTENIDO CONTENIDO Versión Inglés Instrucciones Importantes de Seguridad Requerimientos de Conexión a Tierra 35-36 36 Partes y Características 37 Instalación del Refrigerador Desempaque Instalación Cómo quitar y cambiar las puertas del Refrigerador Como cambia el sentido de las puertas del Refrigerador Cierre y Alineación de Puertas 38 38 38 42-44 45 Uso del Refrigerador Circulación Apropiada del Aire Ajuste de los Controles Cómo regular los Ajustes de los Controles Guía para Alma
INSTRUCCIONES INSTRUCCIONES IMPORTANTES IMPORTANTES DE SEGURIDAD DE SEGURIDAD MENSAJES DE SEGURIDAD Hemos incluido muchos mensajes importantes de seguridad en este manual. Lea y obedezca siempre todos los mensajes de seguridad. Este es el símbolo de advertencia de seguridad. Este símbolo le advierte sobre peligros potenciales que pueden ocasionar la muerte o una lesión a usted y a los demás, así como daños al producto.
PRECAUCIÓN Este aparato no está destinado para su uso por las personas (incluidos niños) con capacidad física, sensorial o mental reducida, falta de experiencia y conocimientos, a menos que se les haya dado la supervisión o instrucción en relación con el uso del aparato por la persona responsable de su seguridad. Los niños deben ser supervisados para asegurar que no jueguen con el aparato.
PARTES Y CARACTERÍSTICAS O A K B C D L E F M G H N I J Use esta sección para que Ud. se familiarice con las partes y características de su nuevo refrigerador. NOTA: Esta guía cubre distintos modelos. Su refrigerador puede tener algunas o todas las características y partes que se muestran en la siguiente lista. Algunas de las localizaciones de las partes tal vez no concuerden con su modelo.
INSTALACIÓN DEL REFRIGERADOR ADVERTENCIA PELIGRO DE PESO EXCESIVO Use la ayuda de dos o más personas para mover e instalar el refrigerador, no seguir estas instrucciones puede ocasionar lesiones en la espalda u otras partes del cuerpo. DESEMPAQUE Antes de instalar su refrigerador, despegue y remueva las cintas y etiquetas temporales. No retire aquellas etiquetas que muestren advertencias, el modelo y número de serie o la ficha técnica del producto que se encuentra en la parte posterior del refrigerador.
INSTALACIÓN REFRIGERADOR INSTALACIÓN DELDEL REFRIGERADOR REMOVIENDO Y REEMPLAZANDO PUERTAS (Para obtener asistencia adicional sobre este tema incluyendo videos útiles, por favor visítenos en: www.lg.com) Si la entrada tiene menos de 35 pulgadas de ancho, se necesitará quitar las puertas del refrigerador. IMPORTANTE: Antes de empezar, apague el refrigerador y desconéctelo. Quite la comida y los anaqueles de las puertas.
INSTALACIÓN DEL REFRIGERADOR Fig. 9 Fig. 6 Para volver a colocar las puertas, comience con la puerta del refrigerador y continúe con la puerta del congelador.. 4. Para Instalar la puerta del Congelador Coloque la puerta del congelador dentro del soporte de la Bisagra Central (Figura 10). 3. Para Instalar la puerta del Refrigerador Coloque la puerta en el pivote de la Bisagra Inferior (Figura 7).
INSTALACIÓN DELDEL REFRIGERADOR INSTALACIÓN REFRIGERADOR CÓMO CAMBIAR EL SENTIDO DE APERTURA A LAS PUERTAS DEL REFRIGERADOR Puede que encuentre más conveniente convertir las puertas del estilo de abrir del lado izquierdo (instalado de fabrica) para abrir del lado derecho. Las direcciones hacen referencia al lado derecho como su lado derecho al mirar la unidad.
INSTALACIÓN DEL REFRIGERADOR 2. INVERTIR Y VOLVER A PONER LA PUERTA DEL REFRIGERADOR Utilizando una llave tubular de ¼ pulgadas, afloje y quite el Pivote de Bisagra del Soporte del Pivote de Inserción de la Bisagra Central. Quite las arandelas debajo de la bisagra central y colóquelas a un lado. NOTA: A este punto la puerta estará floja, levántela un poco y sáquela.
INSTALACIÓN DEL REFRIGERADOR Soporte de Inserción de Bisagra Pivote de Inserción Siguiendo la ilustración, gire el Soporte de la Bisagra Central (la Pestaña quedará hacia arriba) y posiciónela en el lado izquierdo del refrigerador y vuelva a unirla con dos tornillos y el destornillador Phillips. Coloque la puerta del refrigerador sobre el pivote de la bisagra inferior.
INSTALACIÓN USOUSO DELDEL REFRIGERADOR REFRIGERADOR DEL REFRIGERADOR Asegúrese que las cuatro esquinas del empaque de la puerta no esten dobladas. Para cerciorarse de un buen sellado, aplique una pequeña cantidad de silicon en la junta. Corners Esquinas Ajuste los tornillos. Con fuerza ajuste la Tapa de la Bisagra Superior sobre la Bisagra Superior. Reemplace la tapa del lado izquierdo del refrigerador al lado derecho superior para cubrir los orificios. La tapa también se ajusta con fuerza.
USOUSO DELDEL REFRIGERADOR REFRIGERADOR CIERRE Y ALINEACIÓN DE PUERTAS Su refrigerador cuenta con tres tornillos niveladores: uno en el lado izquierdo y otro en el lado derecho. Si su refrigerador se encuentra inestable o si Ud. desea que las puertas cierren más fácil, ajuste la inclinación del refrigerador realizando lo siguiente: Nota: El tercer tornillo nivelador es usado para proteger la bisagra de la parte de abajo de la puerta.
USO DEL REFRIGERADOR AJUSTE DE LOS CONTROLES CÓMO REGULAR LOS AJUSTES DEL CONTROL Su refrigerador cuenta con dos controles que le permiten regular la temperatura en los compartimentos del refrigerador y congelador. Antes de introducir alimentos a su refrigerador, deje que éste se enfríe primero, dejando pasar 24 horas desde el momento en que usted conecta el refrigerador. El ajuste medio indicado en la sección anterior corresponde a un enfriamiento normal de un refrigerador.
USO DEL REFRIGERADOR CONDICIÓN/RAZÓN: AJUSTE RECOMENDADO: La sección del REFRIGERADOR se encuentra “tibia” Se abre la puerta frecuentemente Se almacena gran cantidad de alimentos. La temperatura ambiente es muy alta Ajuste el control del REFRIGERADOR al siguiente dígito superior, espere 24 horas y verifique. La sección del CONGELADOR se encuentra “tibia”/ Los hielos no se forman rápidamente Se abre la puerta frecuentemente Se almacena gran cantidad de alimentos.
USO DEL REFRIGERADOR PARA GUARDAR ALIMENTOS CONGELADOS ADVERTENCIA NOTA: Para mayor información acerca de cómo preparar los alimentos para congelarlos así como para ver el tiempo que pueden ser almacenados, consulte una guía sobre congelamiento o una guía para cocinar. PELIGRO DE SOFOCAMIENTO Ventile adecuadamente la habitación cuando utilice hielo seco. El hielo seco es Dióxido de Carbono (CO2) congelado.
USO DEL REFRIGERADOR CAJÓN DE CARNES FRÍAS Para remover el cajón de carnes frías: ESTANTES DEL REFIGERADOR Los estantes en su refrigerador son ajustables para cumplir con sus necesidades de almacenamiento. Todos los estantes en esta unidad son de cristal.
USOUSO DELDEL REFRIGERADOR REFRIGERADOR CAJÓN CON CONTROL DE HUMEDAD Para sacar la tapa del compartimiento de verduras: Los cajones para verduras mantienen el sabor y la frescura de la fruta y la verdura al permitir controlar fácilmente la humedad dentro del cajón. 1. Saque ambas gavetas del compartimiento. 2. Sacar el cristal del compartimiento de verduras. Para controlar la cantidad de humedad en los cajones 3.
CUIDADO CUIDADO DE SU DE REFRIGERADOR SU REFRIGERADOR CUBIERTA TRASERA ADVERTENCIA ADVERTENCIA PELIGRO DE EXPLOSIÓN PELIGRO DE CHOQUE ELÉCTRICO Antes de comenzar, desenchufe el refrigerador o desconecte la corriente de electricidad en el cortacorriente o caja de fusibles. No seguir estas instrucciones puede ocasionar la muerte o una lesión severa. Utilice limpiadores no inflamables. No seguir ésta instrucción puede ocasionar la muerte, explosión o incendio.
CUIDADO DE SU REFRIGERADOR INTERRUPCIONES DE ENERGÍA 1. Si se desconecta la energía de su hogar, llame a su compañía de energía y pregunte cuánto tiempo durará sin suministro eléctrico. 2. Si no habrá energía en las próximas 24 horas o menos, mantenga las puertas del refrigerador cerradas, para que los alimentos se mantengan fríos y congelados. 3. Si no habrá energía por más de 24 horas, use alguna de las siguientes opciones: Saque todos los alimentos congelados y guárdelos en una hielera.
ACERCA DE LA FÁBRICA DE HIELO AUTOMÁTICA NOTA: La Fábrica de Hielos Automática la incluyen solo algunos modelos. Revise la especificación del suyo. ADVERTENCIA Es normal que algunos cubos queden pegados; si el hielo no se usa frecuentemente, los hielos viejos estarán opacos, con sabor extraño y más pequeños. UD. DEBE ACCIONAR EL INTERRUPTOR A LA POSICIÓN O (OFF, APAGADO) PELIGRO DE DAÑOS PERSONALES Evite el contacto con las partes móviles del mecanismo expulsor o con el calentador que libera los cubos.
CÓMO CONECTAR LA TUBERÍA DE AGUA CÓMO CONECTAR LA TUBERÍA DE AGUA NOTA: La línea de agua es necesaria instalarla cuando las características de los dispensadores de agua y/o hielo están disponibles en su producto. ANTES DE COMENZAR La instalación de la tubería de agua no está garantizada por el fabricante del refrigerador o de la fábrica de hielos. Siga las instrucciones cuidadosamente para minimizar el riesgo de daños al producto.
CÓMO CONECTAR LA TUBERÍA DE AGUA 6. ACOMODE LA TUBERÍA 2. SELECCIONE LA LOCALIZACIÓN DE LA VÁLVULA Acomode la tubería entre la línea de agua fría y el refrigerador. Seleccione la localización para la válvula que mejor se le facilite el acceso. Es mejor conectar en una tubería vertical. Cuando sea necesario conectar en una tubería horizontal, haga la conexión en la parte superior o lateral, en vez de hacerlo en la parte inferior, para prevenir la acumulación de sedimentos.
CÓMO CÓMO CONECTAR CONECTAR LA TUBERÍA LA TUBERÍA DE AGUA DE AGUA 9. CONECTE LA TUBERÍA AL REFRIGERADOR 10. ABRA LA VÁLVULA DE PASO NOTAS: Antes de hacer la conexión al refrigerador, asegúres de que éste no esté conectado al suministro energía. Si su refrigerador no cuenta con filtro de agua, recomendamos que instale uno. Si su suministro agua contiene arena o partículas que puedan s llevadas a través de la válvula, instale un filtro de cerc refrigerador. Apriete todas las conexione que tengan fugas.
GUÍA DE SOLUCIÓN DE PROBLEMAS DESCRIPCIÓN DE LOS SONIDOS QUE SE PUEDEN ESCUCHAR Es posible que su nuevo refrigerador haga ruidos que el antiguo no hacía. La mayoría de los nuevos sonidos son normales. Las superficies duras, como el suelo, las paredes y los muebles, pueden hacer que los sonidos parezcan más fuertes de lo que realmente son. A continuación, se describen los tipos de sonidos que se pueden escuchar y qué los puede estar causando.
GUÍA DE SOLUCIÓN DE PROBLEMAS Problema Posibles DE Causas CUIDADO SU REFRIGERADOR Soluciones El cable de alimentación no está enchufado. Enchufe firmemente el cable en una toma de corriente con el voltaje adecuado (consulte Requisitos eléctricos y de conexión a tierra). Se ha fundido una bombilla. Sustitúyala con una bombilla para electrodomésticos con los mismos vatios, tamaño y forma disponible en su ferretería habitual. (Consulte la sección Sustitución de la bombilla).
GUÍA GUÍA DE SOLUCIÓN DE SOLUCIÓN DE PROBLEMAS DE PROBLEMAS Problema Posibles Causas Soluciones El refrigerador no está nivelado. Consulte la sección Nivelación y alineación de las puertas. Hay paquetes de alimentos Reorganice los contenedores de alimentos para bloqueando la puerta que impiden que liberar la puerta y los estantes de la puerta. se cierre. Las puertas no se cierran completamente Escarcha o cristales de hielo sobre los alimentos congelados. El hielo huele o sabe mal.
GUÍA DE SOLUCIÓN DE PROBLEMAS Problema Posibles Causas Soluciones Los sonidos podrían ser normales El refrigerador parece que hace para su refrigerador. demasiado ruido. La máquina de hielo no está fabricando hielo o no en la cantidad suficiente. Consulte la sección Descripción de los sonidos que se pueden escuchar para obtener más información. La instalación es nueva. Espere de 12 a 24 horas tras la instalación de la máquina de hielo para que comience la fabricación de hielo.
GUÍA DE SOLUCIÓN DE PROBLEMAS Problema La temperatura es demasiado cálida o hay una acumulación de humedad en el interior. Posibles Causas Soluciones Los conductos de ventilación del aire están bloqueados. El aire frío circula desde el congelador hacia la sección de alimentos frescos y vuelta atrás de nuevo a través de los conductos de ventilación del aire que hay en la pared que divide las dos secciones.
GARANTÍA GARANTÍA LG ELECTRONICS U.S.A., INC. FRIGORÍFICO LG GARANTÍA LIMITADA - U.S.A. En caso de que su Frigorífico LG (“Producto”) falle por defectos de material o mano de obra bajo circunstancias de uso doméstico normal durante el período de garantía descrito a continuación, LG, a su criterio, reparará o reemplazará el producto.
NOTAS 63
NOTAS 64
For additional support including helpful videos, please visit us at: www.lg.com LG Customer Information Center 1-800-243-0000 1-888-865-3026 1-888-542-2623 USA, Consumer User USA, Commercial User CANADA Register your Product Online! www.lg.