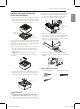
FEATURES AND BENEFITS 7 ENGLISH FEATURES AND BENEFITS KEY PARTS AND COMPONENTS Appearance and specifications may vary without notice to improve the quality of the product. Stacking Switch Lid Drawer Leg Support Control panel Top Cover Leveling feet A INVERTER DIRECT DRIVE MOTOR The inverter motor, which is directly connected to the tub, produces less noise and vibration while offering outstanding durability and a long lifespan.
8 INSTALLATION INSTRUCTIONS INSTALLATION INSTRUCTIONS CHOOSE THE PROPER LOCATION WARNING yy Two or more people are required when moving, unpacking, and stacking the washer. Failure to follow this warning may result in damage to property or serious bodily harm. yy Store and install the washer where it will not be exposed to weather or to temperatures below freezing. Failure to follow this warning can cause serious injury, fire, electric shock, or death.
INSTALLATION INSTRUCTIONS 1. A fter removing the carton and shipping material, lift the washer off the foam base. Make sure the plastic tub support comes off with the base and is not stuck to the bottom of the washer. 4. Make sure the leveling legs on the front-loading washer are fully retracted before stacking it on top of the pedestal washer. Position the appliance on top of the pedestal washer.
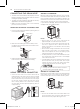
10 INSTALLATION INSTRUCTIONS OVERVIEW OF CONNECTIONS CONNECTING THE WATER LINES WITH FULL-SIZE APPLIANCES CONNECTING THE DRAIN HOSE WITH FULL-SIZE WASHER 1. Front-loading washer and pedestal washer with dryer. 1. Front-loading washer and pedestal washer with dryer. Short inlet hose Hot Cold Wire Clamp Required for water inlet Item Qty Y-Connector 2 Short inlet hose 2 Long inlet hose 4 Tie Strap 2. F ront-loading washer and pedestal washer with hybrid dryer long inlet hoses sold separately 2.
INSTALLATION INSTRUCTIONS NOTE: • For your safety, and for extended product life, use high-quality LG components. LG is not responsible for product malfunction or damage caused by the use of separately purchased nonLG parts. • Do not reuse old hoses. Use only new hoses when installing the washing machine. Old hoses could leak or burst causing flooding and property damage. Contact LG Customer Service for assistance in buying hoses: 1-800-984-6306.
12 INSTALLATION INSTRUCTIONS CONNECTING THE DRAIN HOSE yy The drain hose should always be properly secured. Failure to properly secure the drain hose can result in flooding and property damage. yy The drain must be installed in accordance with any applicable local codes and regulations. yy Make sure that the drain hose is not stretched, pinched, crushed, or kinked. OPTION 1: STANDPIPE Bend the outlet end of the drain hoses to form a U shape. Insert the end of the drain connector into the drain.
INSTALLATION INSTRUCTIONS The washer tub of your new washing machine spins at very high speeds. To minimize vibration, noise, and unwanted movement, the floor must be perfectly level and solid. • Check that the washing machine is level. - Check for levelness by rocking the top edges of the washing machine or placing a level on the washing machine. The slope beneath the washing machine must not exceed 1/2", and all four leveling feet must rest firmly on the floor.
14 INSTALLATION INSTRUCTIONS CONNECTING TO THE POWER SUPPLY The washer should be plugged into a 120 VAC, 60 Hz, 3-prong (grounded) outlet. Plug in the washer. WARNING yy Improper connection of the equipment grounding conductor can result in risk of electric shock. Check with a qualified electrician or service technician if there is doubt that the outlet is properly grounded. Do not modify the plug provided with the appliance. Never damage or cut off the ground prong of the power cord.
INSTALLATION INSTRUCTIONS FABRIC CARE LABELS CAUTION yy Do not load items higher than the top edge of the tub. Failure to follow this caution can result in leakage or damage to fabrics. yy Use the Bedding cycle in the full-size washer for buoyant or nonabsorbent items such as pillows or comforters. Refer to owner's manual included with washing machine. Failure to follow this caution can result in leakage. Many articles of clothing include a fabric care label.
16 INSTALLATION INSTRUCTIONS DETERGENT AND DISPENSER USE A WORD ABOUT DETERGENTS High-Efficiency (HE) detergents produce fewer suds, dissolve more efficiently to improve washing and rinsing performance, and help to keep the interior of your washer clean. Using detergent that is not HE may cause oversudsing and unsatisfactory performance which could result in error codes, cycle failure, and machine damage. Max load (2 tsp., 10 g) Normal (1 tsp., 5 g) This machine requires very little detergent.
HOW TO USE 17 ENGLISH HOW TO USE CONTROL PANEL FEATURES A C B D E A POWER (ON/OFF) BUTTON Press to turn the washer ON. Press again to turn the washer OFF. Pressing the POWER button during a cycle will cancel that cycle and any load settings will be lost. The drawer will unlock after a brief pause. C B NOTE: To protect your clothing, not all settings are available on all cycle selections. MFL68267012_E.indd 17 Touch and hold to Start the selected cycle.
18 HOW TO USE TIME AND STATUS DISPLAY The time and status display shows the estimated time remaining and cycle progress. AEB D A DRAWER LOCK INDICATOR B CHILD LOCK C The DRAWER LOCK indicator will illuminate once a cycle has started. The indicator light will stay on until the cycle is paused, stopped or has finished. When the Child Lock function is activated, the LED lights up. When the Child Lock function is set, except for the POWER button, the other functions are disabled.
HOW TO USE 19 1 SORT LAUNDRY AND LOAD THE WASHER 2 CLEANING PRODUCTS 3 TURN ON THE WASHER 4 SELECT A CYCLE 5 ADJUST SETTINGS Bleach Softener Bleach Softener Detergent Detergent Sort laundry by fabric type, soil level, color and load size, as needed. Open the lid and load items into the washer. ENGLISH OPERATING THE WASHER Measure High-Efficiency (HE) detergent with the dispenser and pour it into the washer. Press the POWER button to turn ON the washer.
20 HOW TO USE CYCLE GUIDE The cycle guide below shows the default settings, available options and recommended fabric types for each cycle. Allowable modifier adjustments are shown below the default setting for each cycle. Cycle Cycle Use Est. Time Normal Lightly soiled cotton, t-shirts, towels, jeans, mixed loads. 39 ~ 116 Intimates Lingerie, underwear, pajamas, delicates, etc. 47 ~ 103 Hand Wash Sweaters, knits, items labeled hand-washable, etc.
HOW TO USE After selecting a cycle, select additional features for the load. NOTE: yy To protect your garments, not every feature is available with every cycle. yy If the START/PAUSE button is not pressed within 4 minutes to start the cycle, the control will shut off and all settings will be lost. ENGLISH OPTIONS 21 WARM WATER The warm water option is selected by default on the Normal and Intimates cycles. It can be deselected by pressing the Warm Water button.
22 CARE AND CLEANING CARE AND CLEANING WARNING To reduce the risk of fire, electric shock, or injury to persons, read and follow this entire Owner’s Manual, including the Important Safety Instructions, before operating this washer. yy Unplug the washer before cleaning to avoid the risk of electric shock. Failure to follow this warning can cause serious injury, fire, electric shock, or death. yy Never use harsh chemicals, abrasive cleaners, or solvents to clean the washer. They will damage the finish.
CARE AND CLEANING NOTE: An IE message may blink on the display when the water pressure is weak or an inlet filter is clogged with dirt. Clean the inlet filter. CLEANING THE WATER INLET FILTERS If the washer does not fill properly, an error message will show on the display. The inlet valve filter screens could be plugged by hard water scale, sediment in the water supply, or other debris.