6 OPERATION OPERATION Before Use £ WARNING » To reduce the risk of fire, electric shock, or injury to persons, read the SAFETY INSTRUCTIONS before operating this appliance. Operation Overview 1 sort laundry and load the washer, « Sort laundry by fabric type, leis level, color and load size, as needed. Open the lid and load items into the washer, « If using single-use detergent packs, place pack into the tub before loading the laundry.
OPERATION 17 Clothing or articles that are waterproof or water resistant must be washed in the Waterproof cycle only. (Examples include water resistant clothing, mattress covers, outdoor clothes, and plastic mats.) Using another cycle may result in personal injury or damage to the washer, clothes, walls, floor, and surrounding objects due to abnormal vibration.
18 OPERATION other fabrics and lead to poor wash performance. Combine large and small items in the tub. Load large items first. Large items should not be more than half of total load. For best results, load dry items only. If washing very wet items, wring out excess water before loading, or run a Spin Only cycle to extract excess water before adding detergent and starting the desired cycle. The washer can be fully loaded, but the tub should not be tightly packed with items.
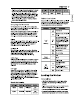
OPERATION 19 Do not load bulky items such as pet beds that are too large or stiff to move easily around the agitator. Impeding the motion of the drum or agitator could cause damage to the items or the washer. Adding Cleaning Products Aleut Detergent Use This washer is designed for use with only HE (High Efficiency) detergents. & HE detergents produce fewer suds, dissolve more efficiently to improve washing and rinsing performance, and help to keep the interior of the washer clean.
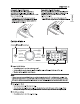
20 OPERATION @ Liquid fabric softener compartment @ Main wash liquid detergent cup ® Insert @ Main wash powdered detergent compartment 3 Gently close the detergent dispenser drawer before starting the cycle, Slamming the drawer closed may resulting the detergent overflowing into another compartment or dispensing into the drum earlier than programmed. Be careful not to get a hand caught in the drawer while closing.
OPERATION 21 Automatic Bleach Dispenser Immediate Bleach Dispenser On some medals, the bleach dispenser Is On some models, when you pour the bleach into connected to the inlet valve. The bleach is the bleach dispenser, the bleach is immediately automatically diluted and dispensed at the proper added to the tub as it fills with water, safely R time in the wash cycle. diluting the bleach. Z » The dispenser is activated twice to ensure * The dispenser cover cannot be removed.
22 OPERATION + If the washer is running, use this button to pause the cycle without losing the current settings. Bep— | NOTE » If the Start/Pause button is not pressed to start the selected cycle, after a delay the washer automatically turns off and all cycle settings are lost. Any water remaining in the drum will be drained. @ Time and Status Display @ Cycle Modifier Buttons « Use these buttons to adjust the wash temperature, spin speed and soil level settings for the selected cycle.
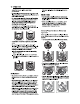
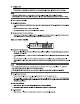
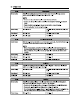
OPERATION 23 Wash Cycles The wash cycles are designed for specific types of wash loads. Select the cycle that best matches the load contents for maximum wash performance and fabric care. See the Sorting Laundry section for best results, and follow the fabric care labels on your garments. For a guide to fabric care symbols, see the Sorting Laundry section. Cybele Guide Tum the knob or press the button to select the desired cycle.
24 OPERATION Description Suitable for washing waterproof items such as water resistant clothing, mattress cavers, outdoor clothes, and plastic mats, (less than 14 Ib) NOTE * Do not use any other wash cycle to wash waterproof items. « Do not use this cycle to wash a mixed lead of waterproof and non-waterproof items. « Check the fabric care label on the garments before using this cycle. » Do not wash other fabrics using this cycle. Wash Temp.
OPERATION 25 Spin Speed Default; Low Available: Medium, Low, No Spin Soil Level Default: Normal Available: All Description You can use a smartphone to download a specialized cycle to this cycle position. » The default cycle is Small Load, used for normally soiled loads with a few items. This cycle is also available for download. » Refer to the LG Thin Q application to see the cycles available for download. Wash Temp.
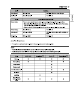
26 OPERATION Cycle Modifiers About Modifier Buttons Each cycle has default settings that are selected automatically. You may also customize these settings using the cycle modifier buttons. Repeatedly press the button for the desired modifier until the indicator light for the desired setting is lit. » The washer automatically adjusts the water level for the type and size of wash load for best results and maximum efficiency.
OPERATION 27 NOTE * Best results are obtained with smaller loads (less than 6 1b.) Speed Wash Use this option to quickly wash lightly soiled clothing and small loads. For high wash and rinse efficiency, wash small loads of 2-3 lightly soiled garments, NOTE * Use very little detergent In this cycle. To add an extra rinse, use the Extra Rinse button. Rinse+Spin Select this option to rinse and spin a load separately from a regular cycle. This can be helpful in preventing fresh stains from setting in fabrics.
28 OPERATION 2 pres sand hold the Span button for 3 seconds, * You can change the spin speed by pressing the Spin button. 3 Press the Start/Pause button to begin. Cold Wash Use this option to save energy by using cooler water while increasing the wash and rinse times to maintain wash performance. » Wash time will increase up to several minutes with this option. * For best wash results, only wash small loads (less than 8 Ib) with this option.
OPERATION 29 Control Lock Use this function to disable the controls. This function can prevent children from changing cycles or operating this washer. T NOTE * The function does not lock the door. » Once this function is set, all buttons are locked except the Power button. + When the controls are locked, CL and the remaining time are alternately shown on the display during the wash cycle. * Turning off the power will not reset this function.
30 SMART FUNCTIONS SMART FUNCTIONS LG Thin Q Application The LG Thin Q application allows you to communicate with the appliance using a smartphone. LG Thin( Application Features » Remote Start Control the appliance remotely from the LG Thin Q application, * Downloaded Download new and specialized cycles that are not included in the standard cycles on the appliance, * Tub Clean Coach This function shows how many cycles remain before running the Tub Clean cycle.
SMART FUNCTIONS 31 unplug the appliance and wait about a minute before trying again. If the firewall on your wireless router is enabled, disable the firewall or add an exception to it. The wireless network name (SAID) should be a combination of English letters and numbers, (Do not use special characters.) Smartphone user interface {UI) may vary depending on the mobile aerating system (OS) and the manufacturer. If the security protocol of the router is set to WEP, network setup may fail.
32 SMART FUNCTIONS try to correct the interference by one or more of the following measures: Reorient or relocate the receiving antenna. Increase the separation between the equipment and the receiver. Connect the equipment to an outlet on a circuit different from that to which the receiver is connected, Consult the dealer or an experienced radiology technician for help. This device complies with part 15 of the FCC Rules.
SMART FUNCTIONS 33 Using LG Thing to Diagnose Issues If you experience a problem with your WI-Fi equipped appliance, it can transmit troubleshooting data to a smartphone using the LG Thin Q application, Launch the LG Thin Q application and select the Smart Diagnosis™ feature in the menu, Follow the instructions provided in the LG Thin Q application.
34 MAINTENANCE MAINTENANCE £\ WARNING » To reduce the risk of fire, electric shock, or injury to persons, read this entire owner's manual, including the SAFETY INSTRUCTIONS, before pore: g this appliance. Unplug the appliance before cleaning to avoid the risk of electric shock. Failure to follow this warning can cause serious injury, fire, electric shock, or death. Do not use volatile substances {benzene, paint thinner, alcohol, acetone, etc.
MAINTENANCE 35 Powdered cleaner | Follow manufacturer's recommendations. Place directly Into the washer tub. Cleaning tablets For other tub cleaning products, follow the cleaner manufacturer’s instructions and recommendations. Do not exceed the maximum fill line when adding bleach or powdered cleaners, Powdered cleaners may remain in the tub after cleaning.
36 MAINTENANCE 4 Clean the inserts and drawer with warm water. * Use a soft cloth or brush to clean and remove any residue. * Do not use soap when cleaning the drawer and inserts. 5 Wipe off any moisture with a dry towel or cloth after cleaning. 6 To clean the drawer opening, use a small, non-metal brush to clean the recess, Remove all residue from the upper and lower parts of the recess. 7 Return the inserts to the proper compartments and replace the drawer.
MAINTENANCE 37 6 Rinse filters thoroughly and press them back into place. T Flush then reattach the water hoses. Before reattaching the water inlet hoses, flush them by running several gallons of water through them into a bucket or drain, preferably with the faucets wide open for maximum flow. NOTE * An1 E error message may blink on the display when the water pressure is low or an inlet filter is clogged with dirt. Clean the inlet filter.
38 MAINTENANCE 5 Reconnect the water Inlet hoses to the water inlets of the washer and to the faucets. « See Connecting the Water Inlet Hoses for details. 6 Turn on the faucets. T Press the Power button to turn on the washer, 8 Pres sand hold the Spin button for 3 seconds to operate Spin Only cycle for draining and spinning. 9 Press the Start/Pause button and check that the water fills properly, When the Drain Hose Is Frozen 1 Paar hot water in the washer tub and close the lid, 2 wait for 1 -2 hours.