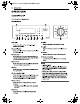
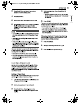
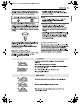
'sustain book. book Page 24 Tuesday, September §, 2022 9:13 AM 24 OPERATION el] OPERATION Control Panel Control Panel Features Model: LSIS6338 TER Gf fi sam om 0 | PLT LST ee L EEX EEK] © Display @® Clock Press any button on the control panel to Press the button to set the time of day. activate the display. © Light @ Control Lock Press and hold the button for 3 seconds to lock the control panel, © Cook Time Press the button to set the desired amount of time for food to cook.
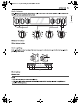
| ® 'sustain book. book Page 25 Tuesday, September §, 2022 9:13 OPERATION 25 ¢ Knob Features After cleaning the oven knobs, make sure to replace each knob in the correct position. Failure to do so can result in improper operation of the burners.
[o— | ® 'sustain book. book Page 26 Tuesday, September §, 2022 9:13 AM 26 OPERATION | ® Changing Oven Settings Clack The clack must be set to the correct time of day in order for the automatic oven timing functions to work properly. 1 Press Clock 2 Press the numbers to enter the time. For example, to set the clock for 10:30, press the numbers: 1,0, 3 and 0. 3 Press Start.
| ® 'sustain book. book Page 27 Tuesday, September §, 2022 9:13 AM | ® OPERATION 27 5 To disconnect the appliance from the network, delete it from the connected appliances in the app. TT ER, NOTE * See the Smart Functions section in the owner's manual for more details. Settings (Hour Mode, Convection Lute Conversion, Oven Temperature, Preheat Alarm Light, Reaper Volume, Fahrenheit or Celsius, Cook top On Alert Volume} Press the Settings button repeatedly to toggle through and change oven settings.
'sustain book. book Page 28 Tuesday, September §, 2022 9:13 AM 28 OPERATION A NOTE « This adjustment does not affect the rolling or Self Clean temperatures. The adjustment is retained in memory after a power failure.
'sustain book. book Page 29 Tuesday, September §, 2022 9:13 Press Cook Time and touch the number buttons to set the baking time, 4 Press Start Time. 5 set the start time: Press 4,3 and 0 for 4:30, 6 Press START. Short beep sounds and Timed Delay and the start time appear in the display. The oven begins baking at the set start time, EEE NOTE To cancel the Delayed Timed Cook function, turn the oven mode knob to the OFF position at any time, To change the cooking time, repeat step 3 and press START.
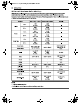
| ® 'sustain book. book Page 30 Tuesday, September §, 2022 9:13 AM 30 OPERATION —o|® Minimum & Maximum Default Settings All of the features listed have a minimum and a maximum time or temperature setting that may be entered into the control. An entry acceptance beep sounds each time a control button is pressed. An entry error tone (two short tones) sounds if the entry of the temperature or time is below the minimum or above the maximum setting for the feature, Feature Min: Temp. / Time | Max. Temp.
| ® 'sustain book. book Page 31 Tuesday, September §, 2022 9:13 AM | ® OPERATION 31 Cook top Precautions when using the Collector 4b WARNING Before Cooking * Do not cook on a broken cook top. If the cook top is broken, cleaning solutions and spillovers may penetrate the broken cook top and create a risk of electric shock. Contact a qualified technician immediately. During Cooking Turn cookware handles inward so they don't extend over adjacent surface units.
'sustain book. book Page 32 Tuesday, September §, 2022 9:13 AM 32 OPERATION el] Noises during Cook top Operation Induction Sound: The electronic processes involved with induction cooking create some unfamiliar background noises such as a slight buzzing sound. These noises are a normal part of the induction cooking process. Cookware Vibration Sound: Some cookware will buzz, depending on its construction or base material.
| ® 'sustain book. book Page 33 Tuesday, September §, 2022 9:13 AM el] OPERATION 33 tT manufacturer as "induction ready” or "induction capable”, or that is marked by the manufacturer as specifically designed for induction cooking. + Stainless Steel Is generally excellent for induction cooking. It is durable, easy to clean, and resists staining. | Symbols of Induction Compatible Slackware @ The base material of the cookware must be magnetic for the cooking elements to activate.
| ® 'sustain book. book Page 34 Tuesday, September §, 2022 9:13 AM 34 OPERATION Incorrect Use + Pan bottom rests on cook top trim or does not rest completely on the cook top surface. * Pan is unbalanced by heavy handle. Pan Sensing fluctuate. If the cookware does not meet the correct conditions, the cooking zone may not heat.
| ® 'sustain book. book Page 35 Tuesday, September §, 2022 9:13 AM | ® OPERATION 35 The pan must make full contact with the glass surface without the bottom of the pan touching the metal cook top trim, If the correct induction cookware—centered on any of the active cooking elements—is too small, the | HEIDI affected cooking element's LED bar fluctuates and the pan does not heat.
| ® 'sustain book. book Page 36 Tuesday, September §, 2022 9:13 AM 36 OPERATION | ® highest heat setting. Once the water is billing, reduce the heat as much as possible while maintaining the boil. It is best to can small amounts and keep the caner light enough to lift. Do not leave the water bath or pressure caners on high heat for extended periods. Alternate surface elements between each batch to allow the elements and surrounding surfaces to cool down. Do not can using the same element all day.
| ® 'sustain book. book Page 37 Tuesday, September §, 2022 9:13 AM | ® OPERATION 37 Power Management The cooking zones, which consist of paired cooking elements, are restricted to drawing a certain maximum amount of power. If you turn on the Boost function for one element while its paired element is in use, the Power Management function may automatically reduce the power of both elements. For consistent performance when using multiple elements, use elements in separate cooking zones.
'sustain book. book Page 38 Tuesday, September §, 2022 9:13 AM 38 OPERATION el] A NOTE « The heat turns off if the door Is left open during baking. If the door is left open for longer than 30 seconds during baking, the heat turns off. The heat turns back on automatically once the door is closed. Avoid opening the oven door more than necessary during use. This helps the oven maintain temperature, prevents unnecessary heat loss, and saves on energy use.
| ® 'sustain book. book Page 39 Tuesday, September §, 2022 9:13 AM | ® OPERATION 39 Bake Bake is used to prepare foods such as pastries, breads and casseroles. The oven can be programmed to bake at any temperature from 170 550 °F (285 °C). The default temperature is 350 °F (175 °C). Setting the Bake Function {For example, to bake at 375 °F) 1 Turn the oven mode knob to select Bake. 2 Seventieth temperature: Press 3, 7 and 5. 3 Press START. The oven starts to preheat.
ov | ® 'sustain book. book Page 40 Tuesday, September §, 2022 9:13 AM 40 OPERATION | ® + When using Convection Bake, place the oven racks in the positions suggested in the charts in this manual. + Multiple oven rack cooking may slightly increase cook times for some foods. * Cakes, cookies and muffins have better results when using multiple racks, The Convection Roast feature is designed to give optimum roasting performance.
[o— | ® 'sustain book. book Page 41 Tuesday, September §, 2022 9:13 settee probe temperature. 5 Press start. IMPORTANT NOTE Turn the oven mode knob to the OFF position to cancel the Meat Probe function at any time, To avoid breaking the probe, make sure food is completely defrosted before Inserting. 4) CAUTION + Always use an oven mitt to remove the temperature probe, Do not touch the broil element. Failure to obey this caution can result in severe personal injury.
oo | ® 'sustain book. book Page 42 Tuesday, September §, 2022 9:13 AM el] 42 OPERATION Rack + Always use a roller pan and grid for excess fat Food atk and grease drainage, This will help to reduce P splatter, smoke, and flare-ups. Fr ult crisps and + When using your broiler, the temperature inside Desserts | cobblers, from scratch 4 the oven will be extremely high.
'sustain book. book Page 43 Tuesday, September §, 2022 9:13 AM OPERATION 43 Always run your cook top ventilation system or vent hood during broiling. Keep the Interior of your oven as clean as possible. Leftover debris from prior meals can burn or catch fire. Av old fatty marinades and sugary glazes. Both of these will increase the amount of smoke you experience. If you would like to use a glaze, apply it at the very end of cooking.
oo | ® 'sustain book. book Page 44 Tuesday, September §, 2022 9:13 AM 44 OPERATION First Second Food Quantifier | Jk | side | wee Comments (min) {min} Cut through back of shell. Spread open. 2-4 Donor | Brush with melted Lobster Tails 10th 12 oz. each 5 812 turn over | butter before broiling and after half of broiling time, Handle and turn very carefully, Brush with Fish Fillets ato 11" thick 6 24 24 lemon butter before and during cooking, if desired. Increase time 5to 10 Ham Slices yn .
| ® 'sustain book. book Page 45 Tuesday, September §, 2022 9:13 AM | ® OPERATION 45 tT For bone-in steaks or chops that have been drenched (all meat removed from around the bone), wrap the exposed sections of bone in foil to reduce burning. » Seafood When broiling skin-on fish, always use the Lo broil setting and always broil the skin side last, Seafood is best consumed immediately after cooking. Allowing seafood to rest after cooking can cause the food to dry out.
| ® 'sustain book. book Page 46 Tuesday, September §, 2022 9:13 AM 46 OPERATION | ® Heep Warm This function maintains an oven temperature of 170 °F. The Keep Warm function will keep cooked food warm for serving up to 3 hours after cooking has finished. The Keep Warm function should be used with any other cooking operations. The Keep Warm function can be used after cooking has finished using a Timed Cook or a Delayed Timed Cook. Setting the Keep Warm Function after a Timed Cook 1 select the Bake, Conn.
| ® 'sustain book. book Page 47 Tuesday, September §, 2022 9:13 AM | ® OPERATION 47 Reduce the cooking time by about 20 percent, check food early, and adjust cooking time as needed. Use a food thermometer to make sure food has reached a safe temperature for consumption. Eating under cooked meats can increase your risk of food-borne illness. For the crispiest results, dredge fresh chicken wings or tenders in seasoned flour. Use 1/3 cup flour for 2 pounds of chicken.
oo | ® 'sustain book. book Page 48 Tuesday, September §, 2022 9:13 AM el] 48 OPERATION Quantity Rack Recommended Items (3 Temp. CF) | position Time Glide Homemade French Fries 25 450 4 27-37 | Cut the potatoes and soak (3/4" x 3/4" or 10x 10 for 30 minutes in hot tap mm) water. Drain and pat dry.Brush or lightly spray Homemade Potato 60 450 4 30-40 | with 3 tsp. of oil. Add salt Wedges and pepper to taste.
| ® 'sustain book. book Page 49 Tuesday, September §, 2022 9:13 AM el] OPERATION 48 + It Is not necessary to preheat the oven when using Air Sous-Side, » Refer to the cooking guide for recommended Air Sous-Side settings. Benefits of Air Sous-Side The lower temperatures and long cooking times used in Air Sous-Side cooking provide many Setting Air Sous-Side Mode tT perfect texture when cooking meat and poultry. The low temperatures used retain more of the moisture in food than conventional cooking methods.
4 | ® 'sustain book. book Page 50 Tuesday, September §, 2022 9:13 AM 50 OPERATION el] When cooking is complete, turn the oven mode knob to the OFF position. NOTE + To cancel the Frozen Meal function during use, turn the oven mode knob to the OFF position at any time. Remote Start This feature starts preheating and maintains the temperature for up to 12 hours (including preheating time). The appliance must be connected to a home WI-Fi network to use Remote Start.
| ® 'sustain book. book Page 51 Tuesday, September §, 2022 9:13 AM | ® SMART FUNCTIONS 51 SMART FUNCTIONS LG Thin Q Application This feature is only available on models with WI-Fi. The LG Thin Q application allows you to communicate with the appliance using a smartphone, LG Thing Application Features + Smart Diagnosis™ This function provides useful information for diagnosing and solving Issues with the appliance based on the pattern of use.
ov | ® 'sustain book. book Page 52 Tuesday, September §, 2022 9:13 AM 52 SMART FUNCTIONS | ® A NOTE If the appliance cannot be connected due to problems with the wireless signal transmission, unplug the appliance and wait about a minute before trying again. If the firewall on your wireless router is enabled, disable the firewall or add an exception to it. The wireless network name (SAID) should be a combination of English letters and numbers, {Do not use special characters.
| ® 'sustain book. book Page 53 Tuesday, September §, 2022 9:13 AM | ® SMART FUNCTIONS 53 However, there is no guarantee that interference will not occur in a particular installation, If this equipment does cause interference to radio or television reception, which can be determined by turning the equipment off and on, the user Is encouraged to try to correct the interference by one or more of the following: Reorient or relocate the receiving antenna of the radio or television.
| ® 'sustain book. book Page 54 Tuesday, September §, 2022 9:13 AM 54 SMART FUNCTIONS el] factors such as, but not limited to, WI-Fi unavailability, WI-Fi disconnection, local app NOTE store policy, or app unavailability. + For best results, do not move the phone while + The feature may be subject to change without the tones are being transmitted. prior notice and may have a different form depending on where you are located.
| ® 'sustain book. book Page 55 Tuesday, September §, 2022 9:13 AM | ® MAINTENANCE 55 MAINTENANCE Cleaning £4) CAUTION * Do not clean this appliance with bleach. + To prevent burns, Walt until the cook top has cooled down before touching any of its parts. * Always wear gloves when cleaning the cook top. Interior Do not use oven cleaners to clean the oven cavity. Use the product's Easy Clean function regularly to clean light soil.
| ® 'sustain book. book Page 56 Tuesday, September §, 2022 9:13 AM 56 MAINTENANCE el] TT ER, NOTE « Always wipe In the direction of the metal surface finish, » Stainless steel appliance cleaner or polish can be purchased online or from most retailers of appliances or home goods. Oven Door £) CAUTION Do not use harsh cleaners or harsh abrasive cleaning materials on the outside of the oven door, Doing so can cause damage, Use soapy water to thoroughly clean the oven door. Rinse well.
oo | ® 'sustain book. book Page 57 Tuesday, September §, 2022 9:13 —of] MAINTENANCE 57 Cook top Surface | Glass-Ceramic Cook top £) WARNING + To protect hands from burns, always wear oven mitts or use pot holders while using a scraper on the hot cooking surface.
oo | ® 'sustain book. book Page 58 Tuesday, September §, 2022 9:13 AM 58 MAINTENANCE NOTE « Do not use a dull or nicked blade. * Hold the scraper at approximately a 30° angle to the cook top. » The razor scraper will not damage the markings on the cooking surface. 2 when the cooking surface has completely cooled, apply a few dime-sized dabs of a glass-ceramic cook top cleaner In each burner area.
'sustain book. book Page 59 Tuesday, September §, 2022 9:13 AM el] MAINTENANCE 59 Metal Marks and Scratches 4), CAUTION » Always use heavier gauge, high-quality cookware on the cooking elements and do not slide it on the ceramic cook top surface. Even high-quality cookware can scratch the cook top surface. » Any cookware that has a rough or dirty bottom can mark and scratch the cook top surface. Always start with clean cookware.
| ® 'sustain book.
| ® 'sustain book. book Page 61 Tuesday, September §, 2022 9:13 AM | ® MAINTENANCE 61 During the Easy Clean cycle, the oven becomes hot enough to cause burns, Wait until the cycle is over before wiping the inside surface of the oven. Allure to do so may result In burns. Avoid leaning or resting on the oven door glass while cleaning the oven cavity. 7 Atone will sound at the end of the 10 minute cycle.
| ® 'sustain book. book Page 62 Tuesday, September §, 2022 9:13 AM 62 MAINTENANCE el] 4b WARNING If the oven Is heavily dolled with oll, self-clean the oven before using the oven again, The oil could cause a fire. If there is a fire In the oven during self-clean, turn the oven off and wait for the fire to go out. Do not force the door open. Introduction of fresh air at self-clean temperatures may lead to a burst of flame from the oven. Failure to follow this instruction may result in severe burns.
| ® 'sustain book. book Page 63 Tuesday, September §, 2022 9:13 AM | ® MAINTENANCE 63 Case 2 * Soil pattern: Drops or spots « Types of soils: Filling or sugar based dolls » Common food items that can soil your oven: Pies Case 3 * Soil pattern: Drops or spots + Types of dolls: Cream or tomato sauce » Common food items that can soil your oven: Casseroles NOTE + The Self Clean cycle can be used for soil that has been built up over time.
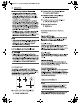
| ® 'sustain book. book Page 64 Tuesday, September §, 2022 9:13 AM 64 MAINTENANCE Removing Doors 1 Fully open the door. 2 ft up the hinge lock @ and flip it towards the hinge arm @ completely. Locked Position Unlocked Position @ Hinge Lock © Oven Frame @ Hinge Arm 3 Firmly grasp both sides of the door at the top. 4 Partially close the door to approximately 5 degrees @. If the position is correct, the hinge arms will move freely.
| ® 'sustain book. book Page 65 Tuesday, September §, 2022 9:13 AM + MAINTENANCE 65 Most cleaning can be done with the drawer In place; however, the drawer may be removed if further cleaning is needed. Use warm water to thoroughly clean. 1 Fully open the drawer. 2 unscrew the screw @ on the side at the back of the drawer. 3 Locate the glide lever on each side of the drawer. Push down on the left glide lever and pull up on the right glide lever.
| ® 'sustain book. book Page 66 Tuesday, September §, 2022 9:13 AM 66 MAINTENANCE 4b WARNING « Disconnect the electrical power to the range at the main fuse or circuit breaker panel, Failure to do so can result in severe personal injury, death, or electrical shock. 1 Unplug the range or disconnect power. 2 Tum the glass lamp cover in the back of the oven counterclockwise to remove. 3 Remove the halogen lamp from the socket. 4 insert new halogen lamp.