UUGGwGXGGm SGq GYZSGYWYXGGZaY^Gwt OWNER'S MANUAL WALL OVEN Read this owner's manual thoroughly before operating the appliance and keep it handy for reference at all times. ENGLISH WDES9428F MFL51224542 Rev.00_072321 www.lg.com Copyright © 2021 LG Electronics Inc. All Rights Reserved.
UUGGwGYGGm SGq GYZSGYWYXGGZaY^Gwt 2 TABLE OF CONTENTS 4 IMPORTANT SAFETY INSTRUCTIONS 16 Factory Data Reset 4 READ ALL INSTRUCTIONS BEFORE USE 16 Timer 4 4 6 Safety Messages WARNING 4 Installation 5 Operation 5 Maintenance 6 Risk of Fire and Flammable Materials 16 Open Source License 16 Oven Cooling 17 17 Before Using the Oven 17 Using Standard Oven Racks 17 Using Gliding Oven Racks 18 Instaview 18 Convection Bake and Roast Mode CAUTION 20 Bake Mode 6 Operatio
UUGGwGZGGm SGq GYZSGYWYXGGZaY^Gwt 3 44 MAINTENANCE 44 Cleaning 44 General Cleaning Tips 44 Exterior 45 EasyClean 47 Self Clean 49 Cleaning the Steam Feeder Tank 50 Cleaning Scale on Oven Bottom 50 Drying the Oven Interior 50 Using Evaporation Function 51 Periodic Maintenance 51 Changing the Oven Light 52 TROUBLESHOOTING 52 FAQs 52 Frequently Asked Questions 55 Before Calling for Service 55 Cooking 57 Parts & Features 58 Noises 58 Wi-Fi 59 LIMITED WARRANTY 59 USA 59 TERMS A
UUGGwG[GGm SGq GYZSGYWYXGGZaY^Gwt 4 IMPORTANT SAFETY INSTRUCTIONS IMPORTANT SAFETY INSTRUCTIONS READ ALL INSTRUCTIONS BEFORE USE Safety Messages Your safety and the safety of others are very important. We have provided many important safety messages in this manual and on your appliance. Always read and follow all safety messages. This is the safety alert symbol. This symbol alerts you to potential hazards that can kill or injure you and others.
UUGGwG\GGm SGq GYZSGYWYXGGZaY^Gwt IMPORTANT SAFETY INSTRUCTIONS 5 Operation • Use care when opening door. The hot air and steam that escape can cause burns to hands, face and eyes. Let hot air or steam escape from the oven before removing or replacing food in the oven. • Do not use plastic to cover food. Use foil or oven-safe lids only. • Never attempt to dry a pet in the oven. • Never use your appliance for warming or heating the room.
UUGGwG]GGm SGq GYZSGYWYXGGZaY^Gwt 6 IMPORTANT SAFETY INSTRUCTIONS • Never pour cold water over a hot oven for cleaning purposes. • Do not clean with metal scouring pads. Pieces can burn off the pad and touch electrical parts causing a risk of electric shock. • Do not store any materials, other than manufacturer’s recommended accessories, in this oven when not in use. • Do not cover racks or any other part of the oven with metal foil. This will cause overheating of the oven.
UUGGwG^GGm SGq GYZSGYWYXGGZaY^Gwt IMPORTANT SAFETY INSTRUCTIONS 7 • To protect against food-borne illnesses, cook meat and poultry thoroughly. The USDA has indicated the following as safe minimum internal temperatures for consumption: - Ground beef: 160 °F (71 ) - Beef, veal, pork, or lamb: 145 °F (68 ) - Fish/seafood: 145 °F (68 ) • Do not use this oven for commercial purposes. It is made for household use only.
UUGGwG_GGm SGq GYZSGYWYXGGZaY^Gwt 8 PRODUCT OVERVIEW PRODUCT OVERVIEW Product Features The appearance and specifications listed in this manual may vary due to constant product improvements.
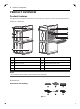
UUGGwG`GGm SGq GYZSGYWYXGGZaY^Gwt PRODUCT OVERVIEW b Heavy duty standard rack (4ea) 9 Manuals c Broiler pan ENGLISH d Gliding rack (2ea) e Meat probe f Air Fry tray Accessories for Installation a Owner’s manual b Installation manual NOTE • Contact LG Customer Service at 1-800-243-0000 (1-888-542-2623 in Canada) if any accessories are missing. • For your safety and for extended product life, only use authorized components.
UUGGwGXWGGm SGq GYZSGYWYXGGZaY^Gwt 10 OPERATION OPERATION Operating Control Panel Control Panel Features a LCD Display On/Off b LCD Touchscreen for Oven Display Icons Icons appear in display when activated.
UUGGwGXXGGm SGq GYZSGYWYXGGZaY^Gwt OPERATION 11 h Wi-Fi Icon • Appears when oven is connected to Wi-Fi ENGLISH • Appears when oven is disconnected from Wi-Fi or is not registered i Remote Start Icon Appears when Remote Start is active j Lock Icon Appears when Lockout is on Energy Saving Tips 4 • Multiple-rack cooking saves time and energy. Whenever possible, cook foods requiring the same cooking temperature together in one oven.
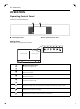
UUGGwGXYGGm SGq GYZSGYWYXGGZaY^Gwt 12 OPERATION Setting Date 6HWWLQJV /RFNRXW 2)) 6DEEDWK 2)) 1:26 AM 'DWH 7LPH &ORFN 7KHPHV 1 )UL MXQ $0 :L )L 5HPRWH 6WDUW 2)) 8SSHU 2YHQ /RZHU 2YHQ 2)) 2)) Touch Settings at the center bottom of the Main screen. Then touch Date & Time on the Settings screen. 2 Touch Date, and scroll to set the correct date. 3 Touch OK.
UUGGwGXZGGm SGq GYZSGYWYXGGZaY^Gwt OPERATION 13 On double wall ovens, either oven or both ovens can be put in Sabbath mode. • If the oven light is turned ON and the SABBATH mode is active, the oven light will stay ON. If the oven light needs to be OFF, be sure to turn the oven light OFF before activating the SABBATH mode. SABBATH mode can only be used in Bake mode. Setting Sabbath Mode 1 2 3 4 5 6 Disconnect the probe. The Probe function is not available in Sabbath mode.
UUGGwGX[GGm SGq GYZSGYWYXGGZaY^Gwt 14 OPERATION 3 3 Touch OK. /HYHO ^ ` When Convection Auto Conversion is ON, the icon appears at the top of the display. Convection auto conversion icon NOTE Display Set the length of time before the display sleeps. • If Convection Auto Conversion is ON, the icon flashes in the display while cooking in a convection mode. There are three options you can select. • ON : Always on • OFF : Automatically turns off if idle for 30 minutes.
UUGGwGX\GGm SGq GYZSGYWYXGGZaY^Gwt OPERATION 15 Setting the Preheat Alarm Temperature Units 1 Set the oven temperature display to show either Fahrenheit or Celsius units. 2 Select ON or OFF. 3 Touch OK. The oven defaults to Fahrenheit unless changed by the user. Setting Temperature Units 1 Temperature Adjustment Your new oven may cook differently than the one it replaced.
UUGGwGX]GGm SGq GYZSGYWYXGGZaY^Gwt 16 OPERATION 1 Touch Settings at the center bottom of the Main screen, swipe to the third Settings screen, and touch Demo Mode. 2 Select either the ON or OFF mode. 3 Touch OK. DEMO Oven Cooling The oven cooling icon appears in the display if the temperature inside the oven is high during or after operation. The icon disappears if the oven temperature is below 210 ૢ (100 ).
UUGGwGX^GGm SGq GYZSGYWYXGGZaY^Gwt OPERATION 17 Adjusting or Cancelling the Timer 1 To cancel the timer, touch the Reset icon in the popup. Then touch OK. Reset icon 3 4 To adjust the time, scroll the numbers in the popup until the desired time appears. Then touch OK. The remaining time in the display is adjusted.
UUGGwGX_GGm SGq GYZSGYWYXGGZaY^Gwt 18 OPERATION Installing Gliding Racks Instaview 1 Knock twice on the center of the glass panel to reveal the contents of the oven without opening the door. 2 Start with the rack in the closed position. Hold the rack with one hand at the center front and the other hand at the back right corner. Carefully insert the rack between the rack guides, and slide it back until the shelf drops into place.
UUGGwGX`GGm SGq GYZSGYWYXGGZaY^Gwt OPERATION 19 The oven can be programmed to bake at any temperature from 170 ૢ (80 ) to 550 ૢ (285 ). The default temperature is 350 ૢ (175 ). • When preparing meats for roasting, use the broiler pan and grid. The broiler pan catches grease spills and the grid helps prevent grease splatters. • The oven fan runs while convection baking and convection roasting. The fan stops when the door is opened.
UUGGwGYWGGm SGq GYZSGYWYXGGZaY^Gwt 20 OPERATION Tips for Convection Roasting Use a broiler pan and grid when preparing meats for convection roasting. The broiler pan catches grease spills and the grid helps prevent grease splatters. 1 2 Place the oven rack in position A or B. Place the grid a in the broiler pan b. 5 6 7 If the cook time is set, the remaining time appears in the display. If a delayed start time is set, the start time appears in the display.
UUGGwGYXGGm SGq GYZSGYWYXGGZaY^Gwt OPERATION 21 Recommended Baking Guide Rack and Pan Placement Baking results will be better if baking pans are centered in the oven as much as possible. If cooking on multiple racks, place the oven racks in the positions shown. Multiple-rack cooking saves time and energy. Whenever possible, cook foods requiring the same cooking temperature together in one oven.
UUGGwGYYGGm SGq GYZSGYWYXGGZaY^Gwt 22 OPERATION 7 A chime sounds at the end of the set cook time and a notification appears in the display. Open the oven door and remove the food. NOTE • If no cook time is set, the oven turns off automatically after 12 hours. • It is normal for cooling fans to run after any cooking cycle is complete, to protect the control panel. Changing the Cook Settings 1 2 3 Touch Edit in the display to bring up the Cook Settings screen.
UUGGwGYZGGm SGq GYZSGYWYXGGZaY^Gwt OPERATION 23 7 Touch Stop to cancel at any time or when cooking is complete. • If the cook time is not set, the oven automatically turns off after 3 hours. • The heating element(s) turn off immediately when the door is opened. They turn on again approximately 1 second after the door is closed. • Touch Stop in the display to cancel Broil at any time. Changing the Broil Settings • Always use a broiler pan.
UUGGwGY[GGm SGq GYZSGYWYXGGZaY^Gwt 24 OPERATION Rack Position First Side Time (min.) Second Side Time (min.) Comments E 4-6 3-4 Space evenly. Up to 9 patties may be broiled at once. Rare D 6 2-3 Medium D 7 2-3 Well done D 8 3-4 Rare D 10 4-6 Medium D 12 6-8 Well done D 14 8-10 1 whole, 2 to 21/2 lbs.
UUGGwGY\GGm SGq GYZSGYWYXGGZaY^Gwt OPERATION 25 First Side Time (min.) Second Side Time (min.) Medium D 6 4-6 Well done D 8 7-9 Medium D 11 9 Well done D 13 9-11 2 (1" thick) D or E 8 3-4 4 (1" thick) about 1 lb D or E 9 4-6 Food Lamb Chops 2 (1" thick) about 10 to 12 oz 1 2 (1 /2" thick) about 1lb Salmon Steaks Comments ENGLISH Rack Position Quantity and/or Thickness Slash fat. Grease pan. Brush steaks with melted butter.
UUGGwGY]GGm SGq GYZSGYWYXGGZaY^Gwt 26 OPERATION Setting the Warm Mode 1 2 Touch UPPER OVEN or LOWER OVEN and select Warm in the cooking mode screen. Scroll to set the desired temperature: Low, Medium, or High. If desired, scroll to set a run time. • High: 200 ૢ (93.3 ) • Medium: 170 ૢ (76.7 ) 3 2 3 Touch Start. The remaining proofing time appears in the display. NOTE • If the proofing time is not set, the oven automatically turns off after 12 hours.
UUGGwGY^GGm SGq GYZSGYWYXGGZaY^Gwt OPERATION 27 2 Set the oven temperature. Scroll through the numbers on the display or touch the number pad icon to enter the numbers directly. 3 4 5 If desired, set the cook time and delayed start time using the same method. Touch the arrow key on the right side of the display to see the delayed start time settings. c Broiler Pan Touch Start. If the cook time is set, the remaining time appears in the display.
UUGGwGY_GGm SGq GYZSGYWYXGGZaY^Gwt 28 OPERATION CAUTION • Never cover slots, holes, or passages in the oven bottom or cover entire racks with materials such as aluminum foil. Doing so blocks airflow through the oven and can result in carbon monoxide poisoning. Aluminum foil can also trap heat, causing a fire hazard or poor oven performance. • Turn on your exhaust hood at a high fan setting before you start Air Fry and leave it on for 15 minutes after you're done.
UUGGwGY`GGm SGq GYZSGYWYXGGZaY^Gwt OPERATION 29 Quantity (oz) Temp. (°F) Rack Position Time Frozen Chicken Strips 35 400 C 25-35 Frozen Hot Wings, Bonein 50 400 C 25-35 Fresh Chicken Wings† 40 450 C 25-35 Fresh Chicken 70 450 C 30-40 Thighs 40 450 C 25-35 Breasts 40 450 C 25-35 Frozen Onion Rings, Breaded 20 400 C 15-25 Frozen Spring Rolls (0.7 oz each) 45 400 C 15-25 Thin Sausage (2.5 oz each, diameter 0.
UUGGwGZWGGm SGq GYZSGYWYXGGZaY^Gwt 30 OPERATION Using the Meat Probe Feature right side of the display to see the additional settings. CAUTION • Always use an oven mitt to remove the temperature probe. Do NOT touch the broil element. Failure to follow this warning can result in severe personal injury. • To avoid damage to the meat probe, do not use tongs to pull on the probe when removing it. • Do not store the meat probe in the oven. 1 2 4 Insert the probe into the food.
UUGGwGZXGGm SGq GYZSGYWYXGGZaY^Gwt OPERATION 31 Category Examples of Food Probe Placement Whole Chicken or Turkey Poultry Insert in the thickest part of thigh, avoiding bone Duck, Goose, Pheasant Stuffing (Alone or in Bird) Insert in the thickest part of the dish Fresh Pork Pork & Ham Insert in the thickest part, away from bone, fat and gristle Fresh Ham (Raw) Precooked Ham (Reheat & Serve) Leftovers Leftovers & Casseroles Insert in the thickest part of the dish Casserol
UUGGwGZYGGm SGq GYZSGYWYXGGZaY^Gwt 32 OPERATION Favorite Mode For frequently used cooking menus, you can combine up to three different temperatures and cooking modes into one hot key. • Proofing doesn't operate when the oven is above 125 ૢ (52 ). • If using Proof after cooking, wait for the oven to cool first. Creating a Favorite • The Proof mode can only be set as a single stage, not as part of multi-stage cooking.
UUGGwGZZGGm SGq GYZSGYWYXGGZaY^Gwt OPERATION 33 Setting Auto Cook Mode 1 3 4 5 Touch a category to filter the options. Scroll through or tap the letters to find and select an item. Follow the recommendations in the display regarding accessories and rack position. Touch Start. ENGLISH 2 Select the UPPER OVEN or LOWER OVEN and touch Auto Cook in the Cooking Modes screen.
UUGGwGZ[GGm SGq GYZSGYWYXGGZaY^Gwt 34 OPERATION Auto Cook Guide • Preheat oven first for most items. • Preheat for 5 minutes when broiling. • If using probe, insert after preheating. NOTE • When cooking thin cuts of meat, insert the probe into the thickest part of the meat. If the probe is inserted incorrectly, the oven could turn off too soon. See the Probe section for instructions. Accessories/ Cookware Shelf Position Cooking time in min.
UUGGwGZ\GGm SGq GYZSGYWYXGGZaY^Gwt OPERATION 35 Accessories/ Cookware Cooking time in min.
UUGGwGZ]GGm SGq GYZSGYWYXGGZaY^Gwt 36 OPERATION Accessories/ Cookware Shelf Position Cooking time in min.
UUGGwGZ^GGm SGq GYZSGYWYXGGZaY^Gwt OPERATION 37 Accessories/ Cookware Cooking time in min.
UUGGwGZ_GGm SGq GYZSGYWYXGGZaY^Gwt 38 OPERATION Steam Bake Mode (Upper Oven Only) The Steam Bake mode heats food gradually, using both the oven heating elements and moist steam heat. The oven can be programmed to cook at any temperature from 210 ૢ (100 ) to 550 ૢ (285 ). Preset temperature options start at 350 ૢ (175 ). 5 Assemble the cover or snap closed the fill lid.
UUGGwGZ`GGm SGq GYZSGYWYXGGZaY^Gwt OPERATION 39 Adjust the settings as desired. 3 Touch Start. To Stop Steam Cooking Touch Stop in the display, and select Yes. Sous Vide (Upper Oven Only) Sous vide cooking uses steam to cook foods "low and slow." Use it to cook meat, fish, seafood, poultry or vegetables. Food must be vacuum packed in pouches. 2 3 Benefits of Sous Vide The lower temperatures and long cooking times used in sous vide cooking provide many benefits.
UUGGwG[WGGm SGq GYZSGYWYXGGZaY^Gwt 40 OPERATION Temp. (oz) (ૢ) Min Target Max 1” thick 14.1-17.6 oz 135 - 2.5 hr. 3 hr. 4.2-5.3 oz 149 - 2.5 hr. 3 hr. 1” thick 7 oz 140 - 2 hr. 2.5 hr. 2.8 oz / 6 ea 5.6 oz / 12 ea 185 20 min. 30 min. 45 min. Beef Steak (Medium rare) Chicken breast Salmon Asparagus Time Quantity Food • Cook 30 mins. or 1 hour more if you use meats thicker than 1". • If you use larger cuts of meat, cut to match the recommended weight.
UUGGwG[XGGm SGq GYZSGYWYXGGZaY^Gwt SMART FUNCTIONS 41 SMART FUNCTIONS This feature is only available on models with Wi-Fi. The LG ThinQ application allows you to communicate with the appliance using a smartphone. Before Using LG ThinQ Application 1 • If the appliance is too far from the wireless router, the signal becomes weak. It may take a long time to connect or fail to install the application.
UUGGwG[YGGm SGq GYZSGYWYXGGZaY^Gwt 42 SMART FUNCTIONS FCC Notice NOTE • If the appliance cannot be connected due to problems with the wireless signal transmission, unplug the appliance and wait about a minute before trying again. • If the firewall on your wireless router is enabled, disable the firewall or add an exception to it. • The wireless network name (SSID) should be a combination of English letters and numbers. (Do not use special characters.
UUGGwG[ZGGm SGq GYZSGYWYXGGZaY^Gwt SMART FUNCTIONS 43 Open Source Software Notice Information 1 2 Place your phone's mouthpiece near the top left corner of the screen. Touch the START button. LG Electronics will also provide open source code to you on CD-ROM for a charge covering the cost of performing such distribution (such as the cost of media, shipping, and handling) upon email request to opensource@lge.com.
UUGGwG[[GGm SGq GYZSGYWYXGGZaY^Gwt 44 MAINTENANCE MAINTENANCE Cleaning Oven Cavity General Cleaning Tips NEVER wipe a warm or hot porcelain surface with a damp sponge; it may cause chipping or crazing (tiny hairlike cracks). Food spills should be cleaned when the oven cools. At high temperature, foods react with porcelain and a permanent dull spot can result. When cleaning a spot, use only nonabrasive cleaners or scrubbers.
UUGGwG[\GGm SGq GYZSGYWYXGGZaY^Gwt MAINTENANCE 45 soils with the EasyClean feature instead of Self Clean. • Remove the grid from the pan. Carefully pour out the grease from the pan into a proper container. When needed, the oven still provides the Self Clean option for longer, more thorough oven cleaning for heavier, built up soils. • Wash and rinse the broiler pan and grid in hot water with a soap-filled or plastic scouring pad.
UUGGwG[]GGm SGq GYZSGYWYXGGZaY^Gwt 46 MAINTENANCE 5 NOTE • The oven should be level to ensure that the bottom surface of the oven cavity is entirely covered by water at the beginning of the EasyClean cycle. • For best results, use distilled or filtered water. Tap water may leave mineral deposits on the oven bottom. • Soil baked on through several cooking cycles will be more difficult to remove with the EasyClean cycle. • Do not open the oven door during the EasyClean cycle.
UUGGwG[^GGm SGq GYZSGYWYXGGZaY^Gwt MAINTENANCE 47 Before Starting Self Clean • Do not use any steel scouring pads, abrasive pads or cleaners as these materials can permanently damage the oven surface. 11 12 - If oven racks are left in the oven cavity during the Self Clean cycle, they will discolor and become difficult to slide in and out. - If you don't remove the water tank from the oven, a beep sounds and the Self Clean cycle does not start.
UUGGwG[_GGm SGq GYZSGYWYXGGZaY^Gwt 48 MAINTENANCE CAUTION • It is normal for parts of the oven to become hot during a Self Clean cycle. Avoid touching the door, window or oven vent area during a Self Clean cycle. • Do not leave small children unattended near the appliance. During the Self Clean cycle, the outside of the oven can become very hot to the touch. • If you have pet birds, move them to another well-ventilated room.
UUGGwG[`GGm SGq GYZSGYWYXGGZaY^Gwt MAINTENANCE 49 Setting Self Clean During Self Clean The Self Clean function has cycle times of 3, 4, or 5 hours. Self Clean Soil Guide Soil Level Cycle Setting Lightly Soiled Oven Cavity 3-Hour Moderately Soiled Oven Cavity 4-Hour Heavily Soiled Oven Cavity 5-Hour 1 2 3 4 Remove all racks and accessories from the oven. Select the UPPER OVEN or LOWER OVEN and touch Clean, Self Clean in that order.
UUGGwG\WGGm SGq GYZSGYWYXGGZaY^Gwt 50 MAINTENANCE NOTE • If the steam feeder tank does not slide in as smoothly as it should, clean the bottom of the tank. 4 5 6 Hard Water Scale After 1 hour 43 minutes of descaling, a popup will appear in the display. Following the instructions, drain the tank and fill it with clean water. Insert the tank and start the Rinsing function. Once the Rinsing function is complete, dry the inside of the oven with a soft cloth.
UUGGwG\XGGm SGq GYZSGYWYXGGZaY^Gwt MAINTENANCE 51 Touch Steam Maintenanceand Evaporation in that order. Touch Start to begin Evaporation. The remaining time appears in the display. Periodic Maintenance Changing the Oven Light The oven light is a standard 25-watt halogen bulb for ovens. WARNING • Make sure that the oven and bulb are cool. • Disconnect the electrical power to the appliance at the main fuse or circuit breaker panel.
UUGGwG\YGGm SGq GYZSGYWYXGGZaY^Gwt 52 TROUBLESHOOTING TROUBLESHOOTING FAQs Frequently Asked Questions Q: My new oven doesn’t cook like my old one. Is there something wrong with the temperature settings? A: No. Your oven has been factory tested and calibrated. For the first few uses, follow your recipe times and temperatures carefully. If you still think your new oven is too hot or too cold, you can adjust the oven temperature yourself to meet your specific cooking needs.
UUGGwG\ZGGm SGq GYZSGYWYXGGZaY^Gwt TROUBLESHOOTING 53 Make sure that the appliance is not in Lock Out mode. The lock k will show in the display if Lock Out is activated. To deactivate Lock Out, refer to the Lockout Feature section. The unlock melody sounds and Loc appears in the display until the controls are unlocked. Q: My appliance is still dirty after running the EasyClean cycle.
UUGGwG\[GGm SGq GYZSGYWYXGGZaY^Gwt 54 TROUBLESHOOTING A: A spray bottle filled with 1¼ cups (10 oz or 300 ml) of water, a plastic scraper, a non-scratch scrubbing pad and a towel. You should not use abrasive scrubbers such as heavy-duty scouring pads or steel wool. Except for a towel, all of the materials you need are included in a special cleaning kit with your new appliance.
UUGGwG\\GGm SGq GYZSGYWYXGGZaY^Gwt TROUBLESHOOTING 55 Before Calling for Service Review this section before calling for service; doing so will save you both time and money. Problem Oven will not work Possible Cause & Solution Plug on appliance is not completely inserted in the electrical outlet. • Make sure electrical plug is plugged into a live, properly grounded outlet. A fuse in your home may be blown or the circuit breaker tripped.
UUGGwG\]GGm SGq GYZSGYWYXGGZaY^Gwt 56 TROUBLESHOOTING Problem Food does not broil properly Possible Cause & Solution Oven controls improperly set. • Make sure you select the Broil mode properly. Improper rack position being used. • See the Broiling Guide. Cookware not suited for broiling. • Use broiling pan and grid. Aluminum foil used on the broiling pan and grid has not been fitted properly and slit as recommended. • See the "Operating the Oven" section in the Operation chapter.
UUGGwG\^GGm SGq GYZSGYWYXGGZaY^Gwt TROUBLESHOOTING 57 Parts & Features Problem Electronic control has detected a fault condition. • Turn off the oven function you are using to clear the display and stop beeping. Reprogram oven. If fault recurs, record fault number and contact a service agent.
UUGGwG\_GGm SGq GYZSGYWYXGGZaY^Gwt 58 TROUBLESHOOTING Noises Problem “Crackling” or “popping” sound Possible Cause & Solution This is the sound of the metal heating and cooling during both the cooking and Self Clean functions. • This is normal. Fan noise A convection fan may automatically turn on and off. • This is normal.
UUGGwG\`GGm SGq GYZSGYWYXGGZaY^Gwt LIMITED WARRANTY 59 LIMITED WARRANTY TERMS AND CONDITIONS ARBITRATION NOTICE: THIS LIMITED WARRANTY CONTAINS AN ARBITRATION PROVISION THAT REQUIRES YOU AND LG TO RESOLVE DISPUTES BY BINDING ARBITRATION INSTEAD OF IN COURT, UNLESS YOU CHOOSE TO OPT OUT. IN ARBITRATION, CLASS ACTIONS AND JURY TRIALS ARE NOT PERMITTED. PLEASE SEE THE SECTION TITLED “PROCEDURE FOR RESOLVING DISPUTES” BELOW.
UUGGwG]WGGm SGq GYZSGYWYXGGZaY^Gwt 60 LIMITED WARRANTY • Damage or failure resulting from misuse, abuse, improper installation, repair, or maintenance. Improper repair includes use of parts not authorized by LG. Improper installation or maintenance includes installation or maintenance contrary to the Product owner’s manual. • Damage or failure caused by incorrect electrical current, voltage, or ventilation/plumbing codes.
UUGGwG]XGGm SGq GYZSGYWYXGGZaY^Gwt LIMITED WARRANTY 61 arbitration, either party may bring an individual action in small claims court, but that small claims court action may not be brought on a class or representative basis. Governing Law. The law of the state of your residence shall govern this Limited Warranty and any disputes between us except to the extent that such law is preempted by or inconsistent with applicable federal law. Fees/Costs.
UUGGwG]YGGm SGq GYZSGYWYXGGZaY^Gwt 62 Memo
UUGGwG]ZGGm SGq GYZSGYWYXGGZaY^Gwt Memo 63
UUGGwG^XGGm SGq GYZSGYWYXGGZaYZGwt LG Customer Information Center For inquiries or comments, visit www.lg.com or call: 1-800-243-0000 1-888-542-2623 U.S.A. CANADA Register your product Online! www.lg.