OWNER’S MANUAL LCD TV / LED LCD TV Please read this manual carefully before operating your set and retain it for future reference. P/NO: MFL63724108(1005-REV00) Printed in Thailand www.lg.
SAFETY INSTRUCTIONS ENGLISH •P lease read these safety precautions carefully before using the product. • In this manual, the illustration may be somewhat different from your product because it is just example to help the instruction. WARNING If you ignore the warning message, you may be seriously injured or there is a possibility of accident or death. CAUTION If you ignore the caution message, you may be slightly injured or the product may be damaged.
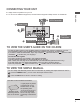
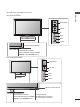
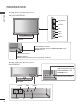
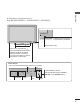
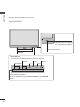
CONNECTING YOUR UNIT 2 3 VCR Connection ENGLISH ■■ Image shown may differ from your TV. ■■ To connect an additional equipment, see the External equipment Setup section in CD Manual.
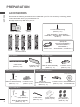
PREPARATION ENGLISH ACCESSORIES Ensure that the following accessories are included with your TV. If an accessory is missing, please contact the dealer where you purchased the TV. ■■ Image shown may differ from your TV. 1-screw for stand fixing (Refer to p. 21) Batteries (AAA) Owner’s Manual LIGHT ENERGY AV MODE ENERGY AV MODE INPUT INPUT ENERGY AV MODE TV/ RAD TV/ RAD ENERGY AV MODE INPUT 1 2 3 1 2 3 1 5 6 4 5 6 9 8 9 4 GHI 5 JKL 6 MNO 8 7 0 Q.VIEW 0 Q.
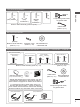
Only 32/37/42/47/55LE53** x4 (M4x22) (Only 32LE53**) (M4x24) (Only 37/42LE53**) x2 x4 x4 (M4x16) (M4x26) (Only 47/55LE53**) Component gender cable, AV gender cable Bolts for stand assembly (Refer to p. 18) ENGLISH x4 Cable Holder (Refer to p. 21) Only 32/37/42/47/55LD6** x8 (M4x20) Bolts for stand assembly (Refer to p. 17) Protection cover (Refer to p.
PREPARATION INPUT ENGLISH FRONT PANEL CONTROLS MENU P OK NOTE ►► TV can be placed in standby mode in order to reduce the power consumption. And TV should be switched off using the power switch on the TV if it will not be watched for some time, as this P will reduce energy consumption. ►►The energy consumed during use can be significantly reduced if the level of brightness of the picture is reduced, and this will reduce the overall running cost.
P ■■ Image shown may differ from your TV. P P PROGRAMME ENGLISH Only 32/37/42/47LD4** OK VOLUME OK MENU INPUT SPEAKER MENU OK INPUT OK MENU INPUT POWER MENU Remote Control Sensor INPUT Power/Standby Indicator (Can be adjusted using the Power Indicator in the OPTION menu.
PREPARATION P ■■ Image shown may differ from your TV. ENGLISH Only 32/37/42/47/55LD6** P P PROGRAMME VOLUME OK OK MENU MENU INPUT OK MENU INPUT INPUT OK POWER SPEAKER MENU Power/Standby Indicator (Can be adjusted using the Power Indicator in the OPTION menu.) INPUT Remote Control Sensor Intelligent Sensor Adjusts picture according to the surrounding conditions. ■■ Image shown may differ from your TV.
ENGLISH ■■ Image shown may differ from your TV. Only 32/37/42/47/55/60LE5***, 32/37/42/47/55LE7***, 42/47/55LX6*** P MENU OK INPUT Intelligent Sensor Adjusts picture according to the surrounding conditions. P OK MENU INPUT Remote Control Sensor SPEAKER Emitter (Only 42/47/55LX6***) It is the part equipped with the emitter exchanging signal with 3D glasses. Please be careful not to block the screen with objects or people while watching a 3D Video.
ENGLISH ■■ Image shown may differ from your TV. Only 42/47/55LE8*** P OK MENU INPUT Intelligent Sensor Adjusts picture according to the surrounding conditions. P OK MENU INPUT Remote Control Sensor SPEAKER Touch Sensor • You can use the desired button function by touching. VOLUME MENU PROGRAMME P OK OK POWER INPUT MENU INPUT Power/Standby Indicator (Can be adjusted using the Power Indicator in the OPTION menu.
ENGLISH ■■ Image shown may differ from your TV. Only 47/55LX9*** PROGRAMME VOLUME OK MENU INPUT POWER SPEAKER Emitter It is the part equipped with the emitter exchanging signal with 3D glasses. Please be careful not to block the screen with objects or people while watching a 3D Video. Intelligent Sensor Adjusts picture according to the surrounding conditions. Remote Control Sensor Power/Standby Indicator (Can be adjusted using the Power Indicator in the OPTION menu.
PREPARATION SERVICE ONLY ■■ Image shown may differ from your TV.
11 IN 2 VIDEO L/MONO AUDIO R 1 IN 2 USB I Only 32/37/42/47LD4** 5 7 OPTICAL DIGITAL AUDIO OUT 8 RS-232C IN (CONTROL & SERVICE) OPTICAL DIGITAL AUDIO OUT AV IN 2 RS-232C IN (CONTROL & SERVICE) RGB IN (PC) RGB IN (PC) VIDEO VIDEO AV IN 1 2 H/P 4 H/P 2 ENGLISH H/P HDMI IN 2 ■■ Image shown may differ from your TV.
PREPARATION ENGLISH ■■ Image shown may differ from your TV.
USB IN CAUTION 11 (RGB/DVI) AUDIO OPTICAL DIGITAL AUDIO OUT VIDEO /DVI IN RS-232C IN (CONTROL & SERVICE) 3 RGB IN (PC) 1 (DVI) WIRELESS CONTROL VIDEO L(MONO) AUDIO 2 8 WIRELESS CONTROL 2 3 4 AUDIO VIDEO 1(DVI) 1 USB IN (RGB) (RGB/DVI) VIDEO L/MONO AUDIO R 3 R ANTENNA / CABLE IN COMPONENT IN1 LAN HDMI/DVI IN 7 USB IN 1 AV IN 1 2 AUDIO IN 9 6 5 10 9 6 ANTENNA IN AV IN2 VIDEO / AUDIO ANTENNA / CABLE IN 4 IN 4 3 COMPONENT IN2 Y PB PR / AUDIO 2 VIDEO / AUDIO R
PREPARATION Only 32/37/42/47/55/60LE55**, 32/37/42/47/55LE7***, 42/47/55LE8***, 42/47/55LX6***, 47/55LX9*** AUDIO IN AUDIO OUT 2 LAN (RGB) 1 3 VIDEO 2 9 1(DVI) 10 WIRELESS CONTROL 1 2 16 VIDEO L/MONO AUDIO R HDMI/DVI IN AUDIO R COMPONENT IN WIRELESS CONTROL 1 AUDIO ANTENNA/ CABLE IN 12 3 COMPONENT IN2 AUDIO / Y PB PR H/P USB IN 2 USB IN 1 8 H/P AUDIO VIDEO 10 ANTENNA IN 13 AV IN 2 Power Cord Socket his TV operates on an AC power.
ENGLISH STAND INSTALLATION ■■ Image shown may differ from your TV. When assembling the desk type stand, check whether the bolt is fully tightened. (If not tightened fully, the product can tilt forward after the product installation.) If you tighten the bolt with excessive force, the bolt can deviate from abrasion of the tightening part of the bolt. Only 22LD3** 1 2 Carefully place the TV screen side down on a cushioned surface to protect the screen from damage.
PREPARATION ENGLISH ■■ Image shown may differ from your TV. Only 22LE53** 1 2 Only 26/32/37/42/47/55LE53** 1 Carefully place the TV screen side down on a cushioned surface to protect the screen from damage. 2 Assemble the parts of the Stand Body with the Stand Base of the TV. Carefully place the TV screen side down on a cushioned surface to protect the screen from damage. Assemble the parts of the Stand Body with the Stand Base of the TV.
ENGLISH ■■ Image shown may differ from your TV. Only 32/37/42/47/55LE55**, 32/37/42/47/55LE7***, 42/47/55LE8***, 42/47/55LX6*** 1 Carefully place the TV screen side down on a cushioned surface to protect the screen from damage. 4 Assemble the parts of the Stand Rear Cover with the TV. Stand Rear Cover 2 Assemble the parts of the Stand Body with the Stand Base of the TV. At this time, tighten the screws that hold the Stand Body on.
PREPARATION Only 47/55LX9*** ENGLISH 1 Carefully place the TV screen side down on a cushioned surface to protect the screen from damage. Only 26/32LD3**, 32/37/42/47LD4**, 32/37/42/47/55LD6**, 32/42/46/52/60LD5** 1 Connect the cables as necessary. To connect additional equipment, see the External equipment setup section. AC IN AC IN 2 Assemble the parts of the Stand Body with the Stand Base of the TV. At this time, tighten the screws that hold the Stand Body on.
Only 22/26LE5*** After connecting the cables as necessary, install Cable Holder as shown and bundle the cables. (Only 26/32LD3**, 32/37/42LD4**, 32/42LD5**, 32/37/42LD6**, 32/42LE4***, 32LE5***) ENGLISH ■■ Image shown may differ from your TV. ATTACHING THE TV TO A DESK ■■ Image shown may differ from your TV. The TV must be attached to desk so it cannot be pulled in a forward/backward direction, potentially causing injury or damaging the product. Use only an attached screw.
PREPARATION ENGLISH NOT USING THE DESKTYPE STAND ■■ Image shown may differ from your TV. When installing the wall-mounted unit, use the protection cover. Only 26/32LD3**, 32/37/42/47LD4**, 32/42/46/52/60LD5**, 32/37/42/47/55LD6** Insert the Protection cover into the TV until clicking sound. Only 22LD3** 1 Carefully place the TV screen side down on a cushioned surface to protect the screen from damage. Protection cover SWIVEL STAND (Except for 22LD3**) 2 Loose the bolts from TV.
< Only 26LE5*** > (Only 22/26LE5***) ■■ Image shown may differ from your TV. ■■ Image shown may differ from your TV. ENGLISH CONNECTION OF TV AC/DC Adaptor 4-Ring spacers 1 Connect the antenna cable to the antenna input port on the TV. 2 Connect the AC/DC adapter plug to the power input jack on the TV. 3 onnect the power cord to the AC/DC C adapter first, then plug the power cord into the wall power outlet.
PREPARATION ENGLISH CAREFUL INSTALLATION ADVICE ■■ You should purchase necessary components to fix the TV safety and secure to the wall on the market. ■■ Position the TV close to the wall to avoid the possibility of it falling when pushed. ■■ The instructions shown below are a safer way to set up the TV, by fixing it to the wall, avoiding the possibility of it falling forwards if pulled. This will prevent the TV from falling forward and causing injury. This will also prevent the TV from damage.
■■ We recommend the use of a LG Brand wall mounting bracket when mounting the TV to a wall. ■■ We recommend that you purchase a wall mounting bracket which supports VESA standard. ■■ LG recommends that wall mounting be performed by a qualified professional installer. A B Model NOTE ►Should ► Install wall mount on a solid wall perpendicular to the floor. ►Should ► use a special wall mount, if you want to install it to ceiling or slanted wall.
NETWORK NETWORK SETUP ENGLISH This feature is not available in all countries. (Only 32/42/52LD56*, 32/37/42/47/55LD6**, 32/37/42/47/55/60LE55**, 32/37/42/47/55LE7***, 42/47/55LE8***, 42/47/55LX6***, 47/55LX9***) Wired Network Connection This TV can be connected to a local area network (LAN) via the LAN port. After making the physical connection, the TV needs to be set up for network communication.
Wired Network Setup NETWORK Move • Network Status If you already set the Network Setting OK Previous setting value exists. Do you want to connect with the previous setting? Network Type ► •• Network Network Setting Setting :: Wired Wired ENGLISH If wired and wireless networks are both available, wired is the preferred method. After making a physical connection, a small number of home networks may require the TV network settings to be adjusted.
NETWORK ■■ This feature requires an always-on broadband internet connection. ENGLISH ■■ You do not need to connect to a PC to use this function. ■■ If Network Setting is not working, check your network conditions. Check the LAN cable and make sure your router has DHCP turned on if you wish to use the Auto Setting. ■■ If the Network Setting is not completed, network may not operate normally.
NOTE ►►Please verify the security settings of AP SSID for wireless AP connection, and enquire to the AP supplier for the AP SSID security settings. ►►The TV can become slower or malfunction with wrong settings of network equipments (wired/wireless router, hub, etc). Please install correctly by referring to the manual of the equipment, and set the network. ►When ► AP is set to include 802.11 n, and if Encryption is designated as WEP(64/128bit) or WPA(TKIP/AES), the connection may not be possible.
NETWORK ENGLISH Wireless Network Setup Setting up the AP (Access Point) or the wireless router is required before connecting the TV to the network. NETWORK Move • Network Status OK Network Type : Internet is connected Wired network is recommended • Legal Notice Wired IP Mode ● IP Address ● Subnet Mask If your AP is locked ◄ IP Auto Setting ► DNS Server 255 . 255 . 0 . 0 4 5 30 ◄ ► Selecting AP Input the new SSID iptime ASW Network1 OK OK Exit Page 1/1 255 . 255 . 0 .
When a security code is already set PIN (Personal Identification Number) Selecting AP Connecting with PIN mode Select AP you want to connect. Page 1/1 Insert PIN number at the AP webpage and press ‘Connect’ button. Input the new SSID ENGLISH If you want to connect the AP (Access Point) or router with PIN, use this feature. PIN NUMBER : 12345670 iptime Connect ASW Access Point Search Network1 For more information, check the AP manual.
NETWORK Ad-hoc Mode ENGLISH This is the method of communicating directly with the machine to communicate without AP. This is the same as connecting two PCs with a cross cable. Select the wireless network setting type. Setting Ad-hoc network Setting Ad-hoc network Select the wireless network setting type. Features using exiting network can be unavailable.
NETCAST This feature is not available in all countries. (Only 32/42/52LD56*, 32/37/42/47/55LD6**, 32/37/42/47/55/60LE55**, 32/37/42/47/55LE7***, 42/47/55LE8***, 42/47/55LX6***, 47/55LX9***) Weather info 1 2 Movie Online ENGLISH NETCAST MENU These services are provided by separate Content Provider. Please visit the content providers web site for specific information on their services. (But, some content manual maybe not provide depending on Content Provider).
TO USE THE 3D VIDEO (Only 42/47/55LX6***, 47/55LX9***) 3D VIDEO ENGLISH This TV can display 3D video when received from a compatible device. 3D video contains two pictures for each video frame formatted for each eye. Therefore, special 3D glasses are required to view 3D video. ►On initial power on after turning the power on, the may need a few seconds to calibrate with the TV.
CAUTION WHEN USING 3D GLASSES ENGLISH ►3D glasses is sold separately. Refer to the 3D glasses manual for operating instructions. ►Do not use the 3D glasses to replace the general glasses, sunglasses or protective goggles. ►Do not store the 3D glasses in hot or cold location. ►Do not drop objects onto the 3D glasses. Do not drop or bend the glasses. ►Since the lenses of the 3D glasses are easily scratched, make sure to clean only with a soft cloth.
TO USE THE 3D VIDEO WATCHING 3D VIDEO ENGLISH 1 Play the title produced in 3D video. Refer to the following for 3D video input format supported. Signal 720p Resolution Horizontal Frequency (kHz) 45 Vertical Frequency (Hz) 60 89.9/90 59.94/60 1280x720 37.5 75 1080i 1920X1080 HDMI Input 1080p USB Input 1080p 50 33.75 28.125 67.50 60 50 60 56.250 50 27 24 53.95/54 23.98/24 33.75 30 33.75 30 1920X1080 1920X1080 Playable 3D video format Top & Bottom, Side by Side HDMI (V. 1.
or L/R SELECT Select Setting Left/Right. ENGLISH 3 Put on 3D glasses. Sit 2 meters from TV to enjoy the best 3D view. (To select more comfortable view for you, change to left/right image of button.) glasses with OK Setting Left/Right 3D End 3D video 4 Select Left/Right or Right/Left. Select the screen with 3D video with better visibility. Setting Left/Right Left/Right Right/Left 3D End 3D video Exit • Press the 3D button to return to normal TV viewing.
WATCHING TV / PROGRAMME CONTROL ENGLISH ■■ To prevent damage do not connect to the mains outlet until all connections are made between the devices. ANTENNA CONNECTION ■■ For optimum picture quality, adjust antenna direction. ■■ An antenna cable and converter are not supplied.
REMOTE CONTROL KEY FUNCTIONS Only 22/26/32LD3**, 32/37/42/47LD4**, 32/42/46/52/60LD55*, 22/26/32/37/42/47/55LE53**, 22/26LE6***, 32/42/47/55LE4*** 1 ENERGY AV MODE Only 32/42/52LD56*, 32/37/42/47/55LD6**, 32/37/42/47/55/60LE55**, 32/37/42/47/55LE7***, 42/47/55LE8*** 5 INPUT 1 ENERGY AV MODE TV/ RAD SAVING 2 3 1 4 5 6 4 GHI 5 JKL 6 MNO 7 8 9 7PQRS 8 TUV 9 WXYZ LIST 0 Q.VIEW 6 MARK FAV P P A G E 2 ABC 3 DEF 0 LIST MENU 4 GUIDE Q.
WATCHING TV / PROGRAMME CONTROL ENGLISH TURNING ON THE TV When your TV is turned on, you will be able to use its features. 1 Firstly, connect the power cord correctly. At this stage, the TV switches to standby mode. 2 In standby mode to turn TV on, press the / I, INPUT or P button on the TV or press or NUMBER button on the remote control and the TV will the POWER, INPUT, P switch on.
WHEN CONNECTING A USB DEVICE When you connect a USB device, this pop up menu is displayed, automatically. “POP UP MENU” will not be displayed while the OSD including Menu, EPG or Schedule list is activated or while the Bluetooth Headset is connected. When the Pop Up menu appears, you can select Music List, Photo List or Movie List in the MY MEDIA menu. In USB device, you can not add a new folder or delete the existing folder. After choosing the desired type of media, choose a device to open files from.
WATCHING TV / PROGRAMME CONTROL ENGLISH ON SCREEN MENUS SELECTION AND ADJUSTMENT Your TV's OSD (On Screen Display) may differ slightly from that shown in this manual. 1 • Press the RED button, you can check the Customer Support menu. • Press the GREEN button, you can check the Simple Manual menu. • Press the MENU/EXIT button to return to normal TV viewing. • Press the BACK button to move to the previous menu screen. Display each menu. 2 Select a menu item. 3 Move to the pop up menu.
● Set OPTION OK Password ● Lock LOCK Move OK ● Language(Language) System : Off Programme ● Parental ● Input Lock ● Country OPTION ● Block ● Key Move ENGLISH LOCK ● Hard Guidance: Blocking Off ● Power Block Indicator ● Factory : Off ● Set Reset ID ● Mode ● IR : Australia of Hearing (ꔞ): Off :1 Setting Blaster : Home Use : Off ● For further information, refer to the optional “Wireless Media Box & Wireless Dongle” manual for operating instructions.
WATCHING TV / PROGRAMME CONTROL ENGLISH AUTO PROGRAMME TUNING Use this to automatically find and store all available programmes. When you start auto programming, all previously stored service information will be deleted. ■■ Image shown may differ from your TV. SETUP Move ► ● Manual ► ● Auto Tuning Tuning ● Programme SETUP OK Edit Move ● Auto Auto Tuning Tuning ● ● Manual OK Antenna Tuning ● Programme Edit Antenna Check your antenna connection.
APPENDIX The TV does not operate properly. The remote control does not work Power is suddenly turned off ■■ Check to see if there is any object between the TV and the remote control causing an obstruction. Ensure you are pointing the remote control directly at the TV. ■■ Ensure that the batteries are installed with correct polarity (+ to +, - to -). ■■ Install new batteries. ■■ Is the sleep timer set? ■■ Check the power control settings. Has the Power supply been interrupted.
Extended Owner’s Manual that contains advanced features of these LG TV-sets is located on CD-ROM in electronic version. To read it You need to open chosen files by using Personal Computer (PC) equipped with CD-ROM drive. Record the model number and serial number of the TV. Refer to the label on the back cover and quote this information to your dealer when requiring any service. (Only DTV) Model : Serial No.