ENGLISH ESPAÑOL OWNER'S MANUAL AIR PURIFIER Read this owner’s manual thoroughly before operating the appliance and keep it handy for reference at all times. Model name: AS560DWR0 www.lg.com MFL69726848 Rev.04_062520 Copyright © 2018 - 2020 LG Electronics Inc. All rights reserved.
Table of Contents ENGLISH This manual is produced for a group of products and may contain images or content different from the model you purchased. This manual is subject to revision by the manufacturer. Important Safety Instructions......03 Smart Functions.............................28 Unpacking........................................09 LG ThinQ Application.............................28 Smart Diagnosis....................................30 Parts......................................................
Important Safety Instructions READ AND SAVE THESE INSTRUCTIONS. This guide contains many important safety messages. Always read and obey all safety messages. All safety messages will be preceded by the safety alert symbol and the hazard signal word WARNING or CAUTION. These words mean: WARNING - You can be killed or seriously injured if you do not follow these instructions.
INSTALLATION ENGLISH ••Install the product near an easily accessible electrical outlet. ••Do not install the product on an uneven or inclined surface. ••Do not install the product in a damp area and keep away from splashing rain or water. ••Do not install the product in an area exposed to direct sunlight or near heat-generating equipment. ••Do not install the product in a place where combustible gas may leak or industrial oil or metallic particulates are present.
ENGLISH ••Do not bend the power cable excessively or place a heavy object on top of it. ••Do not extend the length of the power cable or alter it. ••Do not use several devices on a multi-socket extension outlet. ••Unplug the product before cleaning or attempting any user maintenance. Turning the controls to the OFF position does not disconnect the appliance from the power supply. ••Take care to ensure that the power cable cannot be pulled out or damaged during operation.
ENGLISH ••Do not use the product near an open flame. Do not use or store combustible or flammable substances near the product, such as ether, benzene, alcohol, drugs, propane, butane, combustible sprays, insecticide, air freshener, cosmetics, candles, and lamps. ••Do not place the power cord under rugs, carpeting or mats. ••Do not allow animals or pets to chew on the power cord. ••Do not allow children to climb on or play with the product. ••Do not move the product when it is in operation.
Caution ENGLISH To reduce the risk of fire, electric shock, or personal injury when using the product, follow basic safety precautions, including the following: INSTALLATION ••Do not tilt the product while moving or transporting it. ••This product is not designed for maritime use or for mobile installations such as RVs, trailers, or aircraft. ••Avoid installing product within 3 1/4 ft (1 m) of any TV or audio equipment. ••Do not place the product under bright light.
••Do not place the product near curtains. ENGLISH ••Use this product only for its intended purpose. This product is not intended for use in preserving animals/plants, precision equipment, artwork, etc. ••Do not climb or place objects on the product. ••Do not operate the product with wet hands. ••Do not let the moisture from a humidifier directly touch the product. ••Do not use the product while it is not in an upright position. ••Do not use the product near objects vulnerable to heat.
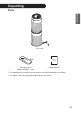
Unpacking Parts ENGLISH Air Purifier Owner’s Manual Remote Control / Battery (CR2025, 1 Unit) Owner’s Manual •• The appearance or components of the product may differ depending on the model. •• The shape of the power plug differs depending on the country.
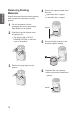
ENGLISH Removing Packing Materials 4 •• Upper filter inlet: 1 support Unpack the product and remove any packing tape or protective vinyl before using the product. 1 2 •• Lower filter inlet: 1 support Pull out the product from the packaging and remove the packing tape attached to the product. Support Grab the top end of the back cover and gently pull it. •• You will see "PM 1.0 & GAS SENSOR SYSTEM" on the back cover of the product. 3 Remove the support located at the filter inlet.
7 ENGLISH 8 Insert the tabs on the bottom of the upper back cover into the slots in the product and close the cover. Follow steps 2 through 7 to unpack and install the lower filter. Caution •• Failure to remove the foam supports may affect the performance of the product. Please be sure to remove them before use. •• Make sure that you remove the filter’s protective packaging prior to use otherwise it may result in product malfunction.
Remote Control Setup ENGLISH 1 With the bottom of the remote facing up, remove the battery tray from the remote. Warning •• A button/coin-shaped battery is used in the remote. •• Do not swallow the battery. It may cause injury, including damage to internal organs, or death. •• If the battery is swallowed, consult a physician immediately. Damage to internal organs, or in severe cases death, may occur within 2 hours of swallowing. 2 Insert the battery provided with the product into the tray.
Installation Caution Transport the product in a well-secured and upright position. Impacts may cause product damage. The product is heavy. Use two people when moving it. •• Dropping the product may cause personal injury or product malfunction. •• Do not hold the outer cover when you carry the product. The cover may open accidentally, causing the product to drop.
Operation Product Overview ENGLISH Front Clean Booster Upper Section Lower Section Upper Air Outlet/Clean Booster Lower Air Inlet (Bottom Cover) •• Discharges purified air through the upper filter. Draws air into the lower section of the air purifier. The front and rear covers can be removed separately. •• Controls the direction of the air so that it reaches every corner of the room. Status Panel Air Quality Indicator Light Indicates air quality and settings status.
Back ENGLISH Smart Diagnosis Speaker Odor (Gas) Sensor In the event of a malfunction or failure, use the Smart Diagnosis option to check the product condition. (See Smart Functions.) Detects odors in the air. PM 1.0 (super ultra-fine dust) sensor Filter Removes ultra-fine dust particles, possible sources of sick house syndrome, smog, and odors. Detects the PM (particulate matter) density for very fine particles.
Filter System ENGLISH Total Deodorizing Care Filter Caution Removes unpleasant everyday odors from sources such as diapers, cigarette smoke, and strong-smelling foods. •• Filters 1 and 2 are assembled together. Do not try to separate the two filters. True HEPA filter Note Removes super ultra-fine particles, such as fine sand and cigarette ash, from the air. •• For best performance, keep windows or doors closed while using the air purifier.
Control Panel ENGLISH Start/Stop Button Booster Speed Button Press to start or stop the air purifier. Press repeatedly to adjust the fan speed of the Clean Booster. Mode Button Press to set the operating mode. •• Press and hold the button for 3 seconds to turn on/off the overall air quality indicator light. (See Turning the Indicator Light On/Off.) Speed Button Press repeatedly to adjust the fan speed. •• Press and hold for 3 seconds to activate the Wi-Fi registration mode.
Status Display Panel ENGLISH Air Quality Status Display ① Overall air quality (color) ② PM particle size and density (color) ③ PM density or Sleep Timer delay time ④ Odor level (color) Operating Mode Display Fan Speed and Booster Speed Display Speed: Displays the air purifier's fan speed. ooster Speed: Displays the B Clean Booster’s fan speed. 18 Icons Icon Description It is time to replace the upper filter. It is time to replace the lower filter. The Wi-Fi function is activated.
Remote Control •• Do not kick or step on the remote control. Doing so may result in damage. •• Do not use the remote near water or in high humidity. Doing so may result in fire or electric shock. •• Do not expose the remote to fire or heat. Doing so may result in a fire or product deformation. Start/Stop Button Press to start or stop the air purifier. Speed Button Press to adjust the fan speed. Sleep Timer Button Press repeatedly to schedule a delay time until the air purifier turns off automatically.
ENGLISH Starting the Air Purifier Using Smart Mode Press the Start/Stop button to turn the air purifier on or off. Use Smart mode to automatically adjust the operating mode and fan speed based on the overall air quality. Press the Mode button to choose the Smart mode. •• Each time you press the button, the operating mode changes in the following order: Smart → Booster → Dual → Single. Note •• The product defaults to Booster mode when used for the first time.
Using Dual Mode The Clean Booster purifies air and then uses the fan to quickly circulate it throughout the room. Dual mode uses both the upper and lower sections of the air purifier to quickly purify indoor air. Press the Mode button to choose the Booster mode. Press the Mode button to choose Dual mode. •• Each time you press the button, the operating mode changes in the following order: Smart → Booster → Dual → Single.
Using Single Mode ENGLISH Single mode uses the lower section of the air purifier to purify the air. Press the Mode button to choose Single mode. •• Each time you press the button, the operating mode changes in the following order: Smart → Booster → Dual → Single. Adjusting the Purifier Fan Speed Press the Speed button to adjust the air purifier fan speed. The fan speed can only be adjusted while the air purifier is running.
Press the Booster Speed button to adjust the Clean Booster fan speed. The Clean Booster fan speed can only be adjusted when the air purifier is in Booster mode. Rotating the Clean Booster While in Booster mode, press the Swing button to rotate the Clean Booster left and right. ENGLISH Adjusting the Clean Booster Fan Speed •• Each time you press the button, the speed changes in the following order: Auto → Low → Middle → High → Turbo. Caution Keep hands away from the Clean Booster and other moving parts.
Checking the Air Quality ENGLISH The overall air quality is indicated by the color of the air quality indicator light and the information displayed on the status panel. Understanding the Overall Air Quality Level The overall air quality level is determined based on the PM density and odor level detected. The detection ranges are separated into 4 levels, and the overall air quality indicator light turns green, yellow, orange, or red depending on the highest contamination level detected.
The status display panel shows the overall air quality, PM density, and odor level. •• Overall air quality: The color of the overall air quality icon in the status display panel shows the overall air quality level. •• PM density: The PM density is shown in the display and is also indicated by the color of the PM particle size indicator, which shows the highest detected level among the 3 particle sizes. –– If all PM densities are at the Good level, the display shows the PM10 (fine dust) density value.
Note ENGLISH •• PM (particulate matter) density is displayed in increments of 1 unit, from 8 to 999. PM density values are based on the data sheet provided by the sensor manufacturer. •• The PM10 and PM2.5 air quality values follow those provided by the United States EPA (Environmental Protection Agency) for 2015. –– The overall air quality level displayed on the product may differ from the level announced by the EPA. •• The PM1.0 density is displayed in the same manner as the PM2.
Setting the Sleep Timer •• Press the button repeatedly to select from among preset time delays: After 2 hours→ After 4 hours → After 8 hours → After 12 hours → Cancel. Press and hold the Sleep Timer button for 3 seconds while the air purifier is running to lock the control panel buttons. This helps prevent children or others from changing settings accidentally. •• (Lock) is displayed on the status panel.
Smart Functions LG ThinQ Application ENGLISH 2 Turn off the Mobile data or Cellular Data on your smartphone. 3 Connect your smartphone to the wireless router. The LG ThinQ application allows you to communicate with the appliance using a smartphone. LG ThinQ Application Features Smart Diagnosis If you experience a problem while using the appliance, this smart diagnosis feature will help you diagnose the problem. Settings Allows you to set various options on the appliance and in the application.
•• The appliance cannot be registered due to problems with the wireless signal transmission. Unplug the appliance and wait about a minute before trying again. •• If the firewall on your wireless router is enabled, disable the firewall or add an exception to it. •• The wireless network name (SSID) should be a combination of English letters and numbers. (Do not use special characters.) •• Smartphone user interface (UI) may vary depending on the mobile operating system (OS) and the manufacturer.
FCC RF Radiation Exposure Statement ENGLISH This equipment complies with FCC radiation exposure limits set forth for an uncontrolled environment. This transmitter must not be co-located or operating in conjunction with any other antenna or transmitter. This equipment should be installed and operated with a minimum distance of 20 cm (7.8 inches) between the antenna and your body. Users must follow the specific operating instructions for satisfying RF exposure compliance.
ENGLISH Using Audible Diagnosis to Diagnose Issues Follow the instructions below to use the audible diagnosis method. •• Launch the LG ThinQ application and select the Smart Diagnosis feature in the menu. Follow the instructions for audible diagnosis provided in the LG ThinQ application. 1 2 3 Press and hold the Indicator button for 5 seconds or more to execute the Smart Diagnosis function. Hold the phone on the or on the back of the appliance.
Maintenance Caution ENGLISH •• Turn off and unplug the product before cleaning it or replacing the filter. •• Do not spray water directly on the product. •• After cleaning the product or replacing the filter, assemble the product in the reverse order of disassembly. •• To help you distinguish between the front and back covers, the front cover has an LG logo on it.
Caution 2 Wipe the exterior with a soft cloth. ENGLISH •• Do not attempt to disassemble the Clean Booster. •• If the Clean Booster cover comes loose, snap the 3 retaining hooks back into place before using the product. •• Do not unscrew the 2 screws fixing the Clean Booster grille on the back of the product. Caution •• Do not clean the product with an alkaline detergent. •• Do not wipe the product surface using sulfuric acid, hydrochloric acid or organic solvent (thinner, kerosene etc.
ENGLISH Cleaning the Filter Replacing the Filter 1 1 2 Separate the cover from the product. •• For more information on how to remove and reassemble the cover, please see Removing Packing Materials. Remove the cover and replace the filter. •• For more information on how to remove the cover and replace the filter, please see Removing Packing Materials. Remove dust from the ultra-fine filter using a vacuum cleaner with a crevice tool or soft brush attachment.
Press and hold the Indicator and Sleep Timer buttons simultaneously for 3 seconds. •• The (Lower Filter Replacement Alert) is reset. Cleaning the PM Sensor Clean the PM1.0 super ultra-fine dust sensor lens regularly. The sensor is used to detect both fine dust and larger dust. 1 2 3 Remove the rear cover from the product. •• For more information on how to remove and reassemble the cover, please see Removing Packing Materials. Open the sensor cover.
4 Close the sensor cover and reassemble the rear cover. 2 Turn off the power and unplug the product from the electrical outlet. ENGLISH •• Wind the power cord around the bottom of the product. Note The shape of the power plug differs depending on the country. Note To avoid product failure, do not use any fluids other than water to clean the sensor. 3 Cover the product to prevent dust or foreign substances from getting inside. Store the product out of direct sunlight.
Before Calling for Service If the product malfunctions, check the following before contacting the LG Customer Information Center. The product does not operate. The fan is noisy even on Low speed. The air purifier is not removing dust or odors. There is a strong odor, but the overall air quality indicator light does not change color. Cause Solution Power plug is unplugged or loose in the outlet. •• Insert the power plug into the outlet properly. The ultra fine filter is dirty.
Symptom ENGLISH The overall air quality indicator light stays red for a long period. The buttons on the control panel do not work. The fine dust density does not change. The fine dust density remains high. Cause The color should change if the air purifier is moved to a cleaner area. If it doesn’t, clean the sensor or unplug the product briefly. •• If the odor level is beyond the capacity of the air purifier, the display may not change. •• Clean the sensor area.
Symptom The air purifier is new. •• The odor of activated charcoal is not harmful. This is similar to the smell you may experience in a brand new car. The odor will go away after 1-2 weeks of use. The air purifier is installed in a smoky or smelly area. •• Do not use the air purifier in place of a vent fan or range hood. Ventilate smoke or strong odors first, then use the air purifier to eliminate lingering odors. The filter is no longer working and needs to be replaced. •• Replace the filter.
Symptom Cause ENGLISH The air purifier may be unplugged. I can't connect to the product in the LG ThinQ app. I can’t register the product in the LG ThinQ app. The PM density levels are different between the product and the LG ThinQ app. 40 The wireless router connected to the product is not working. Solution •• Plug in the air purifier. •• Power off the wireless router then power it on again. •• Check if there is an Internet connection problem with the router.
Product Specifications ENGLISH Height Depth Width The external appearance and dimensions of the product are subject to change without prior notice. Model AS560DWR0 Power 115 V~, 60 Hz Without the Clean Booster running: Exterior dimensions (Width X Height X Depth) 14.7 in. x 42.2 in. x 14.7 in. (373 mm x 1,073 mm x 373 mm) With the Clean Booster running: 14.7 in. x 51.6 in. x 14.7 in.
Warranty (USA) ENGLISH ARBITRATION NOTICE: THIS LIMITED WARRANTY CONTAINS AN ARBITRATION PROVISION THAT REQUIRES YOU AND LG TO RESOLVE DISPUTES BY BINDING ARBITRATION INSTEAD OF IN COURT, UNLESS YOU CHOOSE TO OPT OUT. IN ARBITRATION, CLASS ACTIONS AND JURY TRIALS ARE NOT PERMITTED. PLEASE SEE THE SECTION TITLED “PROCEDURE FOR RESOLVING DISPUTES” BELOW.
•• Damage caused by leaky or broken water pipes, frozen water pipes, restricted drain lines, inadequate or interrupted water supply or inadequate supply of air. •• Damage to the product caused by accidents, pests and vermin, lightning, wind, fire, floods, or acts of God. •• Damage or failure caused by unauthorized modification or alteration, or if it is used for other than the intended purpose, or any water leakage where the unit was not properly installed.
PROCEDURE FOR RESOLVING DISPUTES: ENGLISH ALL DISPUTES BETWEEN YOU AND LG ARISING OUT OF OR RELATING IN ANY WAY TO THIS LIMITED WARRANTY OR THE PRODUCT SHALL BE RESOLVED EXCLUSIVELY THROUGH BINDING ARBITRATION, AND NOT IN A COURT OF GENERAL JURISDICTION. BINDING ARBITRATION MEANS THAT YOU AND LG ARE EACH WAIVING THE RIGHT TO A JURY TRIAL AND TO BRING OR PARTICIPATE IN A CLASS ACTION. Definitions. For the purposes of this section, references to “LG” mean LG Electronics U.S.A., Inc.
relating to the scope and enforceability of the arbitration provision and to the arbitrability of the dispute are for the court to decide. The arbitrator is bound by the terms of this provision. Fees/Costs. You do not need to pay any fee to begin an arbitration. Upon receipt of your written demand for arbitration, LG will promptly pay all arbitration filing fees to the AAA unless you seek more than $25,000 in damages, in which case the payment of these fees will be governed by the AAA Rules.
ENGLISH MEMO
The energy efficiency of this ENERGY STAR qualified model is measured based on a ratio between the model’s CADR for Dust and the electrical energy it consumes, or CADR/Watt.